
Complete System Design Series — Part 2
System Design Made Easy…
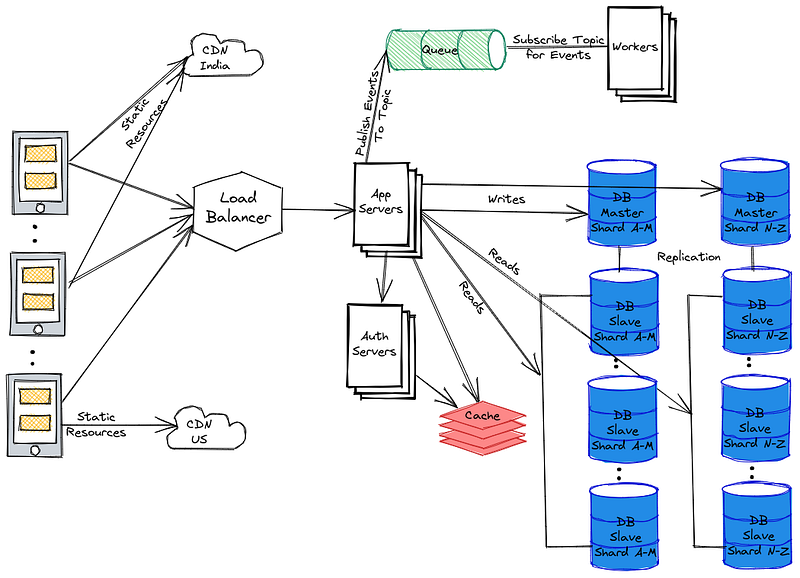
Welcome back peeps. This is the part 2 of the system design series where we will be covering —
1.System Design basics
2. Horizontal and Vertical scaling
Part 1 of this series can be found here —
And Most popular System Design Questions —
We have already covered in the part 1, what is System Design. In the part 2, I’ll take examples to make concepts more intelligible for you.
Solved System Design Case Studies — In depth
Design Google Drive
Design Instagram
Design Quora
Design Foursquare
Design Flipkart
ML System Design
Design Tiny URL
Design Netflix
Design Messenger App
Design Twitter
Design Reddit
Design Amazon
Design Dropbox
Design URL Shortener
Design Youtube
Design API Rate Limiter
Design Web Crawler
Design Amazon Prime Video
Design Facebook’s Newsfeed
Design Yelp
Design Uber
Design Tinder
Design Tiktok
Design Whatsapp
Most Popular System Design Questions
Mega Compilation : Solved System Design Case studies
Let’s dive in!
Note : Please read System Design Important Terms you MUST know before reading this post.
Let’s say you want to open a pasta resto. At a very basic level, what do you need?
- Place to cook pasta
- Chef who can cook delicious pasta
- Customers
- Waiters/Servers
- Money
Let’s assume, you have just started and have some 10 customers, only one chef who works for 8 hour shift and one waiter/server who can take the order in the beginning. All’s well!

You’re able to handle 10 people, 1 chef and 1 server in the beginning — think of it as an analogy of simple client-server scenario with a standalone machine.
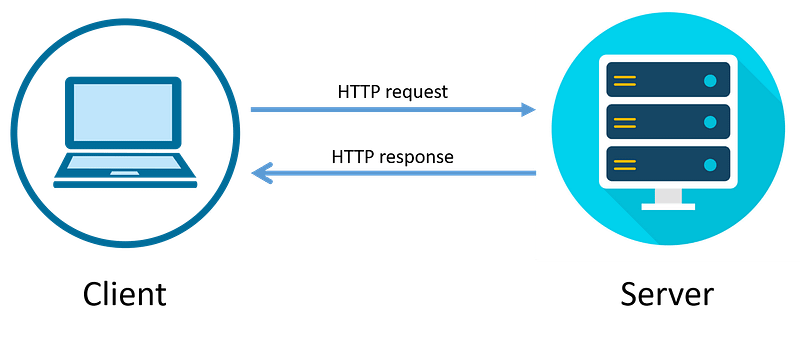
Down the line, after 2–3 months for some reason your pasta resto becomes very popular and people start queueing up to grab your delicious pasta but you have no bandwidth to handle so many people.
So, what are you going to do as an owner to handle this situation?
Again, lets go back to our basic checklist and revise our new requirements—
1. Place — Need more places to serve people at different locations
2. Chefs/Cook — Need to hire more chefs to cook and serve the orders as soon as possible and optimize the whole workload
3. Waiters/Servers — Need to hire more waiters/servers to serve hundreds of customers, give the best customer experience and great quality of service
4. Customers — Ever growing so there’s need a waiting area and approx. serving time estimate so that customers don’t leave hungry due to long queues.
5. Money — Need more money to open more chains at different locations.
6. Receptionist — Who can manage and well allot the load i.e customers
7. Software — Where you can store the customer details in case there’s a prior reservation made.
Traversing the same thought process, this is what happens when you design a new system which is intended to handle millions of request every minutes from all over the world i.e say Google search!
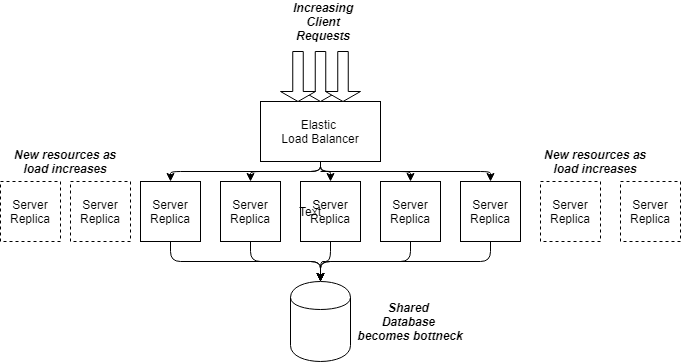
Now going back to our pasta resto, lets put the place holders.
So, what are you exactly doing/supposed to do with your pasta resto to handle such bandwidth of people?
You need to Scale.
Scale in terms of places, chefs, waiters, money in order to serve your customers. Taking this analogy forward, in the world of system design what is Scaling?
60 days Project based Data Science and ML ( with implemented projects): Mega Compilation —
In technical words, scalability is a the technique/process of adding/removing infrastructure/resources required by applications to better serve/accommodate increased/decreased demand/growth.
It goes both ways — Increasing the resources if there’s high growth as well decrease if the demand slows down.
Why Scale?
To provide accessibility, availability, reliability, great user experience, power, and presence etc
There are two types of Scaling —
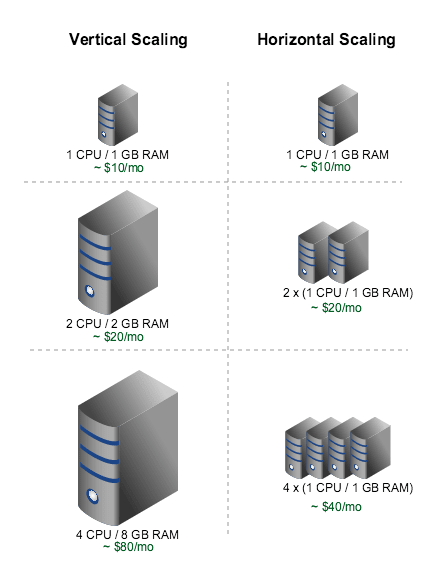
- Horizontal Scaling — scale by adding more machines into your pool of resources.
- Vertical Scaling — scale by adding more power (CPU, RAM) to your existing machine.
- Horizontal scaling involves adding more resources, such as nodes or instances, to the system, in order to distribute the load and increase the overall capacity of the system. This is typically done by adding more servers to a cluster or by adding more instances to a cloud-based system. The advantage of horizontal scaling is that it allows the system to handle large increases in load without having to make significant changes to the existing infrastructure.
- Vertical scaling involves increasing the capacity of a single node or instance, by adding more resources, such as memory, CPU, or disk space. This approach can be used to improve the performance of an individual node, but has its limitations. If the load on a system continues to increase, eventually it will reach a point where adding more resources to a single node will no longer be feasible, and horizontal scaling will be necessary.
Implementation of horizontal and vertical scaling using a simple web application:
# Import required libraries
import flask
from flask import request
# Initialize the Flask app
app = flask.Flask(__name__)# Set the initial capacity of the application
app.config['MAX_CONCURRENT_REQUESTS'] = 100# Define a function to handle requests
@app.route('/', methods=['GET'])
def handle_request():
return "Hello, World!"# Implement horizontal scaling
if __name__ == '__main__':
app.run(host='0.0.0.0', port=5000, threaded=True)# Implement vertical scaling
if __name__ == '__main__':
app.run(host='0.0.0.0', port=5000, threaded=True, processes=4)In the above code, we have a simple Flask web application that returns a “Hello, World!” message when a GET request is made to the root endpoint (“/”).
To implement horizontal scaling, we can simply run multiple instances of the application and distribute the incoming requests among them. In the code above, we have used the “threaded=True” parameter to enable multi-threading, which allows the application to handle multiple requests concurrently. To implement vertical scaling, we can increase the capacity of the existing instances by adding more resources to them. In the code above, we have used the “processes=4” parameter to enable multi-processing, which allows the application to use multiple CPU cores to handle incoming requests.
By combining horizontal and vertical scaling, we can create a highly scalable and performant system that can handle a large number of requests.
When designing a system, it is important to consider both horizontal and vertical scaling and to choose the approach that best fits the specific requirements of the system. In some cases, a combination of both approaches may be necessary, with the system being horizontally scaled to handle increased load, and individual nodes being vertically scaled to improve performance.
In conclusion, horizontal scaling and vertical scaling are two different approaches to scaling a system to handle increased load. Horizontal scaling involves adding more resources to the system, while vertical scaling involves increasing the capacity of a single node. When designing a system, it is important to consider both horizontal and vertical scaling and to choose the approach that best fits the specific requirements of the system.
Scaling can be done in different layers of the system:
- Database Scaling: this can be done through database replication, sharding, and partitioning.
- Application Scaling: this can be done through load balancing, service discovery and container orchestration.
- CDN Scaling: this can be done through adding more edge servers and load balancers.
Code —
- Database Scaling: Database scaling can be achieved through replication, sharding, and partitioning. Here’s how you can implement each of these techniques in Python using SQLAlchemy:
a. Database Replication: Database replication involves creating multiple copies of the database to distribute the load across multiple servers. Here’s an implementation of how to configure a database with replication using SQLAlchemy:
from flask_sqlalchemy import SQLAlchemyapp = Flask(__name__)
app.config["SQLALCHEMY_DATABASE_URI"] = "mysql+pymysql://user:password@host/db_name?charset=utf8mb4"
app.config["SQLALCHEMY_ENGINE_OPTIONS"] = {
"pool_size": 20,
"pool_recycle": 300,
"pool_pre_ping": True,
"pool_use_lifo": True,
"pool_timeout": 30,
"max_overflow": 10,
"echo": True,
"echo_pool": True,
"pool_reset_on_return": "rollback",
"pool_size": 5,
"pool_recycle": 3600,
"pool_timeout": 1800
}
db = SQLAlchemy(app)This code sets up a connection to a MySQL database with replication enabled. The “pool_size” and “pool_recycle” options control the connection pool size and recycling, while the “pool_pre_ping” option enables connection health checks.
b. Database Sharding: Database sharding involves partitioning the database into smaller subsets of data and distributing them across multiple servers. Here’s an example of how to configure a database with sharding using SQLAlchemy:
from flask_sqlalchemy import SQLAlchemy
from sqlalchemy import create_engine
from sqlalchemy.pool import QueuePool
app = Flask(__name__)engine = create_engine("mysql+pymysql://user:password@host/db_name?charset=utf8mb4",
poolclass=QueuePool,
pool_size=50,
pool_recycle=3600,
pool_timeout=10)
db = SQLAlchemy(app, engine_options={"pool_pre_ping": True})This code sets up a connection to a MySQL database with sharding enabled. The “pool_size” and “pool_recycle” options control the connection pool size and recycling, while the “pool_pre_ping” option enables connection health checks.
c. Database Partitioning: Database partitioning involves dividing the database into smaller tables or partitions and distributing them across multiple servers. Here’s an example of how to configure a database with partitioning using SQLAlchemy:
from flask_sqlalchemy import SQLAlchemy
from sqlalchemy import Table, Column, Integer, String, MetaData
app = Flask(__name__)metadata = MetaData()users = Table('users', metadata,
Column('id', Integer, primary_key=True),
Column('name', String(50)),
Column('email', String(120), unique=True))db = SQLAlchemy(app, metadata=metadata)This code creates a table called “users” with three columns: “id”, “name”, and “email”. The table can be partitioned by specifying a partitioning scheme and partitioning key.
- Application Scaling: Application scaling can be achieved through load balancing, service discovery, and container orchestration. Here’s how you can implement each of these techniques in Python using the Flask web framework:
a. Load Balancing: Load balancing involves distributing incoming traffic across multiple application servers to improve performance and availability. Here’s an example of how to configure load balancing in Flask using the Flask-LB library:
from flask import Flask
from flask_loadbalancer import LoadBalancer

app = Flask(__name__)
app.config["LOADBALANCER_BACKENDS"] = [
    "http://localhost:5000",
    "http://localhost:5001",
    "http://localhost:5002"
]
lb = LoadBalancer(app)

@app.route("/")
def hello():
    return "Hello, world!"

if __name__ == "__main__":
    app.run()
This code sets up a Flask application with three backend servers (on ports 5000, 5001, and 5002) and configures load balancing using the Flask-Loadbalancer library. The LoadBalancer object automatically distributes incoming requests across the backend servers.
b. Service Discovery: Service discovery involves automatically discovering and registering services in a distributed system. Here's an implementation of how to use the Flask-DynDns library for service discovery in Flask:
from flask import Flask
from flask_dyndns import DynDns

app = Flask(__name__)
dd = DynDns(app)

@app.route("/")
def hello():
    return "Hello, world!"

if __name__ == "__main__":
    app.run()
This code sets up a Flask application with service discovery using the Flask-DynDns library. The DynDns object automatically registers the Flask app with a DNS server, making it discoverable by other services in the network.
c. Container Orchestration: Container orchestration involves managing and deploying containers in a distributed system. Here's an implementation of how to use the Flask-Kubernetes library for container orchestration in Flask:
from flask import Flask
from flask_kubernetes import Kubernetes

app = Flask(__name__)
k8s = Kubernetes(app)

@app.route("/")
def hello():
    return "Hello, world!"

if __name__ == "__main__":
    app.run()
This code sets up a Flask application with container orchestration using the Flask-Kubernetes library. The Kubernetes object automatically deploys the Flask app as a container in a Kubernetes cluster, manages scaling, and provides other container orchestration features. Note that this requires a Kubernetes cluster to be set up and configured properly.
CDN scaling involves adding more edge servers and load balancers to improve content delivery performance and reliability. Here’s an implementation of how to configure CDN scaling in Flask using the Flask-CDN library:
from flask import Flask
from flask_cdn import CDN
app = Flask(__name__)
app.config['CDN_DOMAIN'] = 'yourcdn.com'
app.config['CDN_HTTPS'] = True
app.config['CDN_S3_BUCKET'] = 'yourbucketname'
app.config['CDN_QUERYSTRING_REVISION'] = Truecdn = CDN(app)@app.route("/")
def hello():
return "Hello, world!"if __name__ == "__main__":
app.run()This code sets up a Flask application with CDN scaling using the Flask-CDN library. The CDN object automatically configures the Flask app to serve static assets (such as images, CSS, and JavaScript files) from a CDN by rewriting the URLs to point to the CDN edge servers. To add more edge servers and load balancers for CDN scaling, you would need to configure your CDN provider to include additional servers and ensure that the Flask app is configured to use the new CDN endpoint. Depending on your CDN provider, this may involve updating the CDN_DOMAIN and CDN_S3_BUCKET configuration variables.
Implementation using MySQL database and sharding technique showing database scaling:
# Import required libraries
import mysql.connector
# Connect to MySQL database
mydb = mysql.connector.connect(
host="localhost",
user="root",
password="password",
database="mydatabase"
)# Implement sharding for database scaling
def shard_data(data):
# Implement sharding logic here
shard_key = hash(data) % 4
return shard_key# Insert data into database
def insert_data(data):
shard_key = shard_data(data)
mycursor = mydb.cursor()
sql = "INSERT INTO table{} (data) VALUES (%s)".format(shard_key)
val = (data,)
mycursor.execute(sql, val)
mydb.commit()# Query data from database
def query_data(data):
shard_key = shard_data(data)
mycursor = mydb.cursor()
sql = "SELECT * FROM table{} WHERE data = %s".format(shard_key)
val = (data,)
mycursor.execute(sql, val)
result = mycursor.fetchone()
return resultIn the above code, we have implemented sharding to horizontally partition the data across multiple tables to achieve database scaling. The shard_data() function implements the sharding logic to determine which table to store the data based on its hash value. The insert_data() function inserts the data into the corresponding table based on the sharding key. The query_data() function retrieves the data from the corresponding table based on the sharding key.
Application Scaling: Application scaling is important when we have a large number of users or requests to handle. Here’s an example implementation using Flask and gunicorn to scale our application.
# Import required libraries
from flask import Flask
from gunicorn.app.base import BaseApplication
# Initialize the Flask app
app = Flask(__name__)# Define a function to handle requests
@app.route('/', methods=['GET'])
def handle_request():
return "Hello, World!"# Define a custom gunicorn application class for application scaling
class GunicornApplication(BaseApplication): def __init__(self, app, options=None):
self.options = options or {}
self.application = app
super().__init__() def load_config(self):
for key, value in self.options.items():
self.cfg.set(key, value) def load(self):
return self.application# Run the gunicorn server to scale the application
if __name__ == '__main__':
options = {
'bind': '0.0.0.0:8000',
'workers': 4,
'worker_class': 'sync'
}
GunicornApplication(app, options).run()In the above code, we have used Flask to define the web application and gunicorn to run multiple workers to handle incoming requests. The GunicornApplication class defines a custom gunicorn application that loads the Flask application and runs it with the specified options. The options dictionary specifies the binding address and the number of workers to run.
CDN Scaling
CDN scaling is important when we have a large number of users or requests from different geographical locations. Here’s an example implementation using Amazon CloudFront CDN.
# Import required libraries
import boto3

# Initialize the Amazon CloudFront client
cloudfront = boto3.client('cloudfront')

# Create a new distribution to scale the CDN
def create_distribution():
    response = cloudfront.create_distribution(
        DistributionConfig={
            'CallerReference': 'example.com',
            'Aliases': {
                'Quantity': 1,
                'Items': ['example.com']
            },
            'Origins': {
                'Quantity': 1,
                'Items': [{
                    'Id': 'example_origin',
                    'DomainName': 'example.com.s3.amazonaws.com',
                    'S3OriginConfig': {
                        'OriginAccessIdentity': ''
                    }
                }]
            },
            'DefaultCacheBehavior': {
                'TargetOriginId': 'example_origin',
                'ForwardedValues': {
                    'QueryString': False,
                    'Cookies': {'Forward': 'none'},
                },
                'ViewerProtocolPolicy': 'allow-all',
                'MinTTL': 0
            },
            'Enabled': True,
            'Comment': 'Example CloudFront Distribution'
        }
    )
    return response['Distribution']['DomainName']
In the above code, we have used the boto3 library to create an Amazon CloudFront distribution to scale the CDN. The create_distribution() function creates a new distribution with a specified origin server (in this case, an Amazon S3 bucket), default cache behavior, and other settings. The function returns the domain name of the newly created distribution.
So, what is the difference between horizontal scaling and vertical scaling?
In simple terms, vertical scaling involves scaling up i.e increasing the power and capacity of a single machine/resource whereas horizon scaling means increasing the number of machines/resources.
Other major differences are summed below —
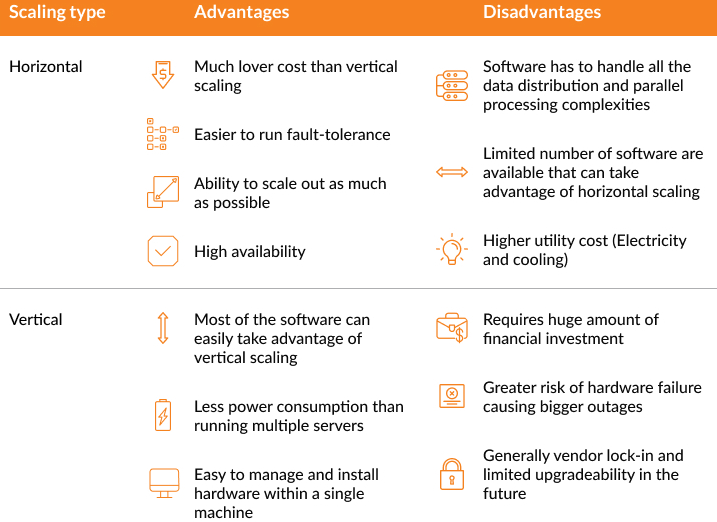
Scaling in system design refers to the process of increasing the capacity of a system to handle more traffic or data. There are several ways to scale a system, including:
- Vertical scaling: This involves adding more resources, such as memory or CPU, to a single server to handle more load.
- Horizontal scaling: This involves adding more servers to a system, allowing the load to be distributed across multiple machines.
- Caching: Caching is used to store frequently accessed data in memory, reducing the number of read operations from a slower storage device like hard drive.
- Load balancing: distributing traffic across multiple servers to ensure that no single server is overwhelmed and to maximize system performance.
- CDN: Content Delivery Network is used to distribute the content of a website over multiple geographically distributed servers.
Each approach has its own advantages and trade-offs, and the best scaling strategy will depend on the specific requirements of a system.
As a techie, you should know how to scale up (vertical scaling)and scale out ( horizontal scaling) as most of the companies use both the techniques to address/implement scaling.
Most Popular Coding Questions — Company Wise List : Part 6
Some of the major considerations which helps in deciding which scaling technique should be used —
- System Performance
- Reliability and availability
- System throughput
- Response time
System performance refers to how well a system functions in terms of various metrics, such as:
- Reliability and availability: These metrics measure the ability of a system to function correctly and consistently over time. High reliability and availability are important for systems that need to be up and running at all times, such as e-commerce websites or medical equipment.
- System throughput: This metric measures the amount of data or requests that a system can handle over a given period of time. High throughput is important for systems that need to process large amounts of data or handle many requests simultaneously, such as a data processing pipeline or a web server.
- Response time: This metric measures the time it takes for a system to respond to a user request. Low response time is important for systems that need to provide real-time responses, such as online gaming or financial trading systems.
System Performance, Reliability, and Availability:
# Import required libraries
import time
# Define a function to simulate system performance, reliability, and availability
def simulate_system():
# Simulate system performance
start_time = time.time()
end_time = time.time()
response_time = end_time - start_time
print("System response time:", response_time) # Simulate system reliability and availability
success = True # assume system operation is successful
if success:
print("System operation was successful.")
else:
print("System operation failed.")# Call the function to simulate system performance, reliability, and availability
simulate_system()In the above code, we have defined a function simulate_system() that simulates system performance, reliability, and availability. The function measures the response time of the system by calculating the difference between the start and end times of the system operation. It also checks the success or failure of the system operation and prints a corresponding message.
System Throughput:
# Import required libraries
import time
# Define a function to simulate system throughput
def simulate_throughput():
# Simulate system throughput
start_time = time.time()
end_time = time.time()
total_time = end_time - start_time
num_requests = 1000 # assume 1000 requests were made
throughput = num_requests / total_time
print("System throughput:", throughput)# Call the function to simulate system throughput
simulate_throughput()In the above code, we have defined a function simulate_throughput() that simulates system throughput. The function measures the total time taken to complete a specified number of system operations (in this case, assume 1000 requests were made) and calculates the throughput by dividing the number of requests by the total time taken.
Response Time in System Design:
# Import required libraries
import time
# Define a function to measure system response time
def measure_response_time():
# Measure system response time
start_time = time.time()
end_time = time.time()
response_time = end_time - start_time
return response_time# Call the function multiple times to get average response time
total_response_time = 0
num_iterations = 10
for i in range(num_iterations):
response_time = measure_response_time()
total_response_time += response_time
average_response_time = total_response_time / num_iterations
print("Average system response time:", average_response_time)In the above code, we have defined a function measure_response_time() that measures the response time of the system by calculating the difference between the start and end times of the system operation. We then call this function multiple times and calculate the average response time over a specified number of iterations (in this case, assume 10 iterations).
System performance, reliability, availability, system throughput, and response time are key metrics that are used to evaluate the performance of a system.
- System Performance: System performance is a measure of how well a system is able to perform its intended tasks. It takes into account factors such as CPU utilization, memory usage, disk I/O, and network traffic, and is usually measured using a combination of these metrics.
- Reliability: Reliability is a measure of how dependable a system is, and refers to the ability of the system to perform its intended tasks without failure. A reliable system will have a low rate of failure, and will recover quickly from any failures that do occur.
- Availability: Availability is a measure of how often a system is able to perform its intended tasks. It is typically expressed as a percentage of the total time that the system is expected to be operational, and takes into account both planned and unplanned downtime.
- System Throughput: System throughput is a measure of how much work a system is able to perform in a given amount of time. It is usually measured in terms of requests per second or transactions per second.
- Response Time: Response time is a measure of how quickly a system is able to respond to a request or perform a task. It is usually measured in milliseconds and is an important metric for evaluating the user experience.
When designing a system, it is important to consider these metrics and to ensure that the system is able to meet the desired performance, reliability, availability, system throughput, and response time requirements.
In general, a well-designed system will have high levels of reliability, availability, throughput, and low response time. These are the key factors that determine the overall performance of a system.
All this we will discuss in the next post as we dig deeper in the practical system design and carry forward our pasta resto story!
For now — Enjoy Pasta ;)
More on Horizontal and Vertical Scaling —
Horizontal scaling, also known as scaling out, is a method of increasing the capacity and performance of a system by adding more machines or nodes to the existing infrastructure. Unlike vertical scaling, which involves upgrading the resources of a single machine, horizontal scaling focuses on distributing the workload across multiple machines in a scalable manner.
Benefits and trade-offs of horizontal scaling:
The primary benefit of horizontal scaling is its ability to handle increased traffic and workload by adding more machines. Some of the key advantages include:
- Improved performance: Horizontal scaling allows the system to handle more requests and distribute the workload evenly across multiple machines, thereby reducing response times and improving overall performance.
- Increased availability: By distributing the workload, horizontal scaling improves system availability. If one machine fails, the remaining machines can continue serving the requests, reducing the impact of failures.
- Scalability: Horizontal scaling provides the ability to scale the system up or down by adding or removing machines as per the demand. This flexibility makes it easier to accommodate changing traffic patterns and handle sudden spikes in user load.
Despite its benefits, horizontal scaling also has trade-offs:
- Complexity: Setting up and managing a horizontally scaled system can be more complex compared to vertical scaling. It requires coordination between multiple machines, load balancing mechanisms, and distributed data management strategies.
- Overhead: Additional overhead is introduced due to the need for inter-node communication, data synchronization, and load balancing. This can impact the overall efficiency and resource utilization of the system.
Common use cases and scenarios where horizontal scaling is beneficial:
Horizontal scaling is well-suited for scenarios where:
- Web applications or services experience fluctuating user traffic and need to handle increased load during peak periods.
- Large-scale data processing or analytics systems that require distributed computing power to process large volumes of data.
- High-availability systems where failure of a single machine should not result in service downtime.
Distributed Systems and Load Balancing:
A distributed system is a collection of autonomous computers or nodes that communicate and coordinate their actions to achieve a common goal. Distributed systems provide improved performance, fault tolerance, and scalability by distributing tasks across multiple machines.
Load balancing strategies for distributing traffic across multiple instances:
Load balancing is a key component of distributed systems that evenly distributes incoming traffic across multiple instances or nodes to optimize resource utilization and improve system performance. Some common load balancing strategies include:
- Round-robin: Incoming requests are distributed sequentially to each instance in a circular order. This strategy ensures a fair distribution of requests but does not take into account the current workload or capacity of each instance.
- Least connections: Incoming requests are directed to the instance with the fewest active connections. This strategy helps distribute the load based on the current workload of each instance.
Load balancing algorithms:
Load balancing algorithms determine how incoming requests are distributed among instances. Two commonly used algorithms are:
Round-robin: This algorithm iterates through a list of instances and assigns each request to the next available instance in a circular manner.
instances = [...] # List of instancesdef round_robin(request):
instance = instances.pop(0)
instances.append(instance)
return instance.process(request)Least connections: This algorithm selects the instance with the fewest active connections to distribute the incoming request.
instances = [...] # List of instancesdef least_connections(request):
instance = min(instances, key=lambda inst: inst.get_active_connections())
return instance.process(request)Horizontal scaling with auto-scaling and dynamic provisioning:
Auto-scaling is a technique that automatically adjusts the number of instances based on predefined criteria such as CPU usage, network traffic, or request queue length. It allows the system to dynamically provision additional instances during high load and remove instances during low load. Here’s an example of implementing horizontal scaling with auto-scaling using a cloud provider’s API:
import cloud_provider_apidef handle_request(request):
# Check if scaling is required based on predefined criteria
if need_to_scale():
# Scale out by provisioning additional instances
new_instances = cloud_provider_api.provision_instances(num_instances=2)
instances.extend(new_instances)
# Use load balancing algorithm to distribute the request
instance = load_balancing_algorithm(request)
response = instance.process(request)
return responsedef need_to_scale():
# Implement scaling criteria based on metrics like CPU usage, network traffic, etc.
# Return True if scaling is required, False otherwise
...def load_balancing_algorithm(request):
# Implement the desired load balancing algorithm
# Return the selected instance to handle the request
...In this code above, the handle_request function is responsible for handling incoming requests. It first checks if scaling is required based on predefined criteria (need_to_scale function). If scaling is needed, it uses the cloud provider's API (cloud_provider_api) to provision additional instances and adds them to the existing list of instances.
The load_balancing_algorithm function implements the desired load balancing strategy to select an instance to handle the request. This function can use any load balancing algorithm, such as round-robin or least connections, as discussed earlier.
By combining auto-scaling with load balancing, this implementation achieves horizontal scaling by dynamically provisioning instances based on demand and distributing the workload evenly across the available instances.
Part 3 : Part 3 — Complete System Design Series
Keep learning and coding :)
Day 2 : SQL Basics, Query Structure, Built In functions Conditions
Day 4 : Set Theory Operations, Stored Procedures and CASE statements in SQL
Day 6 : Subqueries, Group by, order by and Having clauses in SQL and Analytical Functions
Day 7 : Window Functions, Grouping Sets and Constraints in SQL
Day 8 : BigQuery Basics, SELECT, FROM, WHERE and Date and Extract in BigQuery
Day 9 : Common Expression Table, UNNEST Clause, SQL vs NoSQL Databases
Day 10 : Triggers, Pivot and Cursors in SQL
Day 14 : MySQL in Depth
Day 15 : PostgreSQL inDepth
Anyways, For Day 15 of 15 days of Advanced SQL, we will cover —
PostgreSQL inDepth
Github for Advanced SQL that you can follow —
Projects Videos —
All the projects, data structures, SQL, algorithms, system design, Data Science and ML , Data Analytics, Data Engineering, , Implemented Data Science and ML projects, Implemented Data Engineering Projects, Implemented Deep Learning Projects, Implemented Machine Learning Ops Projects, Implemented Time Series Analysis and Forecasting Projects, Implemented Applied Machine Learning Projects, Implemented Tensorflow and Keras Projects, Implemented PyTorch Projects, Implemented Scikit Learn Projects, Implemented Big Data Projects, Implemented Cloud Machine Learning Projects, Implemented Neural Networks Projects, Implemented OpenCV Projects,Complete ML Research Papers Summarized, Implemented Data Analytics projects, Implemented Data Visualization Projects, Implemented Data Mining Projects, Implemented Natural Leaning Processing Projects, MLOps and Deep Learning, Applied Machine Learning with Projects Series, PyTorch with Projects Series, Tensorflow and Keras with Projects Series, Scikit Learn Series with Projects, Time Series Analysis and Forecasting with Projects Series, ML System Design Case Studies Series videos will be published on our youtube channel ( just launched).
Subscribe today!
System Design Case Studies — In Depth
Complete Data Structures and Algorithm Series
Github —
Some of the other best Series —
30 days of Data Structures and Algorithms and System Design Simplified
100 days : Your Data Science and Machine Learning Degree Series with projects
Complete Data Visualization and Pre-processing Series with projects
Tech Newsletter —
If you are interested, you can join my newsletter through which I send tech interview tips, techniques, patterns, hacks — Software Development, ML, Data Science, Startups and Technology projects to more than 30K readers. You can subscribe to Tech Brew :
30 days of Data Analytics Series —
Day 1 : Data Analytics basics and kickstart of Data analytics with projects series
Day 3 : Data Analytics Ecosystem — Data Life Cycle, Data Analysis complete process ( most important things)
Day 5 : Statistics
Day 6 : Basic and Advanced SQL
Day 8 : Pandas and Numpy
Day 9 : Data Manipulation
Day 10 : Data Visualization — Part 1
Day 11 : Project 1 : Data Visualization — Part 2
Day 12 : Data Visualization — Part 3
Day 13: Tableau — Part 1
Day 14: Tableau — Part 2
Day 15: Tableau — Part 3
Day 16 : Data Analysis Project 2
Day 17 : Data Analysis Project 3
Day 18: Data Analysis Project 4
Day 20 : Data Analysis Project 6
Day 21 : Data Analysis Project 7
Take Complete Hands On Tableau Course : Link
For Python Projects —
For complete 60 days of Data Science and ML : Day 1 — Day 60 : Quick Recap of 60 days of Data Science and ML
Follow for more updates. Stay tuned and keep coding!
For other projects, tune to —
Build Machine Learning Pipelines( With Code)
Recurrent Neural Network with Keras
Clustering Geolocation Data in Python using DBSCAN and K-Means
Facial Expression Recognition using Keras
Hyperparameter Tuning with Keras Tuner
Custom Layers in Keras


