
Day 11 of System Design Case Studies Series : Design API Rate Limiter, MS Docs, ATM Machine System, Airport Baggage System, Conference Booking System
Complete Design with examples
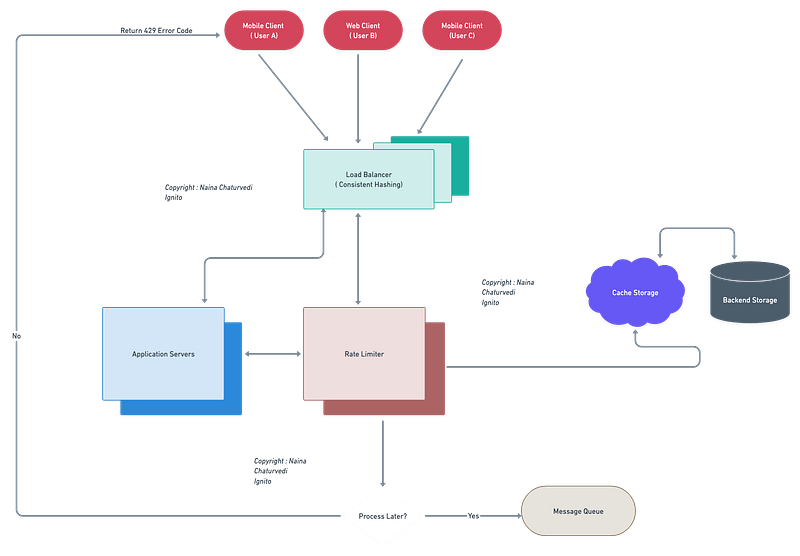
Hello peeps! Welcome to Day 11 of System Design Case studies series where we will design API Rate Limiter and MS Docs, ATM Machine System, Airport Baggage System and Conference Booking System.
This post has system design for ( scroll till the end of the post) —
Note : Please read System Design Important Terms you MUST know and Most Important System Design basics before reading this post.
Projects Videos —
All the projects, data structures, SQL, algorithms, system design, Data Science and ML , Data Analytics, Data Engineering, , Implemented Data Science and ML projects, Implemented Data Engineering Projects, Implemented Deep Learning Projects, Implemented Machine Learning Ops Projects, Implemented Time Series Analysis and Forecasting Projects, Implemented Applied Machine Learning Projects, Implemented Tensorflow and Keras Projects, Implemented PyTorch Projects, Implemented Scikit Learn Projects, Implemented Big Data Projects, Implemented Cloud Machine Learning Projects, Implemented Neural Networks Projects, Implemented OpenCV Projects,Complete ML Research Papers Summarized, Implemented Data Analytics projects, Implemented Data Visualization Projects, Implemented Data Mining Projects, Implemented Natural Leaning Processing Projects, MLOps and Deep Learning, Applied Machine Learning with Projects Series, PyTorch with Projects Series, Tensorflow and Keras with Projects Series, Scikit Learn Series with Projects, Time Series Analysis and Forecasting with Projects Series, ML System Design Case Studies Series videos will be published on our youtube channel ( just launched).
Subscribe today!
Solved System Design Case Studies — In depth
Design Instagram
Design Netflix
Design Reddit
Design Amazon
Design Messenger App
Design Twitter
Design URL Shortener
Design Dropbox
Design Youtube
Design API Rate Limiter
Design Web Crawler
Design Amazon Prime Video
Design Facebook’s Newsfeed
Design Yelp
Design Uber
Design Tinder
Design Tiktok
Design Whatsapp
Most Popular System Design Questions
Mega Compilation : Solved System Design Case studies
We will be discussing in depth -
- What is Rate Limiter
- Important Features
- Data Model — ER requirements
- High Level Design
- Basic Low Level Design
- API Design
- Complete Detailed Design
- Complete Code Implementation
Pre-requisite to this post -
Complete System Design Series — Important Concepts that you should know before starting the Case studies
6. Networking, How Browsers work, Content Network Delivery ( CDN)
13. System Design Template — How to solve any System Design Question
Github —
Day 1 of System Design Case Studies can be found below-
Day 2 of System Design Case Studies can be found below-
Day 3 of System Design Case Studies can be found below-
Day 4 of System Design Case Studies can be found below-
What is API Rate Limiter
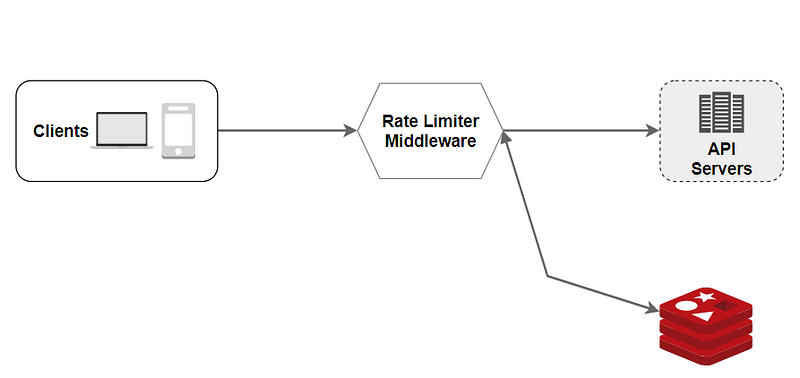
Its a mechanism which is used to —
- Limits the number of requests ( in case the system is receiving huge number of requests)
- It caps/puts a threshold how many requests users can send in a specific time interval and as soon as the the cap/threshold is reached, it blocks the further requests.
Why Rate Limiter?
It helps against —
- Denial of Service ( DOS) attacks — To prevent resource starvation
- Stop spam request
- Block the excess calls
- Reduce the cost of infra
- Prevent server overload
- Filter out excess requests caused by bots and users bad behaviour.
Key Components of API Rate Limiter and functionalities —
- Token Bucket Algorithm: One of the common algorithms used to implement rate limiting is the token bucket algorithm. This algorithm works by maintaining a “bucket” that can hold a certain number of tokens, and tokens are added to the bucket at a fixed rate. Each API request consumes one token, and if the bucket is empty, the request is blocked.
- Request Counting: Another approach for rate limiting is to keep track of the number of requests made by each client within a given time window. If the number of requests exceeds a certain threshold, the client’s requests are blocked until the time window expires.
- IP-based Limiting: To implement IP-based rate limiting, the API service keeps track of the number of requests made by each IP address within a given time window. If an IP address exceeds a certain threshold, its requests are blocked.
- User-based Limiting: To implement user-based rate limiting, the API service keeps track of the number of requests made by each user within a given time window. If a user exceeds a certain threshold, their requests are blocked.
- Authentication: To ensure that the rate limiter only applies to authorized clients, the API service should require authentication for each request. For example, using OAuth2 or JWT tokens.
- Configuration: The rate limiting parameters, such as the number of tokens in the bucket, the token refill rate, and the request threshold, should be configurable by the API service.
- Monitoring: The API service should provide a way to monitor the rate limiter’s performance, such as the number of blocked requests and the number of tokens in the bucket, so that the service can be fine-tuned.
- Headers: The API service should return headers in each response indicating the remaining requests and the reset time, so that client can adapt their behavior accordingly.
Important Features
Limit the number of requests per user
Data Model — ER requirements
User
user_id: Int
request_start_time : DateTime
request_end_time : DateTime
Status : String
Functionality —
User should be able to send request(s).
If the request has been dropped by the rate limiter then user should be informed about the status.
High Level Design
For rate limiting we use various algorithms —
- Leaking bucket — The requests are processed using FIFO queue and requests packets are dropped if the queue is full.
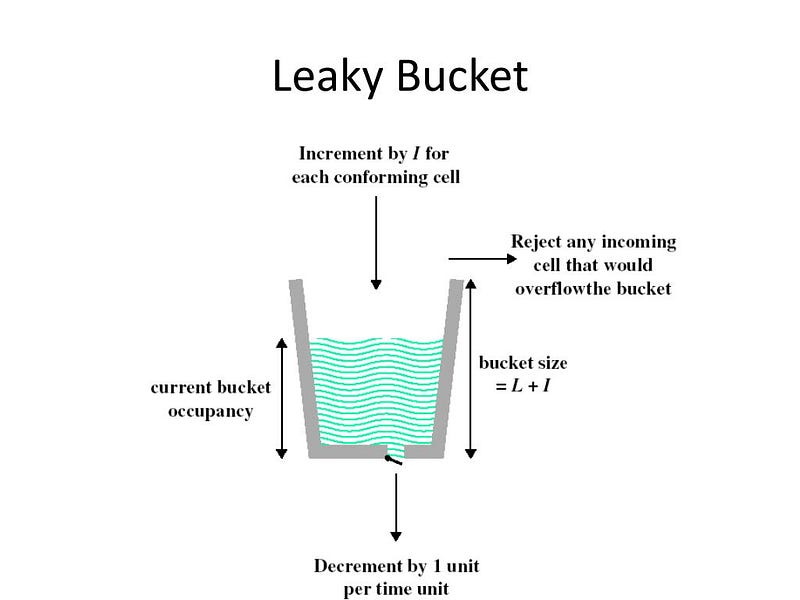
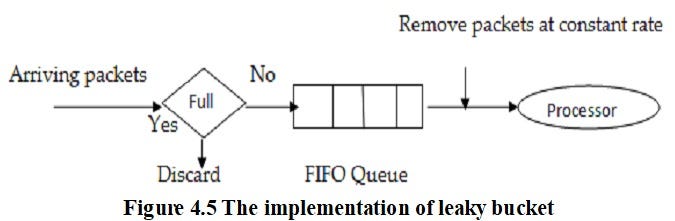
Implement the Leaking bucket algorithm in Python:
import timeclass LeakyBucket:
def __init__(self, capacity, rate):
self.capacity = capacity
self.rate = rate
self.water_level = 0
self.last_leak_time = time.time() def allow_request(self):
current_time = time.time()
time_since_last_leak = current_time - self.last_leak_time
self.last_leak_time = current_time
self.water_level = max(0, self.water_level - time_since_last_leak * self.rate)
if self.water_level < self.capacity:
self.water_level += 1
return True
else:
return FalseIn this implementation, the LeakyBucket class takes two parameters: capacity and rate. capacity is the maximum number of requests allowed in a unit time, and rate is the rate at which the bucket is refilled with new requests per unit time. The allow_request method is called for every incoming request. It first calculates the time since the last leak, which is the time that has elapsed since the bucket was last emptied. It then calculates the new water level in the bucket, which is the current water level minus the water that has leaked out since the last leak, and adds the new request to the bucket if there is space. If the water level is already at the capacity, the method returns False to indicate that the request should be rejected.
Here’s an implementation of how to use the LeakyBucket class to rate limit an API:
bucket = LeakyBucket(10, 1) # allow 10 requests per second
for i in range(20):
    if bucket.allow_request():
        print(f"Request {i} allowed")
    else:
        print(f"Request {i} rejected")
    time.sleep(0.1)
In this example, we create a LeakyBucket object that allows 10 requests per second. We then make 20 requests, with a delay of 0.1 seconds between each request. The allow_request method is called for each request, and the output indicates whether the request was allowed or rejected based on the rate limit.
2. Token bucket — A token bucket with a pre-defined capacity allows tokens to be added till the capacity is full. Once full it resets the capacity rates. It takes bucket size and refill rate as the two parameters — the bucket size designates the max number of tokens allowed and refill rate defines the no of tokens to be put into bucket every second.
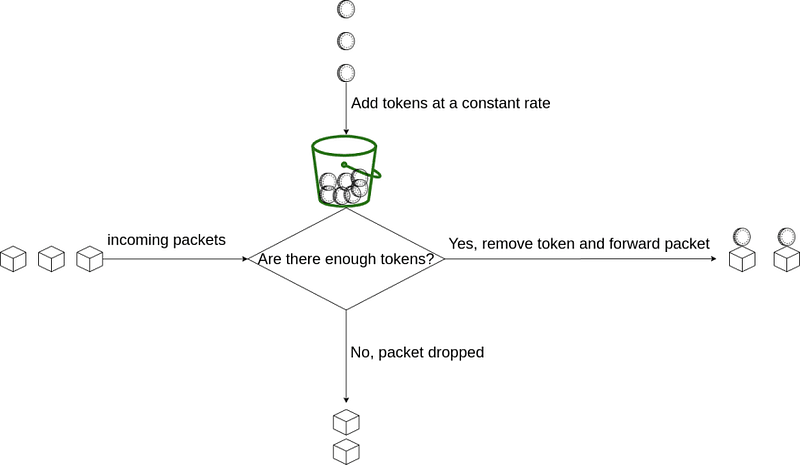
A Python implementation of the token bucket algorithm for rate limiting. Here are the steps:
- Create a class called
TokenBucketthat has the following attributes:
capacity: the maximum number of tokens the bucket can hold.tokens: the current number of tokens in the bucket.fill_rate: the rate at which tokens are added to the bucket (tokens per second).last_update: the time when the bucket was last updated.
- Implement a method called
consumethat accepts the number of tokens a request requires and returnsTrueif the request can be processed (i.e., there are enough tokens in the bucket), orFalseif the request should be blocked. - Implement a method called
refillthat updates the number of tokens in the bucket based on the time elapsed since the last update.
Here’s the Python code for the TokenBucket class:
import timeclass TokenBucket:
def __init__(self, capacity, fill_rate):
self.capacity = capacity
self.tokens = capacity
self.fill_rate = fill_rate
self.last_update = time.time() def consume(self, tokens):
if tokens <= self.tokens:
self.tokens -= tokens
return True
else:
return False def refill(self):
now = time.time()
elapsed_time = now - self.last_update
new_tokens = elapsed_time * self.fill_rate
self.tokens = min(self.tokens + new_tokens, self.capacity)
self.last_update = nowTo use this class for rate limiting, you can create an instance of TokenBucket with the desired capacity and fill rate, and then call its consume method for each incoming request. Here's an example:
# create a token bucket with a capacity of 10 and a fill rate of 1 token per second
bucket = TokenBucket(10, 1)
# process 15 requests
for i in range(15):
if bucket.consume(1):
print(f"Processing request {i+1}")
else:
print(f"Blocking request {i+1}") # refill the token bucket after each request
bucket.refill()This code processes 10 requests, but blocks the remaining 5 requests because the token bucket has been depleted. The refill method is called after each request to update the number of tokens in the bucket based on the elapsed time since the last update.
3. Sliding window counter — The number of requests in the sliding window are calculated. It’s a combination of fixed window counter algorithm and sliding window log.
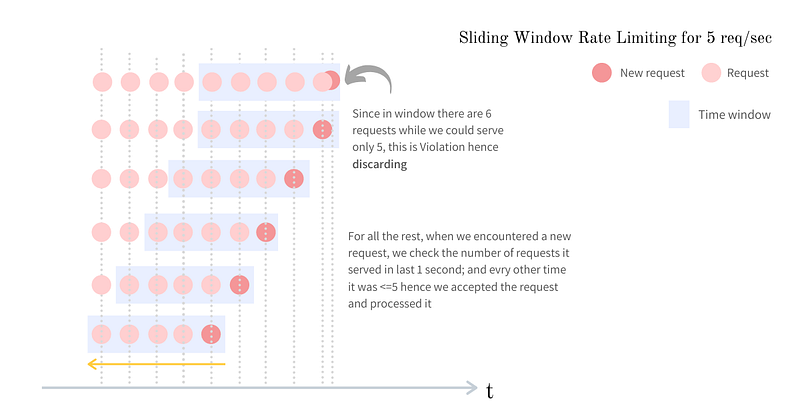
A Python implementation of the sliding window counter algorithm for API rate limiting. Here are the steps:
- Create a class called
SlidingWindowCounterthat has the following attributes:
window_size: the duration of the sliding window in seconds.max_requests: the maximum number of requests allowed within the sliding window.window: a list of timestamps representing the requests made within the sliding window.
- Implement a method called
allow_requestthat checks whether a new request should be allowed based on the number of requests made within the sliding window. If the number of requests exceeds the maximum allowed, the method returnsFalseand the request is blocked. Otherwise, the method returnsTrueand adds the current timestamp to the window. - Implement a method called
cleanupthat removes timestamps from the window that are older than the sliding window duration.
Here’s the Python code for the SlidingWindowCounter class:
import timeclass SlidingWindowCounter:
def __init__(self, window_size, max_requests):
self.window_size = window_size
self.max_requests = max_requests
self.window = [] def allow_request(self):
# remove old timestamps from the window
self.cleanup() # check if the number of requests within the sliding window exceeds the maximum allowed
if len(self.window) < self.max_requests:
self.window.append(time.time())
return True
else:
return False def cleanup(self):
# remove timestamps from the window that are older than the sliding window duration
while self.window and self.window[0] < time.time() - self.window_size:
self.window.pop(0)To use this class for rate limiting, you can create an instance of SlidingWindowCounter with the desired sliding window duration and maximum number of requests, and then call its allow_request method for each incoming request. Here's an example:
# create a sliding window counter with a window size of 10 seconds and a maximum of 5 requests
counter = SlidingWindowCounter(10, 5)
# process 10 requests
for i in range(10):
if counter.allow_request():
print(f"Processing request {i+1}")
else:
print(f"Blocking request {i+1}")
time.sleep(1) # simulate a delay of 1 second between requestsThis code processes 5 requests within each 10-second sliding window, but blocks the remaining 5 requests because the maximum number of requests has been reached within each sliding window. The cleanup method is called before each request to remove old timestamps from the window that are older than the sliding window duration.
4. Fixed window counter — The timeline is divided into fix sized windows and a counter is assigned for each window where coming requests increment the counter by one each time as they come. When the pre-defined size threshold is reached, the new requests are dropped until a new window counter starts ticking.
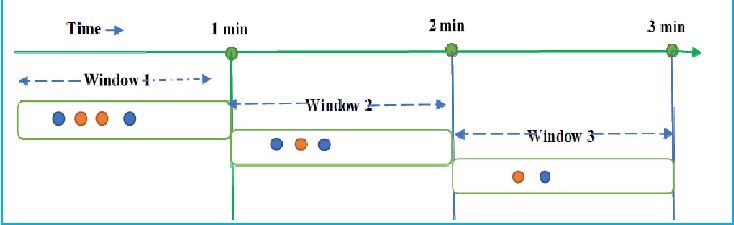
Implement a fixed window counter for API rate limiting using Python:
import timeclass RateLimiter:
def __init__(self, max_requests, window_size):
self.max_requests = max_requests
self.window_size = window_size
self.request_counts = [0] * window_size
self.request_times = [0] * window_size
self.current_index = 0 def allow_request(self):
current_time = int(time.time())
current_count = sum(self.request_counts)
if current_count >= self.max_requests:
return False
else:
index = self.current_index % self.window_size
if current_time - self.request_times[index] >= 1:
self.request_counts[index] = 1
self.request_times[index] = current_time
self.current_index += 1
return True
else:
self.request_counts[index] += 1
return TrueIn this implementation, we define a RateLimiter class with two parameters: max_requests and window_size. max_requests is the maximum number of requests allowed within the time window and window_size is the size of the time window in seconds. The class initializes two arrays: request_counts and request_times. request_counts is an array of integers that stores the number of requests made at each time interval within the time window. request_times is an array of timestamps that stores the time at which each request was made. The allow_request method checks whether a new request can be allowed or not. It first calculates the current number of requests made within the time window. If this number is greater than or equal to max_requests, the method returns False to deny the request. If the current request count is less than max_requests, the method checks whether a new request can be allowed within the current time window. It calculates the index of the current time interval using the current_index variable and checks whether the time difference between the current time and the last request time for that interval is greater than or equal to 1 second. If the time difference is greater than or equal to 1 second, the method resets the request count for that interval to 1 and updates the request time for that interval to the current time. It also increments the current_index variable to move to the next time interval. The method then returns True to allow the request.
If the time difference is less than 1 second, the method increments the request count for that interval and returns True to allow the request.
An implementation of how we can use the RateLimiter class to limit the rate of requests to a function:
limiter = RateLimiter(max_requests=10, window_size=60)def my_function():
if limiter.allow_request():
# process request
else:
# return error responseIn this implementation, we create a RateLimiter object with a maximum of 10 requests per minute. We then define a function my_function that checks whether a new request can be allowed using the allow_request method of the RateLimiter object. If the request is allowed, the function processes the request. If the request is denied, the function returns an error response.
— — — — — — — — — — — — — — — — — — — — — — — — — — — — — — — — — — — — — —
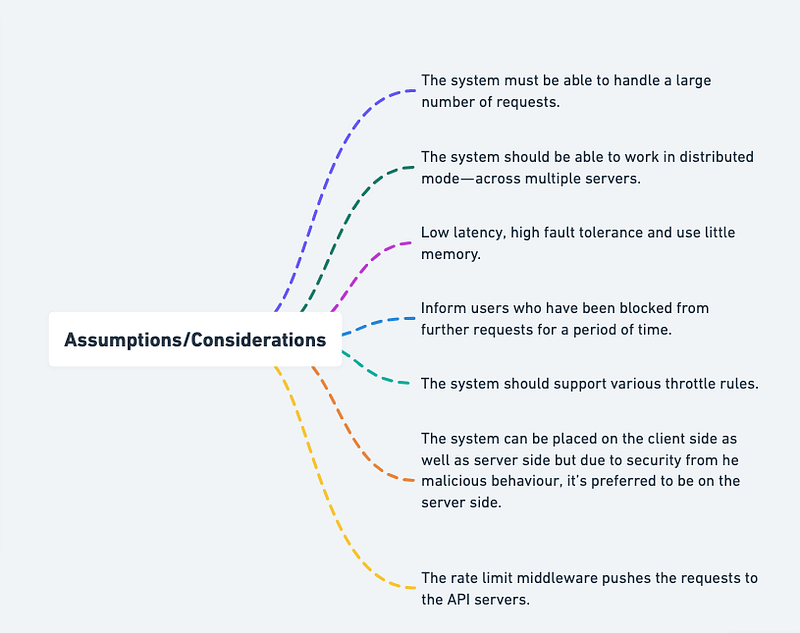
Assumptions/Considerations —
- The system must be able to handle a large number of requests.
- The system should be able to work in distributed mode — across multiple servers.
- Low latency, high fault tolerance and use little memory.
- Inform users who have been blocked from further requests for a period of time.
- The system should support various throttle rules.
- The system can be placed on the client side as well as server side but due to security from he malicious behaviour, it’s preferred to be on the server side.
- The rate limit middleware pushes the requests to the API servers.
— — — — — — — — — — — — — — — — — — — — — — — — — — — — — — — — — — — — —
Components
- Client : Users ( can be both mobile based or web based)
- Rate limiter middleware
- Cache and rules
- API Servers
- Redis
- Message Queue
A simple API rate limiter implemented in Python using Flask:
from flask import Flask
from flask_limiter import Limiter
from flask_limiter.util import get_remote_address
app = Flask(__name__)
limiter = Limiter(app, key_func=get_remote_address)@app.route("/")
@limiter.limit("10/minute")
def index():
return "Hello, World!"if __name__ == "__main__":
app.run()This code uses the Flask-Limiter library to limit the number of requests that can be made to the “/” endpoint to 10 requests per minute. The key_func argument is set to get_remote_address to limit the rate based on the IP address of the client making the request.
An API rate limiter implemented in Python:
import time
from flask import Flask, jsonify
app = Flask(__name__)# Set the maximum number of requests per minute
RATE_LIMIT = 60# Keep track of the number of requests in the current minute
request_counter = 0# Timestamp of the start of the current minute
current_minute = int(time.time() / 60)@app.route("/api/endpoint", methods=["GET"])
def api_endpoint():
global request_counter
global current_minute # Get the current timestamp and check if the current minute has changed
timestamp = int(time.time() / 60)
if timestamp > current_minute:
# If the current minute has changed, reset the request counter
request_counter = 0
current_minute = timestamp # Check if the rate limit has been exceeded
if request_counter >= RATE_LIMIT:
return jsonify({"error": "Rate limit exceeded"}), 429 # Increment the request counter
request_counter += 1 # Return the response
return jsonify({"message": "Success"})if __name__ == "__main__":
app.run(debug=True)In this example, the rate limiter is implemented using two global variables: request_counter and current_minute. The request_counter keeps track of the number of requests in the current minute, and the current_minute variable holds the timestamp of the start of the current minute.
Each time an API endpoint is called, the current timestamp is obtained and compared to the current_minute variable. If the current minute has changed, the request_counter is reset to 0. Then, the rate limit is checked by comparing the request_counter to the RATE_LIMIT constant. If the rate limit has been exceeded, a 429 status code is returned, indicating that the rate limit has been exceeded. If the rate limit has not been exceeded, the request_counter is incremented and a success response is returned.
Basic Low Level Design
import java.time.*;
import java.util.*;

class RateLimiter {
    private Map<String, Queue<LocalDateTime>> requestHistory;
    private int requestsPerSecond;

    public RateLimiter(int requestsPerSecond) {
        this.requestHistory = new HashMap<>();
        this.requestsPerSecond = requestsPerSecond;
    }

    public boolean allowRequest(String clientId) {
        Queue<LocalDateTime> clientRequests = requestHistory.getOrDefault(clientId, new LinkedList<>());
        LocalDateTime currentTime = LocalDateTime.now();

        // Remove requests older than one second
        while (!clientRequests.isEmpty() && Duration.between(clientRequests.peek(), currentTime).getSeconds() >= 1) {
            clientRequests.poll();
        }

        // Check if the request limit has been exceeded
        if (clientRequests.size() >= requestsPerSecond) {
            return false;
        }

        // Add the current request timestamp
        clientRequests.offer(currentTime);
        requestHistory.put(clientId, clientRequests);

        return true;
    }
}

public class RateLimiterApp {
    public static void main(String[] args) {
        RateLimiter rateLimiter = new RateLimiter(3); // Allowing 3 requests per second

        // Simulate API requests
        for (int i = 1; i <= 5; i++) {
            String clientId = "client" + i;
            boolean allowed = rateLimiter.allowRequest(clientId);
            System.out.println("Request from client " + clientId + ": " + (allowed ? "Allowed" : "Denied"));
        }
    }
}
API Design
Implementation —
from flask import Flask, jsonify, request
from flask_limiter import Limiter
from flask_limiter.util import get_remote_address
app = Flask(__name__)
limiter = Limiter(app, key_func=get_remote_address, default_limits=["10 per minute"])# Endpoint for testing rate limiting
@app.route('/test', methods=['GET'])
@limiter.limit("5 per minute")
def test_rate_limiter():
return jsonify({'message': 'Request accepted!'})if __name__ == '__main__':
app.run(debug=True)In this implementation, we have one endpoint:
/test(GET): This endpoint is used to test the rate limiting functionality. A client can only make a certain number of requests within a given time period. In this example, we have set the default limit to "10 per minute" and the limit for this specific endpoint to "5 per minute".
Complete Detailed Design
More on API rate Limiter System Design —
Rate limiting algorithms are used to control and restrict the rate at which requests can be made to an API or a service. They enforce limits on the number of requests that can be processed within a given time period, such as requests per second or requests per minute. There are several common rate limiting algorithms, including the token bucket algorithm, leaky bucket algorithm, and fixed window algorithm. These algorithms determine how tokens are generated, consumed, and replenished to enforce rate limits.
Token Bucket Algorithm:
The token bucket algorithm is a popular rate limiting algorithm that uses a token-based approach. In this algorithm, a token bucket is used to represent the available capacity for requests. Tokens are added to the bucket at a predetermined rate, and each incoming request consumes one or more tokens from the bucket. If the bucket is empty, the request is either delayed or rejected.
Here’s an example implementation of the token bucket algorithm in Python:
import timeclass TokenBucket:
def __init__(self, capacity, fill_rate):
self.capacity = capacity
self.tokens = capacity
self.fill_rate = fill_rate
self.last_refill_time = time.time() def refill(self):
now = time.time()
elapsed_time = now - self.last_refill_time
new_tokens = elapsed_time * self.fill_rate
self.tokens = min(self.capacity, self.tokens + new_tokens)
self.last_refill_time = now def consume(self, tokens):
if tokens <= self.tokens:
self.tokens -= tokens
return True
else:
return False# Usage example
bucket = TokenBucket(capacity=10, fill_rate=2)# Check if there are enough tokens to process a request
if bucket.consume(3):
# Process the request
print("Request processed successfully.")
else:
# Reject the request or delay it
print("Request rate limit exceeded.")Leaky Bucket Algorithm:
The leaky bucket algorithm is another rate limiting algorithm that operates based on the concept of a leaky bucket. In this algorithm, requests are treated as water droplets, and the bucket has a fixed leak rate. Each incoming request is added to the bucket, and if the bucket overflows, the excess requests are either delayed or discarded.
Here’s an example implementation of the leaky bucket algorithm in Python:
import timeclass LeakyBucket:
def __init__(self, capacity, leak_rate):
self.capacity = capacity
self.water_level = 0
self.leak_rate = leak_rate
self.last_leak_time = time.time() def leak(self):
now = time.time()
elapsed_time = now - self.last_leak_time
leaked_water = elapsed_time * self.leak_rate
self.water_level = max(0, self.water_level - leaked_water)
self.last_leak_time = now def add_request(self):
if self.water_level < self.capacity:
self.water_level += 1
return True
else:
return False# Usage example
bucket = LeakyBucket(capacity=10, leak_rate=0.5)# Check if the bucket can accommodate a new request
if bucket.add_request():
# Process the request
print("Request processed successfully.")
else:
# Reject the request or delay it
print("Request rate limit exceeded.")Fixed Window Algorithm:
The fixed window algorithm is a simple rate limiting algorithm that divides time into fixed windows and allows a maximum number of requests within each window. Requests that exceed the limit for a particular window are rejected or delayed.
import time
class FixedWindowRateLimiter:
def __init__(self, max_requests, window_size):
self.max_requests = max_requests
self.window_size = window_size
self.request_log = []
def allow_request(self):
current_time = time.time()
# Remove expired requests from the log
self.request_log = [req_time for req_time in self.request_log if req_time > current_time - self.window_size]
# Check if the number of requests exceeds the limit
if len(self.request_log) < self.max_requests:
self.request_log.append(current_time)
return True
else:
return False
# Usage example
limiter = FixedWindowRateLimiter(max_requests=5, window_size=60)
# Check if a request is allowed
if limiter.allow_request():
# Process the request
print("Request processed successfully.")
else:
# Reject the request or delay it
print("Request rate limit exceeded.")Handling Token Generation, Consumption, and Replenishment:
When implementing a rate limiter, it’s important to handle token generation, consumption, and replenishment. Tokens represent the capacity or allowance for making requests within a given time period.
Here’s an example code for handling token generation, consumption, and replenishment in Python:
import timeclass TokenBucket:
def __init__(self, capacity, fill_rate):
self.capacity = capacity
self.tokens = capacity
self.fill_rate = fill_rate
self.last_refill_time = time.time() def refill(self):
now = time.time()
elapsed_time = now - self.last_refill_time
new_tokens = elapsed_time * self.fill_rate
self.tokens = min(self.capacity, self.tokens + new_tokens)
self.last_refill_time = now def consume(self, tokens):
if tokens <= self.tokens:
self.tokens -= tokens
return True
else:
return False# Usage example
bucket = TokenBucket(capacity=10, fill_rate=2)# Check if there are enough tokens to process a request
if bucket.consume(3):
# Process the request
print("Request processed successfully.")
else:
# Reject the request or delay it
print("Request rate limit exceeded.")Request Tracking and Identification:
In order to enforce rate limits on different clients or user accounts, it is necessary to identify and track requests from each of them. This can be achieved by implementing mechanisms for request identification, such as using API keys, OAuth tokens, IP addresses, or any other unique identifiers associated with the clients.
Here’s an example code for identifying and tracking requests from different clients:
from flask import Flask, request
from collections import defaultdictapp = Flask(__name__)# Track requests using client IP addresses
request_counts = defaultdict(int)@app.route("/")
def index():
client_ip = request.remote_addr
request_counts[client_ip] += 1 # Process the request
return "Request processed successfully."if __name__ == "__main__":
app.run()Rate Limiting Strategies:
Designing strategies for different types of clients (e.g., free tier users, premium users, third-party integrations). Implementing rate limits based on client tiers, user roles, or API endpoints. Providing configurable rate limit policies and settings.
from flask import Flask, request
from functools import wrapsapp = Flask(__name__)# Rate limit decorator
def rate_limit(limit):
def decorator(func):
@wraps(func)
def wrapper(*args, **kwargs):
client_id = get_client_id() # Implement logic to get client ID # Implement rate limit policy based on client ID or any other criteria
if is_rate_limited(client_id, limit):
return "Rate limit exceeded", 429 return func(*args, **kwargs) return wrapper
return decorator# Example API endpoint with rate limit
@app.route("/")
@rate_limit(limit=100) # Limit to 100 requests per minute
def index():
# Process the request
return "Request processed successfully."if __name__ == "__main__":
app.run()Rate Limit Exceeding Handling:
Defining behaviors when a client exceeds the rate limit (e.g., blocking requests, returning error responses). Implementing mechanisms for handling rate limit exceeded scenarios. Providing informative error messages or response headers.
from flask import Flask, request
from functools import wrapsapp = Flask(__name__)# Rate limit decorator
def rate_limit(limit):
def decorator(func):
@wraps(func)
def wrapper(*args, **kwargs):
client_id = get_client_id() # Implement logic to get client ID # Implement rate limit policy based on client ID or any other criteria
if is_rate_limited(client_id, limit):
return handle_rate_limit_exceeded() return func(*args, **kwargs) return wrapper
return decorator# Handle rate limit exceeded
def handle_rate_limit_exceeded():
response = {
"error": "Rate limit exceeded",
"message": "You have reached the maximum number of requests allowed. Please try again later."
}
return response, 429# Example API endpoint with rate limit
@app.route("/")
@rate_limit(limit=100) # Limit to 100 requests per minute
def index():
# Process the request
return "Request processed successfully."if __name__ == "__main__":
app.run()Distributed Rate Limiting:
Designing systems for rate limiting across multiple servers or data centers. Implementing distributed caching mechanisms (e.g., Redis, Memcached) for storing rate limit data. Handling synchronization and consistency across distributed systems.
import redis
from flask import Flask, request
from functools import wrapsapp = Flask(__name__)
redis_client = redis.Redis(host='localhost', port=6379)# Rate limit decorator
def rate_limit(limit):
def decorator(func):
@wraps(func)
def wrapper(*args, **kwargs):
client_id = get_client_id() # Implement logic to get client ID # Implement rate limit policy based on client ID or any other criteria
if is_rate_limited(client_id, limit):
return handle_rate_limit_exceeded() return func(*args, **kwargs) return wrapper
return decorator# Check if the client has exceeded the rate limit
def is_rate_limited(client_id, limit):
key = f"rate_limit:{client_id}"
current_count = redis_client.get(key)
if current_count is None:
redis_client.set(key, 1, ex=limit)
return False
else:
current_count = int(current_count)
if current_count >= limit:
return True
else:
redis_client.incr(key)
return False# Handle rate limit exceeded
def handle_rate_limit_exceeded():
response = {
"error": "Rate limit exceeded",
"message": "You have reached the maximum number of requests allowed. Please try again later."
}
return response, 429# Example API endpoint with rate limit
@app.route("/")
@rate_limit(limit=100) # Limit to 100 requests per minute
def index():
# Process the request
return "Request processed successfully."if __name__ == "__main__":
app.run()Dynamic Rate Limiting:
Implementing mechanisms to dynamically adjust rate limits based on system load or client behavior. Designing algorithms to gradually increase or decrease rate limits. Handling burst rate limits and adaptive rate limits.
from flask import Flask, request
from functools import wrapsapp = Flask(__name__)# Rate limit decorator with dynamic rate adjustment
def rate_limit(limit_func):
def decorator(func):
@wraps(func)
def wrapper(*args, **kwargs):
client_id = get_client_id() # Implement logic to get client ID
limit = limit_func(client_id) # Dynamic rate limit based on client ID or other criteria # Implement rate limit policy based on the dynamic limit
if is_rate_limited(client_id, limit):
return handle_rate_limit_exceeded() return func(*args, **kwargs) return wrapper
return decorator# Example dynamic rate limit function
def get_rate_limit(client_id):
# Implement dynamic rate limit adjustment based on system load or client behavior
# Example: Gradually increase or decrease rate limits based on performance or user activity
return 100 # Return the calculated rate limit# Example burst rate limit function
def get_burst_rate_limit(client_id):
# Implement burst rate limit adjustment based on system load or client behavior
# Example: Set higher rate limits for short periods to handle spikes in traffic
return 200 # Return the calculated burst rate limit# Example adaptive rate limit function
def get_adaptive_rate_limit(client_id):
# Implement adaptive rate limit adjustment based on system load or client behavior
# Example: Adjust rate limits dynamically based on real-time conditions
return 50 # Return the calculated adaptive rate limit# Example API endpoint with dynamic rate limit
@app.route("/")
@rate_limit(limit_func=get_rate_limit) # Dynamically adjust rate limit based on client ID
def index():
# Process the request
return "Request processed successfully."if __name__ == "__main__":
app.run()Rate Limiting Metrics and Monitoring:
Collecting and analyzing rate limiting metrics for system monitoring and troubleshooting. Implementing logging and monitoring systems for rate limit events. Alerting mechanisms for rate limit violations or anomalies.
import time
import logging
from flask import Flask, request
from functools import wrapsapp = Flask(__name__)
logging.basicConfig(level=logging.INFO)# Rate limit decorator with metrics and monitoring
def rate_limit(limit, window):
def decorator(func):
@wraps(func)
def wrapper(*args, **kwargs):
client_id = get_client_id() # Implement logic to get client ID # Update metrics
update_metrics(client_id) # Implement rate limit policy based on metrics
if is_rate_limited(client_id, limit, window):
return handle_rate_limit_exceeded() return func(*args, **kwargs) return wrapper
return decorator# Update metrics for rate limiting
def update_metrics(client_id):
timestamp = int(time.time())
# Implement metrics collection (e.g., store timestamp and request count in a database or log file)
logging.info(f"Rate limited request from client {client_id} at {timestamp}")# Check if the client has exceeded the rate limit
def is_rate_limited(client_id, limit, window):
# Implement rate limit policy based on metrics (e.g., check request count within a specified window)
# Retrieve metrics from a database or log file
# Example: If the request count exceeds the limit within the specified window, return True
return False# Handle rate limit exceeded
def handle_rate_limit_exceeded():
response = {
"error": "Rate limit exceeded",
"message": "You have reached the maximum number of requests allowed. Please try again later."
}
return response, 429# Example API endpoint with rate limit and metrics
@app.route("/")
@rate_limit(limit=100, window=60) # Limit to 100 requests per minute
def index():
# Process the request
return "Request processed successfully."if __name__ == "__main__":
app.run()Whitelisting and Blacklisting:
Providing mechanisms to whitelist or blacklist specific clients or IP addresses. Implementing IP reputation databases or threat intelligence systems for blacklisting abusive or malicious clients. Handling exceptions or special allowances for whitelisted clients.
from flask import Flask, request
from functools import wrapsapp = Flask(__name__)# Whitelist decorator
def whitelist(allowed_clients):
def decorator(func):
@wraps(func)
def wrapper(*args, **kwargs):
client_id = get_client_id() # Implement logic to get client ID # Check if the client is in the allowed clients whitelist
if client_id not in allowed_clients:
return handle_unauthorized() return func(*args, **kwargs) return wrapper
return decorator# Blacklist decorator
def blacklist(blocked_clients):
def decorator(func):
@wraps(func)
def wrapper(*args, **kwargs):
client_id = get_client_id() # Implement logic to get client ID # Check if the client is in the blocked clients blacklist
if client_id in blocked_clients:
return handle_blocked() return func(*args, **kwargs) return wrapper
return decorator# Example whitelist and blacklist
allowed_clients = ["client1", "client2", "client3"]
blocked_clients = ["client4", "client5"]# Example API endpoint with whitelist and blacklist
@app.route("/")
@whitelist(allowed_clients)
@blacklist(blocked_clients)
def index():
# Process the request
return "Request processed successfully."# Handle unauthorized access
def handle_unauthorized():
response = {
"error": "Unauthorized",
"message": "You are not authorized to access this resource."
}
return response, 401# Handle blocked client
def handle_blocked():
response = {
"error": "Blocked",
"message": "Your client is blocked from accessing this resource."
}
return response, 403if __name__ == "__main__":
app.run()Designing test scenarios and load testing the rate limiting system:
import requests# Example test scenario for testing rate limits for different client tiers
def test_rate_limits():
clients = ["client1", "client2", "client3"]
for client in clients:
for i in range(10):
response = requests.get(f"https://api.example.com/endpoint", headers={"X-Client-ID": client})
print(f"Client: {client}, Request {i+1}, Response: {response.status_code}")# Example load testing using Locust
from locust import HttpUser, task, betweenclass MyUser(HttpUser):
wait_time = between(1, 5) @task
def make_request(self):
self.client.get("/endpoint")Optimizing the performance of the rate limiting mechanisms:
# Example of caching rate limit data
import functools
import timedef rate_limit_cache(func):
cache = {} @functools.wraps(func)
def wrapper(*args):
client_id = args[0]
if client_id in cache and time.time() < cache[client_id]['expiry']:
return cache[client_id]['limit'] result = func(*args)
cache[client_id] = {
'limit': result,
'expiry': time.time() + 60 # Assuming rate limit expiry after 60 seconds
}
return result return wrapper@rate_limit_cache
def get_rate_limit(client_id):
# Simulate fetching rate limit from the database or configuration
return 100# Usage
rate_limit = get_rate_limit("client1")
print(rate_limit)Horizontal scaling strategies for handling increased request volume:
# Example using Flask and gunicorn for horizontal scaling
from flask import Flask
app = Flask(__name__)@app.route('/endpoint')
def handle_request():
# Handle the request
return "Response"# Use gunicorn to run multiple worker processes
# gunicorn -w 4 myapp:appSystem Design — MS Docs
We will be discussing in depth -
- What is MS Docs
- Important Features
- Data Model — ER requirements
- High Level Design
- Basic Low Level Design
- API Design
- Complete Detailed Design
- Complete Code Implementation

What is MS Docs?
MS Docs, short for Microsoft Docs, is a comprehensive documentation platform provided by Microsoft. It serves as a central repository for technical documentation, tutorials, and guides related to Microsoft products and technologies. MS Docs offers a wide range of resources, including code samples, reference documentation, API references, and more, to assist developers, IT professionals, and users in effectively utilizing Microsoft’s offerings.
Important Features
- Searchability: MS Docs provides a powerful search engine, enabling users to quickly find relevant documentation by searching for keywords or phrases.
- Structured Content: The platform ensures that documentation is well-organized, structured, and easily navigable, allowing users to browse through topics, categories, and versions.
- Versioning: MS Docs supports version control, allowing multiple versions of documentation to coexist, thereby ensuring that users can access information relevant to specific product releases or versions.
- Collaboration: It offers collaboration features, enabling multiple contributors to work on documentation simultaneously, track changes, and review each other’s work.
- Feedback and Comments: Users can provide feedback, suggest edits, and leave comments on specific sections of the documentation, facilitating community engagement and improvement.
- Localization: MS Docs provides support for localization, allowing content to be translated into multiple languages, making it accessible to a global audience.
- Code Integration: It allows seamless integration of code snippets, examples, and interactive code editors within the documentation, facilitating practical demonstrations and experimentation.
Scaling Requirements — Capacity Estimation
For the sake of simplicity, let’s consider a small-scale simulation for MS Docs:
Total number of users: 10 million Daily active users (DAU): 2 million
Number of documents viewed by a user per day: 5
Total number of documents viewed per day: 10 million documents/day
Assuming the system is read-heavy, let’s consider a read-to-write ratio of 100:1.
Total number of documents uploaded per day: 1/100 * 10 million = 100,000 documents/day
Storage Estimation:
Let’s assume the average size of each document is 5 MB.
Total storage per day: 100,000 * 5 MB = 500,000 MB/day = 500 GB/day
For the next 3 years, the estimated storage would be: 500 GB * 365 * 3 = 547.5 TB
Requests per second: 10 million / (3600 seconds * 24 hours) ≈ 115 requests/second
Data Model — ER requirements
Users:
- UserID (Primary Key)
- Username (String)
- Email (String)
- Password (String)
Documents:
- DocumentID (Primary Key)
- Title (String)
- Content (Text)
- CreatedBy (Foreign Key to Users.UserID)
Likes:
- LikeID (Primary Key)
- UserID (Foreign Key to Users.UserID)
- DocumentID (Foreign Key to Documents.DocumentID)
- Timestamp (DateTime)
Comments:
- CommentID (Primary Key)
- UserID (Foreign Key to Users.UserID)
- DocumentID (Foreign Key to Documents.DocumentID)
- Text (Text)
- Timestamp (DateTime)
High Level Design
Assumptions:
- There will be more reads than writes, so the system needs to be read-heavy.
- Horizontal scalability (scale-out) will be used for handling increased user traffic.
- Services should be highly available and reliable.
- Latency should be kept low for document retrieval.
- Consistency vs. Availability vs. Reliability: Availability and Reliability are more important than strict consistency in this case.
Main Components and Services
Mobile Client:
Users access and interact with MS Docs through a mobile application or web interface.
Application Servers:
- Responsible for handling read and write operations, as well as serving notifications to users.
- Implement business logic and handle user authentication and authorization.
Load Balancer:
- Routes and directs user requests to the appropriate application server for the designated service.
Cache (e.g., Redis):
- Used to store frequently accessed data to improve read performance.
- Cache the most recent and popular documents, as well as user-specific data like document history.
CDN (Content Delivery Network):
- Helps improve latency and throughput by caching and serving static content like document assets (images, CSS, JavaScript) from edge servers located closer to the users.
Relational Database:
- Stores the main data entities (Users, Documents, Likes, Comments) with appropriate indexes for efficient querying and retrieval.
- Provides data consistency and durability.
Storage (e.g., Amazon S3):
- Used to store and serve document assets like images, videos, or other files associated with the documents.
Services:
User Service:
- Handles user registration, login, and authentication.
- Manages user profiles and preferences.
Document Service:
- Handles document creation, editing, and retrieval.
- Manages document versions and permissions.
- Provides search functionality for users to find relevant documents.
Like Service:
- Enables users to like documents.
- Stores information about user likes and timestamps.
Comment Service:
- Allows users to add comments to documents.
- Handles comment threading and replies.
- Stores comment-related data and timestamps.
Notification Service:
- Sends notifications to users for document updates, likes, and comments.
- Tracks user subscriptions and preferences.
Search Service:
- Implements a powerful search engine to enable users to find relevant documents based on keywords, tags, and content.
- Utilizes indexing and search algorithms for efficient search operations.
Basic Low Level Design
User Management API:
POST /users: Create a new user.GET /users/{userId}: Get user details by userId.PATCH /users/{userId}: Update user details.DELETE /users/{userId}: Delete a user.
Document Management API:
POST /documents: Create a new document.GET /documents/{documentId}: Get document details by documentId.PATCH /documents/{documentId}: Update document details.DELETE /documents/{documentId}: Delete a document.POST /documents/{documentId}/collaborators: Add a collaborator to a document.DELETE /documents/{documentId}/collaborators/{userId}: Remove a collaborator from a document.
import java.util.*;
class Document {
private String documentId;
private String title;
private String content;
private User owner;
private List<User> collaborators;
// other document attributes
public Document(String documentId, String title, String content, User owner) {
this.documentId = documentId;
this.title = title;
this.content = content;
this.owner = owner;
this.collaborators = new ArrayList<>();
// initialize other attributes
}
// Getters and setters for attributes
// ...
}
class User {
private String userId;
private String username;
private String password;
// other user attributes
public User(String userId, String username, String password) {
this.userId = userId;
this.username = username;
this.password = password;
// initialize other attributes
}
// Getters and setters for attributes
// ...
}
class MSDocs {
private Map<String, User> users;
private Map<String, Document> documents;
public MSDocs() {
this.users = new HashMap<>();
this.documents = new HashMap<>();
}
public void addUser(User user) {
users.put(user.getUserId(), user);
}
public User getUserById(String userId) {
return users.get(userId);
}
public void createDocument(String documentId, String title, String content, String ownerId) {
User owner = getUserById(ownerId);
if (owner == null) {
System.out.println("Owner not found");
return;
}
Document document = new Document(documentId, title, content, owner);
documents.put(documentId, document);
}
public void addCollaborator(String documentId, String userId) {
Document document = documents.get(documentId);
User collaborator = getUserById(userId);
if (document == null || collaborator == null) {
System.out.println("Document or collaborator not found");
return;
}
document.getCollaborators().add(collaborator);
}
// Additional methods for editing document content, sharing documents, etc.
// ...
}
public class Main {
public static void main(String[] args) {
MSDocs msDocs = new MSDocs();
User user1 = new User("1", "Alice", "password");
User user2 = new User("2", "Bob", "password");
msDocs.addUser(user1);
msDocs.addUser(user2);
msDocs.createDocument("1", "Document 1", "Content 1", "1");
msDocs.addCollaborator("1", "2");
}
}API Design
- Authentication Endpoints: Endpoints for user registration, login, logout, and token generation for secure authentication and authorization.
- Documentation Endpoints: Endpoints for retrieving documentation content, creating new documentation, editing existing documentation, and managing versioning.
- Category and Tag Endpoints: Endpoints for managing categories and tags associated with documentation, facilitating organization and filtering of content.
- Search Endpoints: Endpoints for executing search queries and retrieving search results based on user input.
- Comment Endpoints: Endpoints for managing user-generated comments and feedback associated with documentation.
- Error Handling: Defining error response structures and error codes for proper error handling and graceful degradation
In the high-level API design, we’ll define the major endpoints and their functionalities for interacting with the MS Docs system. Here are some example endpoints:
Authentication Endpoints:
- POST /api/auth/register: Register a new user.
- POST /api/auth/login: Authenticate and log in a user.
- POST /api/auth/logout: Log out a user.
Documentation Endpoints:
- GET /api/docs: Get a list of available documentation.
- GET /api/docs/{doc_id}: Get details of a specific documentation.
- POST /api/docs: Create a new documentation.
- PUT /api/docs/{doc_id}: Update an existing documentation.
- DELETE /api/docs/{doc_id}: Delete a documentation.
Category Endpoints:
- GET /api/categories: Get a list of available categories.
- GET /api/categories/{category_id}: Get details of a specific category.
- POST /api/categories: Create a new category.
- PUT /api/categories/{category_id}: Update an existing category.
- DELETE /api/categories/{category_id}: Delete a category.
Tag Endpoints:
- GET /api/tags: Get a list of available tags.
- GET /api/tags/{tag_id}: Get details of a specific tag.
- POST /api/tags: Create a new tag.
- PUT /api/tags/{tag_id}: Update an existing tag.
- DELETE /api/tags/{tag_id}: Delete a tag.
Search Endpoint:
- GET /api/search: Perform a search based on user query.
For the low-level API design, we’ll focus on the implementation details of the endpoints mentioned in the high-level design.
from flask import Flask, request, jsonify
app = Flask(__name__)
# Authentication Endpoints
@app.route('/api/auth/register', methods=['POST'])
def register_user():
# Implementation details for registering a new user
# Extract data from request and perform necessary operations
return jsonify({'message': 'User registered successfully'})
@app.route('/api/auth/login', methods=['POST'])
def login_user():
# Implementation details for user login
# Extract data from request and perform necessary operations
return jsonify({'message': 'User logged in successfully'})
@app.route('/api/auth/logout', methods=['POST'])
def logout_user():
# Implementation details for user logout
# Perform necessary operations such as invalidating tokens, etc.
return jsonify({'message': 'User logged out successfully'})
# Documentation Endpoints
@app.route('/api/docs', methods=['GET'])
def get_all_docs():
# Implementation details for retrieving all documentation
# Perform necessary operations to fetch and return documentation data
return jsonify({'docs': [...]}) # Placeholder for list of documentation
@app.route('/api/docs/<doc_id>', methods=['GET'])
def get_doc_details(doc_id):
# Implementation details for retrieving details of a specific documentation
# Perform necessary operations to fetch and return documentation details
return jsonify({'doc': {...}}) # Placeholder for documentation detailsComplete Detailed Design
Coming soon! It will be covered on youtube channel.
Subscribe to youtube channel :
Complete Code implementation
Searchability: MS Docs provides a powerful search engine, enabling users to quickly find relevant documentation by searching for keywords or phrases.
Structured Content: The platform ensures that documentation is well-organized, structured, and easily navigable, allowing users to browse through topics, categories, and versions.
Versioning: MS Docs supports version control, allowing multiple versions of documentation to coexist, thereby ensuring that users can access information relevant to specific product releases or versions.
Collaboration: It offers collaboration features, enabling multiple contributors to work on documentation simultaneously, track changes, and review each other’s work.
Feedback and Comments: Users can provide feedback, suggest edits, and leave comments on specific sections of the documentation, facilitating community engagement and improvement.
Localization: MS Docs provides support for localization, allowing content to be translated into multiple languages, making it accessible to a global audience.
Code Integration: It allows seamless integration of code snippets, examples, and interactive code editors within the documentation, facilitating practical demonstrations and experimentation.
from flask import Flask, request, jsonify
app = Flask(__name__)
# Placeholder data for documentation
documentation = [
{
'id': 1,
'title': 'Getting Started with MS Docs',
'content': 'This is the content for getting started guide...',
'category': 'Getting Started',
'version': '1.0'
},
{
'id': 2,
'title': 'Advanced Features of MS Docs',
'content': 'This is the content for advanced features guide...',
'category': 'Advanced',
'version': '2.0'
}
]
# Searchability: Search documentation by keywords or phrases
@app.route('/api/search', methods=['GET'])
def search_documentation():
query = request.args.get('query') # Get search query from request parameters
# Perform search operation on documentation based on query
results = []
for doc in documentation:
if query.lower() in doc['title'].lower() or query.lower() in doc['content'].lower():
results.append(doc)
return jsonify({'results': results})
# Structured Content: Get documentation by category
@app.route('/api/docs', methods=['GET'])
def get_documentation_by_category():
category = request.args.get('category') # Get category from request parameters
# Filter documentation based on category
filtered_docs = [doc for doc in documentation if doc['category'] == category]
return jsonify({'docs': filtered_docs})
# Versioning: Get documentation by version
@app.route('/api/docs/<version>', methods=['GET'])
def get_documentation_by_version(version):
# Filter documentation based on version
filtered_docs = [doc for doc in documentation if doc['version'] == version]
return jsonify({'docs': filtered_docs})
# Collaboration: Update documentation by ID
@app.route('/api/docs/<doc_id>', methods=['PUT'])
def update_documentation(doc_id):
# Get updated content from request body
updated_content = request.json.get('content')
# Find the documentation by ID and update the content
for doc in documentation:
if doc['id'] == int(doc_id):
doc['content'] = updated_content
break
return jsonify({'message': 'Documentation updated successfully'})
# Feedback and Comments: Add comments to documentation
@app.route('/api/docs/<doc_id>/comments', methods=['POST'])
def add_comment(doc_id):
# Get comment data from request body
comment = request.json.get('comment')
# Find the documentation by ID and add the comment
for doc in documentation:
if doc['id'] == int(doc_id):
if 'comments' not in doc:
doc['comments'] = []
doc['comments'].append(comment)
break
return jsonify({'message': 'Comment added successfully'})
# Localization: Get documentation in a specific language
@app.route('/api/docs/<language>', methods=['GET'])
def get_localized_documentation(language):
# Filter documentation based on language
filtered_docs = [doc for doc in documentation if doc.get('language') == language]
return jsonify({'docs': filtered_docs})
# Code Integration: Get code snippets for documentation
@app.route('/api/docs/<doc_id>/code', methods=['GET'])
def get_code_snippets(doc_id):
# Find the documentation by ID and get code snippets
for doc in documentation:
if doc['id'] == int(doc_id):
code_snippets = doc.get('code_snippets', [])
return jsonify({'code_snippets': code_snippets})
return jsonify({'message': 'Documentation not found'})
if __name__ == '__main__':
app.run()System Design — ATM Machine System
We will be discussing in depth -
- What is ATM Machine System
- Important Features
- Data Model — ER requirements
- High Level Design
- Basic Low Level Design
- API Design
- Complete Detailed Design
- Complete Code Implementation
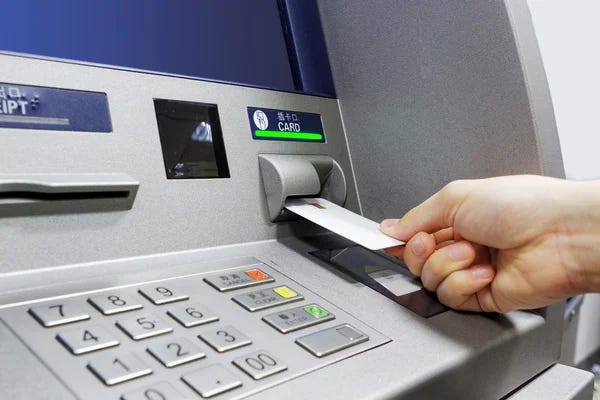
What is ATM Machine System
An ATM (Automated Teller Machine) system is a widely used electronic banking service that allows users to perform financial transactions without the need for human interaction. It enables customers to withdraw cash, check account balances, transfer funds, and carry out various banking operations conveniently and securely
Important Features
- User Authentication: Ensure secure and reliable authentication methods, such as PIN-based, biometric, or card-based authentication, to verify the identity of the users.
- Cash Withdrawal: Allow users to withdraw cash from their accounts while ensuring proper account balance verification and transaction security.
- Balance Inquiry: Enable customers to check their account balances quickly and accurately.
- Fund Transfer: Provide the functionality for users to transfer funds between accounts, both within the same bank and across different banks.
- Deposit Functionality: Include options for users to deposit cash or checks into their accounts.
- Transaction History: Maintain a record of user transactions for later reference and verification.
- Account Management: Allow users to update their account information, change PINs, and manage account preferences.
Scaling Requirements — Capacity Estimation
For the sake of simplicity, let’s consider a small-scale simulation of an ATM Machine System with the following parameters:
- Total number of users: 1 Million
- Daily active users (DAU): 200,000
- Average number of transactions per user per day: 5
Since the system is read-heavy, let’s assume the read-to-write ratio to be 100:1.
Transactions per day:
Total number of transactions per day = DAU * Average transactions per user per day
Total number of transactions per day = 200,000 * 5 = 1 Million transactions/day
Storage Estimation:
Let’s assume on average each transaction record requires 1 KB of storage.
Total storage per day = Total number of transactions per day * Average storage per transaction
Total storage per day = 1 Million * 1 KB = 1 GB/day
For the next 3 years, the estimated storage would be:
Total storage for 3 years = Total storage per day * 365 days * 3 years
Total storage for 3 years = 1 GB/day * 365 days * 3 years = 1,095 GB = 1.095 TB
Requests per Second:
Let’s estimate the requests per second based on the assumption that the ATM usage is evenly distributed throughout the day.
Requests per second = Total number of transactions per day / (24 hours * 3600 seconds)
Requests per second = 1 Million / (24 * 3600) = 11.57 requests/second
# ATM Machine System Simulation - Small Scale
# Constants
TOTAL_USERS = 1000000
DAU = 200000
AVERAGE_TRANSACTIONS_PER_USER_PER_DAY = 5
READ_TO_WRITE_RATIO = 100
AVERAGE_STORAGE_PER_TRANSACTION_KB = 1
DAYS_IN_YEAR = 365
SIMULATION_YEARS = 3
# Function to estimate total storage for the given time period
def estimate_total_storage(days, storage_per_day):
return days * storage_per_day
# Function to estimate requests per second
def estimate_requests_per_second(total_transactions_per_day):
return total_transactions_per_day / (24 * 3600)
# Calculate total number of transactions per day
total_transactions_per_day = DAU * AVERAGE_TRANSACTIONS_PER_USER_PER_DAY
# Calculate total storage per day in KB
total_storage_per_day_kb = total_transactions_per_day * AVERAGE_STORAGE_PER_TRANSACTION_KB
# Calculate total storage for the given time period
total_storage_for_years = estimate_total_storage(SIMULATION_YEARS * DAYS_IN_YEAR, total_storage_per_day_kb)
# Convert total storage to TB
total_storage_tb = total_storage_for_years / (1024 * 1024)
# Calculate requests per second
requests_per_second = estimate_requests_per_second(total_transactions_per_day)
# Print the results
print("ATM Machine System Simulation - Small Scale")
print("------------------------------------------")
print(f"Total number of users: {TOTAL_USERS}")
print(f"Daily active users (DAU): {DAU}")
print(f"Average transactions per user per day: {AVERAGE_TRANSACTIONS_PER_USER_PER_DAY}")
print(f"Total number of transactions per day: {total_transactions_per_day}")
print(f"Read-to-write ratio: {READ_TO_WRITE_RATIO}:1")
print(f"Average storage per transaction: {AVERAGE_STORAGE_PER_TRANSACTION_KB} KB")
print(f"Storage estimation for {SIMULATION_YEARS} years: {total_storage_tb:.3f} TB")
print(f"Requests per second: {requests_per_second:.2f}")Data Model — ER requirements
- User: Stores user details like user ID, name, address, contact information, and authentication credentials.
- Account: Contains information about user accounts, including account number, type, balance, and transaction history.
- Transaction: Represents individual transactions and includes details such as transaction ID, timestamp, type (withdrawal, deposit, transfer), and amount.
- ATM Machines: Physical devices allowing users to interact with the system.
- ATM Server: Manages communication with ATM machines, handles user requests, and interfaces with the core banking system.
- Core Banking System: Contains user account information and processes transactions.
- Authentication Service: Responsible for user authentication and security measures.
- Transaction Processing Service: Handles transaction requests, updates account balances, and logs transaction history.
- Notification Service: Sends notifications to users for various events, like successful transactions or low balances.
High Level Design
- Load Balancing: Distribute user requests across multiple ATM servers to ensure efficient utilization of resources.
- Caching: Implement caching mechanisms for frequently accessed data to reduce database load.
- Horizontal Scaling: Add more ATM machines and servers to the system to handle increased user traffic.
- Database Sharding: Partition the database to distribute data across multiple servers, ensuring better read/write performance.
- Asynchronous Processing: Employ asynchronous processing for non-real-time tasks, such as transaction logging and report generation, to avoid bottlenecks.
System
- The ATM Machine System will consist of a network of ATMs connected to a central server.
- Users will have unique User_IDs and PINs to access their accounts.
- Each ATM will have a unique ATM_ID and will be associated with a specific bank.
- Transactions will be recorded in the Transaction entity, capturing details like User_ID, ATM_ID, Amount, Transaction_Type, and Timestamp.
Main Components:
Mobile App:
- The Mobile App will be the client-side application used by users to interact with the ATM Machine System. It will facilitate user login, balance inquiry, cash withdrawal, fund transfer, and other functionalities.
ATM Machine:
- The ATM Machine will be the physical machine used by users to perform various transactions. It will be connected to the central server to verify user credentials and process transactions.
Central Server:
- The Central Server will handle the core logic of the ATM Machine System. It will be responsible for user authentication, transaction processing, account updates, and maintaining the database of users, ATMs, and transactions.
Database:
- The Database will store the data related to users, ATMs, and transactions. It will be a reliable and scalable database system capable of handling a large number of users and transactions.
Services:
User Authentication Service:
- This service will handle user login and authentication using the User_ID and PIN.
Account Service:
- This service will provide functionalities like balance inquiry, updating user account details, and managing account preferences.
Transaction Service:
- This service will handle transaction processing, including cash withdrawal, fund transfer, and transaction history.
ATM Service:
- This service will manage ATM-related functionalities, such as locating the nearest ATM based on user location and maintaining ATM status.
Security Service:
- This service will implement robust security measures, including encryption, session management, and fraud detection, to safeguard user data and prevent unauthorized access.
Reporting Service:
- This service will generate reports and analytics on ATM usage, transaction trends, and system performance.
Notification Service:
- This service will handle user notifications, such as transaction alerts, account updates, and promotional messages.
# Sample Data (for demonstration purposes, use a database in a real system)
users = {
1: {"User_ID": 1, "Name": "John Doe", "PIN": "1234", "Balance": 5000},
2: {"User_ID": 2, "Name": "Jane Smith", "PIN": "5678", "Balance": 10000}
}
atms = {
101: {"ATM_ID": 101, "Location": "Sample Location", "Bank_ID": "ABC Bank"},
102: {"ATM_ID": 102, "Location": "Another Location", "Bank_ID": "XYZ Bank"}
}
transactions = []
# User Authentication Service
def authenticate_user(user_id, pin):
user = users.get(user_id)
if user and user['PIN'] == pin:
return True
return False
# Account Service
def get_account_balance(user_id):
user = users.get(user_id)
if user:
return user['Balance']
return None
def update_user_account(user_id, name, pin, balance):
if user_id in users:
user = users[user_id]
user['Name'] = name
user['PIN'] = pin
user['Balance'] = balance
return True
return False
# Transaction Service
def perform_cash_withdrawal(user_id, atm_id, amount):
user = users.get(user_id)
atm = atms.get(atm_id)
if user and atm and amount > 0 and amount <= user['Balance']:
user['Balance'] -= amount
transactions.append({
"Transaction_ID": len(transactions) + 1,
"User_ID": user_id,
"ATM_ID": atm_id,
"Amount": amount,
"Transaction_Type": "Withdrawal"
})
return True
return False
def perform_fund_transfer(sender_id, receiver_id, amount):
sender = users.get(sender_id)
receiver = users.get(receiver_id)
if sender and receiver and amount > 0 and amount <= sender['Balance']:
sender['Balance'] -= amount
receiver['Balance'] += amount
transactions.append({
"Transaction_ID": len(transactions) + 1,
"User_ID": sender_id,
"Receiver_ID": receiver_id,
"Amount": amount,
"Transaction_Type": "Transfer"
})
return True
return False
def get_transaction_history(user_id):
return [t for t in transactions if t['User_ID'] == user_id]
# ATM Service
def find_nearest_atm(user_location):
# Implement logic to find the nearest ATM based on user location
pass
# Sample usage:
if __name__ == "__main__":
user_id = 1
pin = "1234"
if authenticate_user(user_id, pin):
print("Authentication successful!")
print("Account Balance:", get_account_balance(user_id))
new_balance = 4000
if update_user_account(user_id, "John Doe", "4321", new_balance):
print("Account updated successfully!")
atm_id = 101
withdrawal_amount = 2000
if perform_cash_withdrawal(user_id, atm_id, withdrawal_amount):
print("Cash withdrawal successful!")
print("Updated Account Balance:", get_account_balance(user_id))
receiver_id = 2
transfer_amount = 1000
if perform_fund_transfer(user_id, receiver_id, transfer_amount):
print(f"Transfer of {transfer_amount} to User ID {receiver_id} successful!")
print("Updated Account Balance:", get_account_balance(user_id))
print("Transaction History:")
print(get_transaction_history(user_id))
else:
print("Authentication failed! Invalid user ID or PIN.")Basic Low Level Design
# Import required modules
from flask import Flask, request, jsonify
# Create Flask app
app = Flask(__name__)
# Simulated user data (in a real system, you'd have a database for this)
users = [
{"user_id": 1, "name": "John Doe", "pin": "1234", "balance": 5000},
{"user_id": 2, "name": "Jane Smith", "pin": "5678", "balance": 10000}
]
# In-memory data to store transaction history (in a real system, use a database)
transaction_history = []
# Helper function to find a user by user_id
def get_user_by_id(user_id):
for user in users:
if user["user_id"] == user_id:
return user
return None
# Helper function to validate the access token (in a real system, use JWT or similar)
def validate_access_token(access_token):
# For simplicity, we are assuming any non-empty access token is valid.
return access_token is not None
# API endpoint for user login (authentication)
@app.route('/api/login', methods=['POST'])
def login():
data = request.json
user_id = data.get('user_id')
pin = data.get('pin')
user = get_user_by_id(user_id)
if user and user['pin'] == pin:
return jsonify({'access_token': 'random_access_token'})
else:
return jsonify({'error': 'Invalid user ID or PIN'}), 401
# API endpoint to get account balance
@app.route('/api/balance', methods=['GET'])
def get_balance():
access_token = request.headers.get('Authorization')
if not validate_access_token(access_token):
return jsonify({'error': 'Unauthorized'}), 401
user_id = request.args.get('user_id')
user = get_user_by_id(int(user_id))
if user:
return jsonify({'balance': user['balance']})
else:
return jsonify({'error': 'User not found'}), 404
# API endpoint for cash withdrawal
@app.route('/api/withdraw', methods=['POST'])
def withdraw():
access_token = request.headers.get('Authorization')
if not validate_access_token(access_token):
return jsonify({'error': 'Unauthorized'}), 401
data = request.json
user_id = data.get('user_id')
amount = data.get('amount')
user = get_user_by_id(int(user_id))
if user:
if amount > 0 and amount <= user['balance']:
user['balance'] -= amount
transaction_history.append({'user_id': user_id, 'type': 'withdrawal', 'amount': amount})
return jsonify({'message': 'Withdrawal successful'})
else:
return jsonify({'error': 'Invalid amount or insufficient balance'}), 400
else:
return jsonify({'error': 'User not found'}), 404
# API endpoint for fund transfer
@app.route('/api/transfer', methods=['POST'])
def transfer():
access_token = request.headers.get('Authorization')
if not validate_access_token(access_token):
return jsonify({'error': 'Unauthorized'}), 401
data = request.json
user_id = data.get('user_id')
amount = data.get('amount')
target_user_id = data.get('target_user_id')
user = get_user_by_id(int(user_id))
target_user = get_user_by_id(int(target_user_id))
if user and target_user:
if amount > 0 and amount <= user['balance']:
user['balance'] -= amount
target_user['balance'] += amount
transaction_history.append({'user_id': user_id, 'type': 'transfer', 'amount': amount})
transaction_history.append({'user_id': target_user_id, 'type': 'transfer_received', 'amount': amount})
return jsonify({'message': 'Transfer successful'})
else:
return jsonify({'error': 'Invalid amount or insufficient balance'}), 400
else:
return jsonify({'error': 'User not found'}), 404
# API endpoint for cash or check deposit
@app.route('/api/deposit', methods=['POST'])
def deposit():
access_token = request.headers.get('Authorization')
if not validate_access_token(access_token):
return jsonify({'error': 'Unauthorized'}), 401
data = request.json
user_id = data.get('user_id')
amount = data.get('amount')
user = get_user_by_id(int(user_id))
if user and amount > 0:
user['balance'] += amount
transaction_history.append({'user_id': user_id, 'type': 'deposit', 'amount': amount})
return jsonify({'message': 'Deposit successful'})
else:
return jsonify({'error': 'Invalid amount or user not found'}), 400
# API endpoint to fetch transaction history
@app.route('/api/transaction-history', methods=['GET'])
def get_transaction_history():
access_token = request.headers.get('Authorization')
if not validate_access_token(access_token):
return jsonify({'error': 'Unauthorized'}), 401
user_id = request.args.get('user_id')
user_transactions = [t for t in transaction_history if t['user_id'] == int(user_id)]
return jsonify({'transactions': user_transactions})
# Run the Flask app
if __name__ == '__main__':
app.run(debug=True)API Design
POST /api/authenticate: Handles user authentication and generates access tokens.GET /api/balance: Retrieves the account balance for a given user.POST /api/withdraw: Processes cash withdrawal requests and updates the account balance.POST /api/transfer: Facilitates fund transfer between user accounts.POST /api/deposit: Processes cash or check deposits into user accounts.GET /api/transaction-history: Fetches the transaction history for a user.
Authentication:

POST /api/login: Authenticates the user by verifying their PIN or card details and returns an access token.

Account Actions:

GET /api/balance: Retrieves the account balance for the authenticated user.
POST /api/withdraw: Processes cash withdrawal requests and updates the account balance.
POST /api/transfer: Facilitates fund transfer between the authenticated user's accounts.
POST /api/deposit: Processes cash or check deposits into the authenticated user's account.

Transaction History:

GET /api/transaction-history: Fetches the transaction history for the authenticated user.
import random
class User:
def __init__(self, user_id, name, pin, balance):
self.user_id = user_id
self.name = name
self.pin = pin
self.balance = balance
class ATM:
def __init__(self, atm_id, location, bank_id):
self.atm_id = atm_id
self.location = location
self.bank_id = bank_id
class Transaction:
def __init__(self, transaction_id, user_id, atm_id, amount, transaction_type, timestamp):
self.transaction_id = transaction_id
self.user_id = user_id
self.atm_id = atm_id
self.amount = amount
self.transaction_type = transaction_type
self.timestamp = timestamp
users = {}
atms = {}
transactions = []
# Add some sample data for demonstration purposes
users["user1"] = User("user1", "John Doe", "1234", 5000)
users["user2"] = User("user2", "Jane Smith", "5678", 10000)
atms["atm1"] = ATM("atm1", "Sample Location", "ABC Bank")
atms["atm2"] = ATM("atm2", "Another Location", "XYZ Bank")
def generate_transaction_id():
return random.randint(10000000, 99999999)
def get_user_by_id(user_id):
return users.get(user_id)
def perform_cash_withdrawal(user_id, atm_id, amount):
user = get_user_by_id(user_id)
atm = atms.get(atm_id)
if user and atm and amount > 0 and amount <= user.balance:
user.balance -= amount
transaction_id = generate_transaction_id()
transaction = Transaction(transaction_id, user_id, atm_id, amount, "Withdrawal", "2023-07-22 12:00:00")
transactions.append(transaction)
return True, transaction_id
return False, None
def perform_fund_transfer(sender_id, receiver_id, amount):
sender = get_user_by_id(sender_id)
receiver = get_user_by_id(receiver_id)
if sender and receiver and amount > 0 and amount <= sender.balance:
sender.balance -= amount
receiver.balance += amount
transaction_id = generate_transaction_id()
transaction = Transaction(transaction_id, sender_id, "NA", amount, "Transfer", "2023-07-22 12:00:00")
transactions.append(transaction)
return True, transaction_id
return False, None
def get_transaction_history(user_id):
return [t for t in transactions if t.user_id == user_id]
# Sample usage:
if __name__ == "__main__":
user_id = "user1"
pin = "1234"
user = get_user_by_id(user_id)
if user and user.pin == pin:
print("Authentication successful!")
print("Account Balance:", user.balance)
withdrawal_amount = 2000
success, transaction_id = perform_cash_withdrawal(user_id, "atm1", withdrawal_amount)
if success:
print("Cash withdrawal successful! Transaction ID:", transaction_id)
print("Updated Account Balance:", user.balance)
receiver_id = "user2"
transfer_amount = 1000
success, transaction_id = perform_fund_transfer(user_id, receiver_id, transfer_amount)
if success:
print(f"Transfer of {transfer_amount} to User ID {receiver_id} successful! Transaction ID:", transaction_id)
print("Updated Account Balance:", user.balance)
print("Transaction History:")
for transaction in get_transaction_history(user_id):
print("Transaction ID:", transaction.transaction_id)
print("Amount:", transaction.amount)
print("Transaction Type:", transaction.transaction_type)
print("Timestamp:", transaction.timestamp)
print()
else:
print("Authentication failed! Invalid user ID or PIN.")Complete Detailed Design
Coming soon! It will be covered on youtube channel.
Subscribe to youtube channel :
Complete Code implementation
# Simulated user data (in a real system, you'd have a database for this)
users = [
    {"user_id": 1, "name": "John Doe", "pin": "1234", "balance": 5000},
    {"user_id": 2, "name": "Jane Smith", "pin": "5678", "balance": 10000}
]

# In-memory data to store transaction history (in a real system, use a database)
transaction_history = []

# Helper function to find a user by user_id
def get_user_by_id(user_id):
    for user in users:
        if user["user_id"] == user_id:
            return user
    return None

# User Authentication
def authenticate_user(user_id, pin):
    user = get_user_by_id(user_id)
    if user and user['pin'] == pin:
        return True
    return False

# Cash Withdrawal
def withdraw_cash(user_id, amount):
    user = get_user_by_id(user_id)
    if user and amount > 0 and amount <= user['balance']:
        user['balance'] -= amount
        transaction_history.append({'user_id': user_id, 'type': 'withdrawal', 'amount': amount})
        return True
    return False

# Balance Inquiry
def get_account_balance(user_id):
    user = get_user_by_id(user_id)
    if user:
        return user['balance']
    return None

# Fund Transfer
def transfer_funds(user_id, target_user_id, amount):
    user = get_user_by_id(user_id)
    target_user = get_user_by_id(target_user_id)

    if user and target_user and amount > 0 and amount <= user['balance']:
        user['balance'] -= amount
        target_user['balance'] += amount
        transaction_history.append({'user_id': user_id, 'type': 'transfer', 'amount': amount, 'target_user_id': target_user_id})
        transaction_history.append({'user_id': target_user_id, 'type': 'transfer_received', 'amount': amount, 'source_user_id': user_id})
        return True
    return False

# Deposit Functionality
def deposit_funds(user_id, amount):
    user = get_user_by_id(user_id)
    if user and amount > 0:
        user['balance'] += amount
        transaction_history.append({'user_id': user_id, 'type': 'deposit', 'amount': amount})
        return True
    return False

# Transaction History
def get_user_transaction_history(user_id):
    user_transactions = [t for t in transaction_history if t['user_id'] == user_id]
    return user_transactions

# Account Management - Update PIN (for demonstration purposes, not a complete account management feature)
def update_pin(user_id, new_pin):
    user = get_user_by_id(user_id)
    if user and len(new_pin) == 4:  # Assume new PIN is a 4-digit string for simplicity
        user['pin'] = new_pin
        return True
    return False

# Security Measures - For demonstration purposes, we are not implementing encryption and session management in this code snippet.
# In a real system, these measures should be carefully implemented for securing user data and preventing unauthorized access.

# Example usage:
if __name__ == '__main__':
    user_id = 1
    pin = "1234"

    if authenticate_user(user_id, pin):
        print("Authentication successful!")
        print("Account Balance:", get_account_balance(user_id))

        amount_to_withdraw = 2000
        if withdraw_cash(user_id, amount_to_withdraw):
            print(f"Withdrawal of ${amount_to_withdraw} successful!")
            print("Updated Account Balance:", get_account_balance(user_id))
        else:
            print("Withdrawal failed! Insufficient balance.")

        target_user_id = 2
        amount_to_transfer = 1500
        if transfer_funds(user_id, target_user_id, amount_to_transfer):
            print(f"Transfer of ${amount_to_transfer} to User ID {target_user_id} successful!")
            print("Updated Account Balance:", get_account_balance(user_id))
        else:
            print("Transfer failed! Insufficient balance or invalid user IDs.")

        amount_to_deposit = 500
        if deposit_funds(user_id, amount_to_deposit):
            print(f"Deposit of ${amount_to_deposit} successful!")
            print("Updated Account Balance:", get_account_balance(user_id))
        else:
            print("Deposit failed! Invalid amount.")

        print("Transaction History:")
        print(get_user_transaction_history(user_id))

        new_pin = "9876"
        if update_pin(user_id, new_pin):
            print("PIN updated successfully!")
        else:
            print("PIN update failed! New PIN must be a 4-digit string.")
    else:
        print("Authentication failed! Invalid user ID or PIN.")
System Design — Airport Baggage System
We will be discussing in depth -
- What is Airport Baggage System
- Important Features
- Data Model — ER requirements
- High Level Design
- Basic Low Level Design
- API Design
- Complete Detailed Design
- Complete Code Implementation

What is Airport Baggage System
An Airport Baggage System is a critical component of any modern airport, responsible for efficiently handling and transporting baggage between various checkpoints, including check-in counters, baggage sorting areas, loading onto aircraft, and arrival baggage claim areas.
Important Features
a. Baggage Tracking: Real-time tracking of baggage throughout its journey, enabling airport staff and passengers to know the exact location of their luggage.
b. Sorting Mechanism: Automatic sorting of baggage based on flight destinations to ensure the correct bags are loaded onto the corresponding flights.
c. Security Screening: Integration with baggage screening systems to ensure security checks are performed accurately and efficiently.
d. Fault Tolerance: Redundancy and failover mechanisms to minimize disruptions and downtime in case of system failures.
e. Scalability: The system should be designed to handle increasing baggage volumes as airports expand and passenger traffic grows.
f. Data Analytics: Collection and analysis of baggage-related data to identify patterns, optimize processes, and improve system performance.
Scaling Requirements — Capacity Estimation
Assumptions for the Airport Baggage System:
- Total number of passengers per day: 50,000
- Average number of bags per passenger: 2
- Total number of bags per day: 100,000
- Since the system is read-heavy, let’s assume the read-to-write ratio to be 50:1.
- Total number of bags checked-in per day: 98,000
- Total number of bags claimed per day: 2,000
Storage Estimation:
- Let’s assume an average size of each baggage record in the system is 10 KB.
- Total Storage per day: 100,000 * 10 KB = 1 GB/day
Requests per Second:
- Total number of bags processed per second: 100,000 / (24 hours * 3600 seconds) ≈ 1.16 bags/second
# Baggage class to hold baggage details

class Baggage:
    def __init__(self, baggage_id, passenger_name, destination, status):
        self.baggage_id = baggage_id
        self.passenger_name = passenger_name
        self.destination = destination
        self.status = status

# Low-Level API for Baggage Handling System

class BaggageHandlingSystem:
    def __init__(self):
        self.baggage_records = {}

    def check_in_baggage(self, baggage):
        # Simulate the check-in process and store the baggage record in the system
        self.baggage_records[baggage.baggage_id] = baggage
        print(f"Baggage {baggage.baggage_id} checked in for passenger {baggage.passenger_name} to {baggage.destination}.")

    def claim_baggage(self, baggage_id):
        # Simulate the baggage claim process and update the baggage status
        if baggage_id in self.baggage_records:
            self.baggage_records[baggage_id].status = "Claimed"
            print(f"Baggage {baggage_id} claimed successfully.")
        else:
            print(f"Baggage {baggage_id} not found.")

    def get_baggage_status(self, baggage_id):
        # Get the current status of the baggage
        if baggage_id in self.baggage_records:
            return self.baggage_records[baggage_id].status
        else:
            return "Baggage not found."

# Usage example:

# Initialize the Baggage Handling System
baggage_system = BaggageHandlingSystem()

# Simulate the check-in process for 100,000 bags
for i in range(1, 100001):
    baggage_id = f"B{i}"
    passenger_name = f"Passenger{i}"
    destination = "LHR"
    status = "Checked-in"
    baggage = Baggage(baggage_id, passenger_name, destination, status)
    baggage_system.check_in_baggage(baggage)

# Simulate the baggage claim process for 2,000 bags
for i in range(1, 2001):
    baggage_id = f"B{i}"
    baggage_system.claim_baggage(baggage_id)

# Get the current status of a baggage
baggage_id_to_check = "B12345"
status = baggage_system.get_baggage_status(baggage_id_to_check)
print(f"Status of Baggage {baggage_id_to_check}: {status}")
Data Model — ER requirements
a. Baggage: Represents individual baggage items with attributes like baggage ID, weight, passenger details, and destination.
b. Conveyor Belt: Represents the conveyor system responsible for transporting baggage between checkpoints.
c. Flight: Stores information about scheduled flights, including flight number, departure, and destination.
d. Check-in Counter: Represents the counters where passengers check in their baggage.
e. Security Checkpoint: Stores data related to the security screening of baggage.
f. Baggage Claim: Represents the area where passengers retrieve their baggage upon arrival.
Baggage:

BaggageID: String (Primary Key)
Weight: Float
PassengerName: String
Destination: String
Status: String

Flight:

FlightNumber: String (Primary Key)
Destination: String

User:

UserID: String (Primary Key)
Username: String
Email: String
Password: String
High Level Design
a. Baggage Input System: Manages the check-in process, assigns baggage to flights, and initiates baggage handling.
b. Baggage Sorting System: Automatically sorts baggage based on their destination using RFID or barcode technology.
c. Conveyor System: Responsible for transporting baggage between various checkpoints securely and efficiently.
d. Security Screening System: Performs baggage security checks, ensuring compliance with safety regulations.
e. Baggage Tracking System: Monitors and tracks baggage in real-time, providing updates to staff and passengers.
f. Baggage Claim System: Facilitates the smooth retrieval of baggage by passengers upon arrival.
Assumptions:
- The system is read-heavy, with more users checking the status of their baggage than baggage being checked-in or claimed.
- High reliability and availability are crucial for real-time baggage tracking.
- The system should scale horizontally to handle increased baggage volumes.
- Consistency and reliability are more important than strict consistency.
Main Components:
- Mobile Client: Represents users accessing the Airport Baggage System through a mobile application or web interface.
- Application Servers: Handle read and write operations, manage notifications, and process user requests.
- Load Balancer: Distributes incoming requests to application servers to balance the load.
- Cache (Memcache): Caches frequently accessed data to improve response times.
- CDN (Content Delivery Network): Improves latency and throughput for media content like images and videos.
- Database: Stores user data, baggage details, likes, comments, and other related information.
- Storage (Object Storage): Stores uploaded baggage images and media content.
Services for Airport Baggage System:
Baggage Tracking Service:
- Provides real-time tracking of baggage and retrieves baggage status for users.
Baggage Check-In Service:
- Handles the check-in process for baggage, creating baggage records in the database.
Baggage Claim Service:
- Manages the baggage claim process and updates baggage status accordingly.
Basic Low Level Design
# Baggage class to hold baggage details

class Baggage:
    def __init__(self, baggage_id, weight, passenger_name, destination):
        self.baggage_id = baggage_id
        self.weight = weight
        self.passenger_name = passenger_name
        self.destination = destination

# Flight class to hold flight details

class Flight:
    def __init__(self, flight_number, destination):
        self.flight_number = flight_number
        self.destination = destination

# Low-Level API for Baggage Sorting System

class BaggageSortingSystem:
    def __init__(self):
        # Initialize the sorting system
        pass

    def sort_baggage(self, baggage, flight):
        # Sorts the given baggage based on the flight destination
        # Parameters:
        # - baggage: Baggage object with necessary details
        # - flight: Flight object representing the destination flight
        print(f"Sorting baggage {baggage.baggage_id} for Flight {flight.flight_number} to {flight.destination}")

# Low-Level API for Conveyor System

class ConveyorSystem:
    def __init__(self):
        # Initialize the conveyor system
        pass

    def transport_baggage(self, baggage, destination):
        # Transports the given baggage to the specified destination (e.g., check-in, security, baggage claim)
        # Parameters:
        # - baggage: Baggage object to be transported
        # - destination: Destination checkpoint or area for the baggage
        print(f"Transporting baggage {baggage.baggage_id} to {destination}")

# Low-Level API for Baggage Tracking System

class BaggageTrackingSystem:
    def __init__(self):
        # Initialize the baggage tracking system
        pass

    def track_baggage(self, baggage):
        # Returns the current location/status of the given baggage
        # Parameters:
        # - baggage: Baggage object to be tracked
        # Returns:
        # - status: Current location/status of the baggage
        print(f"Tracking baggage {baggage.baggage_id}")

# High-Level API for Airport Baggage System

class AirportBaggageSystem:
    def __init__(self):
        self.sorting_system = BaggageSortingSystem()
        self.conveyor_system = ConveyorSystem()
        self.tracking_system = BaggageTrackingSystem()

    def check_in_baggage(self, baggage, flight):
        # Check-in baggage and sort it based on the destination flight
        # Parameters:
        # - baggage: Baggage object with necessary details
        # - flight: Flight object representing the destination flight
        self.sorting_system.sort_baggage(baggage, flight)

    def transport_baggage(self, baggage, destination):
        # Transport the baggage to the specified destination
        # Parameters:
        # - baggage: Baggage object to be transported
        # - destination: Destination checkpoint or area for the baggage
        self.conveyor_system.transport_baggage(baggage, destination)

    def track_baggage_status(self, baggage):
        # Get the current status of the baggage
        # Parameters:
        # - baggage: Baggage object to be tracked
        # Returns:
        # - status: Current location/status of the baggage
        self.tracking_system.track_baggage(baggage)

# Usage example:

# Initialize the Airport Baggage System
airport_system = AirportBaggageSystem()

# Create a Baggage object
baggage1 = Baggage(baggage_id="B1234", weight=25, passenger_name="John Doe", destination="LHR")

# Create a Flight object
flight1 = Flight(flight_number="AA123", destination="LHR")

# Check-in the baggage and sort it based on the destination flight
airport_system.check_in_baggage(baggage1, flight1)

# Transport the baggage to the security checkpoint
airport_system.transport_baggage(baggage1, "Security")

# Track the current status of the baggage
airport_system.track_baggage_status(baggage1)
API Design
Baggage Tracking API:

Endpoint: /baggage/track
Method: GET
Description: Retrieves the real-time tracking status of a specific baggage.
Request Parameters: baggage_id (String)
Response: JSON object with baggage details, including status.

Baggage Check-In API:

Endpoint: /baggage/checkin
Method: POST
Description: Allows airport staff to check in a new baggage.
Request Parameters: baggage_id (String), weight (float), passenger_name (String), destination (String)
Response: JSON object confirming the check-in status.

Baggage Claim API:

Endpoint: /baggage/claim
Method: POST
Description: Allows passengers to claim their baggage after arriving at their destination.
Request Parameters: baggage_id (String)
Response: JSON object confirming the baggage claim status.
Complete Detailed Design
Coming soon! It will be covered on youtube channel.
Subscribe to youtube channel :
Complete Code implementation
# Baggage Tracking: Real-time tracking of baggage throughout its journey, enabling airport staff and passengers to know the exact location of their luggage.

class BaggageTrackingSystem:
    def __init__(self):
        self.baggage_status = {}

    def track_baggage(self, baggage):
        if baggage.baggage_id in self.baggage_status:
            return self.baggage_status[baggage.baggage_id]
        else:
            return "Baggage not found."

    def update_baggage_status(self, baggage, status):
        self.baggage_status[baggage.baggage_id] = status

# Sorting Mechanism: Automatic sorting of baggage based on flight destinations to ensure the correct bags are loaded onto the corresponding flights.

class BaggageSortingSystem:
    def __init__(self):
        self.sorting_rules = {} # Dictionary to hold sorting rules based on flight destination

    def add_sorting_rule(self, flight, destination):
        self.sorting_rules[flight.flight_number] = destination

    def sort_baggage(self, baggage, flight):
        if flight.flight_number in self.sorting_rules:
            destination = self.sorting_rules[flight.flight_number]
            baggage.destination = destination
            return f"Baggage {baggage.baggage_id} sorted for Flight {flight.flight_number} to {destination}."
        else:
            return f"Sorting rule not found for Flight {flight.flight_number}."

# Security Screening: Integration with baggage screening systems to ensure security checks are performed accurately and efficiently.

class SecurityScreeningSystem:
    def __init__(self):
        pass

    def perform_security_check(self, baggage):
        # Logic for performing security checks on baggage
        return f"Security check completed for Baggage {baggage.baggage_id}."

# Usage example:

# Initialize the systems
baggage_tracking_system = BaggageTrackingSystem()
baggage_sorting_system = BaggageSortingSystem()
security_screening_system = SecurityScreeningSystem()

# Create a Baggage object
baggage1 = Baggage(baggage_id="B1234", weight=25, passenger_name="John Doe", destination="")

# Create a Flight object
flight1 = Flight(flight_number="AA123", destination="LHR")

# Add a sorting rule for Flight AA123
baggage_sorting_system.add_sorting_rule(flight1, "LHR")

# Track the current status of the baggage
print(baggage_tracking_system.track_baggage(baggage1))  # Output: "Baggage not found."

# Check-in the baggage and sort it based on the destination flight
baggage_sorting_system.sort_baggage(baggage1, flight1)
print(baggage1.destination)  # Output: "LHR"

# Perform security screening on the baggage
security_screening_system.perform_security_check(baggage1)  # Output: "Security check completed for Baggage B1234."

# Update the baggage status after security check
baggage_tracking_system.update_baggage_status(baggage1, "Security Check Completed")

# Track the current status of the baggage
print(baggage_tracking_system.track_baggage(baggage1))  # Output: "Security Check Completed"
System Design — Conference Booking System
We will be discussing in depth -
- What is Conference Booking System
- Important Features
- Data Model — ER requirements
- High Level Design
- Basic Low Level Design
- API Design
- Complete Detailed Design
- Complete Code Implementation

What is Conference Booking System
Important Features
Scaling Requirements — Capacity Estimation
Data Model — ER requirements
High Level Design
Basic Low Level Design
API Design
Complete Detailed Design
Coming soon! It will be covered on youtube channel.
Subscribe to youtube channel :
Complete Code implementation
Read — how to Design Twitter.
Day 7 of System Design Case Studies Series : Design Twitter
Complete Design with examples
medium.com
Let me know if you have any questions in the comments section below. Subscribe/ Follow, Like/Clap and Stay Tuned!!
Day 2 : SQL Basics, Query Structure, Built In functions Conditions
Day 4 : Set Theory Operations, Stored Procedures and CASE statements in SQL
Day 6 : Subqueries, Group by, order by and Having clauses in SQL and Analytical Functions
Day 7 : Window Functions, Grouping Sets and Constraints in SQL
Day 8 : BigQuery Basics, SELECT, FROM, WHERE and Date and Extract in BigQuery
Day 9 : Common Expression Table, UNNEST Clause, SQL vs NoSQL Databases
Day 10 : Triggers, Pivot and Cursors in SQL
Day 14 : MySQL in Depth
Day 15 : PostgreSQL inDepth
Anyways, For Day 15 of 15 days of Advanced SQL, we will cover —
PostgreSQL inDepth
Github for Advanced SQL that you can follow —
All the projects, data structures, algorithms, system design, Data Science and ML, Data Engineering, MLOps and Deep Learning videos will be published on our youtube channel ( just launched).
Subscribe today!
System Design Case Studies — In Depth
Complete Data Structures and Algorithm Series
Github —
Some of the other best Series —
30 days of Data Structures and Algorithms and System Design Simplified
Data Science and Machine Learning Research ( papers) Simplified **
100 days : Your Data Science and Machine Learning Degree Series with projects
Complete Data Visualization and Pre-processing Series with projects
Exceptional Github Repos — Part 1
Exceptional Github Repos — Part 2
Tech Newsletter —
If you are interested, you can join my newsletter through which I send tech interview tips, techniques, patterns, hacks — Software Development, ML, Data Science, Startups and Technology projects to more than 30K readers. You can subscribe to Tech Brew :
For Python Projects —
For complete 60 days of Data Science and ML : Day 1 — Day 60 : Quick Recap of 60 days of Data Science and ML
Follow for more updates. Stay tuned and keep coding!
For other projects, tune to —
Build Machine Learning Pipelines( With Code)
Recurrent Neural Network with Keras
Clustering Geolocation Data in Python using DBSCAN and K-Means
Facial Expression Recognition using Keras
Hyperparameter Tuning with Keras Tuner
Custom Layers in Keras


