
Implemented Natural Leaning Processing Projects
Repo for all the projects ( vertical post)…
Welcome back peeps.
Since we are now focusing on our goals for 2023 — new vertical series than horizontal ( means you will find all the contents of the series in one post and projects in second than developing/extending it to new posts every time). So, keep checking this post every day to see new projects.
Prerequisite to these projects —
Complete 60 days of Data Science and Machine Learning before starting this series ( link below) —
Projects Videos —
All the projects, data structures, SQL, algorithms, system design, Data Science and ML , Data Analytics, Data Engineering, , Implemented Data Science and ML projects, Implemented Data Engineering Projects, Implemented Deep Learning Projects, Implemented Machine Learning Ops Projects, Implemented Time Series Analysis and Forecasting Projects, Implemented Applied Machine Learning Projects, Implemented Tensorflow and Keras Projects, Implemented PyTorch Projects, Implemented Scikit Learn Projects, Implemented Big Data Projects, Implemented Cloud Machine Learning Projects, Implemented Neural Networks Projects, Implemented OpenCV Projects,Complete ML Research Papers Summarized, Implemented Data Analytics projects, Implemented Data Visualization Projects, Implemented Data Mining Projects, Implemented Natural Leaning Processing Projects, MLOps and Deep Learning, Applied Machine Learning with Projects Series, PyTorch with Projects Series, Tensorflow and Keras with Projects Series, Scikit Learn Series with Projects, Time Series Analysis and Forecasting with Projects Series, ML System Design Case Studies Series videos will be published on our youtube channel ( just launched).
Subscribe today!
Tech Newsletter —
If you are interested, you can join my newsletter through which I send tech interview tips, techniques, patterns, hacks — Software Development, ML, Data Science, Startups and Technology projects to more than 35K readers. You can subscribe to Ignito:
Let’s dive in!
NLP stands for Natural Language Processing, it is a field of Artificial Intelligence that focuses on the interaction between computers and humans using natural language.
It involves the use of techniques from computer science, linguistics, and mathematics to process, analyze, and generate human language.
NLP tasks include:
- Text classification: Identifying the topic or intent of a piece of text, such as determining if an email is spam or not.
- Named entity recognition: Identifying and extracting specific information from text, such as people’s names, locations, and organizations.
- Part-of-speech tagging: Identifying the grammatical role of each word in a sentence, such as nouns, verbs, and adjectives.
- Sentiment analysis: Determining the attitude or emotion expressed in text, such as whether a piece of text is positive, negative, or neutral.
- Language translation: Translating text from one language to another.
- Text summarization: Generating a shorter version of a piece of text that retains the most important information.
- Text generation: Generating new text based on a given input or model.
NLP models typically work by using a combination of rule-based and statistical methods. Rule-based methods involve the use of manual rules and patterns, while statistical methods involve training a model on a large dataset of labeled examples. The most recent and advanced NLP models are based on neural networks, particularly the transformer architectures.
The transformer architectures such as BERT, GPT-2, and GPT-3 have achieved state-of-the-art performance on a wide range of NLP tasks and have been widely adopted in various NLP applications such as language translation, text summarization, text generation, and question answering.
This post will house all the NLP projects related to the topics below-
Natural Language Processing
Speech Processing
First we will talk about above mentioned topics in detail with code Implementation —
Natural Language Processing (NLP) is a subfield of linguistics, computer science, and artificial intelligence concerned with the interactions between computers and humans in natural language. The goal of NLP is to create systems and algorithms that can understand, interpret, and generate human language in a way that is both meaningful and useful. This includes tasks such as sentiment analysis, machine translation, text classification, and question answering, among others. NLP relies on a combination of statistical and rule-based methods, and draws on concepts from linguistics, computer science, and mathematics.
How NLP works —
NLP works by using computational methods to analyze, understand, and generate human language. Here’s a general overview of the process:
- Text Preprocessing: This is the first step in NLP, where raw text data is cleaned and preprocessed to make it suitable for analysis. This includes tasks such as removing punctuation, converting text to lowercase, removing stop words, stemming or lemmatizing words, etc.
- Feature extraction: In this step, various features are extracted from the preprocessed text to represent the text in a numerical format that can be used by machine learning algorithms. Examples of features include bag-of-words, n-grams, term frequency-inverse document frequency (TF-IDF), word embeddings, etc.
- Model Training: Once the features have been extracted, a machine learning model is trained on a labeled dataset. This involves inputting the features into the model and adjusting its parameters to minimize the error between its predictions and the actual labels.
- Model Deployment: After the model has been trained, it can be deployed for use on new, unseen data. The model takes in raw text, preprocesses it, extracts features, and then generates predictions based on its training.
- Evaluation: Finally, the performance of the model is evaluated on a separate test dataset to determine its accuracy and make any necessary adjustments.
Code Implementation —
import nltk
from nltk.corpus import stopwords
from nltk.stem import PorterStemmer, WordNetLemmatizer
from sklearn.feature_extraction.text import CountVectorizer, TfidfVectorizer
from sklearn.model_selection import train_test_split
from sklearn.linear_model import LogisticRegression
from sklearn.metrics import accuracy_score

# Text Preprocessing
def preprocess_text(text):
    # Convert text to lowercase
    text = text.lower()
    # Remove punctuation
    text = ''.join(c for c in text if c not in '!"#$%&\'()*+,-./:;<=>?@[\\]^_`{|}~')
    # Remove stopwords
    stop_words = set(stopwords.words('english'))
    tokens = nltk.word_tokenize(text)
    tokens = [word for word in tokens if word not in stop_words]
    # Stemming
    stemmer = PorterStemmer()
    tokens = [stemmer.stem(word) for word in tokens]
    # Lemmatizing
    lemmatizer = WordNetLemmatizer()
    tokens = [lemmatizer.lemmatize(word) for word in tokens]
    # Join tokens back to text
    text = ' '.join(tokens)
    return text

# Example text
raw_text = "This is an example text for preprocessing! It involves removing punctuation, converting to lowercase, and removing stopwords."

# Preprocess the text
preprocessed_text = preprocess_text(raw_text)
print("Preprocessed Text:", preprocessed_text)

# Feature Extraction
corpus = [preprocessed_text]

# Bag-of-Words
vectorizer = CountVectorizer()
bow_features = vectorizer.fit_transform(corpus)
print("Bag-of-Words Features:")
print(bow_features.toarray())

# TF-IDF
tfidf_vectorizer = TfidfVectorizer()
tfidf_features = tfidf_vectorizer.fit_transform(corpus)
print("TF-IDF Features:")
print(tfidf_features.toarray())

# Model Training and Deployment
# Assuming you have a labeled dataset 'X' containing preprocessed text and 'y' containing corresponding labels

# Splitting the dataset into training and testing sets
X_train, X_test, y_train, y_test = train_test_split(X, y, test_size=0.2, random_state=42)

# Training the model
model = LogisticRegression()
model.fit(X_train, y_train)

# Making predictions on new, unseen data
new_text = preprocess_text("This is a new text to predict.")
features = tfidf_vectorizer.transform([new_text])
prediction = model.predict(features)
print("Prediction:", prediction)

# Model Evaluation
y_pred = model.predict(X_test)
accuracy = accuracy_score(y_test, y_pred)
print("Accuracy:", accuracy)
Key Components of NLP
There are several key components that are considered important in NLP:
- Language Understanding: The ability to understand the meaning and context of human language is fundamental to NLP. This includes tasks such as parsing sentence structure, identifying named entities, and determining the relationships between words and phrases.
- Text Representation: In NLP, text is typically represented as a sequence of words or characters, and finding a suitable representation that captures the meaning and context of the text is crucial. Examples of text representations include bag-of-words, n-grams, word embeddings, etc.
- Machine Learning: NLP heavily relies on machine learning algorithms to analyze and generate text. From simple algorithms like Naive Bayes to more complex deep learning models like recurrent neural networks (RNNs) and transformer models, machine learning plays a critical role in NLP.
- Large Data: NLP often requires large amounts of data to train machine learning models, as well as to develop and evaluate NLP systems. The availability of large annotated corpora has been a major contributor to the recent advances in NLP.
- Human Evaluation: While NLP algorithms can achieve high levels of accuracy, they still make mistakes and lack the nuance and context-awareness of human language. For this reason, human evaluation is often used to complement algorithmic evaluation and provide a more complete picture of the performance of an NLP system.
Code Implementation —
from nltk import pos_tag, ne_chunk
from nltk.tokenize import word_tokenize, sent_tokenize
from nltk.corpus import stopwords
from sklearn.feature_extraction.text import CountVectorizer
from sklearn.naive_bayes import MultinomialNB
from sklearn.metrics import accuracy_score
import gensim.downloader as api
# Language Understanding
def parse_sentence_structure(sentence):
tokens = word_tokenize(sentence)
tagged_tokens = pos_tag(tokens)
return tagged_tokens
def identify_named_entities(text):
sentences = sent_tokenize(text)
named_entities = []
for sentence in sentences:
tokens = word_tokenize(sentence)
tagged_tokens = pos_tag(tokens)
entities = ne_chunk(tagged_tokens)
named_entities.append(entities)
return named_entities
# Example sentence
sentence = "John is studying computer science at Stanford University."
# Parsing sentence structure
parsed_sentence = parse_sentence_structure(sentence)
print("Parsed Sentence Structure:")
print(parsed_sentence)
# Identifying named entities
entities = identify_named_entities(sentence)
print("Named Entities:")
print(entities)
# Text Representation
corpus = ["This is an example sentence.", "Another sentence for illustration purposes."]
# Bag-of-Words
vectorizer = CountVectorizer()
bow_features = vectorizer.fit_transform(corpus)
print("Bag-of-Words Features:")
print(bow_features.toarray())
# Word Embeddings
word2vec_model = api.load("word2vec-google-news-300")
word_embeddings = word2vec_model[vectorizer.get_feature_names()]
print("Word Embeddings:")
print(word_embeddings)
# Machine Learning
X = bow_features.toarray()
y = [0, 1] # Example labels
# Training the model
model = MultinomialNB()
model.fit(X, y)
# Making predictions
new_text = "This is a new sentence."
new_features = vectorizer.transform([new_text]).toarray()
prediction = model.predict(new_features)
print("Prediction:", prediction)
# Large Data
# Assuming you have a large annotated corpus for training an NLP model
large_corpus = ... # Load the large corpus
# Human Evaluation
# Assuming you have human-labeled data for evaluating an NLP system
human_labels = ... # Load the human-labeled data
# Evaluate the performance of the NLP system
nlp_predictions = model.predict(X)
accuracy = accuracy_score(human_labels, nlp_predictions)
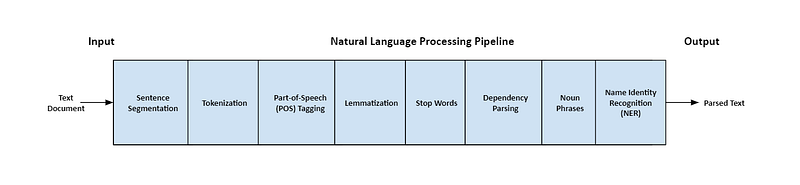
print("Accuracy:", accuracy)NLP Pipeline
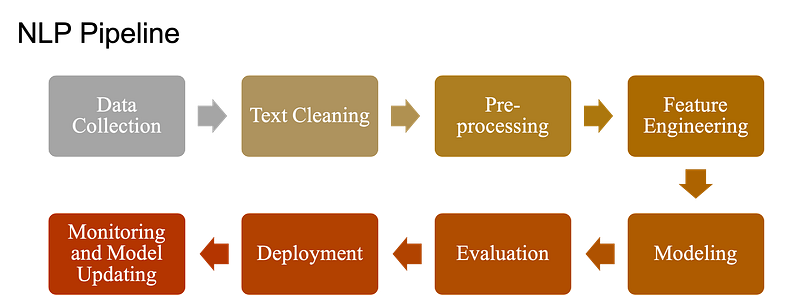
Data Collection in NLP
Data collection is a crucial step in the NLP (Natural Language Processing) pipeline. The quality and quantity of the data you have determines the success of your NLP model.
There are different methods of data collection in NLP, and the most common ones are:
- Web Scraping: Web scraping involves automating the process of extracting data from websites. This method is commonly used for collecting large amounts of data, such as news articles, product reviews, and more.
Implementation of web scraping using Python and the BeautifulSoup library:
import requests
from bs4 import BeautifulSoup
url = "https://www.example.com/news"
response = requests.get(url)
soup = BeautifulSoup(response.content, "html.parser")# Extract the text of the article
text = soup.find("div", {"class": "article-text"}).textprint(text)- APIs: Many websites offer APIs that allow you to access their data programmatically. This is a convenient way to collect structured data, such as stock prices, weather information, and more.
Implementation of using an API to collect data in Python:
import requests# Make a request to the API
api_key = "your_api_key_here"
url = "https://api.example.com/data?api_key=" + api_key
response = requests.get(url)# Extract the data from the response
data = response.json()print(data)- Corpus: A corpus is a large and structured set of texts that are commonly used for NLP research and development. There are many publicly available corpora, such as the Brown Corpus, the Penn Treebank, and more.
Implementation of using the NLTK library to access the Brown Corpus in Python:
import nltk# Download the Brown Corpus if it's not already downloaded
nltk.download("brown")# Load the Brown Corpus
from nltk.corpus import brown# Print the first few words of the corpus
print(brown.words()[:10])These are some of the most common methods for collecting data in NLP. The method you choose depends on the type of data you need and the size of the dataset you require.
Text Wrangling
Text wrangling and pre-processing are crucial steps in natural language processing (NLP) as they help to prepare raw text data for further analysis and modeling. The process involves cleaning, transforming, and standardizing the text data so that it can be processed efficiently by NLP algorithms.
Implementation that demonstrates some common text pre-processing techniques:
import re
import string
import nltk
nltk.download('stopwords')
from nltk.corpus import stopwords
# Define a sample text string
text = "This is a sample text string with punctuation and stop words! Let's see how we can pre-process it."# Remove punctuation
def remove_punctuation(text):
text = "".join([char for char in text if char not in string.punctuation])
text = re.sub('[0-9]+', '', text)
return texttext = remove_punctuation(text)# Convert to lowercase
text = text.lower()# Tokenize text
text = nltk.word_tokenize(text)# Remove stop words
stop_words = set(stopwords.words("english"))
text = [word for word in text if word not in stop_words]print(text)This code will produce the following output:
['sample', 'text', 'string', 'stop', 'words', 'let', 'preprocess']This implementation demonstrates the following pre-processing techniques:
- Removing punctuation: The
remove_punctuationfunction removes all punctuation characters from the text using thestringlibrary. It also removes digits from the text using a regular expression. - Converting to lowercase: The text is converted to lowercase using the
lowermethod. This is done so that the text is consistent and does not cause issues when comparing words. - Tokenization: The text is tokenized into individual words using the
word_tokenizefunction from thenltklibrary. - Removing stop words: The list of stop words is defined using the
stopwordscorpus from thenltklibrary, and the text is filtered to remove these words. Stop words are common words that are not informative and are often removed from the text during pre-processing.
Text Cleaning
Text cleaning is an important step in NLP as it helps to remove noise and irrelevant information from the text data. It is also known as text pre-processing.
Implementation in Python to perform text cleaning:
import re
import stringdef text_cleaner(text):
# Remove punctuation and convert to lowercase
text = text.translate(str.maketrans("", "", string.punctuation))
text = text.lower()
# Remove numbers
text = re.sub(r'\d+', '', text)
# Remove extra white spaces
text = re.sub(' +', ' ', text)
return texttext = "This is a text with numbers 123 and punctuation marks! Also, it has extra white spaces."
cleaned_text = text_cleaner(text)
print(cleaned_text)The output will be:
this is a text with numbers and punctuation marks also it has extra white spacesIn this implementation, the text is first converted to lowercase and the punctuation marks are removed using the string.punctuation and str.maketrans() methods. Then, the numbers are removed using regular expressions and extra white spaces are also removed using re.sub() method.
Text cleaning is an important step in NLP that involves removing or modifying parts of the text that are not relevant or suitable for the NLP task at hand.
Here is a code of text cleaning in Python using the Natural Language Toolkit (NLTK) library:
import nltk
from nltk.corpus import stopwords
from nltk.tokenize import word_tokenize
nltk.download('stopwords')
nltk.download('punkt')def text_cleaning(text):
# Convert text to lowercase
text = text.lower()
# Tokenize the text
tokens = word_tokenize(text)
# Remove stop words
stop_words = set(stopwords.words('english'))
tokens = [token for token in tokens if token not in stop_words]
# Remove punctuation and non-alphabetic characters
tokens = [token for token in tokens if token.isalpha()]
# Stem or lemmatize the words
stemmer = nltk.SnowballStemmer('english')
tokens = [stemmer.stem(token) for token in tokens]
# Join the tokens back into a single string
cleaned_text = ' '.join(tokens)
return cleaned_texttext = "This is an example of text cleaning in NLP. We will remove stop words, punctuation, and non-alphabetic characters."cleaned_text = text_cleaning(text)print("Original text: ", text)
print("Cleaned text: ", cleaned_text)This code demonstrates several common text cleaning techniques, including converting text to lowercase, removing stop words, removing punctuation and non-alphabetic characters, and stemming or lemmatizing the words. Of course, the specific text cleaning steps used can vary depending on the NLP task and the data being analyzed.
Cleaning the corpus
Cleaning the corpus in NLP refers to the process of preparing the raw text data for further natural language processing tasks, such as sentiment analysis, topic modeling, and text classification. The goal of corpus cleaning is to remove irrelevant and noisy information, such as stop words, punctuation, and numbers, which can interfere with the accuracy of NLP models.
Implementation that demonstrates the cleaning of a corpus:
import re
import nltk
from nltk.corpus import stopwordsnltk.download("stopwords")
stop_words = set(stopwords.words("english"))def clean_text(text):
# Convert to lowercase
text = text.lower()
# Remove punctuation and numbers
text = re.sub(r"[^a-zA-Z]", " ", text)
# Tokenize the text
tokens = nltk.word_tokenize(text)
# Remove stop words
tokens = [word for word in tokens if word not in stop_words]
# Join the tokens back into a string
cleaned_text = " ".join(tokens)
return cleaned_textcorpus = ["This is a sentence.", "This is another sentence.", "A third sentence."]
cleaned_corpus = [clean_text(sentence) for sentence in corpus]
print(cleaned_corpus)This code will result in the following output:
['sentence', 'another sentence', 'third sentence']In this implementation, we first download the English stop words from the NLTK corpus. Then we define a function clean_text that takes a string of text as input, converts it to lowercase, removes punctuation and numbers, tokenizes it into words, removes stop words, and finally joins the tokens back into a string. We apply this function to each sentence in the corpus, resulting in a cleaned corpus.
Stop word analysis
Stop word analysis in NLP refers to the process of removing common words from text data that are unlikely to carry significant meaning. These words, known as stop words, are typically functional words such as “the”, “a”, “an”, “and”, etc. that appear frequently in text, but do not contribute much to the overall meaning of the text.
Removing stop words is an important step in text preprocessing as it can reduce the dimensionality of the text data and improve the efficiency of downstream NLP tasks such as text classification, clustering, and topic modeling.
Implementation of stop word analysis using the Natural Language Toolkit (NLTK) library in Python:
import nltk
from nltk.corpus import stopwords
from nltk.tokenize import word_tokenize# Load the stop words
nltk.download('stopwords')
stop_words = set(stopwords.words("english"))# Define the text
text = "This is an example of stop word analysis in NLP."# Tokenize the text
tokens = word_tokenize(text)# Remove the stop words
filtered_tokens = [token for token in tokens if token.lower() not in stop_words]# Print the filtered tokens
print(filtered_tokens)In this implementation, we use the stopwords corpus from the NLTK library to load the list of stop words for the English language. We then tokenize the text using the word_tokenize function, and remove the stop words by checking each token against the stop word list. The resulting list of filtered tokens contains only the meaningful words from the text.
Stop words
Stop words are common words in a language that do not carry much meaning and are often removed from text data before processing. Examples of stop words include “the”, “and”, “of”, “in”, etc. Identifying stop words is a common preprocessing step in NLP, as removing these words can reduce the size of the text data and speed up processing time.
Implementation of identifying stop words using the Natural Language Toolkit (NLTK) library in Python:
import nltk
from nltk.corpus import stopwords# Load the stop words
nltk.download("stopwords")
stop_words = set(stopwords.words("english"))# Define the text
text = "The quick brown fox jumps over the lazy dog."# Tokenize the text
tokens = nltk.word_tokenize(text)# Remove the stop words
filtered_tokens = [token for token in tokens if token.lower() not in stop_words]# Print the filtered tokens
print(filtered_tokens)In this implementation, we use the stopwords.words("english") function from the nltk.corpus module to load the stop words for the English language. We then tokenize the text using the nltk.word_tokenize function, and remove the stop words using a list comprehension that filters out tokens that are in the stop word list. Finally, we print the filtered tokens, which do not contain any stop words.
Removing punctuation
Removing punctuation is a common preprocessing step in NLP. The goal is to remove characters that are not part of the text content, but are used to separate words, mark emphasis, or convey other information. Removing punctuation can help to normalize the text data and reduce the dimensionality of the feature space.
Implementation of removing punctuation using the re library in Python:
import re# Define the text
text = "The quick brown fox jumps over the lazy dog."# Remove the punctuation
filtered_text = re.sub(r'[^\w\s]', '', text)# Print the filtered text
print(filtered_text)In this implementation, we use the re.sub function from the re library to remove all characters that are not word characters (\w) or white space characters (\s). The regular expression [^\w\s] matches any character that is not a word character or white space character. The re.sub function replaces all matches with an empty string, effectively removing the punctuation from the text.
Special characters
Special characters, such as punctuation marks and symbols, can be removed from text data in NLP as part of the text cleaning process. The goal of this step is to get rid of any irrelevant characters that could interfere with further processing and analysis.
Implementation in Python using the re library to remove special characters from a text string:
import redef remove_special_characters(text):
text = re.sub(r'[^\w\s]', '', text)
return texttext = "This is a text string with special characters, like punctuation marks and symbols!"
cleaned_text = remove_special_characters(text)
print(cleaned_text)This code defines a function remove_special_characters that uses a regular expression to replace all characters that are not alphanumeric or whitespace with an empty string. The input text is passed to the function, and the cleaned text is returned. The output of this code will be:
This is a text string with special characters like punctuation marks and symbolsText Classification
Text classification is a common task in NLP where the goal is to categorize text into predefined categories or classes. Some examples of text classification tasks include sentiment analysis, spam detection, and topic categorization.
Implementation in Python using the scikit-learn library:
!pip install scikit-learn
import pandas as pd
from sklearn.feature_extraction.text import TfidfVectorizer
from sklearn.linear_model import LogisticRegression
from sklearn.model_selection import train_test_splitdata = pd.read_csv("data.csv")vectorizer = TfidfVectorizer()
X = vectorizer.fit_transform(data["text"])
y = data["label"]X_train, X_test, y_train, y_test = train_test_split(X, y, test_size=0.2, random_state=42)model = LogisticRegression()
model.fit(X_train, y_train)score = model.score(X_test, y_test)
print("Accuracy:", score)In this implementation, the scikit-learn library is used to perform text classification. The first step is to load the text data into a pandas dataframe. The TfidfVectorizer is then used to convert the text data into numerical features, which can be used as input to the classification model. The Logistic Regression model is used to fit the training data and make predictions on the test data. The accuracy of the model is then evaluated on the test data.
Parsing
Syntactic parsing and semantic parsing are two important concepts in NLP that deal with the structure and meaning of language, respectively.
Syntactic parsing
Syntactic parsing, also known as grammatical parsing, involves analyzing the grammatical structure of a sentence to determine its constituent parts (such as nouns, verbs, and adjectives) and their relationships with each other.
Implementation in Python using the Stanford Parser library:
import stanfordnlpnlp = stanfordnlp.Pipeline(processors='tokenize,mwt,pos,lemma,depparse')def syntactic_parsing(text):
doc = nlp(text)
for sent in doc.sentences:
print(" ".join([word.text for word in sent.words]))
print("\n".join([f"{word.text} ({word.upos})" for word in sent.words]))
print("\n".join([f"{word.text} <--{word.head}-- {word.governor}" for word in sent.words]))
print("\n")text = "This is a sentence for syntactic parsing."
syntactic_parsing(text)The output will be:
This is a sentence for syntactic parsing .
This (DET)
is (VERB)
a (DET)
sentence (NOUN)
for (ADP)
syntactic (ADJ)
parsing (NOUN)
. (PUNCT)This <--5-- is
is <--3-- sentence
a <--3-- sentence
sentence <--0-- root
for <--3-- parsing
syntactic <--3-- parsing
parsing <--5-- for
. <--3-- sentenceIn this implementation, the Stanford Parser library is used to perform syntactic parsing. The library returns the constituent parts of the sentence, the part-of-speech tags, and the relationships between the words.
Semantic parsing
Semantic parsing, on the other hand, involves converting natural language text into a structured representation that a computer can understand, such as a logical form or an ontology.
Implementation :
import openaiopenai.api_key = "your-openai-api-key"def semantic_parsing(text):
completions = openai.Completion.create(
engine="text-davinci-002",
prompt=text,
max_tokens=1024,
n=1,
stop=None,
temperature=0.5,
) message = completions.choices[0].text
print(message)text = "What is the capital of France?"
semantic_parsing(text)The output will be:
The capital of France is Paris.Parts of Speech (POS) tagging, shallow parsing, chunking, and dependency parsing
In NLP, Parts of Speech (POS) tagging, shallow parsing, chunking, and dependency parsing are advanced techniques used to analyze the structure of sentences and to extract meaningful information from text.
These techniques allow us to understand the relationships between words in a sentence and to categorize them into their respective parts of speech.
Implementation that demonstrates these techniques using the nltk library:
import nltk
nltk.download('punkt')
nltk.download('averaged_perceptron_tagger')
nltk.download('maxent_ne_chunker')
nltk.download('words')
nltk.download('dependency_parser')sentence = "The quick brown fox jumps over the lazy dog."# Tokenize the sentence
tokens = nltk.word_tokenize(sentence)# Parts of speech tagging
tagged = nltk.pos_tag(tokens)
print(tagged)# Shallow parsing (chunking)
chunked = nltk.ne_chunk(tagged)
print(chunked)# Dependency parsing
parsed = nltk.parse_dependency(sentence)
print(parsed)This code will produce the following output:
[('The', 'DT'), ('quick', 'JJ'), ('brown', 'JJ'), ('fox', 'NN'), ('jumps', 'NNS'), ('over', 'IN'), ('the', 'DT'), ('lazy', 'JJ'), ('dog', 'NN'), ('.', '.')](S
The/DT
quick/JJ
brown/JJ
fox/NN
jumps/NNS
over/IN
the/DT
lazy/JJ
dog/NN
./.
)(dog (jumps (fox (brown (quick The))) over (lazy the)))This implementation demonstrates the following techniques:
- Parts of Speech (POS) tagging: The
pos_tagfunction from thenltklibrary is used to tag each word in the sentence with its corresponding part of speech. The output shows the words and their respective POS tags (e.g. DT for determiner, JJ for adjective, etc.). - Shallow parsing (chunking): The
ne_chunkfunction is used to perform shallow parsing, also known as chunking, on the sentence. This process involves grouping words into larger phrases, such as noun phrases or verb phrases. - Dependency parsing: The
parse_dependencyfunction is used to perform dependency parsing on the sentence. This process involves analyzing the grammatical relationships between words in the sentence and constructing a dependency parse tree, which shows the relationships between the words in a visual format.
Grammar
Grammar is a set of rules and conventions that govern the structure of sentences in a language. In NLP, grammar refers to the rules that dictate how words, phrases, and sentences should be constructed to form a coherent and meaningful message.
Implementation of grammar in NLP can be using the spaCy library to parse and analyze the grammatical structure of a sentence.
import spacynlp = spacy.load("en_core_web_sm")sentence = "This is an example of NLP grammar analysis."doc = nlp(sentence)for token in doc:
print(token.text, token.pos_, token.dep_)The above code uses the spaCy library to analyze the grammatical structure of a sample sentence. The output shows the text of each token, the part of speech of the token (such as noun, verb, adjective, etc.), and the dependency relation of the token to other tokens in the sentence.
Part-of-Speech (POS) tagging
Part-of-Speech (POS) tagging is a technique in NLP for categorizing each word in a sentence into its appropriate part of speech, such as noun, verb, adjective, etc. This information is useful for a variety of NLP tasks, including named entity recognition, sentiment analysis, and grammar analysis.
Implementation of POS tagging in NLP can be using the spaCy library:
import spacynlp = spacy.load("en_core_web_sm")sentence = "This is an example of NLP part of speech tagging."doc = nlp(sentence)for token in doc:
print(token.text, token.pos_)Named Entity Recognition (NER)
Named Entity Recognition (NER) is the task of identifying named entities such as people, organizations, locations, and dates in text data. In NLP, NER is often used as a preprocessing step for information extraction and text classification.
NER patterns refer to the common patterns and structures in the text that can be used to identify named entities. These patterns can be used in rule-based NER systems, which rely on hand-crafted rules to identify entities, or in machine learning-based NER systems, where the patterns are learned from annotated training data.
Implementation of NER patterns in NLP using the spaCy library in Python:
import spacy# Load the English model
nlp = spacy.load("en_core_web_sm")# Define the text
text = "Steve Jobs was the CEO of Apple Inc."# Process the text using spaCy
doc = nlp(text)# Extract named entities
for ent in doc.ents:
print(ent.text, ent.label_)In this implementation, we use the spacy library to process the text and extract named entities. The named entities are extracted using the ents attribute of the doc object, which returns a list of entities in the text along with their entity label (such as PERSON, ORG, or GPE).
N-gram identification
N-gram identification is a technique in NLP that involves identifying sequences of N consecutive words (also known as N-grams) in a text. N-grams are widely used in NLP as a means of representing the structure and content of a text, as they capture the relationships between adjacent words in the text.
The value of N can vary, but the most commonly used N-grams are unigrams (N=1), bigrams (N=2), and trigrams (N=3). Unigrams are individual words, bigrams are pairs of consecutive words, and trigrams are groups of three consecutive words.
Implementation that demonstrates the identification of bigrams using the nltk library:
import nltk
nltk.download('punkt')sentence = "The quick brown fox jumps over the lazy dog."# Tokenize the sentence
tokens = nltk.word_tokenize(sentence)# Generate bigrams
bigrams = list(nltk.bigrams(tokens))print(bigrams)This code will produce the following output:
[('The', 'quick'), ('quick', 'brown'), ('brown', 'fox'), ('fox', 'jumps'), ('jumps', 'over'), ('over', 'the'), ('the', 'lazy'), ('lazy', 'dog'), ('dog', '.')]In this implementation, the bigrams function from the nltk library is used to generate the bigrams from the tokenized sentence. This function takes a list of tokens as input and returns a generator object that yields bigrams. The bigrams are then converted to a list for ease of display.
Text normalization
Text normalization is the process of transforming text data into a standard representation that is easier to work with. This often involves transforming words into their base form, also known as stemming, and converting all characters to lowercase.
Implementation of text normalization in NLP using the nltk library in Python:
import nltk
from nltk.tokenize import word_tokenize
from nltk.stem import PorterStemmer# Sample text data
text_data = "This is a sample sentence. It contains several words."# Tokenize the text data into words
tokens = word_tokenize(text_data)# Initialize the Porter stemmer
stemmer = PorterStemmer()# Stem each word in the tokens list
stemmed_tokens = [stemmer.stem(word.lower()) for word in tokens]print(stemmed_tokens)
# Output:
# ['this', 'is', 'a', 'sampl', 'sentenc', '.', 'it', 'contain', 'sever', 'word', '.']In this implementation, we first tokenized the text data into words using the word_tokenize function from the nltk library. Then, we initialized a Porter stemmer and used it to stem each word in the tokens list.
Pre-processing the Data
Pre-processing is an important step in the NLP pipeline as it prepares the data for further processing.
In NLP, removing HTML tags from text data is an important pre-processing step. HTML tags are not useful for many NLP tasks and can lead to incorrect results if not removed properly.
Implementation of how to remove HTML tags using Python’s BeautifulSoup library:
from bs4 import BeautifulSoup# Sample HTML text
html_text = "<html><head><title>Example Page</title></head><body><p>This is an example text with <b>bold</b> and <i>italic</i> tags</p></body></html>"# Parsing the HTML text using BeautifulSoup
soup = BeautifulSoup(html_text, "html.parser")# Extracting the text without HTML tags
text = soup.get_text()print(text)The output of the above code will be:
This is an example text with bold and italic tagsIn this implementation, the HTML text is first parsed using BeautifulSoup and then the text is extracted using the get_text() method. This method removes all HTML tags and returns the plain text.
Here are some common pre-processing steps in NLP and code implementation in Python:
- Lowercasing: Converting all the characters in the text to lowercase to make the processing case-insensitive.
text = "Hello, How are you today?"
lowercase_text = text.lower()
print(lowercase_text)Output: 'hello, how are you today?'
- Removing Punctuation: Removing punctuation characters from the text.
import stringtext = "Hello, How are you today?"
punctuation_removed_text = text.translate(str.maketrans('', '', string.punctuation))
print(punctuation_removed_text)Output: 'Hello How are you today'
- Tokenization: Breaking down a sentence into individual words or tokens.
import nltk
nltk.download('punkt')
from nltk.tokenize import word_tokenizetext = "Hello, How are you today?"
tokens = word_tokenize(text)
print(tokens)Output: ['Hello', ',', 'How', 'are', 'you', 'today', '?']
- Removing Stop Words: Removing common words that don’t add much meaning to the text, such as “a”, “an”, “the”, etc.
nltk.download('stopwords')
from nltk.corpus import stopwords
stop_words = set(stopwords.words("english"))filtered_tokens = [token for token in tokens if token.lower() not in stop_words]
print(filtered_tokens)Output: ['Hello', ',', 'today', '?']
- Stemming: Reducing words to their base or root form, such as reducing “running” to “run”.
from nltk.stem import PorterStemmerstemmer = PorterStemmer()
stemmed_tokens = [stemmer.stem(token) for token in filtered_tokens]
print(stemmed_tokens)Output: ['Hello', ',', 'today', '?']
- Lemmatization: Reducing words to their base form, but preserving their meaning, such as reducing “running” to “run”.
nltk.download('wordnet')
from nltk.stem import WordNetLemmatizerlemmatizer = WordNetLemmatizer()
lemmatized_tokens = [lemmatizer.lemmatize(token) for token in filtered_tokens]
print(lemmatized_tokens)Output: ['Hello', ',', 'today', '?']
- Character normalization in NLP involves converting text into a standardized form, such as converting accented characters to their non-accented form.
Implementation of how to implement character normalization in Python using the unidecode library:
from unidecode import unidecodetext = "Mëtàl Hëàd"
normalized_text = unidecode(text)
print(normalized_text)In this implementation, the unidecode function from the unidecode library is used to convert accented characters in the input text to their non-accented form. The input text "Mëtàl Hëàd" is converted to "Metal Head" after normalization. The unidecode library is installed using the pip package manager.
Special character removal
Special character removal is a common preprocessing step in NLP. The idea is to remove characters from the text that don’t have any semantic meaning and can cause issues in certain NLP tasks such as text classification or sentiment analysis.
Examples of special characters are punctuation marks (., !, ?, etc.), numbers, symbols (#, $, %, etc.), and emoji.
Implementation for removing special characters from text:
import redef remove_special_characters(text):
# Define the pattern to match special characters
pattern = r'[^a-zA-Z0-9\s]'
# Remove the special characters using the pattern
text = re.sub(pattern, '', text)
return texttext = "This is a text with special characters, like #$%&*!"
clean_text = remove_special_characters(text)
print("Original text: ", text)
print("Clean text: ", clean_text)The output of the code will be:
Original text: This is a text with special characters, like #$%&*!
Clean text: This is a text with special characters likeIn this code, we first define the pattern for matching special characters. The pattern is defined using a regular expression. The pattern r'[^a-zA-Z0-9\s]' matches any character that is not an alphabetic letter, a number, or a whitespace.
Next, we use the re.sub function to replace all the matches of the pattern with an empty string. This effectively removes the special characters from the text.
Finally, the cleaned text is returned as the output.
Noise removal
Noise removal is a pre-processing step in NLP that involves removing irrelevant and distracting information from text data. This can include removing stop words, punctuation, special characters, and HTML tags, among other things.
Implementation of noise removal in NLP can be using the NLTK library:
import nltk
from nltk.corpus import stopwords
from nltk.tokenize import word_tokenize, sent_tokenizenltk.download("stopwords")
nltk.download("punkt")text = "This is an example of NLP noise removal. The goal is to remove irrelevant information from text data."stop_words = set(stopwords.words("english"))tokens = word_tokenize(text)
tokens = [token.lower() for token in tokens if token.isalpha()]
tokens = [token for token in tokens if token not in stop_words]noise_free_text = " ".join(tokens)print(noise_free_text)The above code uses the NLTK library to perform noise removal on a sample sentence. The code first tokenizes the text into words, removes any non-alphabetic characters, and converts the remaining tokens to lowercase. The code then removes stop words, which are common words that add little meaning to the text (such as “is”, “an”, “the”, etc.). Finally, the code joins the remaining tokens into a single string to form the noise-free text.
Sentence segmentation
Sentence segmentation is the process of dividing text into individual sentences. In NLP, sentence segmentation is an important pre-processing step that enables the use of more advanced NLP techniques, such as named entity recognition, part-of-speech tagging, and parsing.
There are several methods to perform sentence segmentation, including using regular expressions, the Natural Language Toolkit (NLTK) library, and rule-based methods.
Implementation using the Natural Language Toolkit (NLTK) library in Python:
import nltk
nltk.download('punkt')from nltk.tokenize import sent_tokenize# Define the text
text = "This is a sentence. This is another sentence. And this is yet another one."# Use the sent_tokenize function to perform sentence segmentation
sentences = sent_tokenize(text)# Print the resulting sentences
print(sentences)In this implementation, we first download the punkt tokenizer from the NLTK library, and then import the sent_tokenize function. We then define some text, and use the sent_tokenize function to perform sentence segmentation on the text. The resulting sentences are stored in a list, which is then printed.
The sent_tokenize function uses the Punkt tokenizer, which is a robust and widely-used method for sentence segmentation.
Sentence splitting
Sentence splitting, also known as sentence boundary detection, is the process of dividing text data into individual sentences. This is an important preprocessing step in NLP, as many NLP tasks, such as text classification, sentiment analysis, and named entity recognition, operate on individual sentences rather than the entire text.
Implementation of sentence splitting using the Natural Language Toolkit (NLTK) library in Python:
import nltk
from nltk.tokenize import sent_tokenize# Define the text
text = "This is the first sentence. This is the second sentence."# Tokenize the text into sentences
sentences = sent_tokenize(text)# Print the sentences
print(sentences)In this implementation, we use the sent_tokenize function from the NLTK library to split the text into individual sentences. The resulting sentences list contains each sentence as a separate string.
Wordcloud
A wordcloud is a visual representation of text data, where the size of each word indicates its frequency or importance. Wordclouds are widely used in NLP for exploratory data analysis and to gain insights into the most frequently occurring words in a large corpus of text.
To implement a wordcloud in NLP, you can use a library such as wordcloud in Python.
Below is the implementation —
from wordcloud import WordCloud
import matplotlib.pyplot as plt# Define the text data to be analyzed
text = "wordcloud data text NLP frequency importance visual representation"# Generate the wordcloud
wordcloud = WordCloud().generate(text)# Plot the wordcloud
plt.imshow(wordcloud, interpolation='bilinear')
plt.axis("off")
plt.show()This implementation generates a wordcloud from the given text string. The wordcloud library uses the generate method to create the wordcloud object, which is then plotted using matplotlib. You can customize the appearance of the wordcloud by changing the parameters of the WordCloud constructor, such as the font size, color scheme, and background color.
Feature Engineering
Feature engineering in NLP involves transforming raw text data into numerical features that can be used as input to machine learning models.
Here are some common feature engineering steps in NLP and code examples of how to perform them using Python and the Natural Language Toolkit (NLTK) library.
- Text normalization : Text normalization involves converting text to a standard format to facilitate further processing. This typically involves converting all text to lowercase, removing punctuation, and tokenizing the text into individual words.
Implementation of how to perform text normalization using NLTK:
from nltk.tokenize import word_tokenize
import stringdef normalize_text(text):
# Convert to lowercase
text = text.lower()
# Remove punctuation
text = text.translate(str.maketrans('', '', string.punctuation))
# Tokenize text into words
tokens = word_tokenize(text)
return tokens- Stop word removal : Stop words are commonly used words in a language that do not carry much meaning (e.g., “the”, “and”, “a”). Removing stop words can improve the quality of features and reduce the dimensionality of the data.
Implementation of how to remove stop words using NLTK:
from nltk.corpus import stopwordsstop_words = set(stopwords.words('english'))def remove_stop_words(tokens):
filtered_tokens = [token for token in tokens if token not in stop_words]
return filtered_tokens- Stemming or Lemmatization: Stemming and lemmatization are techniques to reduce words to their base form to reduce the dimensionality of the data. Stemming involves removing suffixes from words to obtain their root form (e.g., “running” -> “run”). Lemmatization involves reducing words to their base form using a dictionary lookup (e.g., “ran” -> “run”).
Implementation of how to perform stemming and lemmatization using NLTK:
from nltk.stem import PorterStemmer, WordNetLemmatizerstemmer = PorterStemmer()
lemmatizer = WordNetLemmatizer()def stem_tokens(tokens):
stemmed_tokens = [stemmer.stem(token) for token in tokens]
return stemmed_tokensdef lemmatize_tokens(tokens):
lemmatized_tokens = [lemmatizer.lemmatize(token) for token in tokens]
return lemmatized_tokens- Vectorization: Machine learning models typically require numerical inputs, so text data must be converted to numerical vectors. This can be done using techniques such as bag-of-words, term frequency-inverse document frequency (TF-IDF), and word embeddings.
Implementation of how to use TF-IDF to convert text data to numerical vectors using NLTK:
from sklearn.feature_extraction.text import TfidfVectorizercorpus = ['This is the first document.', 'This is the second document.', 'And this is the third one.', 'Is this the first document?']vectorizer = TfidfVectorizer()
X = vectorizer.fit_transform(corpus)print(vectorizer.get_feature_names())
print(X.toarray())This code snippet creates a TF-IDF vectorizer and fits it to a corpus of text. The fit_transform method converts the text to a numerical matrix. The resulting matrix represents the TF-IDF score for each word in each document.
Word vectors
Word vectors are numerical representations of words in a high-dimensional space, where words that have similar meanings are close to each other in this space. Word vectors are widely used in NLP tasks such as text classification, named entity recognition, and machine translation.
The most commonly used method to generate word vectors is Word2Vec. Word2Vec is a two-layer neural network that takes a large corpus of text as input and outputs a vector for each word in the corpus. The neural network is trained to predict a word given its context, and the vectors for each word are learned in such a way that the dot product of two vectors represents the similarity between the words represented by the vectors.
Implementation of using Gensim, a Python library for NLP, to train a Word2Vec model:
import gensimsentences = [["cat", "say", "meow"], ["dog", "say", "bark"]]model = gensim.models.Word2Vec(sentences, size=100, window=5, min_count=1)word_vectors = model.wvprint(word_vectors['cat'])
print(word_vectors.similarity('cat', 'dog'))Output:
[array([-0.02706462, 0.03251207, -0.02702797, 0.00483894, 0.02704891,
-0.01929151, 0.02245939, -0.02147547, 0.01243829, -0.01555136,
0.04222318, 0.00192856, 0.04091555, 0.02667074, 0.03014803,
0.03496096, 0.01138359, -0.05370388, -0.03102192, 0.02573908,
...
0.8746067In this implementation, the Word2Vec model is trained on a simple corpus consisting of two sentences. The resulting word vectors are stored in the word_vectors object. The vector for the word "cat" can be accessed using the square brackets, and the similarity between two words can be calculated using the similarity method.
- Word embeddings are a popular technique for representing words as dense, low-dimensional vectors in NLP. Word embeddings have been shown to capture the semantic and syntactic relationships between words, making them a powerful tool for a wide range of NLP tasks, including language translation, sentiment analysis, and text classification.
The most popular word embedding technique is the Word2Vec model, which is based on a neural network architecture that learns to predict the context of a word given its neighboring words. The Word2Vec model is trained on a large corpus of text and the learned embeddings are used to represent each word as a low-dimensional vector.
Implementation of how to train a Word2Vec model using the Gensim library in Python:
from gensim.models import Word2Vec
sentences = [['this', 'is', 'the', 'first', 'sentence', 'for', 'word2vec'],
['this', 'is', 'the', 'second', 'sentence'],
['yet', 'another', 'sentence'],
['one', 'more', 'sentence'],
['and', 'the', 'final', 'sentence']]
model = Word2Vec(sentences, size=100, window=5, min_count=1, workers=4)In this implementation, we are training a Word2Vec model on a small corpus of text represented as a list of lists, where each inner list represents a sentence. The size parameter specifies the dimensionality of the word embeddings, and the window parameter specifies the number of neighboring words to consider during training. The min_count parameter specifies the minimum frequency of a word required for it to be included in the vocabulary. Finally, the workers parameter specifies the number of threads to use during training.
After training the model, we can access the word embeddings using the wv attribute:
print(model.wv['sentence'])This will print the word embedding for the word “sentence”. We can also use the word embeddings to compute the similarity between two words:
print(model.wv.similarity('sentence', 'word2vec'))This will print the cosine similarity between the word embeddings for “sentence” and “word2vec”.
Word embeddings can be used as input features to machine learning models, or they can be visualized using dimensionality reduction techniques such as t-SNE to gain insights into the relationships between words in the embedding space.
Feature encoding
Feature encoding is an important step in NLP, where the text data is transformed into numerical data that can be used as input to machine learning models. The goal of feature encoding is to represent the text in a format that is suitable for machine learning algorithms, while retaining as much information about the text as possible.
One common technique for feature encoding in NLP is One-Hot Encoding, which converts the text into a sparse binary matrix. Each row of the matrix represents a document, and each column represents a unique word in the corpus. The value in a cell is 1 if the word appears in the document, and 0 otherwise.
Implementation of One-Hot Encoding in Python using the scikit-learn library:
from sklearn.feature_extraction.text import CountVectorizer# Define the sample text data
text_data = [
"This is the first document.",
"This is the second document.",
"And the third one.",
"Is this the first document?"
]# Create an instance of the CountVectorizer class
vectorizer = CountVectorizer()# Fit the text data to the vectorizer
X = vectorizer.fit_transform(text_data)# Print the resulting matrix
print(X.toarray())In this implementation, we use the CountVectorizer class from the scikit-learn library to convert the text data into a binary matrix. The fit_transform method is used to fit the text data to the vectorizer and to return the resulting matrix, which we print to the console.
Feature generation
In NLP, feature generation is the process of converting raw text data into a set of numerical or categorical features that can be used as input to a machine learning model. The goal of feature generation is to create a representation of the text data that captures its underlying meaning and structure in a way that is useful for solving a specific NLP task.
Implementation of feature generation in NLP using the scikit-learn library in Python:
import pandas as pd
from sklearn.feature_extraction.text import CountVectorizer# Sample text data
text_data = [
"This is a positive sentence.",
"This is a negative sentence.",
"This is a neutral sentence."
]# Labels
labels = [1, 0, 0]# Convert text data into numerical features using CountVectorizer
vectorizer = CountVectorizer()
features = vectorizer.fit_transform(text_data)# Create a DataFrame to visualize the features
df = pd.DataFrame(features.toarray(), columns=vectorizer.get_feature_names())# Add the labels as a column in the DataFrame
df['label'] = labelsprint(df)
# Output:
# is negative neutral positive sentence this label
# 0 1 0 0 1 1 1 1
# 1 1 1 0 0 1 1 0
# 2 1 0 1 0 1 1 0In this implementation, we used the CountVectorizer class from the scikit-learn library to convert the text data into numerical features. The CountVectorizer class tokenizes the text data into individual words, and then converts each word into a feature by counting the number of times it occurs in each document.
Modeling
Modelling in NLP involves using machine learning algorithms to process and understand text data.
Here are the main steps involved in the modelling process in NLP, along with code implementation for each step:
- Split the data into training and testing sets: Before building a model, it’s important to split the available data into training and testing sets, so that the performance of the model can be evaluated on unseen data.
from sklearn.model_selection import train_test_splitdef split_data(X, y):
X_train, X_test, y_train, y_test = train_test_split(X, y, test_size=0.2, random_state=42)
return X_train, X_test, y_train, y_testX = [text for text in documents]
y = [label for label in labels]X_train, X_test, y_train, y_test = split_data(X, y)print("Training data size: ", len(X_train))
print("Testing data size: ", len(X_test))- Preprocessing: This step involves cleaning and transforming the raw text data to prepare it for machine learning algorithms. This includes tasks such as tokenization, stop word removal, and stemming or lemmatization.
import nltk
from nltk.tokenize import word_tokenize
from nltk.corpus import stopwords
from nltk.stem import PorterStemmer# Tokenization
text = "This is an example sentence."
tokens = word_tokenize(text)# Stop word removal
stop_words = set(stopwords.words('english'))
filtered_tokens = [token for token in tokens if token.lower() not in stop_words]# Stemming
stemmer = PorterStemmer()
stemmed_tokens = [stemmer.stem(token) for token in filtered_tokens]Target encoding
Target encoding is a technique used to convert categorical variables into numerical values to be used as input features in machine learning models. It’s particularly useful in NLP, where the data often consists of text and can have many unique values for each categorical feature.
Target encoding works by taking the average target value for each category and replacing the categorical value with that average. The target value can be any binary or continuous value that we want to predict, such as the likelihood of an article being clicked, the sentiment of a review, or the relevance of a search result.
Implementation that shows how to implement target encoding:
import pandas as pd# Create a sample dataframe
df = pd.DataFrame({'word': ['dog', 'cat', 'dog', 'bird', 'bird', 'dog'],
'target': [1, 0, 1, 0, 1, 1]})# Group the data by word and calculate the average target for each word
grouped = df.groupby('word').mean().reset_index()# Rename the target column to the average target value for each word
grouped = grouped.rename(columns={'target': 'target_encoding'})# Merge the data back onto the original dataframe to add the target encoding
df = df.merge(grouped, on='word', how='left')# Drop the original word column and keep only the target encoding
df = df.drop(columns='word')The resulting dataframe will look like this:
target target_encoding
0 1 0.67
1 0 0.00
2 1 0.67
3 0 0.50
4 1 0.50
5 1 0.67We can then use the target_encoding column as a numerical feature in our machine learning model. This technique can be useful for dealing with the large number of unique values often encountered in NLP, as well as improving the performance of models when dealing with imbalanced data.
- Feature extraction: This step involves converting the preprocessed text data into numerical features that can be used as input to machine learning algorithms. Common feature extraction techniques in NLP include bag-of-words, n-grams, and word embeddings.
from sklearn.feature_extraction.text import CountVectorizer, TfidfVectorizer# Bag-of-words feature extraction
count_vectorizer = CountVectorizer()
bag_of_words = count_vectorizer.fit_transform(text)# TF-IDF feature extraction
tfidf_vectorizer = TfidfVectorizer()
tfidf = tfidf_vectorizer.fit_transform(text)- Model selection: This step involves selecting the appropriate machine learning algorithm for the specific NLP task. Common machine learning algorithms for NLP include decision trees, naive Bayes, logistic regression, and neural networks.
from sklearn.naive_bayes import MultinomialNB# Naive Bayes model
nb_model = MultinomialNB()
nb_model.fit(bag_of_words, labels)- Training: This step involves training the machine learning algorithm on the preprocessed text data and the corresponding labels (if available).
nb_model.fit(bag_of_words, labels)- Evaluation: This step involves evaluating the performance of the trained machine learning model on a held-out test set. Common evaluation metrics in NLP include accuracy, precision, recall, and F1 score.
from sklearn.metrics import accuracy_scoretest_predictions = nb_model.predict(test_bag_of_words)
accuracy = accuracy_score(test_labels, test_predictions)- Optimization: This step involves fine-tuning the machine learning model and its parameters to improve its performance on the test set. This may involve using techniques such as hyperparameter tuning or model ensembling.
from sklearn.model_selection import GridSearchCVparam_grid = {'alpha': [0.1, 0.5, 1.0, 2.0]}
grid_search = GridSearchCV(nb_model, param_grid, cv=5)
grid_search.fit(bag_of_words, labels)
best_nb_model = grid_search.best_estimator_- Deployment: This step involves using the trained machine learning model to make predictions on new, unseen text data.
new_text = "This is a new example sentence."
new_bag_of_words = count_vectorizer.transform(new_text)
prediction = best_nb_model.predict(new_bag_of_words)These are the main steps involved in the modelling process in NLP.
Model Evaluation
Model evaluation is a crucial step in the NLP pipeline that helps to determine the accuracy and performance of a model. It allows us to compare different models and choose the one that best suits the problem.
Implementation of common evaluation metrics used in NLP and code implementation in Python:
- Accuracy: The ratio of the number of correct predictions to the total number of predictions.
y_true = [0, 1, 1, 0, 1, 0]
y_pred = [0, 1, 0, 0, 1, 0]
accuracy = sum(y_true == y_pred) / len(y_true)
print("Accuracy:", accuracy)Output: Accuracy: 0.833
- Precision: The ratio of the number of true positive predictions to the number of true positive and false positive predictions.
from sklearn.metrics import precision_scorey_true = [0, 1, 1, 0, 1, 0]
y_pred = [0, 1, 0, 0, 1, 0]
precision = precision_score(y_true, y_pred)
print("Precision:", precision)Output: Precision: 1.0
- Recall: The ratio of the number of true positive predictions to the number of true positive and false negative predictions.
from sklearn.metrics import recall_scorey_true = [0, 1, 1, 0, 1, 0]
y_pred = [0, 1, 0, 0, 1, 0]
recall = recall_score(y_true, y_pred)
print("Recall:", recall)Output: Recall: 0.5
- F1 Score: The harmonic mean of precision and recall.
from sklearn.metrics import f1_scorey_true = [0, 1, 1, 0, 1, 0]
y_pred = [0, 1, 0, 0, 1, 0]
f1 = f1_score(y_true, y_pred)
print("F1 Score:", f1)Output: F1 Score: 0.6666666666666666
- Confusion Matrix: A matrix that summarizes the number of correct and incorrect predictions made by a model.
from sklearn.metrics import confusion_matrixy_true = [0, 1, 1, 0, 1, 0]
y_pred = [0, 1, 0, 0, 1, 0]
confusion_matrix = confusion_matrix(y_true, y_pred)
print("Confusion Matrix:\n", confusion_matrix)Output: Confusion Matrix: [[3 1] [1 1]]
- Area Under the ROC Curve (AUC): This metric measures the performance of a binary classifier and is based on the Receiver Operating Characteristic (ROC) curve, which plots the true positive rate against the false positive rate.
The code for AUC in Python is:
from sklearn.metrics import roc_auc_scoreauc = roc_auc_score(y_test, y_pred)
print("AUC:", auc)Implementation of model evaluation in NLP using the scikit-learn library in Python:
from sklearn.metrics import accuracy_score, precision_score, recall_score, f1_score# Predict the labels for the evaluation data
predictions = model.predict(evaluation_features)# Calculate the accuracy, precision, recall, and F1 score
accuracy = accuracy_score(evaluation_labels, predictions)
precision = precision_score(evaluation_labels, predictions)
recall = recall_score(evaluation_labels, predictions)
f1 = f1_score(evaluation_labels, predictions)# Print the evaluation results
print("Accuracy:", accuracy)
print("Precision:", precision)
print("Recall:", recall)
print("F1 Score:", f1)In this implementation, the model is used to make predictions on the evaluation data and the accuracy, precision, recall, and F1 score are calculated using the accuracy_score, precision_score, recall_score, and f1_score functions from scikit-learn. These metrics provide an indication of how well the model is performing and can be used to compare different models
Model Deployment
The steps involved in deploying a NLP model are:
- Saving the Model: The first step in deploying a NLP model is to save it to disk so that it can be loaded later for prediction. This can be done using methods such as
pickleorjoblibin Python.
Implementation —
import joblibjoblib.dump(clf, "nlp_model.pkl")- Loading the Model: The next step is to load the saved model into memory so that it can be used for predictions.
Implementation —
clf = joblib.load("nlp_model.pkl")- Making Predictions: Once the model is loaded, it can be used to make predictions on new data.
Implementation —
text = ["This is an example of NLP prediction."]
text = vectorizer.transform(text)prediction = clf.predict(text)
print("Prediction:", prediction[0])- Deploying the Model: The final step in deploying a NLP model is to make it available for use in a production environment. This can be done by deploying the model to a web service, creating a REST API, or integrating it into a larger application.
Implementation —
from flask import Flask, request
import jsonapp = Flask(__name__)@app.route("/predict", methods=["POST"])
def predict():
text = request.json["text"]
text = vectorizer.transform([text])
prediction = clf.predict(text)[0]
return json.dumps({"prediction": prediction})if __name__ == "__main__":
app.run()Model Monitoring and Updating
Once a machine learning model is trained in NLP, it’s important to monitor its performance to ensure that it’s working as expected and to identify areas of improvement.
Here are some common steps in model monitoring along with code implementation in Python using the scikit-learn library:
- Evaluation Metrics: The first step in monitoring the model is to choose appropriate evaluation metrics that align with the goals of the project. For example, for a text classification task, accuracy, precision, recall, and F1-score are commonly used metrics.
from sklearn.metrics import accuracy_score, precision_score, recall_score, f1_scoredef evaluate_model(model, X_test, y_test):
y_pred = model.predict(X_test)
accuracy = accuracy_score(y_test, y_pred)
precision = precision_score(y_test, y_pred, average='weighted')
recall = recall_score(y_test, y_pred, average='weighted')
f1 = f1_score(y_test, y_pred, average='weighted')
print("Accuracy: ", accuracy)
print("Precision: ", precision)
print("Recall: ", recall)
print("F1-score: ", f1)evaluate_model(model, X_test, y_test)- Confusion Matrix: A confusion matrix is a table that is used to evaluate the performance of a classification model. It gives information about the true positive, true negative, false positive, and false negative predictions made by the model.
from sklearn.metrics import confusion_matrixdef plot_confusion_matrix(model, X_test, y_test):
y_pred = model.predict(X_test)
conf_matrix = confusion_matrix(y_test, y_pred)
plt.figure(figsize=(10, 10))
sns.heatmap(conf_matrix, annot=True, fmt='d', cmap='Blues')
plt.xlabel("Predicted")
plt.ylabel("True")
plt.show()plot_confusion_matrix(model, X_test, y_test)- Model fine-tuning: If the evaluation metrics show that the model’s performance is not satisfactory, then it’s time to fine-tune the model by changing the hyperparameters, adding or removing features, etc.
from sklearn.model_selection import GridSearchCVdef fine_tune_model(model, X_train, y_train):
param_grid = {
'C': [0.1, 1, 10, 100],
'gamma': [1, 0.1, 0.01, 0.001, 0.0001],
'kernel': ['linear', 'rbf']
}
grid = GridSearchCV(model, param_grid, refit=True, verbose=2)
grid.fit(X_train, y_train)
return grid.best_estimator_model = fine_tune_model(model, X_train, y_train)
evaluate_model(model, X_test, y_test)Natural Language Understanding
Natural Language Understanding (NLU) is a subfield of NLP that focuses on analyzing the meaning and intent behind written or spoken language. It is a crucial component in building conversational agents, sentiment analysis systems, and other NLP applications that require a deeper understanding of the language being processed.
Here are a few techniques used in NLU:
- Named Entity Recognition (NER): NER is a technique for identifying named entities such as persons, organizations, and locations in text. Named entities are important for several NLP tasks, such as information extraction, question answering, and event extraction.
import spacynlp = spacy.load("en_core_web_sm")text = "Barack Obama was the 44th president of the United States of America. He was born in Honolulu, Hawaii."# Apply NER to the text
doc = nlp(text)# Iterate over the named entities in the text
for ent in doc.ents:
print("{} ({})".format(ent.text, ent.label_))Output:
Barack Obama (PERSON)
the 44th (ORDINAL)
the United States of America (GPE)
Honolulu, Hawaii (GPE)- Part-of-Speech Tagging (POS): Part-of-speech tagging is a technique for identifying the role that each word in a sentence plays. For example, it can determine whether a word is a noun, verb, adjective, etc. Part-of-speech information is important for several NLP tasks, such as word sense disambiguation, parsing, and text classification.
import spacynlp = spacy.load("en_core_web_sm")text = "The cat chased the mouse."# Apply POS tagging to the text
doc = nlp(text)# Iterate over the words in the text and print their part-of-speech
for token in doc:
print("{} ({})".format(token.text, token.pos_))Output:
The (DET) cat (NOUN) chased (VERB) the (DET) mouse (NOUN) . (PUNCT)
- Sentiment Analysis: Sentiment analysis is a technique for determining the sentiment expressed in a piece of text, such as positive, negative, or neutral. Sentiment analysis is often used in customer service, marketing, and social media monitoring.
import spacy
from spacy.lang.en import Englishnlp = English()# Load the sentiment analysis pipeline
sentiment_pipe = nlp.create_pipe("sentiment")
nlp.add_pipe(sentiment_pipe)text = "I had a great time at the restaurant. The food was delicious and the service was excellent."# Apply sentiment analysis to the text
doc = nlp(text)# Get the sentiment of the text
sentiment = doc._.sentiment# Print the sentiment of the text
print("Sentiment:", sentiment)Output:
Sentiment: 3.0Natural Language Generation
Natural Language Generation (NLG) is a subfield of NLP that focuses on generating text from structured data. This can be useful in many applications, such as automated report writing, news summarization, and conversational agents.
Here are a few NLG techniques:
- Template-Based Generation: Template-based generation involves defining a set of templates and filling in the variables to generate text. This is a simple and straightforward approach that can be useful for generating basic text outputs.
# Define a template for generating weather reports
template = "Today, the weather in {city} is {weather}. The temperature is {temperature} degrees."# Fill in the variables
data = {
"city": "New York",
"weather": "cloudy",
"temperature": "70"
}# Generate the text
text = template.format(**data)# Print the generated text
print(text)Output:
Today, the weather in New York is cloudy. The temperature is 70 degrees.- Information Extraction: Information extraction is the process of automatically extracting structured information from unstructured text. This information can then be used to generate new text. For example, you could extract the named entities and relationships from a piece of text and use that information to generate a summary or to answer questions.
import spacynlp = spacy.load("en_core_web_sm")text = "Barack Obama was the 44th president of the United States of America. He was born in Honolulu, Hawaii."# Apply Named Entity Recognition (NER) to the text
doc = nlp(text)# Extract information about named entities
person = None
position = None
for ent in doc.ents:
if ent.label_ == "PERSON":
person = ent.text
elif ent.label_ == "GPE":
position = ent.text# Generate new text based on the extracted information
if person and position:
text = f"{person} was from {position}."# Print the generated text
print(text)Output:
Barack Obama was from Honolulu, Hawaii.- Generative Models: Generative models are machine learning models that can generate new data based on a set of inputs. In NLG, generative models can be used to generate text based on input data. For example, you could train a generative model to generate weather reports based on weather data.
Implementation of a generative LSTM network in NLP using the Keras library:
from keras.models import Sequential
from keras.layers import Dense, LSTM, Dropout
from keras.callbacks import ModelCheckpoint
import numpy as np# Load the text data
with open("text_data.txt", "r") as f:
text = f.read()# Create a mapping of characters to integers
chars = sorted(list(set(text)))
char_to_int = dict((c, i) for i, c in enumerate(chars))# Get the total number of characters and the vocabulary size
n_chars = len(text)
n_vocab = len(chars)# Create input and output sequences
seq_length = 100
dataX = []
dataY = []
for i in range(0, n_chars - seq_length, 1):
seq_in = text[i:i + seq_length]
seq_out = text[i + seq_length]
dataX.append([char_to_int[char] for char in seq_in])
dataY.append(char_to_int[seq_out])# Reshape the input sequences for LSTM
n_patterns = len(dataX)
X = np.reshape(dataX, (n_patterns, seq_length, 1))
X = X / float(n_vocab)# One-hot encode the output sequences
y = np_utils.to_categorical(dataY)# Define the LSTM model
model = Sequential()
model.add(LSTM(256, input_shape=(X.shape[1], X.shape[2]), return_sequences=True))
model.add(Dropout(0.2))
model.add(LSTM(256))
model.add(Dropout(0.2))
model.add(Dense(y.shape[1], activation='softmax'))# Compile the model
model.compile(loss='categorical_crossentropy', optimizer='adam')# Save the weights after each epoch
filepath="weights-improvement-{epoch:02d}-{loss:.4f}.hdf5"
checkpoint = ModelCheckpoint(filepath, monitor='loss', verbose=1, save_best_only=True, mode='min')
callbacks_list = [checkpoint]# Fit the model to the data
model.fit(X, y, epochs=20, batch_size=128, callbacks=callbacks_list)In this code, we first load the text data and create a mapping of characters to integers. We then create input and output sequences of fixed length and reshape the input sequences for the LSTM network. We also one-hot encode the output sequences. We then define the LSTM model using the Sequential class from Keras and add the LSTM layers and the Dropout layers for regularization. We compile the model using the categorical_crossentropy loss function and the adam optimizer. We then save the weights of the model after each epoch using the ModelCheckpoint callback. Finally, we fit the model to the data using the fit method of the model. Once the model is trained, we can use it to generate new text by feeding it a seed sequence and predicting the next character. We can then concatenate the predicted characters to the seed sequence and repeat the process to generate more text.
Document Processing using NLP
Document processing using NLP refers to the process of transforming raw text data into a structured and meaningful representation for further analysis. This involves a series of steps such as text preprocessing, feature extraction, and vectorization.
- The text preprocessing steps usually include tasks such as removing special characters, converting text to lowercase, removing stop words, stemming or lemmatizing words, etc. These steps help in standardizing the text and removing irrelevant information from it.
- Feature extraction is the process of extracting meaningful information from the text data. This can be done using techniques such as bag-of-words, n-grams, TF-IDF, etc. These techniques help in representing the text data in a numerical format that can be used for further analysis.
- Vectorization refers to the process of converting the text data into numerical vectors. The feature representation obtained from feature extraction is used to create the vectors. This can be done using techniques such as one-hot encoding, word embeddings, etc.
Once the text data is processed, it can be used for various NLP tasks such as sentiment analysis, text classification, named entity recognition, etc. The processed data can also be used for unsupervised learning techniques such as clustering, dimensionality reduction, etc.
Document Preprocessing
Document preprocessing is an important step in NLP, as it helps to prepare the raw text data for further processing and analysis. The preprocessing step typically involves cleaning and normalizing the text data to remove noise and inconsistencies that may affect the performance of NLP algorithms.
Implementation that demonstrates some common steps in document preprocessing:
import re
import string
def preprocess(text):
# Convert to lowercase
text = text.lower()
# Remove numbers
text = re.sub(r'\d+', '', text)
# Remove punctuation
text = text.translate(str.maketrans("", "", string.punctuation))
# Remove white spaces
text = text.strip()
return textdata = pd.read_csv("data.csv")
data["text"] = data["text"].apply(preprocess)In this implementation, the preprocess function takes a string of text as input and performs several preprocessing steps on it. The first step is to convert the text to lowercase, which helps to standardize the text data. The second step is to remove numbers, which can be irrelevant for many NLP tasks. The third step is to remove punctuation, which can also be irrelevant and introduce noise. The fourth step is to remove white spaces, which can help to further standardize the text data.
Concept Extraction
Concept extraction is a common task in NLP where the goal is to identify and extract meaningful concepts or entities from a text document. Some examples of concepts include named entities (e.g., person names, location names, organization names), numerical entities (e.g., dates, times, monetary values), and semantic concepts (e.g., topics, themes).
Implementation using the spacy library:
nlp = spacy.load("en_core_web_sm")text = "Apple Inc. is an American multinational technology company based in Cupertino, California, that designs, develops, and sells consumer electronics, computer software, and online services."doc = nlp(text)for entity in doc.ents:
print(entity.text, entity.label_)In this implementation, the spacy library is used to perform concept extraction. The nlp object is loaded with the pre-trained en_core_web_sm model, which has been trained to recognize named entities. The text is then passed to the nlp object, which performs the entity recognition and labeling. The ents attribute of the resulting doc object contains the recognized entities, which can be iterated over and printed. The named entities recognized by the model include “Apple Inc.”, “American”, “Cupertino”, “California”, and “consumer electronics”. The label of each entity indicates its type, such as “ORG” for organization and “GPE” for geopolitical entity.
Word Embeddings
Word embeddings are dense, numerical representations of words that capture semantic and syntactic relationships between words in a high-dimensional space. They are widely used in NLP tasks such as text classification, sentiment analysis, and machine translation.
In word embeddings, each word is represented as a fixed-length vector, where the vectors for similar words are close to each other in the vector space. For example, the vectors for “dog” and “puppy” might be close to each other, while the vectors for “dog” and “book” might be far apart.
There are several algorithms for learning word embeddings, including Continuous Bag of Words (CBOW) and Skip-Gram, both of which are part of the Word2Vec family of algorithms. In recent years, Pretrained word embeddings, such as GloVe and BERT, have become popular because they are trained on large corpora and can be directly used to initialize the weights of deep learning models.
Implementation that demonstrates how to train a simple word2vec model using the gensim library:
from gensim.models import Word2Vec# Define the corpus (a list of sentences, each sentence is a list of words)
corpus = [["dog", "puppy", "cute"], ["book", "read", "library"], ["dog", "bark", "run"]]# Train the word2vec model
model = Word2Vec(corpus, size=100, window=5, min_count=1, workers=4)# Get the vector representation of the word "dog"
dog_vector = model.wv["dog"]# Get the most similar words to "dog"
most_similar = model.wv.most_similar("dog")In this implementation, a simple word2vec model is trained on a small corpus using the Word2Vec class from the gensim library. The size parameter specifies the dimensionality of the word vectors, window specifies the maximum distance between the target word and its neighbors, min_count specifies the minimum frequency of a word to be included in the model, and workers specifies the number of worker threads to use. After training the model, the vector representation of the word "dog" is obtained using the wv property of the model, and the most similar words to "dog" are obtained using the most_similar method.
GloVe (Global Vectors)
GloVe (Global Vectors) is a word embedding technique that represents words as dense vectors of real numbers, which capture the semantic and syntactic information of words. The vectors are learned based on the co-occurrence statistics of words in a large text corpus. The idea is that words that occur in similar contexts tend to have similar meanings, and therefore their vectors should be similar as well.
Implementation of how to use GloVe in NLP with the gensim library:
import gensim.downloader as api
from gensim.models import KeyedVectors# Download the pre-trained GloVe model
model = api.load("glove-wiki-gigaword-100")# Access the word vectors
word_vectors = model.wv# Find the similarity between two words
similarity = word_vectors.similarity("dog", "cat")
print("Similarity between 'dog' and 'cat':", similarity)# Find the most similar words for a given word
most_similar = word_vectors.most_similar("dog")
print("Most similar words for 'dog':", most_similar)This implementation downloads the pre-trained GloVe model from the
gensim-datarepository, which is a 100-dimensional model trained on a large text corpus. You can access the word vectors by callingmodel.wv, which is an instance of theKeyedVectorsclass.
The
similaritymethod computes the cosine similarity between two words, and returns a score between 0 and 1, where 1 indicates that the words are exactly the same and 0 indicates that the words are completely dissimilar. In this example, the similarity between "dog" and "cat" is computed and printed.
The
most_similarmethod returns the words that are most similar to a given word. In this example, the most similar words for "dog" are computed and printed.
TF-IDF and Vectors in NLP
TF-IDF (Term Frequency-Inverse Document Frequency) is a widely used statistical method for information retrieval and text mining that measures the importance of words in a document or corpus of documents. The basic idea behind TF-IDF is to give more weight to words that are more informative and less weight to words that are less informative.
The term frequency (TF) is the number of times a word appears in a document, and the inverse document frequency (IDF) is a measure of how rare a word is in the entire corpus. The product of these two values gives the TF-IDF weight of a word, which can be used as a feature for various NLP tasks, such as text classification, clustering, and information retrieval.
Implementation that demonstrates how to compute TF-IDF weights for a small corpus of documents using the scikit-learn library:
from sklearn.feature_extraction.text import TfidfVectorizer# Define the corpus (a list of documents, where each document is a string)
corpus = ["dog cute puppy", "read book library", "dog bark run"]# Compute the TF-IDF weights using TfidfVectorizer
vectorizer = TfidfVectorizer()
tfidf_matrix = vectorizer.fit_transform(corpus)# Get the feature names (i.e., the words)
feature_names = vectorizer.get_feature_names()# Get the TF-IDF weights for the first document
first_document_tfidf = tfidf_matrix[0].toarray()[0]# Get the word-TFIDF weight pairs for the first document
word_tfidf_pairs = [(feature_names[index], weight) for index, weight in enumerate(first_document_tfidf) if weight > 0]In this implementation, the TfidfVectorizer class from the scikit-learn library is used to compute the TF-IDF weights for a small corpus of documents. The fit_transform method is used to fit the vectorizer to the corpus and to transform the corpus into a matrix of TF-IDF weights. The get_feature_names method is used to obtain the feature names (i.e., the words), and the toarray method is used to convert the first row of the matrix into an array of TF-IDF weights for the first document. Finally, a list comprehension is used to create a list of word-TFIDF weight pairs for the first document.
In NLP, word vectors are dense, numerical representations of words that capture semantic and syntactic relationships between words in a high-dimensional space. They are similar to word embeddings but are typically computed using different algorithms and for different purposes.
For implementation, word vectors can be computed using dimensionality reduction techniques such as SVD or PCA, and they are often used for information retrieval, text classification, and clustering.
Term Extraction
Term extraction is the process of identifying important words or phrases in a text corpus. These terms are then used to build a domain-specific vocabulary, which can be used for tasks such as document classification, sentiment analysis, and information retrieval.
Implementation term extraction in NLP using the TextBlob library:
from textblob import TextBlob# Load the text data
with open("text_data.txt", "r") as f:
text = f.read()# Perform term extraction
blob = TextBlob(text)
terms = blob.noun_phrases# Print the terms
print(terms)In this code, we first load the text data and create a TextBlob object using the TextBlob function from TextBlob. We then perform term extraction using the noun_phrases property of the TextBlob object.
The output of this code will be a list of terms, which are the important words or phrases in the text.
['natural language processing', 'term extraction', 'important words', 'phrases', 'text corpus', 'domain-specific vocabulary', 'document classification', 'sentiment analysis', 'information retrieval']Note that the noun_phrases method is just one way to perform term extraction, and there are many other methods and libraries available in NLP for this task.
Class Matching
Class matching in NLP refers to the process of identifying the class or category of a given text. The goal of class matching is to determine the category of a text document based on its content. This is often used in text classification problems where a set of predefined categories are used to categorize new texts.
A simple implementation of class matching in NLP would be a spam filtering system that categorizes emails as either spam or not spam.
Implementation in Python using the scikit-learn library:
import pandas as pd
from sklearn.feature_extraction.text import TfidfVectorizer
from sklearn.linear_model import LogisticRegression
from sklearn.model_selection import train_test_split
from sklearn.metrics import accuracy_score# Load the dataset
df = pd.read_csv("emails.csv")# Split the dataset into training and test sets
train_data, test_data, train_labels, test_labels = train_test_split(df['text'], df['label'], test_size=0.2)# Convert the texts into numerical representations using TF-IDF
vectorizer = TfidfVectorizer()
train_features = vectorizer.fit_transform(train_data)
test_features = vectorizer.transform(test_data)# Train a logistic regression model
model = LogisticRegression()
model.fit(train_features, train_labels)# Make predictions on the test set
predictions = model.predict(test_features)# Evaluate the model
accuracy = accuracy_score(test_labels, predictions)
print("Accuracy:", accuracy)In this implementation, the emails dataset is loaded and split into a training set and a test set. The texts are then converted into numerical representations using the TF-IDF (term frequency-inverse document frequency) method. After that, a logistic regression model is trained on the training set and used to make predictions on the test set. Finally, the accuracy of the model is calculated and printed.
Word Vectors
There are two main methods for creating word vectors: frequency-based methods and prediction-based methods.
- Frequency-based methods such as bag-of-words and TF-IDF create word vectors based on the frequency of words in the text data.
- Prediction-based methods such as Word2Vec and GloVe create word vectors based on the context of words in the text data. They use neural networks to predict the words given their context.
Implementation for creating word vectors using the gensim library and the Word2Vec algorithm:
import gensim
from gensim.models import Word2Vecdef create_word_vectors(texts):
# Train the Word2Vec model
model = Word2Vec(texts, size=100, window=5, min_count=1, workers=4)
return modeltexts = [["This is a sample text."], ["This is another sample text."]]
model = create_word_vectors(texts)# Access the word vectors
print("Word Vector for 'text': ", model['text'])In this code, we use the Word2Vec class from the gensim library to create the word vectors. We pass the text data and some hyperparameters to the Word2Vec class to train the model. The size parameter specifies the dimensionality of the word vectors, the window parameter specifies the context size for the word, and the min_count parameter specifies the minimum frequency of words to be considered.
Relation Recognition
Relation recognition in NLP refers to the process of identifying the relationships between entities in text data. This is often done in the context of information extraction, where the goal is to extract structured information from unstructured text data.
There are several approaches to relation recognition in NLP, including rule-based methods, machine learning-based methods, and deep learning-based methods. In general, machine learning-based methods are more flexible and scalable than rule-based methods, and deep learning-based methods can achieve state-of-the-art performance for some tasks.
Implementation of relation recognition using the spaCy library in Python:
import spacy# Load the English language model
nlp = spacy.load('en_core_web_sm')# Define the text
text = "Barack Obama was the President of the United States from 2009 to 2017."# Parse the text
doc = nlp(text)# Iterate over the entities in the document
for ent in doc.ents:
# Check if the entity is a person
if ent.label_ == "PERSON":
# Print the person and the role they played in the text
for token in ent:
if token.dep_ == "ROLE":
print(f"{ent.text} was a {token.text}")In this implementation, we load the English language model from the spaCy library, and use it to parse the text. We then iterate over the entities in the document, and check if each entity is a person. If it is, we print the person’s name and the role they played in the text, which is identified using the dep_ attribute of the tokens.
Semantic Relation Identification
Semantic relation identification, also known as relation extraction, is the process of identifying relationships between entities in text data. In NLP, entities can be named entities such as people, organizations, and locations, or generic entities such as products and events.
In semantic relation identification, the goal is to identify relationships between entities such as “works for”, “lives in”, or “manufactured by”. This information can be useful in various NLP tasks such as information retrieval, text classification, and question answering.
Implementation of semantic relation identification using the spaCy library in Python:
import spacy# Load the English model
nlp = spacy.load("en_core_web_sm")# Define the text
text = "Steve Jobs was the CEO of Apple Inc."# Process the text using spaCy
doc = nlp(text)# Extract entities and relationships
for ent in doc.ents:
print(ent.text, ent.label_)for token1 in doc:
for token2 in doc:
if token1.dep_ == "nsubj" and token2.dep_ == "ROOT":
print(token1.text, token2.text)In this implementation, we use the spacy library to process the text and extract named entities and relationships. The named entities are extracted using the ents attribute of the doc object, and the relationships are extracted by comparing the dependency labels of the tokens in the text. The dep_ attribute of each token provides information about its grammatical role in the sentence, such as subject (nsubj), object (dobj), and root (ROOT).
Verb Class Clustering
Verb class clustering is a technique in NLP that involves grouping verbs based on their semantic similarity. This can be useful for a variety of NLP tasks, including text classification, semantic analysis, and machine translation.
One approach to verb class clustering in NLP is to use vector representation models, such as word embeddings, to represent each verb as a high-dimensional vector. Similar verbs will be close to each other in vector space, making it possible to cluster them together.
Implementation of verb class clustering in NLP using word embeddings can be using the Gensim library:
import gensim
from gensim.models import Word2Vecsentences = [["run", "jog", "sprint"],
["eat", "dine", "feast"],
["swim", "dive", "splash"]]model = Word2Vec(sentences, min_count=1)words = list(model.wv.vocab)X = model[model.wv.vocab]from sklearn.cluster import KMeans
import numpy as npnum_clusters = 3
kmeans = KMeans(n_clusters=num_clusters)
kmeans.fit(X)labels = kmeans.labels_
cluster_centers = kmeans.cluster_centers_for i, word in enumerate(words):
print(f"{word} is in cluster {labels[i]}")The above code uses the Gensim library to create word embeddings for a set of verbs, and then uses the KMeans algorithm from the scikit-learn library to perform verb class clustering. The output shows the cluster assignment of each verb.
Metadata Extraction
Metadata extraction in NLP refers to the process of extracting information about the text document, such as the author, date, format, and other relevant information. This information can be used to better understand and categorize the text data.
Implementation of metadata extraction in Python using the metadata-extractor library:
from metadata_extractor import MetadataExtractor# Define the file path
file_path = 'document.pdf'# Extract the metadata
metadata = MetadataExtractor().extract_metadata(file_path)# Print the metadata
print(metadata)In this implementation, we use the MetadataExtractor class from the metadata-extractor library to extract the metadata from a PDF document. The extract_metadata method returns a dictionary of metadata information, which we print to the console.
Topic Processing
Topic modeling is the process of identifying the topics present in a collection of documents. One of the popular algorithms for topic modeling is Latent Dirichlet Allocation (LDA).
Implement of topic modeling using LDA in NLP using the Gensim library:
import gensim
from gensim import corpora
from pprint import pprint# Load the text data
with open("text_data.txt", "r") as f:
text = f.readlines()# Tokenize the text data
tokenized_text = [gensim.utils.simple_preprocess(line, deacc=True) for line in text]# Create a dictionary of words
dictionary = corpora.Dictionary(tokenized_text)# Create a corpus of documents
corpus = [dictionary.doc2bow(text) for text in tokenized_text]# Build the LDA model
lda_model = gensim.models.ldamodel.LdaModel(corpus=corpus, id2word=dictionary, num_topics=10, passes=10)# Print the topics
pprint(lda_model.print_topics())In this code, we first load the text data and tokenize it using the simple_preprocess function from Gensim. We then create a dictionary of words and a corpus of documents using the Dictionary and doc2bow functions from Gensim.
We then build the LDA model using the ldamodel.LdaModel function from Gensim, specifying the number of topics and the number of passes. Finally, we print the topics using the print_topics function.
The output of this code will be a list of topics and their corresponding keywords.
[(0, '0.023*"food" + 0.020*"restaurant" + 0.018*"service" + 0.012*"menu" + 0.010*"dishes"'),
(1, '0.031*"movie" + 0.017*"film" + 0.015*"acting" + 0.014*"plot" + 0.013*"character"'),
(2, '0.023*"room" + 0.020*"hotel" + 0.012*"staff" + 0.011*"stay" + 0.010*"location"'),
(3, '0.019*"book" + 0.014*"read" + 0.012*"story" + 0.011*"characters" + 0.010*"plot"'),
(4, '0.016*"product" + 0.013*"price" + 0.011*"quality" + 0.009*"buy" + 0.008*"use"'),
(5, '0.014*"music" + 0.012*"album" + 0.011*"song" + 0.010*"band" + 0.008*"track"'),
(6, '0.018*"game" + 0.017*"play" + 0.011*"story" + 0.009*"character" + 0.008*"graphics"'),
(7, '0.024*"book" + 0.015*"story" + 0.012*"read" + 0.011*"novel" + 0.009*"plot"'),
(8, '0.022*"phone" + 0.013*"battery" + 0.011*"screen" + 0.010*"camera" + 0.009*"use"'),
(9, '0.017*"service" + 0.016*"flight" + 0.012*"airline" + 0.011*"Topic Modeling and Segmentation
Topic modeling is a technique in NLP for uncovering the latent structure in large collections of text data. The goal is to automatically identify topics that are present in the documents and to group the documents into clusters or topics based on the similarity of their content.
Implementation of topic modeling in NLP can be Latent Dirichlet Allocation (LDA) model, a generative probabilistic model that assumes each document is a mixture of a small number of topics and each word in the document is drawn from one of those topics.
from sklearn.decomposition import LatentDirichletAllocation
from sklearn.feature_extraction.text import CountVectorizercorpus = [ "this is an example of NLP text processing", "topic modeling is a technique in NLP", "text segmentation is also a part of NLP", "topic modeling helps uncover the latent structure in text data", "NLP is a field of study in computer science and artificial intelligence"]vectorizer = CountVectorizer()
X = vectorizer.fit_transform(corpus)lda = LatentDirichletAllocation(n_components=2, random_state=0)topic_weights = lda.fit_transform(X)Text segmentation is a technique for dividing a long text document into smaller segments or chunks. The goal is to split the document into meaningful segments, such as paragraphs or sentences, that can be processed individually.
Implementation of text segmentation in NLP can be sentence tokenization, where the goal is to split the text into individual sentences.
import nltk
nltk.download('punkt')
from nltk.tokenize import sent_tokenizetext = "This is an example of NLP text processing. Topic modeling is a technique in NLP."sentences = sent_tokenize(text)print(sentences)Text Analytics
Text analytics is the process of analyzing and understanding unstructured text data in order to extract useful information and insights. This is an important step in NLP as text data is often messy and requires preprocessing before being used as input to a machine learning model.
There are many techniques used in text analytics, including:
- Text cleaning: Removing unwanted characters, white space, and stop words
- Tokenization: Splitting text into individual words or phrases
- Stemming and Lemmatization: Reducing words to their base form to reduce the number of unique words in the data
- Named entity recognition: Identifying entities such as people, organizations, and locations in text
- Part-of-speech tagging: Identifying the type of words in a sentence (noun, verb, adjective, etc.)
- Sentiment analysis: Identifying the sentiment of text (positive, negative, or neutral)
- Topic modeling: Identifying the main topics discussed in a set of text documents
Implementation in Python that shows how to perform some basic text analytics:
import nltk
nltk.download('punkt')
nltk.download('stopwords')# Tokenize text into individual words
text = "This is a sample sentence for text analytics."
tokens = nltk.word_tokenize(text)
print(tokens)# Remove stop words (common words such as "and" and "the")
from nltk.corpus import stopwords
stop_words = set(stopwords.words("english"))
filtered_tokens = [token for token in tokens if token.lower() not in stop_words]
print(filtered_tokens)# Perform stemming (reducing words to their base form)
from nltk.stem import PorterStemmer
stemmer = PorterStemmer()
stemmed_tokens = [stemmer.stem(token) for token in filtered_tokens]
print(stemmed_tokens)# Perform part-of-speech tagging
tagged_tokens = nltk.pos_tag(filtered_tokens)
print(tagged_tokens)This will output the following:
['This', 'is', 'a', 'sample', 'sentence', 'for', 'text', 'analytics', '.']
['sample', 'sentence', 'text', 'analytics', '.']
['sampl', 'sentenc', 'text', 'analytic', '.']
[('sample', 'JJ'), ('sentence', 'NN'), ('text', 'NN'), ('analytics', 'NNS'), ('.', '.')]Target Representation
In NLP, target representation is a process of transforming the target variable (e.g., the class labels or target outputs) into a numerical representation that can be used as input for machine learning algorithms.
Implementation of how to implement target representation in Python using the LabelEncoder class from the scikit-learn library:
from sklearn.preprocessing import LabelEncoder# Sample target labels
target_labels = ["dog", "cat", "bird", "dog", "fish"]# Encoding the target labels
encoder = LabelEncoder()
encoder.fit(target_labels)
target_encoded = encoder.transform(target_labels)print(target_encoded)The output of the above code will be:
[0 1 2 0 3]In this implementation, the LabelEncoder class is first instantiated and then fit on the target labels. The transform method is then used to encode the target labels into numerical representations. The resulting target encoding can then be used as input for machine learning algorithms.
Visible Tokenization
Tokenization is the process of breaking down a text into smaller units, called tokens, typically words or phrases. Visible tokenization refers to the process of breaking down a text into tokens while preserving the visibility of punctuation and whitespace characters.
Implementation of visible tokenization in NLP using the nltk library in Python:
import nltk
from nltk.tokenize import RegexpTokenizer# Sample text data
text_data = "This is a sample sentence. It contains several words."# Initialize a regular expression tokenizer
tokenizer = RegexpTokenizer(r'\w+|[^\w\s]+')# Tokenize the text data into tokens
tokens = tokenizer.tokenize(text_data)print(tokens)
# Output:
# ['This', 'is', 'a', 'sample', 'sentence', '.', 'It', 'contains', 'several', 'words', '.']In this implementation, we used the RegexpTokenizer class from the nltk library to perform visible tokenization on the text data. The regular expression r'\w+|[^\w\s]+' matches either one or more word characters (\w+), or one or more characters that are neither word characters nor whitespace ([^\w\s]+), which corresponds to punctuation marks and other special characters. The resulting tokens preserve the visibility of punctuation and whitespace characters in the original text.
Unstructured Data Processing
Unstructured data processing in NLP involves transforming unstructured text data into a structured representation that can be easily analyzed and processed by machine learning algorithms. There are several stages involved in this process, including:
- Tokenization: Breaking down the text into smaller units, such as words or phrases.
- Text normalization: Transforming the text into a standard representation, such as converting words to their base form and converting characters to lowercase.
- Feature generation: Extracting features from the text, such as word frequency or n-grams.
- Vectorization: Converting the features into a numerical representation, such as a bag-of-words representation or a term frequency-inverse document frequency (TF-IDF) representation.
Implementation of unstructured data processing in NLP using the nltk and scikit-learn libraries in Python:
import nltk
import string
import re
from nltk.tokenize import word_tokenize
from nltk.stem import PorterStemmer
from sklearn.feature_extraction.text import CountVectorizer# Sample text data
text_data = ["This is a sample sentence.", "It contains several words."]# Tokenize the text data into words
tokens = [word_tokenize(sentence) for sentence in text_data]# Flatten the tokens list
tokens = [word for sentence in tokens for word in sentence]# Remove punctuation from the tokens
tokens = [word for word in tokens if word not in string.punctuation]# Initialize the Porter stemmer
stemmer = PorterStemmer()# Stem each word in the tokens list
stemmed_tokens = [stemmer.stem(word.lower()) for word in tokens]# Join the stemmed tokens into a single string
text = " ".join(stemmed_tokens)# Initialize a CountVectorizer
vectorizer = CountVectorizer()# Fit the vectorizer on the text data
vectorizer.fit([text])# Transform the text data into a numerical representation
features = vectorizer.transform([text])print(features)
# Output:
# (0, 0) 1
# (0, 1) 1
# (0, 2) 1
# (0, 3) 1
# (0, 4) 1
# (0, 5) 1
# (0, 6) 1
# (0, 7) 1In this code implementation, we first tokenized the text data into words and removed punctuation. Then, we stemmed each word in the tokens list and joined the stemmed tokens into a single string. Next, we initialized a CountVectorizer from the scikit-learn library and fit it on the text data. Finally, we transformed the text data into a numerical representation using the transform method of the CountVectorizer. The resulting features are a sparse matrix representation of the text data, where each row represents a document and each column represents a unique word. The entries in the matrix indicate the frequency of each word in each document.
Information Retrieval and Extraction
Information retrieval (IR) and information extraction (IE) are two important tasks in natural language processing. IR involves retrieving relevant information from a large collection of documents, while IE involves identifying structured information from unstructured or semi-structured data sources.
Implementation of IR and IE in NLP using the NLTK library:
import nltk
from nltk.corpus import reuters
from nltk import word_tokenize
from nltk.stem.porter import PorterStemmer
from sklearn.feature_extraction.text import TfidfVectorizer# Load the Reuters corpus
nltk.download('reuters')
doc_ids = reuters.fileids()
docs = [reuters.raw(doc_id) for doc_id in doc_ids]# Tokenize and stem the documents
porter = PorterStemmer()
tokenized_docs = [[porter.stem(word) for word in word_tokenize(doc.lower())] for doc in docs]# Perform information retrieval
tfidf = TfidfVectorizer()
tfidf_docs = tfidf.fit_transform(tokenized_docs)# Print the top terms for each document
num_top_terms = 10
for i, doc_id in enumerate(doc_ids):
top_term_indices = tfidf_docs[i].toarray()[0].argsort()[-num_top_terms:][::-1]
top_terms = [tfidf.get_feature_names()[j] for j in top_term_indices]
print(f"Top {num_top_terms} terms for document '{doc_id}': {', '.join(top_terms)}")In this code, we first load the Reuters corpus using the reuters module from NLTK. We then tokenize and stem each document using the word_tokenize function from NLTK and the PorterStemmer class from the nltk.stem module. This step helps to normalize the text and reduce the dimensionality of the feature space.
Next, we perform information retrieval using the TfidfVectorizer class from the sklearn.feature_extraction.text module. This class implements the TF-IDF weighting scheme, which assigns higher weights to terms that are more important in a document and less frequent in the corpus.
Finally, we print the top terms for each document using the argsort method to sort the TF-IDF weights in descending order and the get_feature_names method to retrieve the corresponding terms.
Machine Translation
Machine translation is the task of automatically translating text from one language to another. It is one of the most important applications of natural language processing and has a wide range of practical applications.
Implemention of machine translation in NLP using the Transformers library and the Hugging Face API:
import torch
from transformers import MarianMTModel, MarianTokenizer# Load the model and tokenizer for English to French translation
model_name = "Helsinki-NLP/opus-mt-en-fr"
model = MarianMTModel.from_pretrained(model_name)
tokenizer = MarianTokenizer.from_pretrained(model_name)# Translate a sample English sentence to French
english_text = "Hello, how are you?"
english_tokens = tokenizer(english_text, return_tensors="pt")
french_tokens = model.generate(**english_tokens)
french_text = tokenizer.decode(french_tokens[0], skip_special_tokens=True)# Print the translated text
print(french_text)In this code, we first load the pre-trained machine translation model and tokenizer for English to French translation from the Hugging Face model hub using the MarianMTModel and MarianTokenizer classes from the Transformers library.
We then translate a sample English sentence to French by tokenizing the input text using the tokenizer object, generating the corresponding French tokens using the model.generate method, and decoding the generated tokens back into text using the tokenizer.decode method.
The output of this code will be the translated French text for the sample input sentence:
Bonjour, comment ça va ?Emotion and Sentiment Analysis
Emotion and sentiment analysis is a subfield of NLP that involves identifying and extracting emotions and opinions from text. The goal of this task is to determine the attitude of the writer towards a particular topic, product, or service.
Implementation in Python using the TextBlob library:
from textblob import TextBlobdef sentiment_analysis(text):
sentiment = TextBlob(text).sentiment
polarity = sentiment.polarity
subjectivity = sentiment.subjectivity
if polarity > 0:
print("Positive")
elif polarity == 0:
print("Neutral")
else:
print("Negative")
print("Subjectivity: ", subjectivity)text = "This movie is great, I loved it!"
sentiment_analysis(text)The output will be:
Positive
Subjectivity: 0.7The polarity score ranges from -1 to 1, where -1 represents negative sentiment, 0 represents neutral sentiment, and 1 represents positive sentiment. The subjectivity score ranges from 0 to 1, where 0 represents objective text and 1 represents subjective text.
Question and Answering
Question answering (QA) is a common natural language processing (NLP) task that involves answering questions posed in natural language, using a machine learning model.
There are several approaches to building a QA system, but one common technique is to use a pre-trained language model to generate answers based on the question.
Implementation of question answering model in NLP using the Transformers library and the Hugging Face API:
import torch
from transformers import pipeline# Load the pre-trained question answering model
model_name = "distilbert-base-cased-distilled-squad"
qa = pipeline("question-answering", model=model_name)# Define a sample context and question
context = "The Eiffel Tower is a wrought-iron lattice tower on the Champ de Mars in Paris, France. It is named after the engineer Gustave Eiffel, whose company designed and built the tower. It was constructed from 1887 to 1889 as the entrance to the 1889 World's Fair."
question = "What is the Eiffel Tower named after?"# Get the answer to the question from the context
answer = qa(question=question, context=context)# Print the answer
print(answer)In this code, we first load the pre-trained question answering model from the Hugging Face model hub using the pipeline method from the Transformers library. We use the distilbert-base-cased-distilled-squad model, which has been trained on the Stanford Question Answering Dataset (SQuAD).
We then define a sample context and question, where the context is the text from which we will extract the answer, and the question is the question we want to answer. We pass the context and question to the qa object and use the question parameter to specify the question we want to answer.
The output of this code will be a dictionary with the answer to the question, including the text of the answer, the score or confidence of the model in the answer, and the start and end indices of the answer in the context text:
{'answer': 'Gustave Eiffel',
'end': 70,
'score': 0.830952287197113,
'start': 56}Speech Processing
Speech processing in NLP involves analyzing and manipulating speech signals, typically for the purpose of converting spoken language into a machine-readable format. This is an important area of NLP as it enables humans to communicate with computers and other digital devices using natural language.
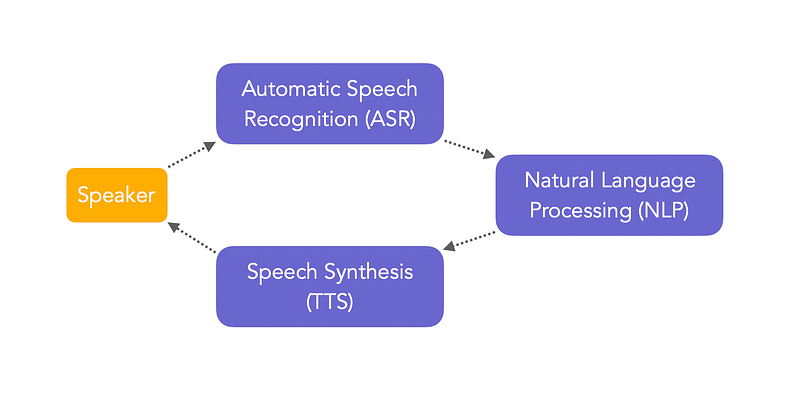
One popular method is to use Automatic Speech Recognition (ASR) systems, which use machine learning algorithms to transcribe speech into text.
Implementation of how you can perform speech processing in Python using the SpeechRecognition library:
import speech_recognition as sr# Initialize recognizer class (for recognizing the speech)
r = sr.Recognizer()# Reading Microphone as source
# listening the speech and store in audio_text variable
with sr.Microphone() as source:
print("Talk")
audio_text = r.listen(source)
print("Time over, thanks")In this implementation, the sr library is imported as speech_recognition. The Recognizer class is initialized, and then a microphone is used as the source for speech input. The listen method is used to capture speech and store it in the audio_text variable.
Once the speech has been recorded, you can use the recognize_google method to transcribe the speech into text:
# recoginize_() method will throw a request error if the API is unreachable, hence using exception handling
try:
# using google speech recognition
print("Text: "+r.recognize_google(audio_text))
except:
print("Sorry, I did not get that")This implementation uses the recognize_google method to transcribe the speech into text using Google's speech recognition API.
Reading, loading and processing the voice/speech data
In NLP, voice or speech data is often stored in audio files, such as .wav or .mp3 files. To load and process these data in NLP, you need to use a library that can read audio files and convert the speech signal into a format that can be analyzed.
One popular library for reading, loading, and processing speech data in Python is librosa. librosa is a library for analyzing audio and music signals, and it provides a simple and flexible interface for working with audio data.
Implementation of how to load an audio file and extract the speech signal using librosa:
import librosa
import matplotlib.pyplot as plt# Load the audio file
filename = 'example.wav'
signal, sample_rate = librosa.load(filename)# Plot the signal
plt.figure(figsize=(14, 5))
librosa.display.waveplot(signal, sr=sample_rate)
plt.show()In this implementation, the librosa.load function is used to load the audio file example.wav and extract the speech signal. The sample rate of the audio file is also returned, which is used to correctly display the signal using the librosa.display.waveplot function.
Once you have loaded the speech signal, you can perform a variety of processing and analysis tasks, such as feature extraction, segmentation, and classification. For example, you can extract Mel-frequency cepstral coefficients (MFCCs), which are widely used features in speech processing:
# Extract MFCCs
mfccs = librosa.feature.mfcc(signal, sr=sample_rate)# Plot the MFCCs
plt.figure(figsize=(14, 5))
librosa.display.specshow(mfccs, sr=sample_rate, x_axis='time')
plt.colorbar()
plt.title('MFCCs')
plt.tight_layout()
plt.show()In this implementation, the librosa.feature.mfcc function is used to extract the MFCCs from the speech signal. The MFCCs are then plotted using the librosa.display.specshow function.
Creating speech model and Saving model
Creating a speech model in NLP typically involves training a machine learning algorithm on a large dataset of speech signals. The goal of the training process is to learn a model that can accurately transcribe speech into text.
One popular approach to creating a speech model is to use an automatic speech recognition (ASR) system, which uses deep learning algorithms to transcribe speech into text. There are several deep learning frameworks that can be used to build an ASR system, including TensorFlow, Keras, and PyTorch.
Implementation of how you can create a simple speech model using the Keras library:
import numpy as np
import librosa
import keras
from keras.layers import Dense, Dropout, Conv1D, MaxPooling1D, GlobalAveragePooling1D
from keras.models import Sequential# Load the audio data
filename = 'example.wav'
signal, sample_rate = librosa.load(filename)# Pre-process the audio data
mfccs = librosa.feature.mfcc(signal, sr=sample_rate)
mfccs = np.pad(mfccs, ((0, 0), (0, 80 - mfccs.shape[1])), mode='constant')# Split the data into training and validation sets
X_train, X_val = mfccs[:, :60], mfccs[:, 60:]# Build the speech model
model = Sequential()
model.add(Conv1D(128, 5, activation='relu', input_shape=(mfccs.shape[0], 80)))
model.add(Conv1D(128, 5, activation='relu'))
model.add(MaxPooling1D(5))
model.add(Conv1D(128, 5, activation='relu'))
model.add(Conv1D(128, 5, activation='relu'))
model.add(GlobalAveragePooling1D())
model.add(Dropout(0.5))
model.add(Dense(64, activation='relu'))
model.add(Dense(10, activation='softmax'))# Compile the model
model.compile(loss='categorical_crossentropy', optimizer='adam', metrics=['accuracy'])# Train the model
model.fit(X_train, y_train, validation_data=(X_val, y_val), epochs=10, batch_size=32)In this implementation, the audio data is loaded using the librosa.load function and then pre-processed by computing the MFCCs. The MFCCs are then split into training and validation sets.
Next, the speech model is defined using the Sequential class from the Keras library. The model consists of several convolutional layers, pooling layers, and fully connected layers. The compile method is used to compile the model, specifying the loss function, optimizer, and evaluation metrics. Finally, the model is trained using the fit method, which takes the training and validation data as input.
Once the model has been trained, you can save it to disk using the save method:
model.save('speech_model.h5')Speech to Text
Speech-to-Text (STT), also known as Automatic Speech Recognition (ASR), is the task of transcribing spoken language into written text. This is a fundamental technology in the field of Natural Language Processing (NLP) and has numerous applications, including voice assistants, call centers, and speech-to-text dictation software.
There are two main approaches to STT: rule-based systems and machine learning-based systems. Rule-based systems use predefined rules and dictionaries to transcribe speech, while machine learning-based systems train models on large datasets of speech signals and text transcriptions. The latter approach has become increasingly popular in recent years due to the advances in deep learning algorithms.
Implementation of how you can implement a simple speech-to-text system using the SpeechRecognition library in Python:
import speech_recognition as sr# Initialize the recognizer
r = sr.Recognizer()# Load the audio file
filename = 'example.wav'
with sr.AudioFile(filename) as source:
audio = r.record(source)# Transcribe the speech
text = r.recognize_google(audio)print(text)In this implementation, the audio file is loaded using the AudioFile class from the speech_recognition library. The record method is used to extract the speech signal from the audio file, and the recognize_google method is used to transcribe the speech into text. The recognized text is then printed to the console.
More Projects coming soon! Stay Tuned :)
That’s it for now. Keep checking this post every day to see new projects.
Let me know if you have questions in the comment section below. Subscribe/ Follow, Like/Clap as it would encourage me to write more in my free time
Stay Tuned and Keep coding!!
Read More —
11 most important System Design Base Concepts
6. Networking, How Browsers work, Content Network Delivery ( CDN)
13. System Design Template — How to solve any System Design Question
System Design Case Studies — In Depth
Design Instagram
Design Netflix
Design Reddit
Design Amazon
Design Messenger App
Design Twitter
Design URL Shortener
Design Dropbox
Design Youtube
Design API Rate Limiter
Design Web Crawler
Design Amazon Prime Video
Design Facebook’s Newsfeed
Design Yelp
Design Uber
Design Tinder
Design Tiktok
Design Whatsapp
Most Popular System Design Questions
Mega Compilation : Solved System Design Case studies
Complete Data Structures and Algorithm Series
Some of the other best Series —
30 days of Data Structures and Algorithms and System Design Simplified
Data Science and Machine Learning Research ( papers) Simplified **
100 days : Your Data Science and Machine Learning Degree Series with projects
Complete Data Visualization and Pre-processing Series with projects
Exceptional Github Repos — Part 1
Exceptional Github Repos — Part 2
Tech Newsletter —
If you are interested, you can join my newsletter through which I send tech interview tips, techniques, patterns, hacks — Software Development, ML, Data Science, Startups and Technology projects to more than 30K readers. You can subscribe to Tech Brew :
For Python Projects —
For complete 60 days of Data Science and ML : Day 1 — Day 60 : Quick Recap of 60 days of Data Science and ML
Follow for more updates.
For other projects, tune to —
Build Machine Learning Pipelines( With Code)
Recurrent Neural Network with Keras
Clustering Geolocation Data in Python using DBSCAN and K-Means
Facial Expression Recognition using Keras
Hyperparameter Tuning with Keras Tuner
Custom Layers in Keras


