
Day 12 of System Design Case Studies Series : Design Web Crawler, Google Docs, HubSpot, Comment Filtering System, DocuSign, Ninja Van
Complete Design with examples
Hello peeps! Welcome to Day 12 of System Design Case studies series where we will design Web Crawler, Google Docs, HubSpot, Comment Filtering System, DocuSign and Ninja Van.
This post has system design for ( scroll till the end of the post) —
Note : Please read System Design Important Terms you MUST know and Most Important System Design basics before reading this post.
Projects Videos —
All the projects, data structures, SQL, algorithms, system design, Data Science and ML , Data Analytics, Data Engineering, , Implemented Data Science and ML projects, Implemented Data Engineering Projects, Implemented Deep Learning Projects, Implemented Machine Learning Ops Projects, Implemented Time Series Analysis and Forecasting Projects, Implemented Applied Machine Learning Projects, Implemented Tensorflow and Keras Projects, Implemented PyTorch Projects, Implemented Scikit Learn Projects, Implemented Big Data Projects, Implemented Cloud Machine Learning Projects, Implemented Neural Networks Projects, Implemented OpenCV Projects,Complete ML Research Papers Summarized, Implemented Data Analytics projects, Implemented Data Visualization Projects, Implemented Data Mining Projects, Implemented Natural Leaning Processing Projects, MLOps and Deep Learning, Applied Machine Learning with Projects Series, PyTorch with Projects Series, Tensorflow and Keras with Projects Series, Scikit Learn Series with Projects, Time Series Analysis and Forecasting with Projects Series, ML System Design Case Studies Series videos will be published on our youtube channel ( just launched).
Subscribe today!
Solved System Design Case Studies — In depth
Design Instagram
Design Messenger App
Design Twitter
Design URL Shortener
Design Dropbox
Design Youtube
Design API Rate Limiter
Design Web Crawler
Design Facebook’s Newsfeed
Design Yelp
Design Uber
Design Tinder
Design Tiktok
Design Whatsapp
Most Popular System Design Questions
Mega Compilation : Solved System Design Case studies
We will be discussing in depth -
- What is Web Crawler
- Important Features
- Scaling Requirements
- Data Model — ER requirements
- High Level Design
- Basic Low Level Design
- API Design
- Complete Detailed Design
- Code Implementation
Pre-requisite to this post -
Complete System Design Series — Important Concepts that you should know before starting the Case studies
6. Networking, How Browsers work, Content Network Delivery ( CDN)
13. System Design Template — How to solve any System Design Question
Github —
Day 1 of System Design Case Studies can be found below-
Day 2 of System Design Case Studies can be found below-
Day 3 of System Design Case Studies can be found below-
Day 4 of System Design Case Studies can be found below-
What is Web Crawler?
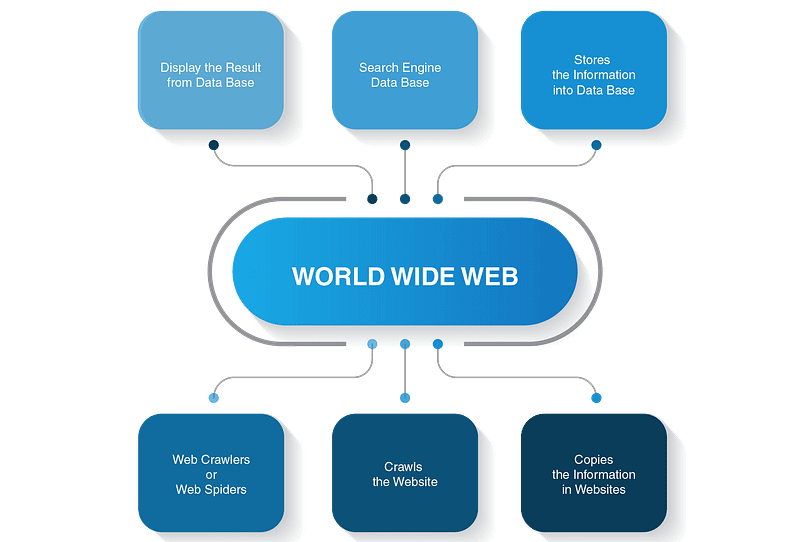
Web crawler is a spider bot which is used for —
- Search Engine Indexing
- Web Mining and monitoring
- Web Archiving
- To search for copyright infringements
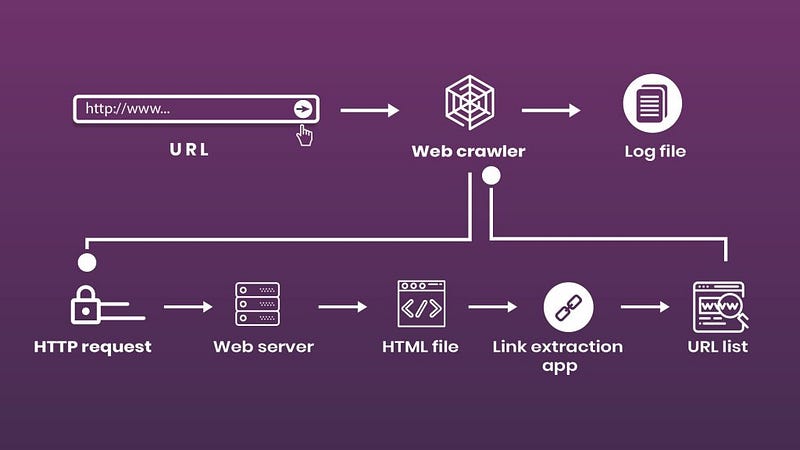
A web crawler works by following a set of instructions to navigate through web pages and extract information. The basic process of a web crawler can be broken down into the following steps:
- Start with a seed URL: The crawler begins by visiting a seed URL, which is a starting point for the crawl. This can be a single URL or a list of URLs.
- Extract links from the seed URL: The crawler then extracts all the URLs from the seed URL’s HTML content. These URLs represent the pages that the crawler will visit next.
- Add URLs to a queue: The extracted URLs are added to a queue, which is a list of URLs that the crawler needs to visit.
- Visit the next URL: The crawler visits the next URL in the queue by sending an HTTP request to the server and receiving the HTML content in response.
- Extract new URLs: The crawler then extracts all the URLs from the new HTML content and adds them to the queue.
- Repeat steps 4 and 5: The crawler continues to visit the next URL in the queue and extract new URLs until the queue is empty.
- Extract data: The crawler can extract data from the visited pages, such as text, images, and metadata, and store it in a database or file.
- URL filtering: The crawler can filter the URLs to avoid visiting the same URL multiple times or visiting irrelevant pages.
- Repeat: The crawler can repeat the process from step 1, using the new URLs as seed URLs.
- Stop condition: The crawler stops when certain conditions are met, such as reaching a maximum number of URLs visited or a maximum depth of links to follow.
Key components and functionalities of Web Crawler—
- Starting point: Identify the seed URL(s) from which the crawler will begin to traverse the web.
- URL queue: Create a queue to store the URLs that the crawler needs to visit. The seed URLs are added to the queue first.
- URL processing: Develop a mechanism for processing the URLs in the queue. This typically involves sending an HTTP request to the URL, and then parsing the HTML content of the response to extract the URLs of other pages that need to be visited.
- URL filtering: Create a mechanism for filtering the URLs that are extracted from the HTML content. This will help to avoid visiting the same URL multiple times, and also prevent the crawler from visiting irrelevant pages.
- Data storage: Decide how to store the data that is extracted by the crawler. This could involve storing the data in a database, a file, or another type of storage system.
- Handling errors: Implement a mechanism for handling errors that may occur while the crawler is running. This could include logging errors, retrying failed requests, and handling cases where the server returns a 404 or other error status code.
- Performance Optimization: To improve the performance of the crawler, one can implement multi-threading, rate-limiting and caching of the visited pages.
- Deployment: Decide how the crawler will be deployed and run. This could involve running the crawler on a scheduled basis, or having it run continuously.
Important Features
For this case study we will explore —
Search Engine Indexing for HTML pages
Scaling Requirements- Capacity Estimations
Let’s say, we have —
No of web pages downloaded per month : 500 Million
Average web page size : 500 KB
Total Storage Needed per month:
500 Million * 500KB = 250 TB
Total Storage needed for next 10 years:
250 TB * 10 years * 12 months = 30 PB
Query per second :
500 Million/30/24/3600 = 192 pages per second
Peak Query per second = 2 * 192 = 384
High Level Design
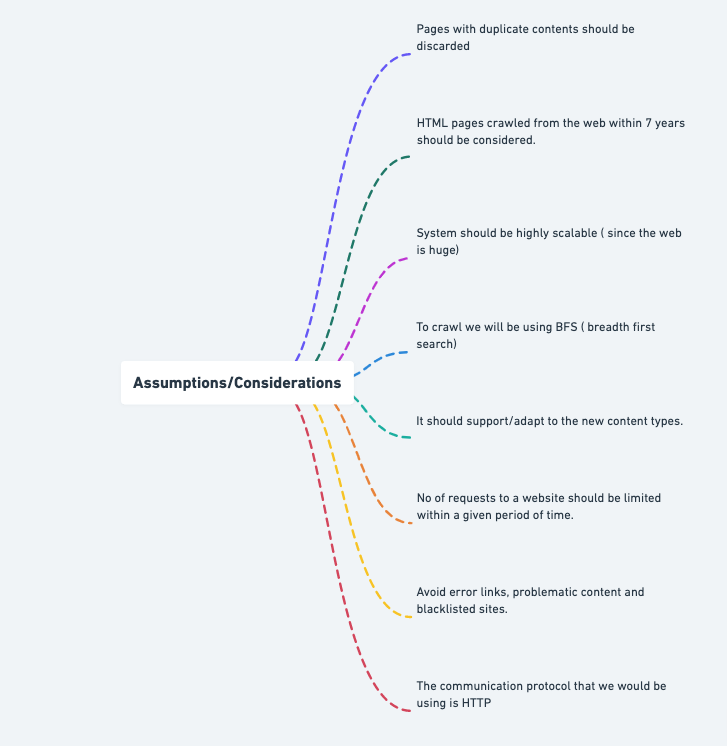
Assumptions/Considerations —
- Pages with duplicate contents should be discarded
- HTML pages crawled from the web within 7 years should be considered.
- System should be highly scalable ( since the web is huge)
- To crawl we will be using BFS ( breadth first search)
- It should support/adapt to the new content types.
- No of requests to a website should be limited within a given period of time.
- Avoid error links, problematic content and blacklisted sites.
- The communication protocol that we would be using is HTTP
— — — — — — — — — — — — — — — — — — — — — — — — — — — — — — — — — —
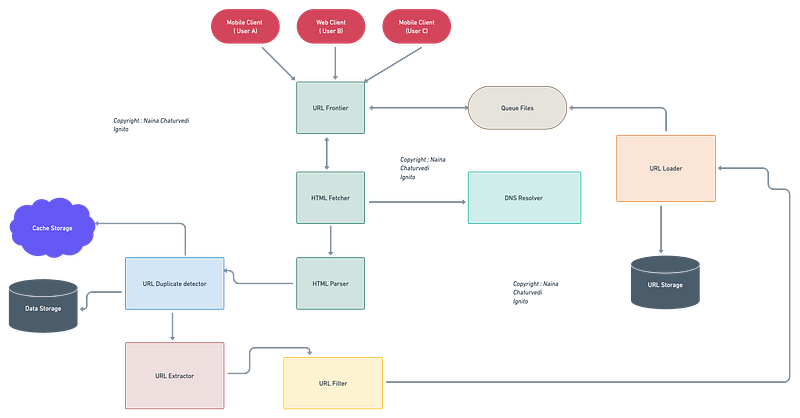
Components —
- Client : User machine
- start URLs: URL’s that will be used as the starting point for e.g college website URL
- HTML fetcher and downloader : To download the web pages from the internet for the URL’s given by the URL frontier after checking if they are already downloaded or not.
- URL Frontier : To find of the URL is already downloaded or not
- Content Parser : To parse and validate the web pages
- Queues : Priority Queues
- Link Extractor: To parse and extract links from the HTML pages
- Datastore : To store HTML content
- DNS Resolver: to convert URL to IP address
- URL filter and DB : To filter error links, blacklisted pages and store only the valid ones.
A simple web crawler in Python using the requests and BeautifulSoup libraries:
import requests
from bs4 import BeautifulSoup
def crawl_web_page(url):
# Make a request to the URL
response = requests.get(url)
# Check if the request was successful
if response.status_code == 200:
# Get the content of the page
page_content = response.content
# Parse the content using BeautifulSoup
soup = BeautifulSoup(page_content, 'html.parser')
# Get all the links on the page
links = [link.get('href') for link in soup.find_all('a')]
# Return the links
return links
else:
return None# Example usage
start_url = "https://www.example.com"
links = crawl_web_page(start_url)if links:
for link in links:
print(link)
else:
print("Failed to retrieve page content.")This is just a simple code to give you an idea of how you can implement a web crawler in Python. In a real-world scenario, you would probably want to add more functionality, such as logging, error handling, and storing the information you collect in a database.
Implementation of an API web crawler in Python to search Google:
import requests
import re
def search_google(query):
query = query.replace(" ", "+")
url = f"https://www.google.com/search?q={query}"
headers = {
'User-Agent': 'Mozilla/5.0 (Windows NT 10.0; Win64; x64) AppleWebKit/537.36 (KHTML, like Gecko) Chrome/89.0.4389.82 Safari/537.36'
}
response = requests.get(url, headers=headers)
if response.status_code == 200:
return response.text
else:
return Nonedef parse_results(html_content):
links = re.findall(r'<a href="(.*?)"', html_content)
return linksdef get_google_results(query):
html_content = search_google(query)
if html_content:
return parse_results(html_content)
else:
return NoneIn this example, search_google function uses the requests library to send a GET request to the Google search URL with the User-Agent header set as a typical Google Chrome user agent. The function returns the HTML content of the search results page if the request is successful.
The parse_results function uses the re library to parse the HTML content and extract the links of the search results using a regular expression pattern.
The get_google_results function combines the above two functions and returns the extracted links from the search results.
— — — — — — — — — — — — — — — — — — — — — — — — — — — — — — — — — —
Basic Low level Design
import java.util.*;
import java.util.concurrent.*;

class WebCrawler {
    private Set<String> visitedUrls;
    private ExecutorService executorService;

    public WebCrawler() {
        this.visitedUrls = new HashSet<>();
        this.executorService = Executors.newFixedThreadPool(10);
    }

    public void crawl(String startingUrl) {
        submitTask(startingUrl);

        executorService.shutdown();
        try {
            executorService.awaitTermination(Long.MAX_VALUE, TimeUnit.NANOSECONDS);
        } catch (InterruptedException e) {
            e.printStackTrace();
        }
    }

    private void submitTask(String url) {
        if (visitedUrls.contains(url)) {
            return;
        }

        visitedUrls.add(url);

        Callable<Void> task = () -> {
            // Process the URL and extract information
            System.out.println("Processing URL: " + url);
            // ...

            // Get links from the page
            List<String> links = getLinksFromPage(url);
            for (String link : links) {
                submitTask(link);
            }

            return null;
        };

        executorService.submit(task);
    }

    private List<String> getLinksFromPage(String url) {
        // Simulated method to get links from the page
        List<String> links = new ArrayList<>();
        // ...

        return links;
    }
}

public class WebCrawlerApp {
    public static void main(String[] args) {
        WebCrawler webCrawler = new WebCrawler();

        // Start crawling from a specific URL
        webCrawler.crawl("https://example.com");
    }
}
API Design
Implementation —
from flask import Flask, jsonify, request
import requests
from bs4 import BeautifulSoup
app = Flask(__name__)# Endpoint for crawling a website and extracting links
@app.route('/crawl', methods=['POST'])
def crawl_website():
# Get URL from request body
url = request.json['url']
# Send request to URL and get HTML content
response = requests.get(url)
html_content = response.content
# Parse HTML content with BeautifulSoup and extract links
soup = BeautifulSoup(html_content, 'html.parser')
links = []
for link in soup.find_all('a'):
href = link.get('href')
if href:
links.append(href)
# Return list of links
return jsonify(links)# Endpoint for checking if a website is up or down
@app.route('/check', methods=['POST'])
def check_website():
# Get URL from request body
url = request.json['url']
# Send request to URL and check status code
response = requests.get(url)
if response.status_code == 200:
return jsonify({'message': 'Website is up!'})
else:
return jsonify({'message': 'Website is down!'})if __name__ == '__main__':
app.run(debug=True)In this example, we have two endpoints:
/crawl(POST): This endpoint is used to crawl a website and extract links. The URL is passed in the request body as JSON./check(POST): This endpoint is used to check if a website is up or down. The URL is passed in the request body as JSON.
Complete Detailed Design
(Zoom it)
Code
Web crawler for Search Engine Indexing:
Web crawlers or spiders are programs that automatically browse the web to gather data from websites. They are used by search engines to build an index of the web, which can be searched by users.
Here is a Python code to implement a basic web crawler that extracts the title and URL of all links on a webpage:
import requests
from bs4 import BeautifulSoup# Define the URL to crawl
url = 'https://www.example.com/'# Send a GET request to the URL
response = requests.get(url)# Parse the HTML content of the page using BeautifulSoup
soup = BeautifulSoup(response.content, 'html.parser')# Find all links on the page and print their titles and URLs
for link in soup.find_all('a'):
title = link.get('title')
if not title:
title = link.text
print(title, link.get('href'))Web Mining and Monitoring:
Web mining refers to the process of extracting useful information from the web. It involves data mining, machine learning, and natural language processing techniques to analyze web content, structure, and usage. Web monitoring, on the other hand, refers to the process of tracking changes to web content over time.
Here is a Python code to implement web mining and monitoring using the Beautiful Soup library:
import requests
from bs4 import BeautifulSoup# Define the URL to crawl
url = 'https://www.example.com/'# Send a GET request to the URL
response = requests.get(url)# Parse the HTML content of the page using BeautifulSoup
soup = BeautifulSoup(response.content, 'html.parser')# Extract useful information from the page
title = soup.find('title').text
description = soup.find('meta', {'name': 'description'}).get('content')
keywords = soup.find('meta', {'name': 'keywords'}).get('content')# Save the information to a database or file
# ...# Monitor the page for changes
while True:
# Send a GET request to the URL
response = requests.get(url) # Parse the HTML content of the page using BeautifulSoup
soup = BeautifulSoup(response.content, 'html.parser') # Check if the title, description, or keywords have changed
new_title = soup.find('title').text
new_description = soup.find('meta', {'name': 'description'}).get('content')
new_keywords = soup.find('meta', {'name': 'keywords'}).get('content')
if new_title != title or new_description != description or new_keywords != keywords:
print('Page has changed!')
# Send a notification email or update the database
# ... # Wait for some time before checking again
time.sleep(3600) # Check every hourWeb Archiving:
Web archiving refers to the process of collecting, preserving, and providing access to web content for future use. It involves crawling web pages, storing them in a database, and providing search and retrieval functionality.
Here is a Python code to implement web archiving using the Wayback Machine API:
import requests# Define the URL to archive
url = 'https://www.example.com/'# Send a POST request to the Wayback Machine API to archive the URL
response = requests.post('https://web.archive.org/save/' + url)# Check the response status code to see if the archiving was successful
if response.status_code == 200:
print('URL has been archived successfully!')
else:
print('Error archiving URL: ' + response.text)To search for copyright infringements using Python code:
Searching for copyright infringements involves crawling the web to find instances of copyrighted material being used without permission.
Here is a Python code to implement a basic copyright infringement checker that searches for text matches of a given query on web pages:
import requests# Define the query to search for
query = 'example query'# Define the URL to search on
url = 'https://www.google.com/search?q=' + query# Send a GET request to the URL
response = requests.get(url)# Parse the HTML content of the page using BeautifulSoup
soup = BeautifulSoup(response.content, 'html.parser')# Find all links on the page and print their URLs
for link in soup.find_all('a'):
href = link.get('href')
if href.startswith('/url?q='):
url = href.split('=')[1]
if not url.startswith('http'):
url = 'https://' + url
# Send a GET request to the URL and search for the query in the content
response = requests.get(url)
if response.status_code == 200 and query in response.text:
print('Copyright infringement found on', url)More on Web Crawler System Design —
URL Frontier and Queue:
Designing systems to manage the list of URLs to be crawled (URL frontier):
- Queue data structure: Use a queue to maintain the list of URLs to be crawled. Newly discovered URLs are appended to the queue, and the crawler dequeues URLs to fetch and parse.
- URL deduplication: Check and filter out duplicate URLs to avoid visiting the same page multiple times.
- URL normalization: Normalize URLs to handle variations in their formats and make them consistent.
from collections import deque
from urllib.parse import urlparseclass Frontier:
def __init__(self):
self.queue = deque()
self.visited = set() def enqueue(self, url):
normalized_url = self.normalize_url(url)
if normalized_url not in self.visited:
self.queue.append(normalized_url)
self.visited.add(normalized_url) def dequeue(self):
return self.queue.popleft() def normalize_url(self, url):
# Normalize URL by removing trailing slashes and resolving relative URLs
parsed_url = urlparse(url)
return parsed_url.geturl() def is_empty(self):
return len(self.queue) == 0# Example usage
frontier = Frontier()
frontier.enqueue("https://example.com/page1")
frontier.enqueue("https://example.com/page2")
frontier.enqueue("https://example.com/page1") # Duplicate URL, should be filtered out
print(frontier.dequeue()) # Output: https://example.com/page1
print(frontier.dequeue()) # Output: https://example.com/page2
print(frontier.is_empty()) # Output: TrueCrawling Policies and Scheduling:
Defining crawling policies for determining which pages to crawl:
- Breadth-first or depth-first: Choose to crawl pages in a breadth-first or depth-first manner.
- Page relevance or importance: Assign scores or weights to pages based on relevance or importance and crawl high-scoring pages first.
- Page updates: Track page updates and prioritize crawling based on the last modification time.
class Crawler:
def __init__(self, policy):
self.policy = policy
def should_crawl(self, url):
# Determine whether to crawl the given URL based on the crawling policy
if self.policy == "breadth-first":
return True
elif self.policy == "depth-first":
return False
else:
# Add custom crawling policy logic here
return True
def prioritize_crawl(self, urls):
# Prioritize the URLs based on the crawling policy
if self.policy == "breadth-first":
return urls
elif self.policy == "depth-first":
return list(reversed(urls))
else:
# Add custom prioritization logic here
return urls
# Example usage
crawler = Crawler("breadth-first")
if crawler.should_crawl("https://example.com/page1"):
print("Crawl page1")
else:
print("Skip page1")
urls_to_crawl = ["https://example.com/page1", "https://example.com/page2", "https://example.com/page3"]
prioritized_urls = crawler.prioritize_crawl(urls_to_crawl)
for url in prioritized_urls:
print(url)Distributed Crawling:
Designing systems for distributed crawling across multiple machines or nodes:
- Partitioning: Divide the crawling workload among multiple machines by partitioning the set of URLs.
- Load balancing: Distribute the workload evenly across machines to ensure efficient resource utilization.
- Coordination and synchronization: Implement mechanisms for coordinating the distributed crawlers and synchronizing their progress.
class DistributedCrawler:
def __init__(self, num_nodes):
self.num_nodes = num_nodes def partition_urls(self, urls):
# Partition the list of URLs among the distributed nodes
partitions = [[] for _ in range(self.num_nodes)]
for i, url in enumerate(urls):
partitions[i % self.num_nodes].append(url)
return partitions def balance_load(self, nodes):
# Balance the load across the distributed nodes
avg_load = len(nodes) // self.num_nodes
balanced_nodes = [[] for _ in range(self.num_nodes)]
for i, node in enumerate(nodes):
balanced_nodes[i % self.num_nodes].extend(node)
return balanced_nodes def synchronize_crawlers(self, crawlers):
# Synchronize the progress of distributed crawlers
# Implement synchronization logic here
pass# Example usage
distributed_crawler = DistributedCrawler(num_nodes=3)
urls_to_crawl = ["https://example.com/page1", "https://example.com/page2", "https://example.com/page3",
"https://example.com/page4", "https://example.com/page5"]
url_partitions = distributed_crawler.partition_urls(urls_to_crawl)
balanced_partitions = distributed_crawler.balance_load(url_partitions)for i, node in enumerate(balanced_partitions):
print(f"Node {i}: {node}")crawlers = ["Crawler1", "Crawler2", "Crawler3"]
distributed_crawler.synchronize_crawlers(crawlers)Page Fetching and Parsing:
Designing systems for fetching and downloading web pages:
- Use libraries like
requestsorurllibto send HTTP requests and retrieve web page content. - Implement mechanisms for handling different protocols such as HTTP or HTTPS.
- Parsing HTML and extracting relevant information can be done using libraries like
BeautifulSouporlxml.
import requests
from bs4 import BeautifulSoupclass PageFetcher:
def fetch_page(self, url):
response = requests.get(url)
if response.status_code == 200:
return response.text
else:
return Noneclass PageParser:
def parse_html(self, html_content):
soup = BeautifulSoup(html_content, 'html.parser')
# Extract relevant information from the parsed HTML
# Implement parsing logic here
pass# Example usage
fetcher = PageFetcher()
parser = PageParser()url = "https://example.com"
html_content = fetcher.fetch_page(url)
if html_content:
parsed_data = parser.parse_html(html_content)
print(parsed_data)
else:
print(f"Failed to fetch page: {url}")URL Filtering and Filtering Rules:
Implementing mechanisms to filter out irrelevant or unwanted URLs:
- Use regular expressions or string matching to define filtering rules based on patterns or content analysis.
- Handle URL normalization and canonicalization to ensure consistent filtering.
import re
class URLFilter:
def __init__(self, filter_rules):
self.filter_rules = filter_rules
def filter_urls(self, urls):
filtered_urls = []
for url in urls:
if self.is_url_allowed(url):
filtered_urls.append(url)
return filtered_urls
def is_url_allowed(self, url):
for rule in self.filter_rules:
if re.match(rule, url):
return False
return True
# Example usage
filter_rules = ["^https://example.com/allowed/.*", "^https://example.com/excluded/.*"]
url_filter = URLFilter(filter_rules)
urls_to_filter = [
"https://example.com/allowed/page1",
"https://example.com/excluded/page1",
"https://example.com/allowed/page2",
"https://example.com/excluded/page2",
]
filtered_urls = url_filter.filter_urls(urls_to_filter)
for url in filtered_urls:
print(url)Distributed Data Storage and Indexing:
Designing systems to store and index crawled data efficiently:
- Utilize distributed storage systems like NoSQL databases (e.g., MongoDB, Cassandra) for scalability and fault tolerance.
- Implement full-text indexing mechanisms (e.g., Elasticsearch, Solr) to enable efficient search capabilities.
from pymongo import MongoClientclass DataStorage:
def __init__(self):
self.client = MongoClient()
self.db = self.client['crawled_data']
self.collection = self.db['pages'] def store_page_data(self, page_data):
self.collection.insert_one(page_data)# Example usage
storage = DataStorage()
page_data = {
"url": "https://example.com/page1",
"title": "Example Page",
"content": "This is an example page.",
# Additional page data
}
storage.store_page_data(page_data)Recrawling and Freshness:
Designing mechanisms to determine when to recrawl pages for freshness:
- Use heuristics or time-based scheduling to determine when a page should be recrawled based on its last modification time or expiration date.
- Implement crawling priority based on page updates or importance to ensure fresh content is retrieved.
import datetimeclass Recrawler:
def __init__(self, freshness_threshold):
self.freshness_threshold = freshness_threshold def should_recrawl(self, last_modified):
current_time = datetime.datetime.now()
time_difference = current_time - last_modified
return time_difference.days > self.freshness_threshold# Example usage
recrawler = Recrawler(freshness_threshold=7)
last_modified = datetime.datetime(2023, 6, 5) # Assume last modified on June 5, 2023
if recrawler.should_recrawl(last_modified):
print("Recrawl needed")
else:
print("Page is fresh")Handling Dynamic Web Pages:
Designing systems to handle dynamic web pages generated by JavaScript or AJAX:
- Utilize headless browsers like Selenium or Puppeteer to render and interact with dynamic web content.
- Implement techniques for parsing dynamically loaded content and interacting with web forms.
from selenium import webdriver
from selenium.webdriver.chrome.options import Options
class DynamicPageHandler:
def __init__(self):
chrome_options = Options()
chrome_options.add_argument("--headless") # Run browser in headless mode
self.driver = webdriver.Chrome(options=chrome_options)
def handle_dynamic_page(self, url):
self.driver.get(url)
# Implement handling logic for dynamic content
# Extract relevant information, interact with forms, etc.
# Use driver.find_element...() methods to locate elements and perform actions
def close(self):
self.driver.quit()
# Example usage
page_handler = DynamicPageHandler()
page_handler.handle_dynamic_page("https://example.com/dynamic-page")
# Perform actions on the dynamic page using Selenium methods
page_handler.close()Distributed Parsing and Content Extraction:
Designing systems for distributed content extraction and processing:
- Implement parsing algorithms for structured data extraction.
- Handle data transformation and normalization to ensure consistent representation.
import multiprocessing
class DistributedParser:
def __init__(self):
self.pool = multiprocessing.Pool()
def parse_data(self, data):
# Implement parsing logic for structured data extraction
# Perform data transformation and normalization
def process_data(self, data_list):
parsed_data = self.pool.map(self.parse_data, data_list)
return parsed_data
# Example usage
parser = DistributedParser()
data_list = [data1, data2, data3] # List of data to be parsed
parsed_data = parser.process_data(data_list)
for data in parsed_data:
print(data)Scalability and Performance:
Horizontal scaling strategies for handling large-scale crawling:
- Implement strategies like sharding or partitioning to distribute the workload across multiple nodes or machines.
- Optimize network and I/O operations by using asynchronous programming or utilizing efficient libraries.
- Implement caching mechanisms to reduce redundant requests and improve performance.
import asyncio
import aiohttp
import aioredis
class DistributedCrawler:
async def fetch_page(self, url):
async with aiohttp.ClientSession() as session:
async with session.get(url) as response:
if response.status == 200:
return await response.text()
else:
return None
async def crawl_pages(self, urls):
tasks = []
for url in urls:
tasks.append(self.fetch_page(url))
return await asyncio.gather(*tasks)
class CachingMiddleware:
def __init__(self):
self.redis = aioredis.from_url('redis://localhost')
async def fetch_page(self, url):
cached_page = await self.redis.get(url)
if cached_page:
return cached_page.decode('utf-8')
else:
page_content = await self.fetcher.fetch_page(url)
await self.redis.set(url, page_content)
return page_content
# Example usage
urls_to_crawl = ["https://example.com/page1", "https://example.com/page2", "https://example.com/page3"]
distributed_crawler = DistributedCrawler()
caching_middleware = CachingMiddleware()
loop = asyncio.get_event_loop()
crawled_pages = loop.run_until_complete(distributed_crawler.crawl_pages(urls_to_crawl))
for page in crawled_pages:
# Process crawled pages
loop.close()System Design — Google Docs
We will be discussing in depth -
- What is Google Docs
- Important Features
- Scaling Requirements
- Data Model — ER requirements
- High Level Design
- Basic Low Level Design
- API Design
- Complete Detailed Design
- Code Implementation

What is Google Docs
Google Docs is a web-based document editing and collaboration platform developed by Google. It allows users to create, edit, and store documents online, and enables real-time collaboration among multiple users. Google Docs supports various document formats, including text documents, spreadsheets, presentations, and more. It offers a range of features that enhance productivity and streamline document management.
Important Features
- Real-time collaboration: Multiple users can work on the same document simultaneously, making it easy to collaborate and coordinate.
- Version history: Google Docs maintains a revision history, allowing users to review changes, restore previous versions, and track document modifications.
- Commenting and suggesting: Users can leave comments and suggestions on specific parts of the document, facilitating feedback and review processes.
- Offline access: Google Docs provides the ability to work offline and automatically syncs changes when the user regains an internet connection.
- Third-party add-ons: Users can enhance the functionality of Google Docs by integrating various add-ons for tasks like citation management, language translation, and more.
Scaling Requirements — Capacity Estimation
Let’s simulate a small-scale scenario for Google Docs -
Lets say we have —
- Total number of users: 1.2 Billion
- Daily active users (DAU): 300 million
- Number of documents edited by user/day: 5
- Total number of documents edited per day: 1.5 Billion documents/day
- Read to write ratio: 100:1
Storage Estimation:
- Average document size: 1 MB
- Total storage per day: 1.5 Billion * 1 MB = 1.5 PB/day
- Storage estimation for the next 3 years: 1.5 PB * 5 * 365 = 2,737.5 PB
Requests per Second:
- Number of requests per second: 1.5 Billion / (3600 seconds * 24 hours) ≈ 17,361 requests/second
import time
import random
# Simulating small-scale scenario for Google Docs
total_users = 1200000000
active_users = 300000000
documents_per_user_per_day = 5
documents_per_day = active_users * documents_per_user_per_day
read_to_write_ratio = 100
total_documents_written_per_day = documents_per_day / read_to_write_ratio
document_size_mb = 1
storage_per_day_tb = total_documents_written_per_day * document_size_mb / 1000
storage_for_3_years_pb = storage_per_day_tb * 365 * 3
requests_per_second = documents_per_day / (24 * 60 * 60)
print("Google Docs Small-Scale Simulation:")
print("-----------------------------------")
print("Total Users: ", total_users)
print("Active Users: ", active_users)
print("Documents Edited per User per Day: ", documents_per_user_per_day)
print("Total Documents Edited per Day: ", documents_per_day)
print("Storage per Day: ", storage_per_day_tb, "TB")
print("Storage for Next 3 Years: ", storage_for_3_years_pb, "PB")
print("Requests per Second: ", requests_per_second)
# Simulating requests per second for Google Docs
def simulate_requests():
while True:
requests = random.randint(0, int(requests_per_second))
print("Simulating Requests per Second: ", requests)
time.sleep(1)
simulate_requests()Data Model — ER requirements
Users:
- Fields:
- UserID: Int (Primary Key)
- Username: String
- Email: String
- Password: String
Documents:
- DocumentID: Int (Primary Key)
- UserID: Int (Foreign Key referencing Users.UserID)
- Title: String
- Content: Text
- CreatedAt: DateTime
- UpdatedAt: DateTime
Collaborators:
- DocumentID: Int (Foreign Key referencing Documents.DocumentID)
- UserID: Int (Foreign Key referencing Users.UserID)
Comments:
- CommentID: Int (Primary Key)
- DocumentID: Int (Foreign Key referencing Documents.DocumentID)
- UserID: Int (Foreign Key referencing Users.UserID)
- Content: Text
- CreatedAt: DateTime
High Level Design
Assumptions:
- The system is read-heavy, with more users viewing documents than creating/editing them.
- Availability and reliability are crucial.
- Latency should be kept low, around 350ms or below.
- The system needs to scale horizontally to handle increasing user demand.
Main Components and Services:
Mobile/Web Clients:
- Users access Google Docs through mobile apps or web browsers.
Application Servers:
- Responsible for handling user requests, authentication, and authorization.
- Perform read and write operations on the database.
- Handle real-time collaboration, conflict resolution, and synchronization between users.
- Generate notifications for document updates and user interactions.
Load Balancer:
- Distributes incoming user requests to multiple application servers for load balancing.
- Ensures high availability and fault tolerance by routing traffic to healthy servers.
Cache (e.g., Memcached or Redis):
- Used to cache frequently accessed documents and user data for faster retrieval.
- Improves system performance and reduces database load.
CDN (Content Delivery Network):
- Caches and delivers static content (e.g., images, scripts) to users from geographically distributed servers.
- Improves latency and reduces bandwidth consumption.
Database:
- Stores user information, document metadata, and collaboration data.
- Utilizes NoSQL databases (e.g., MongoDB, Cassandra) for scalability and flexibility.
- Ensures data reliability and availability through replication and fault-tolerant configurations.
Storage (e.g., Amazon S3 or Google Cloud Storage):
- Stores the actual document files (content) and associated media (e.g., images).
- Provides scalability, durability, and high availability for data storage.
Services
Authentication Service:
- Handles user authentication and authorization.
- Verifies user credentials and issues access tokens.
- Enforces security measures to protect user data.
Document Service:
- Manages document creation, retrieval, and updates.
- Handles document versioning, synchronization, and conflict resolution.
- Provides APIs for document editing and collaboration.
Collaboration Service:
- Facilitates real-time collaboration between multiple users editing the same document.
- Handles concurrent editing, conflict detection, and resolution.
- Implements collaborative features like cursor tracking, presence awareness, and chat.
Notification Service:
- Sends notifications to users about document updates, comments, and collaboration activities.
- Utilizes push notifications, emails, or in-app notifications to keep users informed.
Comment Service:
- Allows users to add comments to documents.
- Supports threaded discussions and replies.
- Manages comment storage, retrieval, and updates.
Search Service:
- Enables document search functionality.
- Provides fast and relevant search results based on user queries.
- Utilizes indexing and search algorithms to optimize search performance.
Basic Low Level Design
class User:
def __init__(self, user_id, username, password):
self.user_id = user_id
self.username = username
self.password = password
class Document:
def __init__(self, doc_id, title, content, owner):
self.doc_id = doc_id
self.title = title
self.content = content
self.owner = owner
self.collaborators = []
self.comments = []
class Comment:
def __init__(self, comment_id, user, content):
self.comment_id = comment_id
self.user = user
self.content = content
class GoogleDocs:
def __init__(self):
self.users = {}
self.documents = {}
self.next_user_id = 1
self.next_doc_id = 1
self.next_comment_id = 1
def register_user(self, username, password):
user_id = self.next_user_id
user = User(user_id, username, password)
self.users[user_id] = user
self.next_user_id += 1
return user_id
def create_document(self, title, content, owner_id):
doc_id = self.next_doc_id
owner = self.users.get(owner_id)
if owner is None:
return None
document = Document(doc_id, title, content, owner)
self.documents[doc_id] = document
self.next_doc_id += 1
return doc_id
def add_collaborator(self, doc_id, user_id):
document = self.documents.get(doc_id)
user = self.users.get(user_id)
if document is None or user is None:
return False
document.collaborators.append(user)
return True
def add_comment(self, doc_id, user_id, content):
document = self.documents.get(doc_id)
user = self.users.get(user_id)
if document is None or user is None:
return None
comment_id = self.next_comment_id
comment = Comment(comment_id, user, content)
document.comments.append(comment)
self.next_comment_id += 1
return comment_idAPI Design
/documents: Handles document creation, retrieval, and modification operations.
/collaboration: Manages user collaboration, including adding/removing collaborators and updating access levels.
/revisions: Handles retrieval and management of document revision history.
/users: Manages user accounts, authentication, and preferences.
User Registration API:
- Endpoint:
POST /users - Request Body:
{ "username": "john_doe", "password": "password123" } - Response:
{ "user_id": 1 } - Description: This API allows users to register and create an account. It receives the username and password in the request body and returns the assigned
user_idas the response.
Document Creation API:
- Endpoint:
POST /documents - Request Body:
{ "title": "My Document", "content": "This is the content of my document.", "owner_id": 1 } - Response:
{ "doc_id": 1 } - Description: This API allows users to create a new document. It receives the document title, content, and the owner’s
user_idin the request body. It returns the assigneddoc_idas the response.
Collaborator Addition API:
- Endpoint:
POST /documents/{doc_id}/collaborators - Request Body:
{ "user_id": 2 } - Response:
{ "success": true } - Description: This API allows the document owner to add a collaborator to a document. It receives the
doc_idin the URL path and theuser_idof the collaborator in the request body. It returns a success status indicating whether the operation was successful.
Comment Addition API:
- Endpoint:
POST /documents/{doc_id}/comments - Request Body:
{ "user_id": 1, "content": "This is a comment." } - Response:
{ "comment_id": 1 } - Description: This API allows users to add comments to a document. It receives the
doc_idin the URL path, theuser_idof the commenter, and the commentcontentin the request body. It returns the assignedcomment_idas the response.
Document Management:
- Endpoint:
/documents - Methods: GET, POST, PUT, DELETE
- Description:
GET /documents: Retrieves a list of documents owned by the user.POST /documents: Creates a new document.GET /documents/{document_id}: Retrieves the details of a specific document.PUT /documents/{document_id}: Updates the content of a document.DELETE /documents/{document_id}: Deletes a document.
Collaboration Management:
- Endpoint:
/collaboration - Methods: POST, DELETE
- Description:
POST /collaboration/{document_id}: Adds a collaborator to a document.DELETE /collaboration/{document_id}/{user_id}: Removes a collaborator from a document.
Revision Management:
- Endpoint:
/revisions - Methods: GET
- Description:
GET /revisions/{document_id}: Retrieves the revision history of a document.
User Management:
- Endpoint:
/users - Methods: POST, GET, PUT, DELETE
- Description:
POST /users: Creates a new user account.GET /users/{user_id}: Retrieves the details of a user.PUT /users/{user_id}: Updates user preferences.DELETE /users/{user_id}: Deletes a user account.
from flask import Flask, jsonify, request
app = Flask(__name__)
# Document Management API
@app.route('/documents', methods=['GET'])
def get_documents():
# Retrieve and return a list of documents
# Implement your logic here
documents = []
# Code to fetch documents from the database or storage
return jsonify(documents)
@app.route('/documents', methods=['POST'])
def create_document():
# Create a new document
# Implement your logic here
data = request.get_json()
# Code to create a new document in the database or storage
document_id = 'abc123' # Replace with the generated document ID
return jsonify({'document_id': document_id}), 201
@app.route('/documents/<document_id>', methods=['GET'])
def get_document(document_id):
# Retrieve the details of a specific document
# Implement your logic here
# Code to fetch the document from the database or storage
document = {'document_id': document_id, 'title': 'Sample Document', 'content': 'Lorem ipsum dolor sit amet.'}
return jsonify(document)
@app.route('/documents/<document_id>', methods=['PUT'])
def update_document(document_id):
# Update the content of a document
# Implement your logic here
data = request.get_json()
# Code to update the document content in the database or storage
return jsonify({'message': 'Document updated successfully'})
@app.route('/documents/<document_id>', methods=['DELETE'])
def delete_document(document_id):
# Delete a document
# Implement your logic here
# Code to delete the document from the database or storage
return jsonify({'message': 'Document deleted successfully'})
# Collaboration Management API
@app.route('/collaboration/<document_id>', methods=['POST'])
def add_collaborator(document_id):
# Add a collaborator to a document
# Implement your logic here
data = request.get_json()
# Code to add the collaborator to the document in the database or storage
return jsonify({'message': 'Collaborator added successfully'})
@app.route('/collaboration/<document_id>/<user_id>', methods=['DELETE'])
def remove_collaborator(document_id, user_id):
# Remove a collaborator from a document
# Implement your logic here
# Code to remove the collaborator from the document in the database or storage
return jsonify({'message': 'Collaborator removed successfully'})
# Revision Management API
@app.route('/revisions/<document_id>', methods=['GET'])
def get_revisions(document_id):
# Retrieve the revision history of a document
# Implement your logic here
# Code to fetch the revisions of the document from the database or storage
revisions = []
return jsonify(revisions)
# User Management API
@app.route('/users', methods=['POST'])
def create_user():
# Create a new user account
# Implement your logic here
data = request.get_json()
# Code to create a new user account in the database or storage
user_id = 'xyz789' # Replace with the generated user ID
return jsonify({'user_id': user_id}), 201
@app.route('/users/<user_id>', methods=['GET'])
def get_user(user_id):
# Retrieve the details of a user
# Implement your logic here
# Code to fetch the user details from the database or storage
user = {'user_id': user_id, 'username': 'john', 'email': '[email protected]'}
return jsonify(user)
@app.route('/users/<user_id>', methods=['PUT'])
def update_user(user_id):
# Update user preferences
# Implement your logic here
data = request.get_json()
# Code to update the user preferences in the database or storage
return jsonify({'message': 'User preferences updated successfully'})
@app.route('/users/<user_id>', methods=['DELETE'])
def delete_user(user_id):
# Delete a user account
# Implement your logic here
# Code to delete the user account from the database or storage
return jsonify({'message': 'User account deleted successfully'})
# Run the Flask app
if __name__ == '__main__':
app.run(debug=True)Complete Detailed Design
Coming soon! It will be covered on youtube channel.
Subscribe to youtube channel :
Complete Code implementation
from flask import Flask, render_template
from flask_socketio import SocketIO, join_room, leave_room, emit

app = Flask(__name__)
app.config['SECRET_KEY'] = 'secret'
socketio = SocketIO(app)

# Keep track of connected clients and the document content
clients = {}
document_content = ""


@app.route('/')
def index():
    return render_template('index.html')


@socketio.on('connect')
def handle_connect():
    # Add client to the connected clients list
    clients[request.sid] = True
    emit('document_content', document_content)


@socketio.on('disconnect')
def handle_disconnect():
    # Remove client from the connected clients list
    if request.sid in clients:
        del clients[request.sid]


@socketio.on('update_content')
def handle_update_content(data):
    # Update the document content and broadcast it to all connected clients
    document_content = data['content']
    emit('document_content', document_content, broadcast=True)


if __name__ == '__main__':
    socketio.run(app, debug=True)
System Design — Hubspot
We will be discussing in depth -
- What is Hubspot
- Important Features
- Scaling Requirements
- Data Model — ER requirements
- High Level Design
- Basic Low Level Design
- API Design
- Complete Detailed Design
- Code Implementation
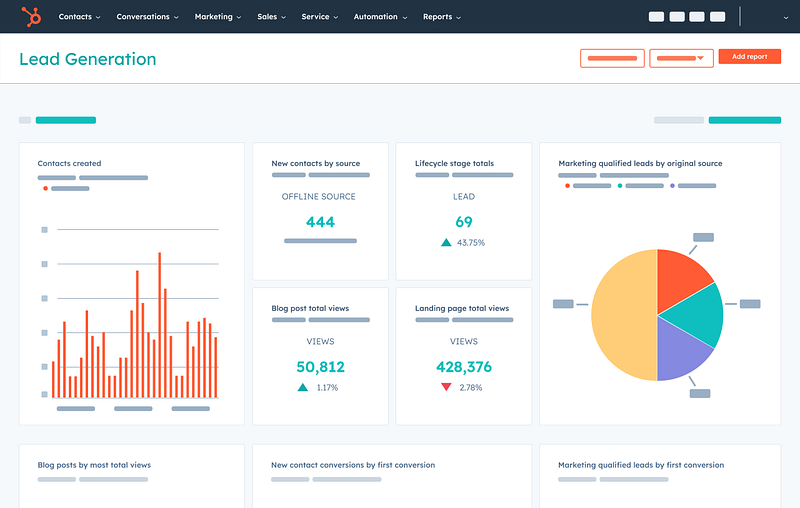
What is Hubspot
Hubspot is an all-in-one inbound marketing, sales, and customer service platform designed to help businesses attract, engage, and delight customers. It offers a wide range of tools and features to streamline marketing campaigns, manage leads, automate sales processes, and provide exceptional customer support.
Important Features
2.1. Marketing Automation: Hubspot’s marketing automation empowers users to create, schedule, and track personalized marketing campaigns across various channels, including email, social media, and website.
2.2. Customer Relationship Management (CRM): The integrated CRM allows businesses to manage leads, track interactions, and nurture customer relationships effectively.
2.3. Sales Automation: Hubspot offers sales automation capabilities, such as lead scoring, task automation, and sales pipeline management, to improve the efficiency of sales teams.
2.4. Analytics and Reporting: The platform provides in-depth analytics and reporting features, enabling data-driven decision-making for marketing, sales, and customer service strategies.
2.5. Content Management System (CMS): Hubspot’s CMS allows businesses to create and manage website content, landing pages, and blog posts seamlessly.
Scaling Requirements — Capacity Estimation
Total number of users: 100 Million
Daily active users (DAU): 20 Million
Number of leads managed by a user per day: 5
Total number of leads managed per day: 100 Million leads/day
Since the system is read-heavy, let’s say the read-to-write ratio be 50:1
Total number of leads created per day = 1/50 * 100 Million = 2 Million/day
Storage Estimation:
Let’s assume on average each lead’s data size is 1 KB
Total Storage per day: 2 Million * 1 KB = 2 GB/day
For the next 3 years, 2 GB * 5 * 365 = 3.65 TB
Requests per second: 100 Million / 3600 seconds * 24 hours = ~2,314 requests/second
import random
import time

class HubspotSimulation:
    def __init__(self, total_users, daily_active_users, leads_per_user, read_write_ratio):
        self.total_users = total_users
        self.daily_active_users = daily_active_users
        self.leads_per_user = leads_per_user
        self.read_write_ratio = read_write_ratio

        # Assuming each lead data size is 1 KB
        self.lead_data_size_kb = 1
        self.total_leads_per_day = self.total_users * self.daily_active_users * self.leads_per_user

        # Simulated storage in GB
        self.total_storage_per_day_gb = self.total_leads_per_day * self.lead_data_size_kb / 1024

    def simulate_storage_growth(self, years):
        total_storage_tb = self.total_storage_per_day_gb * 365 * years / 1024
        return total_storage_tb

    def simulate_requests_per_second(self):
        # Simulated requests per second
        requests_per_second = self.total_leads_per_day / (24 * 3600)
        return requests_per_second

    def simulate_read_write_requests(self):
        # Simulated read and write requests based on read_write_ratio
        total_requests = self.total_leads_per_day
        read_requests = total_requests / (self.read_write_ratio + 1)
        write_requests = total_requests - read_requests
        return read_requests, write_requests

    def simulate_daily_activity(self):
        # Simulated daily activity of users
        for user_id in range(self.daily_active_users):
            leads_managed = random.randint(0, self.leads_per_user)
            print(f"User {user_id} managed {leads_managed} leads today.")
            time.sleep(0.01)  # Simulate processing time

if __name__ == "__main__":
    # Instantiate the HubspotSimulation class
    hubspot_sim = HubspotSimulation(total_users=100_000_000,
                                    daily_active_users=20_000_000,
                                    leads_per_user=5,
                                    read_write_ratio=50)

    # Simulate storage growth for the next 3 years
    total_storage_tb = hubspot_sim.simulate_storage_growth(years=3)
    print(f"Total storage required for the next 3 years: {total_storage_tb:.2f} TB")

    # Simulate requests per second
    requests_per_second = hubspot_sim.simulate_requests_per_second()
    print(f"Simulated requests per second: {requests_per_second:.2f} requests")

    # Simulate read and write requests
    read_requests, write_requests = hubspot_sim.simulate_read_write_requests()
    print(f"Simulated read requests: {read_requests:.2f} requests")
    print(f"Simulated write requests: {write_requests:.2f} requests")

    # Simulate daily activity of users
    print("\nSimulating daily user activity:")
    hubspot_sim.simulate_daily_activity()
Data Model — ER requirements
Users:

Fields:
User ID: INT (Primary Key)
Username: STRING
Email: STRING
Password: STRING

Leads:

Fields:
Lead ID: INT (Primary Key)
User ID: INT (Foreign Key referencing Users.User ID)
Name: STRING
Email: STRING
Phone: STRING
Company: STRING

Contacts:

Fields:
Contact ID: INT (Primary Key)
User ID: INT (Foreign Key referencing Users.User ID)
Name: STRING
Email: STRING
Phone: STRING
Company: STRING

Marketing Campaigns:

Fields:
Campaign ID: INT (Primary Key)
User ID: INT (Foreign Key referencing Users.User ID)
Campaign Name: STRING
Start Date: DATETIME
End Date: DATETIME
Description: TEXT

Sales Pipeline:

Fields:
Pipeline ID: INT (Primary Key)
User ID: INT (Foreign Key referencing Users.User ID)
Deal Name: STRING
Deal Amount: FLOAT
Deal Stage: STRING
Closing Date: DATETIME
Description: TEXT
High Level Design
3.1. High Availability: The platform needs to be highly available to ensure uninterrupted service and handle spikes in user traffic during peak periods.
3.2. Scalable Infrastructure: Hubspot’s infrastructure should be designed to scale horizontally to accommodate growing user bases and increasing data volumes.
3.3. Load Balancing: Efficient load balancing mechanisms are crucial to distribute incoming requests evenly across multiple servers and prevent overloading.
3.4. Database Scaling: The data storage layer must be designed to scale both vertically and horizontally to manage the increasing data demands.
Assumptions:
- The system is designed to handle a large number of users, leads, contacts, marketing campaigns, and sales pipelines.
- The system should be scalable, highly available, and reliable.
- The data will be stored in a NoSQL database to handle the scale and relationship between different entities.
Main Components and Services:
- Mobile and Web Clients: These are the users accessing the Hubspot platform.
- Application Servers: The application servers will handle read and write operations as well as manage notifications for users.
- Load Balancer: The load balancer will route and distribute incoming requests to the appropriate application servers.
- Cache (Memcache or Redis): The system will use caching to improve read performance and reduce database load.
- CDN: A Content Delivery Network (CDN) will be used to cache and deliver static content to users, improving latency and throughput.
- NoSQL Database (e.g., MongoDB): The system will use a NoSQL database to store user data, leads, contacts, marketing campaigns, and sales pipelines.
Data Services:
- User Service: Manages user data, including registration, authentication, and profile management.
- Lead Service: Handles lead data, including lead generation and management.
- Contact Service: Manages contact data and interactions with customers.
- Marketing Service: Handles marketing campaign creation, scheduling, and tracking.
- Sales Service: Manages the sales pipeline, including deal creation, progress tracking, and closing.
Basic Low Level Design
from flask import Flask, request

app = Flask(__name__)

# Sample data to be stored in the server
users = {}
leads = {}
contacts = {}
campaigns = {}
deals = {}

# Low Level Design
class User:
    def __init__(self, user_id, username, password, role):
        self.user_id = user_id
        self.username = username
        self.password = password
        self.role = role
        self.profile = {}

class Lead:
    def __init__(self, lead_id, user_id, name, email, phone, company, status, source):
        self.lead_id = lead_id
        self.user_id = user_id
        self.name = name
        self.email = email
        self.phone = phone
        self.company = company
        self.status = status
        self.source = source

class Contact:
    def __init__(self, contact_id, user_id, name, email, phone, company, status):
        self.contact_id = contact_id
        self.user_id = user_id
        self.name = name
        self.email = email
        self.phone = phone
        self.company = company
        self.status = status

class Campaign:
    def __init__(self, campaign_id, user_id, campaign_name, start_date, end_date, description):
        self.campaign_id = campaign_id
        self.user_id = user_id
        self.campaign_name = campaign_name
        self.start_date = start_date
        self.end_date = end_date
        self.description = description

class Deal:
    def __init__(self, deal_id, user_id, deal_name, amount, stage, closing_date, description):
        self.deal_id = deal_id
        self.user_id = user_id
        self.deal_name = deal_name
        self.amount = amount
        self.stage = stage
        self.closing_date = closing_date
        self.description = description

# API Design
@app.route('/users', methods=['POST'])
def create_user():
    data = request.get_json()
    user_id = len(users) + 1
    user = User(user_id, data['username'], data['password'], data['role'])
    users[user_id] = user.__dict__
    return {"message": "User created successfully", "user": user.__dict__}, 201

@app.route('/users/<int:user_id>', methods=['GET'])
def get_user(user_id):
    user = users.get(user_id)
    if user:
        return user, 200
    return {"message": "User not found"}, 404

@app.route('/leads', methods=['POST'])
def create_lead():
    data = request.get_json()
    lead_id = len(leads) + 1
    lead = Lead(lead_id, data['user_id'], data['name'], data['email'], data['phone'], data['company'], data['status'], data['source'])
    leads[lead_id] = lead.__dict__
    return {"message": "Lead created successfully", "lead": lead.__dict__}, 201

@app.route('/leads/<int:lead_id>', methods=['GET'])
def get_lead(lead_id):
    lead = leads.get(lead_id)
    if lead:
        return lead, 200
    return {"message": "Lead not found"}, 404

# Additional API endpoints for contacts, campaigns, deals, etc.

if __name__ == '__main__':
    app.run(debug=True)
User:
Fields:
UserID: INT (Primary Key)
Username: STRING
Email: STRING
Password: STRING
Role: STRING (e.g., "Marketing", "Sales", "Customer Service")
Profile: TEXT (Additional profile information)
Lead:
Fields:
LeadID: INT (Primary Key)
UserID: INT (Foreign Key referencing User.UserID)
Name: STRING
Email: STRING
Phone: STRING
Company: STRING
Status: STRING (e.g., "New", "Qualified", "Lost", "Won")
Source: STRING (e.g., "Website", "Email Campaign", "Social Media")
Contact:
Fields:
ContactID: INT (Primary Key)
UserID: INT (Foreign Key referencing User.UserID)
Name: STRING
Email: STRING
Phone: STRING
Company: STRING
Status: STRING (e.g., "Active", "Inactive", "Unsubscribed")
Marketing Campaign:
Fields:
CampaignID: INT (Primary Key)
UserID: INT (Foreign Key referencing User.UserID)
CampaignName: STRING
StartDate: DATE
EndDate: DATE
Description: TEXT
Sales Deal:
Fields:
DealID: INT (Primary Key)
UserID: INT (Foreign Key referencing User.UserID)
DealName: STRING
Amount: FLOAT
Stage: STRING (e.g., "Prospect", "Negotiation", "Closed Won", "Closed Lost")
ClosingDate: DATE
Description: TEXTAPI Design
User Management API:

POST /users: Create a new user account.
POST /login: Authenticate user login.
PATCH /users/{user_id}: Update user profile information.
GET /users/{user_id}: Get user profile information.
Lead Management API:

POST /leads: Create a new lead.
PATCH /leads/{lead_id}: Update lead information (e.g., status, source).
GET /leads/{lead_id}: Get lead details by ID.
GET /users/{user_id}/leads: Get all leads associated with a user.
Contact Management API:

POST /contacts: Create a new contact.
PATCH /contacts/{contact_id}: Update contact information (e.g., status).
GET /contacts/{contact_id}: Get contact details by ID.
GET /users/{user_id}/contacts: Get all contacts associated with a user.
Marketing Campaign API:

POST /campaigns: Create a new marketing campaign.
PATCH /campaigns/{campaign_id}: Update campaign details (e.g., name, dates).
GET /campaigns/{campaign_id}: Get campaign details by ID.
GET /users/{user_id}/campaigns: Get all campaigns associated with a user.
Sales Deal API:

POST /deals: Create a new sales deal.
PATCH /deals/{deal_id}: Update deal information (e.g., amount, stage).
GET /deals/{deal_id}: Get deal details by ID.
GET /users/{user_id}/deals: Get all deals associated with a user.
Email Service API:

POST /emails: Send an email to a contact or lead.
GET /emails/{email_id}: Get email details by ID.
GET /users/{user_id}/emails: Get all emails sent or received by a user.
Analytics and Reporting API:

GET /reports/campaigns: Get campaign performance metrics (e.g., clicks, conversions).
GET /reports/deals: Get sales deal performance metrics (e.g., revenue, win rate).
GET /reports/users: Get user activity and engagement metrics.
Search Service API:

GET /search?q={query}: Search for leads, contacts, campaigns, or deals based on the query.
Real-time Notifications API:

POST /notifications: Send real-time notifications to users.
GET /users/{user_id}/notifications: Get a list of notifications for a user.
from typing import List, Dict
from fastapi import FastAPI, HTTPException
app = FastAPI()
# Placeholder for authentication and authorization mechanisms
def authenticate_user(api_key: str) -> bool:
# In a real implementation, check the validity of the API key and user permissions
# For simplicity, we'll assume all API keys are valid
return True
# Placeholder data storage for leads (In a real implementation, use a database)
leads_db = {}
# Placeholder for CRM operations
def create_lead(lead_data: Dict[str, str]) -> Dict[str, str]:
# Create a lead in the Hubspot CRM
lead_id = str(len(leads_db) + 1)
lead_data["lead_id"] = lead_id
leads_db[lead_id] = lead_data
return {"status": "success", "message": "Lead created successfully", "lead_id": lead_id}
def read_lead(lead_id: str) -> Dict[str, str]:
# Read lead details from the Hubspot CRM
if lead_id not in leads_db:
raise HTTPException(status_code=404, detail="Lead not found")
return leads_db[lead_id]
def update_lead(lead_id: str, lead_data: Dict[str, str]) -> Dict[str, str]:
# Update a lead in the Hubspot CRM
if lead_id not in leads_db:
raise HTTPException(status_code=404, detail="Lead not found")
leads_db[lead_id].update(lead_data)
return {"status": "success", "message": "Lead updated successfully", "lead_id": lead_id}
def delete_lead(lead_id: str) -> Dict[str, str]:
# Delete a lead from the Hubspot CRM
if lead_id not in leads_db:
raise HTTPException(status_code=404, detail="Lead not found")
del leads_db[lead_id]
return {"status": "success", "message": "Lead deleted successfully", "lead_id": lead_id}
# Placeholder for marketing automation
# Placeholder for sales automation
@app.post("/authenticate/")
def authenticate_endpoint(api_key: str):
# Authentication
if not authenticate_user(api_key):
raise HTTPException(status_code=401, detail="Unauthorized")
return {"status": "success", "message": "Authentication successful"}
@app.post("/create_lead/")
def create_lead_endpoint(api_key: str, lead_data: Dict[str, str]):
# Authentication
if not authenticate_user(api_key):
raise HTTPException(status_code=401, detail="Unauthorized")
# Validate lead_data (e.g., check required fields, data types, etc.)
if not lead_data.get("name") or not lead_data.get("email"):
raise HTTPException(status_code=400, detail="Name and email are required.")
# Create a lead
response = create_lead(lead_data)
return response
@app.get("/read_lead/{lead_id}")
def read_lead_endpoint(api_key: str, lead_id: str):
# Authentication
if not authenticate_user(api_key):
raise HTTPException(status_code=401, detail="Unauthorized")
# Read lead details
response = read_lead(lead_id)
return response
@app.put("/update_lead/{lead_id}")
def update_lead_endpoint(api_key: str, lead_id: str, lead_data: Dict[str, str]):
# Authentication
if not authenticate_user(api_key):
raise HTTPException(status_code=401, detail="Unauthorized")
# Update a lead
response = update_lead(lead_id, lead_data)
return response
@app.delete("/delete_lead/{lead_id}")
def delete_lead_endpoint(api_key: str, lead_id: str):
# Authentication
if not authenticate_user(api_key):
raise HTTPException(status_code=401, detail="Unauthorized")
# Delete a lead
response = delete_lead(lead_id)
return responseComplete Detailed Design
Coming soon! It will be covered on youtube channel.
Subscribe to youtube channel :
Complete Code implementation
# Sample data storage using dictionaries (replace with actual database in real implementation)
users_data = {}
leads_data = {}
contacts_data = {}
campaigns_data = {}
sales_pipeline_data = {}

class UserService:
    def register_user(self, username, email, password):
        # Placeholder for user registration
        user_id = len(users_data) + 1
        users_data[user_id] = {"username": username, "email": email, "password": password}
        return user_id

    def authenticate_user(self, email, password):
        # Placeholder for user authentication
        for user_id, user_data in users_data.items():
            if user_data["email"] == email and user_data["password"] == password:
                return user_id
        return None

    def get_user_profile(self, user_id):
        # Placeholder for fetching user profile
        return users_data.get(user_id, {})


class LeadService:
    def create_lead(self, user_id, name, email, phone, company):
        # Placeholder for lead creation
        lead_id = len(leads_data) + 1
        leads_data[lead_id] = {"user_id": user_id, "name": name, "email": email, "phone": phone, "company": company}
        return lead_id

    def get_leads_by_user(self, user_id):
        # Placeholder for fetching leads by user
        return [lead_data for lead_data in leads_data.values() if lead_data["user_id"] == user_id]


class ContactService:
    def create_contact(self, user_id, name, email, phone, company):
        # Placeholder for contact creation
        contact_id = len(contacts_data) + 1
        contacts_data[contact_id] = {"user_id": user_id, "name": name, "email": email, "phone": phone, "company": company}
        return contact_id

    def get_contacts_by_user(self, user_id):
        # Placeholder for fetching contacts by user
        return [contact_data for contact_data in contacts_data.values() if contact_data["user_id"] == user_id]


class MarketingService:
    def create_campaign(self, user_id, campaign_name, start_date, end_date, description):
        # Placeholder for campaign creation
        campaign_id = len(campaigns_data) + 1
        campaigns_data[campaign_id] = {
            "user_id": user_id,
            "campaign_name": campaign_name,
            "start_date": start_date,
            "end_date": end_date,
            "description": description
        }
        return campaign_id

    def get_campaigns_by_user(self, user_id):
        # Placeholder for fetching campaigns by user
        return [campaign_data for campaign_data in campaigns_data.values() if campaign_data["user_id"] == user_id]


class SalesService:
    def create_deal(self, user_id, deal_name, deal_amount, deal_stage, closing_date, description):
        # Placeholder for deal creation
        deal_id = len(sales_pipeline_data) + 1
        sales_pipeline_data[deal_id] = {
            "user_id": user_id,
            "deal_name": deal_name,
            "deal_amount": deal_amount,
            "deal_stage": deal_stage,
            "closing_date": closing_date,
            "description": description
        }
        return deal_id

    def get_deals_by_user(self, user_id):
        # Placeholder for fetching deals by user
        return [deal_data for deal_data in sales_pipeline_data.values() if deal_data["user_id"] == user_id]


# Sample usage of services
if __name__ == "__main__":
    user_service = UserService()
    lead_service = LeadService()
    contact_service = ContactService()
    marketing_service = MarketingService()
    sales_service = SalesService()

    # Register a new user
    user_id = user_service.register_user("john_doe", "[email protected]", "password123")

    # Create a new lead
    lead_id = lead_service.create_lead(user_id, "John Doe", "[email protected]", "1234567890", "Sample Company")

    # Create a new contact
    contact_id = contact_service.create_contact(user_id, "Jane Smith", "[email protected]", "9876543210", "Sample Company")

    # Create a new marketing campaign
    campaign_id = marketing_service.create_campaign(user_id, "Summer Sale", "2023-07-01", "2023-07-31", "Special discounts for summer")

    # Create a new sales deal
    deal_id = sales_service.create_deal(user_id, "Big Sale Deal", 5000.00, "Negotiation", "2023-08-15", "Big sale deal opportunity")
System Design — Comment Filtering System
We will be discussing in depth -
- What is Comment Filtering System
- Important Features
- Scaling Requirements
- Data Model — ER requirements
- High Level Design
- Basic Low Level Design
- API Design
- Complete Detailed Design
- Code Implementation

What is Comment Filtering System
A Comment Filtering System is a vital component in modern web applications and online platforms that deal with user-generated content. Its primary purpose is to filter, moderate, and manage comments posted by users to ensure that inappropriate or harmful content is not displayed publicly.
Important Features
- Profanity Filter: The system should be capable of detecting and filtering out comments that contain offensive language or inappropriate content.
- Spam Detection: Implement mechanisms to identify and handle spam comments, preventing them from overwhelming the platform.
- Custom Moderation Rules: Allow administrators to define custom moderation rules based on specific criteria to tailor moderation to the platform’s requirements.
- User Reporting: Provide users with the ability to report comments that they find offensive or inappropriate, which can be further analyzed by the moderation team.
- Machine Learning Integration: Utilize machine learning algorithms to improve the accuracy of content moderation and adapt to evolving comment patterns.
- Real-time Processing: Comments should be processed quickly to minimize the time between submission and display.
Scaling Requirements — Capacity Estimation
Let me create a small-scale simulation for the Comment Filtering System:
Assumptions:
- Total no of users: 1.2 Billion
- Daily active users (DAU): 300 million
- No of comments posted by user/day: 5 (assuming each user posts 5 comments on average per day)
- Total no of comments posted per day: 300 million * 5 = 1.5 billion comments/day
- Since the system is read-heavy, let’s assume the read to write ratio be 100:1.
- Total no of comments uploaded per day = 1/100 * 1.5 billion = 15 million/day
Storage Estimation:
- Let’s say on average each comment size is 100 bytes (for simplicity).
- Total Storage per day: 15 million * 100 bytes = 1.5 GB/day
For the next 3 years (365 days each year):
- Total Storage for 3 years: 1.5 GB/day * 3 years * 365 days = 1.6425 TB (approx)
Requests per second:
- Assuming an average day with 1.5 billion comments distributed evenly over 24 hours (ignoring peaks).
- Requests per second = 1.5 billion / (3600 seconds * 24 hours) = 17,361 requests per second (approx)
Data Model — ER requirements
- Comment: This entity represents a user-generated comment and would include attributes such as comment_id, user_id, content, timestamp, and status.
- User: The User entity would store user details, including user_id, username, email, and other relevant information.
- Moderation Rules: This entity would define the custom moderation rules set by administrators, including attributes like rule_id, keyword, action (approve, reject, or flag), etc.
- Reported Comments: To handle user reports, this entity would store the comment_id, user_id of the reporter, timestamp, and reason for the report.
Users

UserID: Integer (Primary Key)
Username: String
Email: String
Password: String
Comments

CommentID: Integer (Primary Key)
UserID: Integer (Foreign Key references Users.UserID)
PostID: Integer (Foreign Key references Posts.PostID)
Content: String
Timestamp: DateTime
Posts

PostID: Integer (Primary Key)
UserID: Integer (Foreign Key references Users.UserID)
PhotoURL: String
Caption: String
Timestamp: DateTime
Location: String
High Level Design
- Horizontal Scaling: Use load balancers to distribute incoming comment requests across multiple filtering nodes, allowing for increased parallel processing.
- Caching: Implement caching mechanisms to store frequently accessed data, reducing the need to retrieve the same data repeatedly from the database.
- Asynchronous Processing: Offload non-critical tasks, such as reporting and user notifications, to background queues to free up resources for core filtering tasks.
- Distributed Databases: Employ distributed databases to distribute the comment data across multiple nodes, preventing data bottlenecks and enabling seamless data retrieval.
Components —
- Web Server: The system can be accessed through web servers that handle incoming comment requests from users.
- Load Balancer: A load balancer distributes incoming traffic across multiple filtering nodes to ensure even distribution of the processing load.
- Filtering Service: This is the core component responsible for comment processing, including profanity filtering, spam detection, and application of custom moderation rules.
- Machine Learning Service: The ML service analyzes comments to improve accuracy in identifying harmful content.
- Database: The database stores comment data, user information, moderation rules, and reported comments.
- Caching Service: Caches frequently accessed data to improve response times.
class User:
    def __init__(self, user_id, username, email, password):
        self.user_id = user_id
        self.username = username
        self.email = email
        self.password = password
        # Other user attributes like profile picture, bio, etc.

class Post:
    def __init__(self, post_id, user, content):
        self.post_id = post_id
        self.user = user  # User who posted the post
        self.content = content
        # Other post attributes like media_url, timestamp, etc.

class Comment:
    def __init__(self, comment_id, post, user, content):
        self.comment_id = comment_id
        self.post = post  # Post on which the comment is made
        self.user = user  # User who posted the comment
        self.content = content
        # Other comment attributes like timestamp, likes, etc.
from flask import Flask, request, jsonify
app = Flask(__name__)
# Placeholder lists to simulate database storage
users_db = []
posts_db = []
comments_db = []
# Endpoint to create a new comment
@app.route('/comments', methods=['POST'])
def create_comment():
data = request.get_json()
user_id = data.get('user_id')
post_id = data.get('post_id')
content = data.get('content')
# Check if the user and post exist in the database
user = next((user for user in users_db if user.user_id == user_id), None)
post = next((post for post in posts_db if post.post_id == post_id), None)
if not user or not post:
return jsonify({'error': 'User or post not found'}), 404
# Generate a unique comment_id (you may use a UUID or other methods in production)
comment_id = len(comments_db) + 1
# Create a new comment and add it to the database
new_comment = Comment(comment_id, post, user, content)
comments_db.append(new_comment)
return jsonify({'message': 'Comment created successfully', 'comment_id': comment_id}), 201
# Endpoint to get comments for a specific post
@app.route('/posts/<int:post_id>/comments', methods=['GET'])
def get_comments_for_post(post_id):
# Check if the post exists in the database
post = next((post for post in posts_db if post.post_id == post_id), None)
if not post:
return jsonify({'error': 'Post not found'}), 404
# Get all comments for the specified post
comments = [comment.__dict__ for comment in comments_db if comment.post == post]
return jsonify({'comments': comments}), 200
if __name__ == '__main__':
app.run(debug=True)Basic Low Level Design
from flask import Flask, request, jsonify

app = Flask(__name__)

# Placeholder dictionaries to simulate database storage
comments_db = {}
moderation_rules_db = {}


# Endpoint to submit a new comment
@app.route('/comments', methods=['POST'])
def submit_comment():
    data = request.get_json()
    # Validate incoming data
    if 'user_id' not in data or 'content' not in data:
        return jsonify({'error': 'Invalid data. User ID and content are required.'}), 400

    comment_id = len(comments_db) + 1
    comment = {
        'comment_id': comment_id,
        'user_id': data['user_id'],
        'content': data['content'],
        'status': 'pending'  # Initial status until filtering completes
    }

    # Simulate comment filtering and processing
    # For simplicity, we assume all comments pass filtering and get approved
    comment['status'] = 'approved'

    comments_db[comment_id] = comment
    return jsonify({'message': 'Comment submitted successfully.', 'comment_id': comment_id}), 201


# Endpoint to retrieve details about a specific comment
@app.route('/comments/<int:comment_id>', methods=['GET'])
def get_comment(comment_id):
    comment = comments_db.get(comment_id)
    if comment:
        return jsonify(comment)
    else:
        return jsonify({'error': 'Comment not found.'}), 404


# Endpoint to allow users to report a comment
@app.route('/comments/<int:comment_id>/report', methods=['PUT'])
def report_comment(comment_id):
    comment = comments_db.get(comment_id)
    if not comment:
        return jsonify({'error': 'Comment not found.'}), 404

    # Here, you can implement the reporting logic
    # For simplicity, we'll just mark the comment as reported
    comment['status'] = 'reported'
    return jsonify({'message': 'Comment reported successfully.'}), 200


# Endpoint to create a new custom moderation rule
@app.route('/moderation-rules', methods=['POST'])
def create_moderation_rule():
    data = request.get_json()
    # Validate incoming data
    if 'keyword' not in data or 'action' not in data:
        return jsonify({'error': 'Invalid data. Keyword and action are required.'}), 400

    rule_id = len(moderation_rules_db) + 1
    rule = {
        'rule_id': rule_id,
        'keyword': data['keyword'],
        'action': data['action']
    }

    moderation_rules_db[rule_id] = rule
    return jsonify({'message': 'Moderation rule created successfully.', 'rule_id': rule_id}), 201


# Endpoint to retrieve existing moderation rules
@app.route('/moderation-rules', methods=['GET'])
def get_moderation_rules():
    return jsonify(list(moderation_rules_db.values())), 200


# Endpoint to delete a specific moderation rule
@app.route('/moderation-rules/<int:rule_id>', methods=['DELETE'])
def delete_moderation_rule(rule_id):
    rule = moderation_rules_db.get(rule_id)
    if not rule:
        return jsonify({'error': 'Moderation rule not found.'}), 404

    moderation_rules_db.pop(rule_id)
    return jsonify({'message': 'Moderation rule deleted successfully.'}), 200


if __name__ == '__main__':
    app.run(debug=True)
API Design
POST /comments: Submit a new comment for filtering and processing.GET /comments/{comment_id}: Retrieve details about a specific comment.PUT /comments/{comment_id}/report: Allow users to report a comment.POST /moderation-rules: Create a new custom moderation rule.GET /moderation-rules: Retrieve existing moderation rules.DELETE /moderation-rules/{rule_id}: Delete a specific moderation rule.
Complete Detailed Design
Coming soon! It will be covered on youtube channel.
Subscribe to youtube channel :
Complete Code implementation
from flask import Flask, request, jsonify

app = Flask(__name__)

# Placeholder dictionaries to simulate database storage
comments_db = {}
moderation_rules_db = {}

# Placeholder list to simulate reported comments
reported_comments = []


# Function to check for profanity in a comment
def profanity_filter(comment):
    profane_words = ['bad', 'offensive', 'inappropriate']  # Placeholder list of profane words
    for word in profane_words:
        if word in comment['content'].lower():
            return True
    return False


# Function to check for spam in a comment
def spam_detection(comment):
    # Placeholder logic for spam detection
    # For simplicity, we assume comments containing 'spam' in the content are spam
    return 'spam' in comment['content'].lower()


# Function to check if a comment matches any custom moderation rule
def custom_moderation_rules(comment):
    for rule in moderation_rules_db.values():
        if rule['keyword'] in comment['content'].lower():
            return rule['action']
    return None


# Function to report a comment
def report_comment(comment_id):
    comment = comments_db.get(comment_id)
    if comment:
        reported_comments.append(comment)
        return True
    return False


# Function to simulate machine learning integration for content moderation
def machine_learning_integration(comment):
    # Placeholder machine learning logic for content moderation
    # For simplicity, we assume all comments pass moderation
    return True


# Function to simulate real-time processing of comments
def process_comment(comment):
    # Check for profanity
    if profanity_filter(comment):
        return {'status': 'rejected', 'reason': 'profanity'}

    # Check for spam
    if spam_detection(comment):
        return {'status': 'rejected', 'reason': 'spam'}

    # Check custom moderation rules
    custom_rule_action = custom_moderation_rules(comment)
    if custom_rule_action:
        return {'status': custom_rule_action, 'reason': 'custom_moderation_rule'}

    # Apply machine learning integration
    if not machine_learning_integration(comment):
        return {'status': 'rejected', 'reason': 'machine_learning'}

    return {'status': 'approved'}


# Endpoint to submit a new comment
@app.route('/comments', methods=['POST'])
def submit_comment():
    data = request.get_json()
    # Validate incoming data
    if 'user_id' not in data or 'content' not in data:
        return jsonify({'error': 'Invalid data. User ID and content are required.'}), 400

    comment_id = len(comments_db) + 1
    comment = {
        'comment_id': comment_id,
        'user_id': data['user_id'],
        'content': data['content'],
    }

    # Process the comment
    result = process_comment(comment)
    comment['status'] = result['status']

    comments_db[comment_id] = comment
    return jsonify({'message': 'Comment submitted successfully.', 'comment_id': comment_id, 'status': comment['status']}), 201


# Endpoint to retrieve details about a specific comment
@app.route('/comments/<int:comment_id>', methods=['GET'])
def get_comment(comment_id):
    comment = comments_db.get(comment_id)
    if comment:
        return jsonify(comment)
    else:
        return jsonify({'error': 'Comment not found.'}), 404


# Endpoint to allow users to report a comment
@app.route('/comments/<int:comment_id>/report', methods=['PUT'])
def report_comment_endpoint(comment_id):
    if report_comment(comment_id):
        return jsonify({'message': 'Comment reported successfully.'}), 200
    return jsonify({'error': 'Comment not found.'}), 404


# Endpoint to create a new custom moderation rule
@app.route('/moderation-rules', methods=['POST'])
def create_moderation_rule():
    data = request.get_json()
    # Validate incoming data
    if 'keyword' not in data or 'action' not in data:
        return jsonify({'error': 'Invalid data. Keyword and action are required.'}), 400

    rule_id = len(moderation_rules_db) + 1
    rule = {
        'rule_id': rule_id,
        'keyword': data['keyword'],
        'action': data['action']
    }

    moderation_rules_db[rule_id] = rule
    return jsonify({'message': 'Moderation rule created successfully.', 'rule_id': rule_id}), 201


# Endpoint to retrieve existing moderation rules
@app.route('/moderation-rules', methods=['GET'])
def get_moderation_rules():
    return jsonify(list(moderation_rules_db.values())), 200


# Endpoint to delete a specific moderation rule
@app.route('/moderation-rules/<int:rule_id>', methods=['DELETE'])
def delete_moderation_rule(rule_id):
    rule = moderation_rules_db.get(rule_id)
    if not rule:
        return jsonify({'error': 'Moderation rule not found.'}), 404

    moderation_rules_db.pop(rule_id)
    return jsonify({'message': 'Moderation rule deleted successfully.'}), 200


if __name__ == '__main__':
    app.run(debug=True)
System Design — Docusign
We will be discussing in depth -
- What is Docusign
- Important Features
- Scaling Requirements
- Data Model — ER requirements
- High Level Design
- Basic Low Level Design
- API Design
- Complete Detailed Design
- Code Implementation

What is Docusign
DocuSign is a pioneering electronic signature and transaction management platform that enables businesses and individuals to conduct secure, legally binding electronic transactions. It provides a cloud-based platform to streamline and digitize documentation processes, reducing paperwork, time, and costs associated with traditional paper-based agreements.
Important Features
- Electronic Signature: DocuSign allows users to electronically sign documents, contracts, and agreements with a secure and legally binding signature. This process ensures authenticity and integrity, meeting regulatory standards.
- Transaction Management: The platform supports end-to-end transaction management, enabling users to send, track, and manage documents throughout the entire lifecycle.
- Template Library: DocuSign offers a vast template library, allowing users to create standardized document templates for frequently used agreements, increasing efficiency.
- Workflow Automation: With workflow automation, users can define sequential or parallel signing processes, reminders, and expiration dates to streamline document workflows.
- Integration Capabilities: DocuSign integrates seamlessly with various third-party applications, such as CRM systems, cloud storage services, and productivity tools.
Scaling Requirements — Capacity Estimation
For the sake of simplicity, let me consider a smaller scale simulation for DocuSign:
- Total number of users: 10 Million
- Daily active users (DAU): 2 Million
- Number of documents signed by a user per day: 5
- Total number of documents signed per day: 10 Million documents/day
- Read-to-write ratio: 100:1
- Total number of documents uploaded per day: 10 Million / 100 = 100,000 documents/day
Storage Estimation:
Assumptions:
- On average, each document size is 2 MB.
Storage Calculation:
- Total storage per day: 100,000 * 2 MB = 200 GB/day
- For the next 3 years: 200 GB * 365 * 3 = 219 TB
Requests per Second:
Assumptions:
- The service operates 24/7.
Request Calculation:
- Requests per second: 10 Million / (24 * 60 * 60) seconds = ~115 requests/second
class DocuSign:
    def __init__(self):
        self.users = {}
        self.documents = {}
        self.storage_used = 0

    def register_user(self, user_id, email):
        self.users[user_id] = email

    def sign_document(self, user_id, document_id):
        if user_id not in self.users:
            return "User not found. Please register first."

        self.documents[document_id] = user_id
        return f"Document {document_id} signed by user {user_id}"

    def upload_document(self, document_id, size_mb):
        self.documents[document_id] = None
        self.storage_used += size_mb

    def get_storage_usage(self):
        return f"Storage used: {self.storage_used} MB"

    def get_total_documents(self):
        return f"Total documents: {len(self.documents)}"

if __name__ == '__main__':
    docusign = DocuSign()

    # Register users
    docusign.register_user(1, "[email protected]")
    docusign.register_user(2, "[email protected]")

    # Sign documents
    print(docusign.sign_document(1, "doc1"))
    print(docusign.sign_document(2, "doc2"))
    print(docusign.sign_document(1, "doc3"))

    # Upload documents
    docusign.upload_document("doc4", 5)
    docusign.upload_document("doc5", 3)

    # Get storage usage and total documents
    print(docusign.get_storage_usage())
    print(docusign.get_total_documents())
Data Model — ER requirements
- User Profile: Contains user details like name, email, and authentication information.
- Document: Represents the individual documents or agreements uploaded to the platform.
- Template: Stores predefined templates for various types of documents.
- Transaction: Connects users, documents, and templates, capturing metadata related to the signing process.
- Audit Trail: Tracks user actions, timestamps, and document changes to maintain a comprehensive history.
Users:

Username: String
Email: String
Password: String

Documents:

DocumentId: Int
UserId: Int (Foreign key from Users table)
DocumentName: String
DocumentContent: Binary/URL
UploadTimestamp: DateTime

Signatures:

SignatureId: Int
UserId: Int (Foreign key from Users table)
DocumentId: Int (Foreign key from Documents table)
SignatureContent: Binary/URL
SignatureTimestamp: DateTime
High Level Design
- Load Balancing: Employing load balancers to distribute incoming traffic across multiple servers to prevent overloading and ensure smooth performance.
- Horizontal Scaling: Adding more server instances to the system as demand grows, allowing it to handle a higher number of concurrent users.
- Database Sharding: Implementing database sharding to partition data across multiple database servers, improving read/write operations and overall database performance.
- Caching Mechanisms: Utilizing caching systems like Redis or Memcached to store frequently accessed data, reducing database queries and improving response times.
Components —
- Web Servers: Handle user interactions, authentication, and serve the web application.
- Application Servers: Process business logic, transaction management, and user workflows.
- Database Servers: Store user data, documents, templates, and transactional information.
- File Storage: Securely store uploaded documents and templates.
- Third-Party Integrations: APIs to connect with external applications.
Modules —
- Document Processing Module: Responsible for uploading, converting, and storing documents.
- Authentication Module: Handles user authentication and authorization.
- Transaction Manager: Orchestrates the signing process, sending notifications, and managing reminders.
Assumptions:
- The system will handle electronic signatures and transaction management.
- The system should be highly available, scalable, and reliable.
- The read-to-write ratio is high as users view documents more than uploading them.
- Data consistency is essential for maintaining legal integrity.
- Horizontal scaling will be used for handling increased user load.
Main Components and Services:
- Mobile/Web Clients: These are the users accessing the DocuSign platform through mobile apps or web browsers.
- Application Servers: These servers handle various operations, including document uploads, signature requests, and user interactions. They interact with the database and cache for data retrieval and processing.
- Load Balancer: The load balancer distributes incoming user requests across multiple application servers to ensure high availability and even load distribution.
- Cache (Memcache/Redis): To improve response times and reduce database load, caching is used to store frequently accessed data temporarily.
- CDN (Content Delivery Network): For faster delivery of documents and other assets, a CDN is used to serve static content to users from edge servers closer to their location.
- Database (NoSQL): For data storage, a NoSQL database is used to store user information, documents, and signatures in a key-value store, providing high scalability and read performance.
- Storage (Amazon S3): For handling document uploads and large files, an object storage service like Amazon S3 is used to store documents securely and reliably.
Services:
Document Service:
- UploadDocument(userId, documentName, documentContent): Allows users to upload documents to the system.
- GetDocument(userId, documentId): Retrieves a specific document for a user.
Signature Service:
- CreateSignatureRequest(userId, documentId, signatureContent): Creates a signature request for a specific document.
- SignDocument(userId, documentId, signatureContent): Allows users to sign a document electronically.
- GetSignature(userId, documentId): Retrieves the signature details for a specific document.
Transaction Management Service:
- CreateTransaction(transactionId, userIds): Creates a transaction and associates multiple users with it.
- GetTransaction(transactionId): Retrieves the details of a specific transaction.
- GetTransactionDocuments(transactionId): Retrieves all documents associated with a transaction.
Feed Generation Service:
- GenerateUserFeed(userId): Generates a user’s feed based on the documents they have uploaded and the signatures they have completed.
Notification Service:
- SendNotification(userId, message): Sends notifications to users for document updates, signature requests, etc.
Document Service:
class DocumentService:
    def __init__(self):
        self.documents = {}
        self.document_id_counter = 1
def upload_document(self, user_id, document_name, document_content):
document_id = self.document_id_counter
self.documents[document_id] = {
"UserId": user_id,
"DocumentName": document_name,
"DocumentContent": document_content,
"UploadTimestamp": datetime.now()
}
self.document_id_counter += 1
return document_id def get_document(self, user_id, document_id):
document = self.documents.get(document_id)
if document and document["UserId"] == user_id:
return document
return None# Usage example
document_service = DocumentService()
document_id = document_service.upload_document(1, "Agreement.pdf", "BinaryContentHere")
print(document_service.get_document(1, document_id))Signature Service:
class SignatureService:
    def __init__(self):
        self.signatures = {}
        self.signature_id_counter = 1
def create_signature_request(self, user_id, document_id, signature_content):
signature_id = self.signature_id_counter
self.signatures[signature_id] = {
"UserId": user_id,
"DocumentId": document_id,
"SignatureContent": signature_content,
"SignatureTimestamp": datetime.now()
}
self.signature_id_counter += 1
return signature_id def sign_document(self, user_id, document_id, signature_content):
if document_id not in self.signatures:
return "Signature request not found."
if self.signatures[document_id]["UserId"] == user_id:
self.signatures[document_id]["SignatureContent"] = signature_content
self.signatures[document_id]["SignatureTimestamp"] = datetime.now()
return "Document signed successfully."
return "Unauthorized to sign this document." def get_signature(self, user_id, document_id):
signature = self.signatures.get(document_id)
if signature and signature["UserId"] == user_id:
return signature
return None# Usage example
signature_service = SignatureService()
signature_request_id = signature_service.create_signature_request(1, 1, "SignatureContentHere")
print(signature_service.get_signature(1, signature_request_id))
signature_service.sign_document(1, signature_request_id, "SignedContentHere")
print(signature_service.get_signature(1, signature_request_id))Transaction Management Service:
class TransactionManagementService:
    def __init__(self):
        self.transactions = {}
        self.transaction_id_counter = 1
def create_transaction(self, user_ids):
transaction_id = self.transaction_id_counter
self.transactions[transaction_id] = {
"UserIds": user_ids,
"Documents": [],
"Timestamp": datetime.now()
}
self.transaction_id_counter += 1
return transaction_id def get_transaction(self, transaction_id):
return self.transactions.get(transaction_id) def add_document_to_transaction(self, transaction_id, document_id):
if transaction_id not in self.transactions:
return "Transaction not found."
self.transactions[transaction_id]["Documents"].append(document_id)
return "Document added to transaction." def get_transaction_documents(self, transaction_id):
transaction = self.transactions.get(transaction_id)
if transaction:
return transaction["Documents"]
return None# Usage example
transaction_service = TransactionManagementService()
transaction_id = transaction_service.create_transaction([1, 2])
print(transaction_service.get_transaction(transaction_id))
transaction_service.add_document_to_transaction(transaction_id, 1)
print(transaction_service.get_transaction_documents(transaction_id))Basic Low Level Design
class User:
    def __init__(self, user_id, username, password, email):
        self.user_id = user_id
        self.username = username
        self.password = password
        self.email = email

class Document:
    def __init__(self, document_id, user, document_content, timestamp):
        self.document_id = document_id
        self.user = user
        self.document_content = document_content
        self.timestamp = timestamp

class Signature:
    def __init__(self, signature_id, user, document, signature_content, timestamp):
        self.signature_id = signature_id
        self.user = user
        self.document = document
        self.signature_content = signature_content
        self.timestamp = timestamp

class DocuSign:
    def __init__(self):
        self.users = {}
        self.documents = {}
        self.signatures = {}
        self.user_id_counter = 1
        self.document_id_counter = 1
        self.signature_id_counter = 1

    def add_user(self, username, password, email):
        user_id = str(self.user_id_counter)
        user = User(user_id, username, password, email)
        self.users[user_id] = user
        self.user_id_counter += 1
        return user_id

    def add_document(self, user_id, document_content):
        if user_id not in self.users:
            return "User not found. Please register first."

        document_id = str(self.document_id_counter)
        user = self.users[user_id]
        timestamp = "CurrentTimestamp"  # Replace with actual timestamp logic
        document = Document(document_id, user, document_content, timestamp)
        self.documents[document_id] = document
        self.document_id_counter += 1
        return document_id

    def add_signature(self, user_id, document_id, signature_content):
        if user_id not in self.users:
            return "User not found. Please register first."
        if document_id not in self.documents:
            return "Document not found. Please upload the document first."

        signature_id = str(self.signature_id_counter)
        user = self.users[user_id]
        document = self.documents[document_id]
        timestamp = "CurrentTimestamp"  # Replace with actual timestamp logic
        signature = Signature(signature_id, user, document, signature_content, timestamp)
        self.signatures[signature_id] = signature
        self.signature_id_counter += 1
        return signature_id
from flask import Flask, request, jsonify
app = Flask(__name__)
# Mock database to store access tokens
users = {
"[email protected]": "token1",
"[email protected]": "token2",
}
# Authentication API - User login and access token generation
@app.route('/auth', methods=['POST'])
def authenticate_user():
data = request.get_json()
email = data.get('email')
password = data.get('password')
# Check if the user exists and the password is correct (for simplicity, using hardcoded values)
if email in users and password == "password":
access_token = users[email]
return jsonify({"access_token": access_token})
else:
return jsonify({"error": "Invalid credentials"}), 401
# Document Management API - Upload, retrieve, and delete documents
@app.route('/documents', methods=['POST', 'GET', 'DELETE'])
def manage_documents():
access_token = request.headers.get('Authorization')
# Check if the access token is valid
if is_valid_token(access_token):
if request.method == 'POST':
# Handle document upload logic here
return jsonify({"message": "Document uploaded successfully"})
elif request.method == 'GET':
# Handle document retrieval logic here
return jsonify({"documents": ["document1.pdf", "document2.docx"]})
elif request.method == 'DELETE':
# Handle document deletion logic here
return jsonify({"message": "Document deleted successfully"})
else:
return jsonify({"error": "Unauthorized"}), 401
def is_valid_token(token):
# Check if the access token is valid (for simplicity, checking against the mock database)
return token in users.values()
if __name__ == '__main__':
app.run(debug=True)API Design
- Authentication API: Generate access tokens and authenticate users.
- Document Management API: Upload, retrieve, and manage documents.
- Template Management API: Create, modify, and retrieve document templates.
- Transaction API: Initiate and manage transactions, including signature requests and notifications.
from flask import Flask, request, jsonify

app = Flask(__name__)
docusign = DocuSign()

@app.route('/users', methods=['POST'])
def create_user():
    data = request.get_json()
    username = data.get('username')
    password = data.get('password')
    email = data.get('email')
    user_id = docusign.add_user(username, password, email)
    return jsonify({"user_id": user_id}), 201

@app.route('/documents', methods=['POST'])
def upload_document():
    data = request.get_json()
    user_id = data.get('user_id')
    document_content = data.get('document_content')
    document_id = docusign.add_document(user_id, document_content)
    return jsonify({"document_id": document_id}), 201

@app.route('/signatures', methods=['POST'])
def add_signature():
    data = request.get_json()
    user_id = data.get('user_id')
    document_id = data.get('document_id')
    signature_content = data.get('signature_content')
    signature_id = docusign.add_signature(user_id, document_id, signature_content)
    return jsonify({"signature_id": signature_id}), 201

if __name__ == '__main__':
    app.run()
Authentication API:
Endpoint: /auth
Method: POST
Description: This endpoint will handle user authentication and return an access token that the user can use for subsequent API requests.
Document Management API:
Endpoint: /documents
Method: POST, GET, DELETE
Description: This endpoint will allow users to upload, retrieve, and delete documents.
Template Management API:
Endpoint: /templates
Method: POST, GET, PUT, DELETE
Description: This endpoint will enable users to create, retrieve, update, and delete document templates.
Transaction API:
Endpoint: /transactions
Method: POST, GET
Description: This endpoint will manage the signing process, allowing users to initiate transactions and check their status.Complete Detailed Design
Coming soon! It will be covered on youtube channel.
Subscribe to youtube channel :
Complete Code implementation
class DocuSign:
    def __init__(self):
        self.users = {}
        self.transactions = {}
        self.template_library = {}

    # Electronic Signature
    def electronic_signature(self, user, document):
        if user not in self.users:
            return "User not found. Please register first."

        if document not in self.transactions:
            return "Document not found. Please create a transaction first."

        return f"{user} electronically signed {document}"

    # Transaction Management
    def create_transaction(self, transaction_id):
        if transaction_id in self.transactions:
            return "Transaction ID already exists. Please choose a different ID."

        self.transactions[transaction_id] = []
        return f"Transaction {transaction_id} created successfully."

    def add_document_to_transaction(self, transaction_id, document):
        if transaction_id not in self.transactions:
            return "Transaction ID not found. Please create a transaction first."

        self.transactions[transaction_id].append(document)
        return f"{document} added to transaction {transaction_id}"

    # Template Library
    def add_template(self, template_name, template_content):
        self.template_library[template_name] = template_content
        return f"Template '{template_name}' added to the library."

    def get_template(self, template_name):
        if template_name not in self.template_library:
            return "Template not found. Please add the template to the library first."

        return self.template_library[template_name]

    # Workflow Automation
    def workflow_automation(self, signing_process, reminders, expiration_date):
        return f"Workflow: {signing_process}, Reminders: {reminders}, Expiration Date: {expiration_date}"

    # Integration Capabilities
    def integrate_with_third_party_app(self, app_name):
        return f"Integration with {app_name} successful"

    # Mobile Support
    def sign_document_on_mobile(self, user, document, platform):
        return f"{user} signed {document} on {platform}"


if __name__ == '__main__':
    # Test the functionalities
    docusign = DocuSign()

    # Register users
    docusign.users["John Doe"] = "[email protected]"
    docusign.users["Jane Smith"] = "[email protected]"

    # Create a transaction
    print(docusign.create_transaction("12345"))

    # Add documents to the transaction
    print(docusign.add_document_to_transaction("12345", "Agreement.pdf"))
    print(docusign.add_document_to_transaction("12345", "Contract.docx"))

    # Add templates to the library
    print(docusign.add_template("NDA", "Non-Disclosure Agreement Template"))
    print(docusign.add_template("Proposal", "Business Proposal Template"))

    # Retrieve templates from the library
    print(docusign.get_template("NDA"))
    print(docusign.get_template("Proposal"))

    # Electronic Signature
    print(docusign.electronic_signature("John Doe", "Agreement.pdf"))

    # Workflow Automation
    print(docusign.workflow_automation("Sequential", 2, "2023-07-31"))

    # Integration Capabilities
    print(docusign.integrate_with_third_party_app("CRM System"))

    # Mobile Support
    print(docusign.sign_document_on_mobile("John Doe", "Agreement.pdf", "iOS"))
System Design — Ninja Van
We will be discussing in depth -
- What is Ninja Van
- Important Features
- Scaling Requirements
- Data Model — ER requirements
- High Level Design
- Basic Low Level Design
- API Design
- Complete Detailed Design
- Code Implementation

What is Ninja Van
Important Features
Scaling Requirements — Capacity Estimation
Data Model — ER requirements
High Level Design
Basic Low Level Design
API Design
Complete Detailed Design
Coming soon! It will be covered on youtube channel.
Subscribe to youtube channel :
Complete Code implementation
Read Next— how to Design Facebook NewsFeed
Let me know if you have any questions in the section below. Subscribe/ Follow, Like/Clap and Stay Tuned!!
Day 2 : SQL Basics, Query Structure, Built In functions Conditions
Day 4 : Set Theory Operations, Stored Procedures and CASE statements in SQL
Day 6 : Subqueries, Group by, order by and Having clauses in SQL and Analytical Functions
Day 7 : Window Functions, Grouping Sets and Constraints in SQL
Day 8 : BigQuery Basics, SELECT, FROM, WHERE and Date and Extract in BigQuery
Day 9 : Common Expression Table, UNNEST Clause, SQL vs NoSQL Databases
Day 10 : Triggers, Pivot and Cursors in SQL
Day 14 : MySQL in Depth
Day 15 : PostgreSQL inDepth
Anyways, For Day 15 of 15 days of Advanced SQL, we will cover —
PostgreSQL inDepth
Github for Advanced SQL that you can follow —
All the projects, data structures, algorithms, system design, Data Science and ML, Data Engineering, MLOps and Deep Learning videos will be published on our youtube channel ( just launched).
Subscribe today!
System Design Case Studies — In Depth
Complete Data Structures and Algorithm Series
Github —
Some of the other best Series —
30 days of Data Structures and Algorithms and System Design Simplified
Data Science and Machine Learning Research ( papers) Simplified **
100 days : Your Data Science and Machine Learning Degree Series with projects
Complete Data Visualization and Pre-processing Series with projects
Exceptional Github Repos — Part 1
Exceptional Github Repos — Part 2
Tech Newsletter —
If you are interested, you can join my newsletter through which I send tech interview tips, techniques, patterns, hacks — Software Development, ML, Data Science, Startups and Technology projects to more than 30K readers. You can subscribe to Tech Brew :
For Python Projects —
For complete 60 days of Data Science and ML : Day 1 — Day 60 : Quick Recap of 60 days of Data Science and ML
Follow for more updates. Stay tuned and keep coding!
For other projects, tune to —
Build Machine Learning Pipelines( With Code)
Recurrent Neural Network with Keras
Clustering Geolocation Data in Python using DBSCAN and K-Means
Facial Expression Recognition using Keras
Hyperparameter Tuning with Keras Tuner
Custom Layers in Keras


