
Day 14 of System Design Case Studies Series : Design Yelp, Cache Mechanism, Todoist, Headspace, Mint, Freecharge, Notification System, Message Queueing System
Complete Design with examples..
Hello peeps! Welcome to Day 14 of System Design Case studies series where we will design Yelp, Cache Mechanism, Todoist, Headspace, Mint, Freecharge, Notification System, Message Queueing System.
This post has system design for ( scroll till the end of the post) —
Note : Please read System Design Important Terms you MUST know and Most Important System Design basics before reading this post.
Projects Videos —
All the projects, data structures, SQL, algorithms, system design, Data Science and ML , Data Analytics, Data Engineering, , Implemented Data Science and ML projects, Implemented Data Engineering Projects, Implemented Deep Learning Projects, Implemented Machine Learning Ops Projects, Implemented Time Series Analysis and Forecasting Projects, Implemented Applied Machine Learning Projects, Implemented Tensorflow and Keras Projects, Implemented PyTorch Projects, Implemented Scikit Learn Projects, Implemented Big Data Projects, Implemented Cloud Machine Learning Projects, Implemented Neural Networks Projects, Implemented OpenCV Projects,Complete ML Research Papers Summarized, Implemented Data Analytics projects, Implemented Data Visualization Projects, Implemented Data Mining Projects, Implemented Natural Leaning Processing Projects, MLOps and Deep Learning, Applied Machine Learning with Projects Series, PyTorch with Projects Series, Tensorflow and Keras with Projects Series, Scikit Learn Series with Projects, Time Series Analysis and Forecasting with Projects Series, ML System Design Case Studies Series videos will be published on our youtube channel ( just launched).
Subscribe today!
Solved System Design Case Studies — In depth
Design Instagram
Design Messenger App
Design Twitter
Design URL Shortener
Design Dropbox
Design Youtube
Design API Rate Limiter
Design Web Crawler
Design Facebook’s Newsfeed
Design Yelp
Design Uber
Design Tinder
Design Tiktok
Design Whatsapp
Most Popular System Design Questions
Mega Compilation : Solved System Design Case studies
We will be discussing in depth -
- What is Yelp
- Important Features
- Scaling Requirements
- Data Model — ER requirements
- High Level Design
- Basic Low Level Design
- API Design
- Complete Detailed Design
Pre-requisite to this post -
Complete System Design Series — Important Concepts that you should know before starting the Case studies
6. Networking, How Browsers work, Content Network Delivery ( CDN)
13. System Design Template — How to solve any System Design Question
Github —
Day 1 of System Design Case Studies can be found below-
Day 2 of System Design Case Studies can be found below-
Day 3 of System Design Case Studies can be found below-
Day 4 of System Design Case Studies can be found below-
What is Yelp?

Yelp is a platform which is used to —
- Discover nearby places, restaurants, events etc.
- It stores the information about the different places which can be searched by the user based on the user requirement and location.
- Users can add/delete and update the places by giving the search radius/location
- Places can get reviewed by the users on the yelp platform.
Users can be mobile based or web based.
Designing Yelp would involve —
- User registration and authentication: Allow users to create an account and log in to the platform.
- Business listing: Allow businesses to create a listing on the platform, which includes information such as the business name, address, contact information, and categories.
- Reviews and ratings: Allow users to leave reviews and ratings for businesses, and display the average rating on each business’s listing.
- Search and filtering: Implement a search function that allows users to find businesses based on location, category, and keywords. Also, provide a way for users to filter search results based on various criteria such as rating, price, and distance.
- Photos and videos: Allow users to upload photos and videos of businesses and display them on the business’s listing.
- Maps integration: Integrate a map functionality that shows the location of businesses and allows users to get directions.
- Advertising: Create a way for businesses to purchase advertising on the platform to increase visibility.
- Personalization: Personalize the experience for each user by showing them businesses and reviews that are relevant to their interests and location.
- Security: Implement security measures to protect user data and prevent fraud, such as using encryption and monitoring for suspicious activity.
- Analytics: Implement an analytics system to track user behavior and business performance, which can be used to improve the platform and provide insights to business owners.
- Scalability: Design the platform to handle a large number of users and businesses, and be able to scale as the platform grows.
- A/B testing: Regularly perform A/B testing on different features and algorithms to ensure that the platform is providing the best possible user experience.
Important Features
Users should be able to search nearby restaurants based on user’s location in a search radius
Users should be able to see the detailed information about the business.
Users should be able to write reviews/give feedback about the location through comments/ratings
Scaling Requirements
Let’s say we have —
Number of locations : 200 Million
Size of location data = 500 bytes
Total storage estimate for all the locations:
200 Milllion * 500 bytes = 100 GB
Query per second : 70K
Total estimate for geospatial index : 200 Million * 18 bytes = 3.6 GB
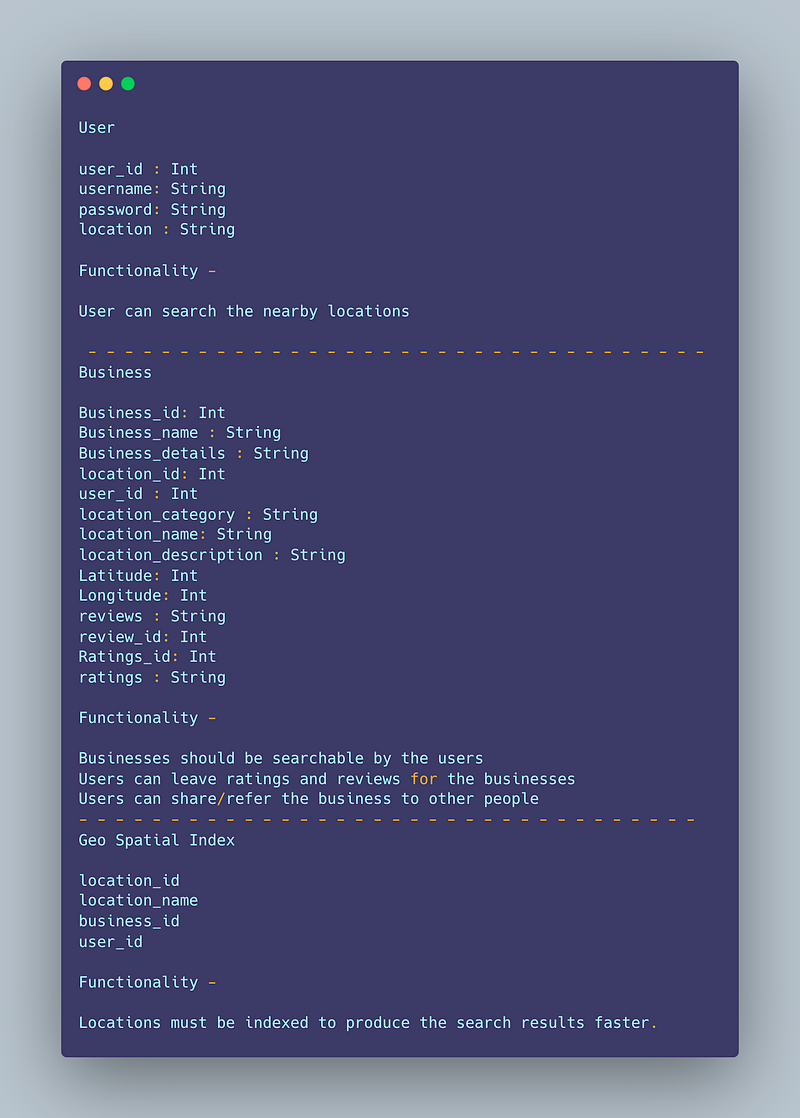
Data Model — ER requirements
User
user_id : Int
username: String
password: String
location : String
Functionality —
User can search the nearby locations
— — — — — — — — — — — — — — — — — — — — — — — — — — — — — — — — — —
Business
Business_id: Int
Business_name : String
Business_details : String
location_id: Int
user_id : Int
location_category : String
location_name: String
location_description : String
Latitude: Int
Longitude: Int
reviews : String
review_id: Int
Ratings_id: Int
ratings : String
Functionality —
Businesses should be searchable by the users
Users can leave ratings and reviews for the businesses
Users can share/refer the business to other people
— — — — — — — — — — — — — — — — — — — — — — — — — — — — — — — — — —
Geo Spatial Index
location_id
location_name
business_id
user_id
Locations must be indexed to produce the search results faster.
High Level Design
Before we dive in, first understand what is —
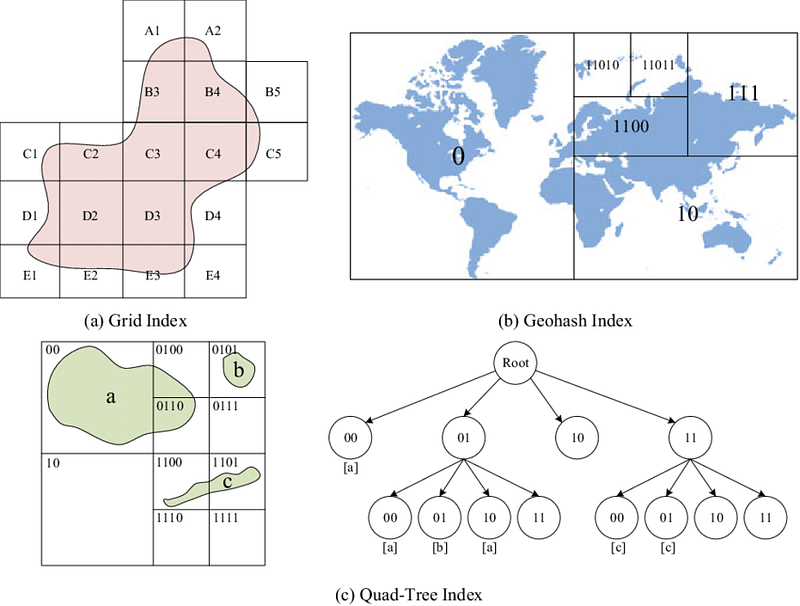
- Geospatial database — It’s a database which stores, queries and indexes the spatial data in an efficient manner. It represents objects that are defined in a geo space. Example — PostGIS, Redis Geohash
Here’s a geospatial database implemented in Python using the sqlite3 library and the sqlite3-rtree extension:
import sqlite3conn = sqlite3.connect(":memory:")
conn.execute("CREATE VIRTUAL TABLE geodata USING rtree(id, minx, maxx, miny, maxy);")def insert_data(conn, id, minx, maxx, miny, maxy):
conn.execute("INSERT INTO geodata VALUES (?, ?, ?, ?, ?)", (id, minx, maxx, miny, maxy))def query_data(conn, minx, maxx, miny, maxy):
cursor = conn.execute("SELECT id FROM geodata WHERE minx >= ? AND maxx <= ? AND miny >= ? AND maxy <= ?", (minx, maxx, miny, maxy))
return cursor.fetchall()insert_data(conn, 1, 0, 2, 0, 2)
insert_data(conn, 2, 1, 3, 1, 3)
insert_data(conn, 3, 2, 4, 2, 4)results = query_data(conn, 1, 2, 1, 2)
print(results)In this example, the insert_data function inserts a new entry into the geodata table with a unique id, a minimum x value minx, a maximum x value maxx, a minimum y value miny, and a maximum y value maxy. The query_data function takes a query bounding box defined by minx, maxx, miny, and maxy and returns all entries in the geodata table that are contained within the query bounding box.
2. Geospatial Indexing — These are index that supports containment and intersection queries for various geometric shapes that are in 2D. It calculates geometries on these shapes..
Here’s an implementation of a geospatial index in Python using the rtree library:
from rtree import indexdef build_index(points):
idx = index.Index()
for i, point in enumerate(points):
idx.insert(i, (point[0], point[1], point[0], point[1]))
return idxdef query_index(idx, query_point, radius):
results = list(idx.intersection((query_point[0]-radius, query_point[1]-radius,
query_point[0]+radius, query_point[1]+radius)))
return resultspoints = [(0,0), (1,1), (2,2), (3,3), (4,4), (5,5)] idx = build_index(points) results = query_index(idx, (2,2), 1) print(results)
In this example, the build_index function takes a list of points and builds an R-Tree index. The query_index function takes a query point and a radius and returns a list of indices for all the points in the index that are within the given radius of the query point. The rtree library provides an efficient implementation of R-Trees, which are a type of spatial index that can be used to efficiently query data based on geographic location.
3. QuadTree Indexing — In this, the quad tree divides/separates the plane into four quads. Ut has one root node and four sub quad tree which has exactly four children. It’s a simple technique that is used for indexing spatial data where root represents the entire area and each internal node represents one area ( quadrant) covered into half along both axes.
Here’s an implementation of a Quadtree in Python:
class Node:
    def __init__(self, x, y, width, height, points=None):
        self.x = x
        self.y = y
        self.width = width
        self.height = height
        self.points = points or []
        self.children = []

    def divide(self):
        x = self.x
        y = self.y
        w = self.width
        h = self.height
        w_half = w / 2
        h_half = h / 2
        self.children = [Node(x, y, w_half, h_half, self.points),
                        Node(x + w_half, y, w_half, h_half),
                        Node(x, y + h_half, w_half, h_half),
                        Node(x + w_half, y + h_half, w_half, h_half)]
        self.points = []
def insert(self, point):
if self.children:
for child in self.children:
if child.contains(point):
child.insert(point)
return
self.points.append(point)
if len(self.points) > 4:
self.divide()def contains(self, point):
x, y = point
return self.x <= x < self.x + self.width and self.y <= y < self.y + self.heightclass QuadTree:
def __init__(self, width, height):
self.root = Node(0, 0, width, height)def insert(self, point):
self.root.insert(point)def query(self, x, y, width, height):
results = []
self._query(self.root, x, y, width, height, results)
return resultsdef _query(self, node, x, y, width, height, results):
if not node.children:
results.extend(node.points)
return
for child in node.children:
if child.x + child.width >= x and child.y + child.height >= y and child.x <= x + width and child.y <= y + height:
self._query(child, x, y, width, height, results)tree = QuadTree(100, 100)
points = [(0,0), (1,1), (2,2), (3,3), (4,4), (5,5)]
for point in points:
tree.insert(point)
results = tree.query(1, 1, 2, 2)
print(results)In this implementation, the Node class represents a single node in the Quadtree. It has an x, y position, a width and height to describe the bounds of the node, and a list of points that are contained within the bounds of the node. The divide method creates four children nodes and moves the points to the appropriate child node.
— — — — — — — — — — — — — — — — — — — — — — — — — — — — — — — — — —
Assumptions/Considerations/Requirements
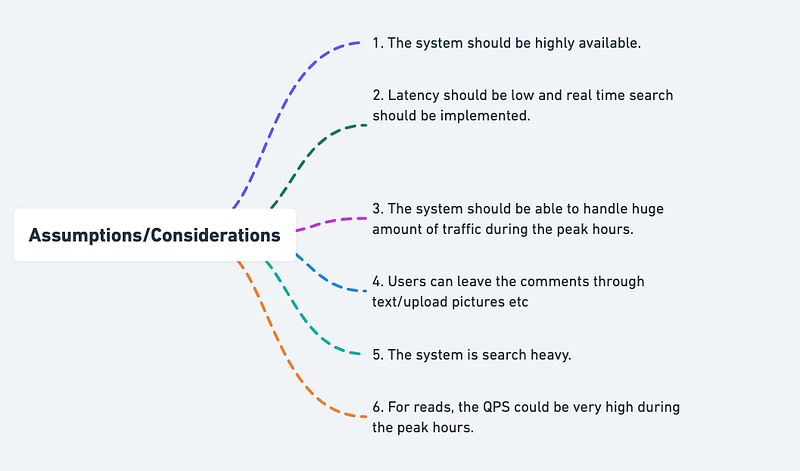
- The system should be highly available.
2. Latency should be low and real time search should be implemented.
3. The system should be able to handle huge amount of traffic during the peak hours.
4. Users can leave the comments through text/upload pictures etc
5. The system is search heavy.
6. For reads, the QPS could be very high during the peak hours.
— — — — — — — — — — — — — — — — — — — — — — — — — — — — — — — — — — — — —
Components
Client : Users ( can be mobile based or web based)
Databases and replicas
Geospatial databases
Load balancer
Aggregation servers
Quadtree Servers
Quadtree Index
— — — — — — — — — — — — — — — — — — — — — — — — — — — — — — — — — — — — —
Services
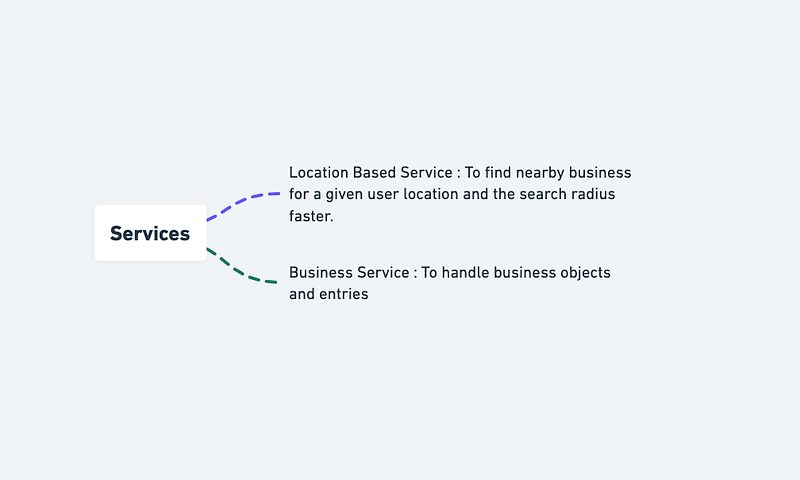
The services are going to be read heavy.
Location Based Service : To find nearby business for a given user location and the search radius faster.
Business Service : To handle business objects and entries
Implement a location-based service and business service in Python:
import os
import requests
from geopy.geocoders import Nominatim
from geopy.distance import geodesic
# Location Based Service
class LocationBasedService:
def __init__(self, user_location, search_radius):
self.user_location = user_location
self.search_radius = search_radius
self.geolocator = Nominatim(user_agent="LocationBasedService") def find_nearby_businesses(self, businesses):
user_location = self.geolocator.geocode(self.user_location)
user_location_coordinates = (user_location.latitude, user_location.longitude)
nearby_businesses = []
for business in businesses:
business_location = self.geolocator.geocode(business.location)
business_location_coordinates = (business_location.latitude, business_location.longitude)
distance = geodesic(user_location_coordinates, business_location_coordinates).miles
if distance <= self.search_radius:
nearby_businesses.append(business)
return nearby_businesses# Business Service
class BusinessService:
def __init__(self):
self.businesses = [] def add_business(self, business):
self.businesses.append(business) def update_business_information(self, business, new_information):
for index, b in enumerate(self.businesses):
if b.name == business.name:
self.businesses[index] = new_information
break def delete_business_entry(self, business):
for index, b in enumerate(self.businesses):
if b.name == business.name:
del self.businesses[index]
break# Business Object
class Business:
def __init__(self, name, location):
self.name = name
self.location = location# Example usage
location_based_service = LocationBasedService("San Francisco, CA", 10)
business_service = BusinessService()
business_1 = Business("Business 1", "San Francisco, CA")
business_2 = Business("Business 2", "Oakland, CA")
business_3 = Business("Business 3", "San Jose, CA")
business_service.add_business(business_1)
business_service.add_business(business_2)
business_service.add_business(business_3)
nearby_businesses = location_based_service.find_nearby_businesses(business_service.businesses)
print("Nearby Businesses:")
for business in nearby_businesses:
print(business.name)In this example, we have a LocationBasedService class that accepts a user's location and a search radius. The find_nearby_businesses method then uses the geopy library to find the coordinates of the user's location and compare it with the locations of businesses in the BusinessService to determine which businesses are within the search radius.
Basic Low Level Design
import java.util.*;

class User {
    private String username;
    private List<Review> reviews;

    public User(String username) {
        this.username = username;
        this.reviews = new ArrayList<>();
    }

    public String getUsername() {
        return username;
    }

    public List<Review> getReviews() {
        return reviews;
    }

    public void submitReview(Business business, int rating, String comment) {
        Review review = new Review(business, rating, comment);
        reviews.add(review);
        System.out.println("Review submitted for business '" + business.getName() + "'.");
    }
}

class Business {
    private String name;
    private String address;
    private List<Review> reviews;

    public Business(String name, String address) {
        this.name = name;
        this.address = address;
        this.reviews = new ArrayList<>();
    }

    public String getName() {
        return name;
    }

    public String getAddress() {
        return address;
    }

    public List<Review> getReviews() {
        return reviews;
    }

    public void addReview(Review review) {
        reviews.add(review);
    }
}

class Review {
    private Business business;
    private int rating;
    private String comment;

    public Review(Business business, int rating, String comment) {
        this.business = business;
        this.rating = rating;
        this.comment = comment;
    }

    public Business getBusiness() {
        return business;
    }

    public int getRating() {
        return rating;
    }

    public String getComment() {
        return comment;
    }
}

class YelpSystem {
    private Map<String, User> users;
    private List<Business> businesses;

    public YelpSystem() {
        this.users = new HashMap<>();
        this.businesses = new ArrayList<>();
    }

    public void registerUser(String username) {
        if (!users.containsKey(username)) {
            User newUser = new User(username);
            users.put(username, newUser);
            System.out.println("User '" + username + "' registered successfully.");
        } else {
            System.out.println("Username '" + username + "' is already taken.");
        }
    }

    public void createBusiness(String name, String address) {
        Business newBusiness = new Business(name, address);
        businesses.add(newBusiness);
        System.out.println("Business '" + name + "' created successfully.");
    }

    public User getUser(String username) {
        return users.get(username);
    }

    public List<Business> getBusinesses() {
        return businesses;
    }
}

public class YelpApp {
    public static void main(String[] args) {
        YelpSystem yelp = new YelpSystem();

        // Register users
        yelp.registerUser("user1");
        yelp.registerUser("user2");

        // Create businesses
        yelp.createBusiness("Restaurant A", "123 Main St");
        yelp.createBusiness("Cafe B", "456 Elm St");

        // Submit reviews
        User user1 = yelp.getUser("user1");
        Business restaurantA = yelp.getBusinesses().get(0);
        user1.submitReview(restaurantA, 4, "Great food!");

        User user2 = yelp.getUser("user2");
        Business restaurantB = yelp.getBusinesses().get(1);
        user2.submitReview(restaurantB, 5, "Excellent service!");

        // Print reviews for a business
        Business business = yelp.getBusinesses().get(0);
        List<Review> reviews = business.getReviews();
        System.out.println("Reviews for business '" + business.getName() + "':");
        for (Review review : reviews) {
            System.out.println("Rating: " + review.getRating());
            System.out.println("Comment: " + review.getComment());
            System.out.println("-----");
        }
    }
}
API Design
Implementation —
from flask import Flask, jsonify, requestapp = Flask(__name__)# Endpoint for getting restaurant information
@app.route('/restaurants/<int:restaurant_id>', methods=['GET'])
def get_restaurant(restaurant_id):
# Code to get restaurant information using restaurant_id
restaurant = {'name': 'Pizza Palace', 'rating': 4.3, 'address': '123 Main St'}
return jsonify(restaurant)# Endpoint for searching for restaurants
@app.route('/search', methods=['GET'])
def search_restaurants():
# Code to search for restaurants using query and location parameters in URL
query = request.args.get('query')
location = request.args.get('location')
results = [{'name': 'Pizza Palace', 'rating': 4.3, 'address': '123 Main St'},
{'name': 'Burger Barn', 'rating': 4.1, 'address': '456 Oak St'}]
return jsonify(results)# Endpoint for adding a review
@app.route('/reviews', methods=['POST'])
def add_review():
# Code to add a review using restaurant_id, rating, and text in request body
restaurant_id = request.json['restaurant_id']
rating = request.json['rating']
text = request.json['text']
return jsonify({'message': f'Review added for restaurant {restaurant_id}!'})if __name__ == '__main__':
app.run(debug=True)In this implementation, we have three endpoints:
/restaurants/<int:restaurant_id>(GET): This endpoint is used to get restaurant information. The restaurant_id is passed as a parameter in the URL./search(GET): This endpoint is used to search for restaurants. The query and location parameters are passed in the URL./reviews(POST): This endpoint is used to add a review. The restaurant_id, rating, and text are passed in the request body as JSON.
There will be 4 API —
- Search nearby places
- Add a business
- Update business information
- Delete the business entry
Implementation in Python for the given requirements:
import json
from typing import List, Dict
class Business:
def __init__(self, name: str, location: str, category: str):
self.name = name
self.location = location
self.category = categoryclass BusinessService:
businesses = [] @classmethod
def search_nearby_places(cls, location: str, category: str = None) -> List[Dict[str, str]]:
nearby_businesses = []
for business in cls.businesses:
if location in business.location and (category is None or category == business.category):
nearby_businesses.append({
'name': business.name,
'location': business.location,
'category': business.category
})
return nearby_businesses @classmethod
def add_business(cls, name: str, location: str, category: str):
cls.businesses.append(Business(name, location, category)) @classmethod
def update_business(cls, name: str, location: str, category: str):
for i, business in enumerate(cls.businesses):
if business.name == name:
cls.businesses[i].location = location
cls.businesses[i].category = category @classmethod
def delete_business(cls, name: str):
for i, business in enumerate(cls.businesses):
if business.name == name:
del cls.businesses[i]A request to the Yelp API to search for businesses near a specific location:
import requestsapi_key = "<API_KEY>"headers = {
"Authorization": "Bearer " + api_key
}url = "https://api.yelp.com/v3/businesses/search"params = {
"term": "food",
"location": "San Francisco"
}response = requests.get(url, headers=headers, params=params)if response.status_code == 200:
data = response.json()
businesses = data["businesses"]
for business in businesses:
print(business["name"], business["location"]["address1"])
else:
print("Request failed with status code", response.status_code)This code makes a GET request to the /businesses/search endpoint of the Yelp API and passes the term and location parameters in the request. The API key is passed in the Authorization header. The response from the API is a JSON object that contains an array of businesses that match the search criteria.
API design discussion will be covered in the workflow video( coming soon. Subscribe today to Ignito)
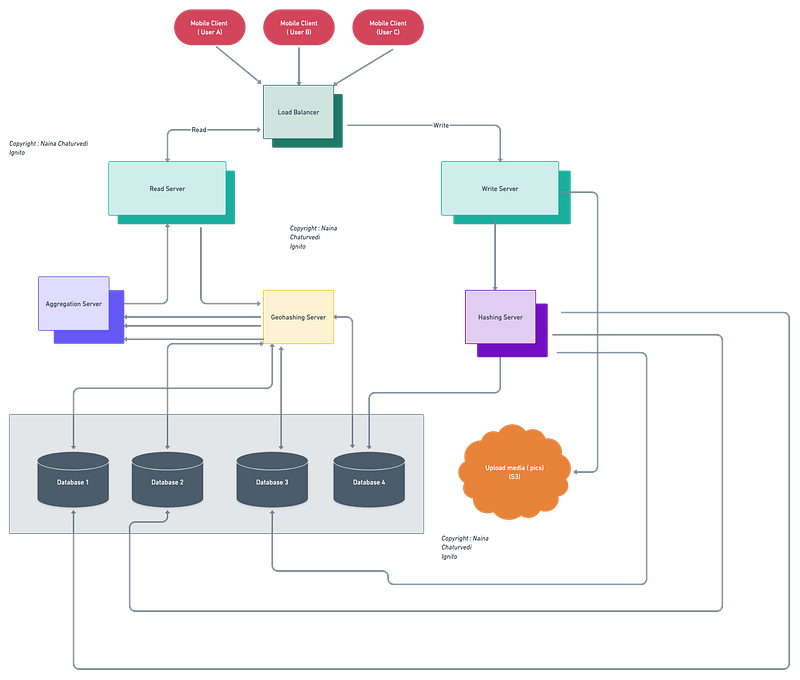
Complete Detailed Design
(Zoom it)
Code
Here’s the code implementation for all the features mentioned above-
- Retrieve data:
from yelpapi import YelpAPI# Define your API key
API_KEY = 'YOUR_API_KEY'# Define the Yelp API client
yelp_api = YelpAPI(API_KEY)# Define the search parameters
params = {
'term': 'food',
'location': 'San Francisco',
'radius': 1000,
'limit': 10
}# Call the Yelp API and retrieve the data
response = yelp_api.search_query(**params)# Print the results
for business in response['businesses']:
print(business['name'])In the above code, we first define our API key, create a YelpAPI client, and then define the search parameters, including the search term (food), location (San Francisco), radius (1000 meters), and limit (10 results). We then call the YelpAPI search_query method and pass in our search parameters. The method returns a response object that contains information about the businesses that match our search criteria. Finally, we loop through the businesses in the response object and print the name of each business.
To add, delete or update a place, you will need to use the Yelp API’s Business Endpoint, which allows you to perform CRUD (Create, Read, Update, Delete) operations on individual businesses.
- To add a new place, you can use the following code:
# Define the business details
business = {
    'name': 'New Business Name',
    'address1': '123 Main St',
    'city': 'San Francisco',
    'state': 'CA',
    'country': 'US',
    'zip_code': '94111',
    'phone': '+14159265400',
    'latitude': 37.792820,
    'longitude': -122.397327
}
# Call the Yelp API to create the new business
response = yelp_api.business_create(**business)# Print the ID of the new business
print(response['id'])- To delete a place, you can use the following code:
# Define the ID of the business to delete
business_id = 'some-business-id'
# Call the Yelp API to delete the business
response = yelp_api.business_delete(business_id)# Print the result of the deletion
print(response)- To update a place, you can use the following code:
# Define the ID of the business to update
business_id = 'some-business-id'
# Define the updated business details
updated_business = {
'name': 'Updated Business Name',
'phone': '+14159265401'
}# Call the Yelp API to update the business
response = yelp_api.business_update(business_id, **updated_business)# Print the updated details of the business
print(response)- To allow users to review a place, you can use the Yelp API’s Reviews Endpoint.
Here’s an implementation of how to create a new review for a business:
# Define the user's location
location = 'San Francisco, CA'
# Define the search parameters
params = {
'term': 'food',
'location': location,
'radius': 1000,
'limit': 10
}# Call the Yelp API and retrieve the data
response = yelp_api.search_query(**params)# Print the results
for business in response['businesses']:
print(business['name'])In this implementation, we define the user’s location as ‘San Francisco, CA’ and include it in the search parameters. The Yelp API will return results that are within a 1000-meter radius of the user’s location.
- To allow users to delete or update a place, you will need to retrieve the business ID of the place. You can do this by searching for the place using the Yelp API and then extracting the business ID from the response object.
Here’s an implementation of how to retrieve the business ID of a place:
# Define the search parameters
params = {
    'term': 'restaurant',
    'location': 'San Francisco',
    'radius': 1000,
    'limit': 1
}
# Call the Yelp API and retrieve the data
response = yelp_api.search_query(**params)# Get the business ID of the first result
business_id = response['businesses'][0]['id']# Print the business ID
print(business_id)In this implementation, we define the search parameters to look for a restaurant in San Francisco within a 1000-meter radius. We then extract the business ID of the first result and print it. This business ID can be used to perform CRUD operations on the restaurant.
More on Yelp System Design —
User Management and Authentication:
User registration, login, and authentication are fundamental functionalities in a system. Here’s an example of how these functionalities can be implemented in Python using Flask, a popular web framework:
from flask import Flask, request, jsonifyapp = Flask(__name__)# User registration endpoint
@app.route('/register', methods=['POST'])
def register():
# Get user data from request
username = request.json['username']
password = request.json['password'] # TODO: Implement user registration logic
# Example: Create a new user record in the database return jsonify({'message': 'User registered successfully'})# User login endpoint
@app.route('/login', methods=['POST'])
def login():
# Get user data from request
username = request.json['username']
password = request.json['password'] # TODO: Implement user login logic
# Example: Verify user credentials and generate an authentication token token = 'generated_token' # Example token for demonstration purposes return jsonify({'token': token})# Protected route example
@app.route('/protected', methods=['GET'])
def protected():
# Get token from request headers
token = request.headers.get('Authorization') # TODO: Implement token verification logic
# Example: Verify the token against the user's stored token return jsonify({'message': 'Access granted'})if __name__ == '__main__':
app.run()Business Listings and Data Management:
Here’s an example of implementing business listing and data management functionalities using Python and a simple in-memory data structure:
class Business:
    def __init__(self, name, description, category):
        self.name = name
        self.description = description
        self.category = category
# In-memory data store for business listings
businesses = []# Add a new business
def add_business(name, description, category):
business = Business(name, description, category)
businesses.append(business)# Retrieve businesses by category
def get_businesses_by_category(category):
return [business for business in businesses if business.category == category]# Example usage
add_business('Restaurant A', 'Delicious food', 'Food')
add_business('Restaurant B', 'Cozy atmosphere', 'Food')food_businesses = get_businesses_by_category('Food')
for business in food_businesses:
print(business.name)Review System:
Implementing a review system involves managing user-generated reviews and enabling various functionalities. Here’s an example of how this can be implemented using Python and a simple data structure:
class Review:
    def __init__(self, user, business, rating, content):
        self.user = user
        self.business = business
        self.rating = rating
        self.content = content
# In-memory data store for reviews
reviews = []# Submit a new review
def submit_review(user, business, rating, content):
review = Review(user, business, rating, content)
reviews.append(review)# Delete a review
def delete_review(user, review):
if review.user == user:
reviews.remove(review)# Example usage
submit_review('user1', 'Restaurant A', 4, 'Great food!')
submit_review('user2', 'Restaurant B', 5, 'Amazing experience!')# Delete the first review
delete_review('user1', reviews[0])for review in reviews:
print(review.content)Recommendation Engine:
Implementing a recommendation engine involves designing algorithms for personalized recommendations based on user preferences. Here’s an example of how this can be implemented using Python:
# User preferences and ratings
user_preferences = {
    'user1': {
        'category': 'Food',
        'rating': 4.5
    },
    'user2': {
        'category': 'Books',
        'rating': 3.8
    },
    # More user preferences...
}
# Business data
businesses = [
{
'name': 'Restaurant A',
'category': 'Food',
'rating': 4.3
},
{
'name': 'Bookstore B',
'category': 'Books',
'rating': 4.6
},
# More business data...
]# Collaborative filtering recommendation algorithm
def collaborative_filtering_recommendation(user):
user_category = user_preferences[user]['category']
filtered_businesses = [business for business in businesses if business['category'] == user_category]
sorted_businesses = sorted(filtered_businesses, key=lambda x: x['rating'], reverse=True)
return sorted_businesses# Content-based filtering recommendation algorithm
def content_based_filtering_recommendation(user):
user_rating = user_preferences[user]['rating']
filtered_businesses = [business for business in businesses if business['rating'] >= user_rating]
sorted_businesses = sorted(filtered_businesses, key=lambda x: x['rating'], reverse=True)
return sorted_businesses# Hybrid recommendation algorithm
def hybrid_recommendation(user):
collaborative_recommendations = collaborative_filtering_recommendation(user)
content_based_recommendations = content_based_filtering_recommendation(user)
hybrid_recommendations = collaborative_recommendations[:3] + content_based_recommendations[:2]
return hybrid_recommendations# Example usage
user = 'user1'
collaborative_recommendations = collaborative_filtering_recommendation(user)
content_based_recommendations = content_based_filtering_recommendation(user)
hybrid_recommendations = hybrid_recommendation(user)print("Collaborative filtering recommendations:")
for recommendation in collaborative_recommendations:
print(recommendation['name'])print("Content-based filtering recommendations:")
for recommendation in content_based_recommendations:
print(recommendation['name'])print("Hybrid recommendations:")
for recommendation in hybrid_recommendations:
print(recommendation['name'])Search Functionality:
Implementing search functionality involves designing systems for business search based on user queries and filters. Here’s an example of how this can be implemented using Python and Elasticsearch:
from elasticsearch import Elasticsearch

# Connect to Elasticsearch
es = Elasticsearch([{'host': 'localhost', 'port': 9200}])

# Index a business
def index_business(business_id, name, description, category):
    body = {
        'name': name,
        'description': description,
        'category': category
    }
    es.index(index='businesses', id=business_id, body=body)

# Search businesses
def search_businesses(query, category=None):
    body = {
        'query': {
            'bool': {
                'must': [
                    {'match': {'name': query}}
                ]
            }
        }
    }

    if category:
        body['query']['bool']['filter'] = {'term': {'category': category}}

    result = es.search(index='businesses', body=body)

    return [hit['_source'] for hit in result['hits']['hits']]

# Example usage
index_business(1, 'Restaurant A', 'Delicious food', 'Food')
index_business(2, 'Bookstore B', 'Great selection of books', 'Books')

# Search for businesses with the query "restaurant"
search_results = search_businesses('restaurant')
for result in search_results:
    print(result['name'])

# Search for businesses with the query "bookstore" in the "Books" category
search_results = search_businesses('bookstore', 'Books')
for result in search_results:
    print(result['name'])
Geolocation and Maps Integration:
Integrating geolocation services involves using geolocation data for location-based search and recommendations, as well as displaying business locations and directions on maps. Here’s an example of how this can be implemented using Python and the Google Maps API:
import googlemaps# Initialize the Google Maps client
gmaps = googlemaps.Client(key='YOUR_API_KEY')# Get geolocation data for a given address
def get_geolocation(address):
geocode_result = gmaps.geocode(address)
if geocode_result:
location = geocode_result[0]['geometry']['location']
return location['lat'], location['lng']
return None# Calculate distance between two locations
def calculate_distance(origin, destination):
distance_result = gmaps.distance_matrix(origin, destination, mode='driving')
if distance_result['rows'][0]['elements'][0]['status'] == 'OK':
distance = distance_result['rows'][0]['elements'][0]['distance']['text']
return distance
return None# Example usage
origin = 'New York, USA'
destination = 'Los Angeles, USA'
origin_location = get_geolocation(origin)
destination_location = get_geolocation(destination)if origin_location and destination_location:
distance = calculate_distance(origin_location, destination_location)
print(f"The distance between {origin} and {destination} is: {distance}")
else:
print("Unable to retrieve geolocation data.")User Interactions and Engagement:
Designing systems for user interactions involves enabling features such as likes, comments, bookmarking, check-ins, and photo uploads. Here’s an example of how this can be implemented using Python:
class Review:
    def __init__(self, user, business, content):
        self.user = user
        self.business = business
        self.content = content
        self.likes = 0
        self.comments = []
def add_like(self):
self.likes += 1 def add_comment(self, user, comment):
self.comments.append({'user': user, 'comment': comment}) def get_likes(self):
return self.likes def get_comments(self):
return self.commentsclass User:
def __init__(self, username):
self.username = username
self.bookmarks = []
self.check_ins = []
self.photos = [] def add_bookmark(self, business):
self.bookmarks.append(business) def add_check_in(self, business):
self.check_ins.append(business) def add_photo(self, photo):
self.photos.append(photo) def get_bookmarks(self):
return self.bookmarks def get_check_ins(self):
return self.check_ins def get_photos(self):
return self.photos# Example usage
user1 = User('JohnDoe')
user2 = User('JaneSmith')review1 = Review(user1, 'Restaurant A', 'Great food!')
review1.add_like()
review1.add_comment(user2, 'I agree, it was delicious.')review2 = Review(user2, 'Restaurant B', 'Amazing experience!')
review2.add_like()user1.add_bookmark('Restaurant A')
user1.add_check_in('Restaurant A')
user1.add_photo('photo1.jpg')print(f'{user1.username} has {review1.get_likes()} like(s).')
print(f'{user1.username} has bookmarked the following businesses: {user1.get_bookmarks()}')
print(f'{user1.username} has checked in to the following businesses: {user1.get_check_ins()}')
print(f'{user1.username} has uploaded the following photos: {user1.get_photos()}')print(f'{user2.username} has {review2.get_likes()} like(s).')
print(f'{user2.username} has commented: {review2.get_comments()}')Business Analytics and Insights:
Designing systems for business analytics involves collecting and analyzing metrics to provide insights to businesses. Here’s an example of how business analytics can be implemented using Python:
class Analytics:
    def __init__(self):
        self.reviews = []
def add_review(self, review):
self.reviews.append(review) def get_average_rating(self):
if not self.reviews:
return 0 total_ratings = sum(review.rating for review in self.reviews)
average_rating = total_ratings / len(self.reviews)
return average_rating def get_review_count(self):
return len(self.reviews)# Example usage
analytics = Analytics()review1 = Review('user1', 'Restaurant A', 'Great food!', 4.5)
review2 = Review('user2', 'Restaurant A', 'Excellent service!', 4.8)analytics.add_review(review1)
analytics.add_review(review2)average_rating = analytics.get_average_rating()
review_count = analytics.get_review_count()print(f'Average rating for Restaurant A: {average_rating}')
print(f'Review count for Restaurant A: {review_count}')Mobile Optimization:
Designing and optimizing the platform for mobile devices involves implementing mobile app features and user experience enhancements. Here’s an example of how mobile optimization can be implemented using Python:
class MobileApp:
    def __init__(self):
        self.cached_data = None
def fetch_data(self):
# Logic to fetch data from the server
data = 'Data fetched from the server'
return data def cache_data(self, data):
self.cached_data = data def get_cached_data(self):
return self.cached_data# Example usage
app = MobileApp()# Fetch data from the server and cache it
data = app.fetch_data()
app.cache_data(data)# Retrieve cached data
cached_data = app.get_cached_data()print(f'Cached data: {cached_data}')Scalability and Performance:
Designing for scalability and performance involves strategies to handle a large number of users and businesses, optimizing data retrieval and processing for efficient search and recommendation, and utilizing caching mechanisms and load balancing techniques. Here’s an example of how scalability and performance can be implemented using Python:
from redis import Redis
from functools import wraps
# Connect to Redis
redis = Redis(host='localhost', port=6379)# Caching decorator
def cache_result(key_prefix):
def decorator(func):
@wraps(func)
def wrapper(*args, **kwargs):
cache_key = f'{key_prefix}:{args}:{kwargs}'
cached_result = redis.get(cache_key)
if cached_result:
return cached_result.decode('utf-8') result = func(*args, **kwargs)
redis.set(cache_key, result)
return result return wrapper return decorator# Example usage
@cache_result('business_search')
def search_businesses(query):
# Logic to search businesses based on the query
result = f'Search result for "{query}"'
return result# Perform business search
result1 = search_businesses('restaurant')
result2 = search_businesses('bookstore')print(result1)
print(result2)System Design — Cache Mechanism
We will be discussing in depth -
- What is Cache Mechanism
- Important Features
- Scaling Requirements
- Data Model — ER requirements
- High Level Design
- Basic Low Level Design
- API Design
- Complete Detailed Design
- Complete Code Implementation
What is Cache Mechanism
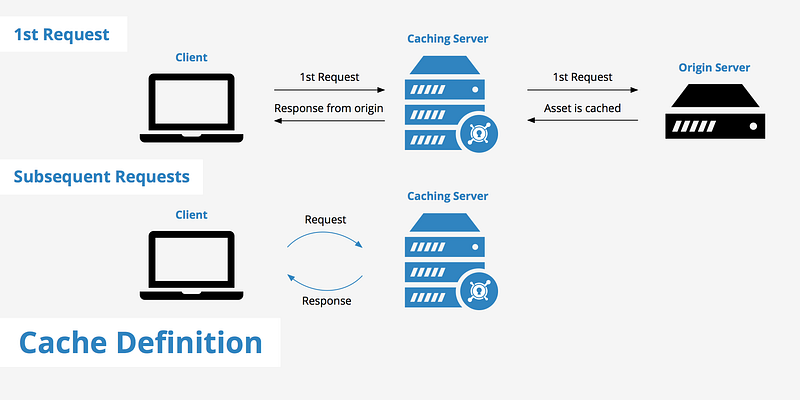
The cache mechanism is a component used in computer systems to improve performance by storing frequently accessed data closer to the processing unit. It acts as a temporary storage that reduces the time and resources required to fetch data from the original source. Caches can exist at various levels in a system hierarchy, such as CPU caches, web browser caches, and database caches.
Important Features
When designing a cache mechanism, it is essential to consider the following features:
- Cache Replacement Policy: Determines how data is evicted from the cache when it reaches its capacity limit. Popular replacement policies include LRU (Least Recently Used), LFU (Least Frequently Used), and FIFO (First-In, First-Out).
- Cache Coherency: Ensures that multiple caches holding copies of the same data are updated consistently when changes are made.
- Cache Partitioning: Allows the cache to be divided into multiple segments or shards, enabling better scalability and parallel processing.
- Cache Persistence: Determines whether the cache data is stored in volatile memory or persistent storage, affecting data durability and recovery.
Scaling Requirements — Capacity Estimation
To simulate a small-scale cache mechanism for the given scalability requirements of Netflix, let’s consider the following example:
Scalability Requirements:
- Total number of users: 1.2 billion
- Daily active users (DAU): 300 million
- Number of videos watched by a user per day: 3
- Total number of videos watched per day: 900 million videos/day
- Read-to-write ratio: 100:1
- Total number of videos uploaded per day: 9 million videos/day
- Average video size: 80 MB
- Total storage per day: 9 million * 80 MB = 720 TB/day
- Storage requirement for the next 3 years: 720 TB * 5 * 365 = 800 PB
- Requests per second: 900 million / (3600 seconds * 24 hours) = 10K/second
import random

class Cache:
    def __init__(self, max_size):
        self.max_size = max_size
        self.cache = {}

    def get_data(self, key):
        if key in self.cache:
            # Data found in the cache
            print(f"Retrieving data for key '{key}' from the cache.")
            return self.cache[key]
        else:
            # Data not found in the cache
            print(f"Data for key '{key}' not found in the cache.")
            return None

    def set_data(self, key, value):
        if len(self.cache) >= self.max_size:
            # Cache is full, need to evict data
            print(f"Cache is full. Evicting data before storing new data for key '{key}'.")
            self._evict_data()
        print(f"Storing data for key '{key}' in the cache.")
        self.cache[key] = value

    def _evict_data(self):
        # Implement cache eviction logic based on replacement policy
        # For simplicity, let's assume we are evicting a random entry
        keys = list(self.cache.keys())
        key_to_evict = random.choice(keys)
        del self.cache[key_to_evict]


def simulate_cache():
    # Instantiate a cache with a maximum size of 1000 entries
    cache = Cache(1000)

    # Simulate retrieving data from the cache
    data = cache.get_data("video123")
    if data is None:
        # Perform a database lookup for the data
        data = "Data from the database for video123"
        # Store the retrieved data in the cache
        cache.set_data("video123", data)

    # Simulate storing new data in the cache
    new_data = "New data for video456"
    cache.set_data("video456", new_data)

    # Simulate retrieving the newly stored data from the cache
    data = cache.get_data("video456")
    if data is not None:
        print("Retrieved data:", data)


# Run the cache simulation
simulate_cache()
Data Model — ER requirements
Cache:
- Key: String
- Value: Any
In this cache mechanism, each item in the cache is identified by a unique string key, and the corresponding value can be of any type (represented as “Any”). The cache is responsible for storing and retrieving these key-value pairs efficiently to optimize read operations.
a) Cache Topology: The cache architecture for Netflix can be designed as a distributed cache system. A distributed cache allows for horizontal scalability, fault tolerance, and efficient handling of large volumes of data and requests. It can be deployed across multiple cache nodes distributed geographically to reduce latency and improve overall performance. The distributed cache can employ techniques such as consistent hashing or data partitioning to distribute the workload evenly across cache nodes.
b) Cache Management: Cache nodes in the distributed cache system can be managed using the following strategies:
- Data Partitioning: The cache can be partitioned based on a key range or a hash of the key to distribute the data across cache nodes. This ensures that each cache node is responsible for a subset of the cached data, allowing for parallel processing and efficient data retrieval.
- Cache Invalidation: Implement a cache invalidation strategy to ensure that the cached data remains consistent with the underlying data source. When a data update or deletion occurs, the corresponding cache entries need to be invalidated or updated to reflect the changes. This can be achieved through various techniques such as write-through or write-back invalidation.
- Cache Consistency Protocols: Depending on the requirements, cache consistency protocols like Read-Write Through, Write-Around, or Write-Back can be implemented to maintain data consistency between the cache and the underlying data source.
c) Monitoring and Metrics: To monitor cache performance and collect relevant metrics, the following mechanisms can be implemented:
- Cache Hit/Miss Ratios: Track the number of cache hits and misses to measure cache effectiveness and efficiency. This metric provides insights into cache performance and helps identify areas for improvement.
- Latency and Throughput: Monitor the cache response times and throughput to identify any performance bottlenecks and ensure that the cache is handling requests efficiently.
- Cache Size and Utilization: Track the cache size and utilization to monitor resource usage and capacity planning. This helps in determining if the cache is appropriately sized to handle the workload and if additional cache nodes need to be added to meet scalability requirements.
- Error and Exception Logging: Implement error and exception logging to capture any cache-related errors or exceptions. This information is valuable for troubleshooting and identifying potential issues in the cache system.
High Level Design
Cache Initialization and Configuration:
- Create Cache:
create_cache(cache_name, max_size) - Set Cache Replacement Policy:
set_replacement_policy(cache_name, replacement_policy) - Set Cache Expiration Time:
set_expiration_time(cache_name, expiration_time)
Data Operations:
- Get Data:
get_data(cache_name, key) - Set Data:
set_data(cache_name, key, value) - Delete Data:
delete_data(cache_name, key) - Clear Cache:
clear_cache(cache_name)
Cache Statistics and Monitoring:
- Get Cache Hit Count:
get_hit_count(cache_name) - Get Cache Miss Count:
get_miss_count(cache_name) - Get Cache Size:
get_cache_size(cache_name) - Get Cache Capacity:
get_cache_capacity(cache_name)
Cache Management:
- Add Cache Node:
add_cache_node(cache_name, node_id) - Remove Cache Node:
remove_cache_node(cache_name, node_id) - Rebalance Cache:
rebalance_cache(cache_name)
class CacheManager:
    def __init__(self):
        self.caches = {}

    def create_cache(self, cache_name, max_size):
        cache = Cache(max_size)
        self.caches[cache_name] = cache

    def set_replacement_policy(self, cache_name, replacement_policy):
        if cache_name in self.caches:
            cache = self.caches[cache_name]
            # Set the replacement policy of the cache

    def set_expiration_time(self, cache_name, expiration_time):
        if cache_name in self.caches:
            cache = self.caches[cache_name]
            # Set the expiration time of the cache

    def get_data(self, cache_name, key):
        if cache_name in self.caches:
            cache = self.caches[cache_name]
            return cache.get(key)
        else:
            return None

    def set_data(self, cache_name, key, value):
        if cache_name in self.caches:
            cache = self.caches[cache_name]
            cache.set(key, value)

    def delete_data(self, cache_name, key):
        if cache_name in self.caches:
            cache = self.caches[cache_name]
            cache.delete(key)

    def clear_cache(self, cache_name):
        if cache_name in self.caches:
            cache = self.caches[cache_name]
            cache.clear()

    def get_hit_count(self, cache_name):
        if cache_name in self.caches:
            cache = self.caches[cache_name]
            # Return the hit count of the cache

    def get_miss_count(self, cache_name):
        if cache_name in self.caches:
            cache = self.caches[cache_name]
            # Return the miss count of the cache

    def get_cache_size(self, cache_name):
        if cache_name in self.caches:
            cache = self.caches[cache_name]
            # Return the size of the cache

    def get_cache_capacity(self, cache_name):
        if cache_name in self.caches:
            cache = self.caches[cache_name]
            # Return the capacity of the cache

    def add_cache_node(self, cache_name, node_id):
        if cache_name in self.caches:
            cache = self.caches[cache_name]
            # Add a cache node to the cache

    def remove_cache_node(self, cache_name, node_id):
        if cache_name in self.caches:
            cache = self.caches[cache_name]
            # Remove a cache node from the cache

    def rebalance_cache(self, cache_name):
        if cache_name in self.caches:
            cache = self.caches[cache_name]
            # Rebalance the cache
Main Components:
- Cache Store: The primary component responsible for storing the cached data. It can be implemented as an in-memory data structure such as a hash map or a key-value store.
Main Services:
- Get: Retrieves the value associated with a given key from the cache. If the value is not present in the cache, it falls back to the underlying data source (e.g., a database) and stores the retrieved value in the cache for future use.
- Set: Stores a key-value pair in the cache. If the cache is already full, a cache eviction policy determines which data should be evicted to make room for the new data.
- Delete: Removes a key-value pair from the cache.
- Clear: Clears the entire cache, removing all cached data.
- Cache Statistics: Provides information about cache hits, misses, and other relevant metrics for monitoring and performance analysis.
- Cache Configuration: Allows the configuration of cache parameters such as maximum cache size, eviction policies, and expiration time.
Basic Low Level Design
The basic low-level design for a Cache Mechanism System can be implemented using a key-value data structure to store cached data.
import java.util.HashMap;
import java.util.Map;

class Cache {
    private Map<String, Object> cacheData;
    private int maxSize;

    public Cache(int maxSize) {
        this.cacheData = new HashMap<>();
        this.maxSize = maxSize;
    }

    public Object get(String key) {
        return cacheData.get(key);
    }

    public void put(String key, Object value) {
        if (cacheData.size() >= maxSize) {
            evict(); // If cache is full, evict the least recently used item
        }
        cacheData.put(key, value);
    }

    public void evict(String key) {
        cacheData.remove(key);
    }

    private void evict() {
        // Evict the least recently used item from the cache
        // Implementation depends on the eviction policy (e.g., LRU, LFU, etc.)
    }
}
In this implementation, the Cache class represents the cache mechanism system. It uses a HashMap (cacheData) to store key-value pairs as the cached data. The maxSize variable determines the maximum size of the cache.
The get method retrieves the value associated with a given key from the cache. The put method stores a key-value pair in the cache. If the cache is already full (cacheData.size() >= maxSize), the evict method is called to make room for the new data by evicting the least recently used item. The evict method can be implemented based on the chosen eviction policy.
The evict(String key) method allows explicit eviction of a specific key-value pair from the cache. It removes the specified key from the cacheData map.
API Design
PUT /cache/{key}
- Method:
PUT - Description: Store a value in the cache with the specified key.
- Request:
{ "value": "example value" }
- Response:
200 OKon success400 Bad Requestif the request is malformed or missing parameters500 Internal Server Errorif an error occurs on the server
GET /cache/{key}
- Method:
GET - Description: Retrieve the value associated with the specified key from the cache.
- Response:
200 OKwith the value in the response body if the key exists in the cache404 Not Foundif the key does not exist in the cache500 Internal Server Errorif an error occurs on the server
DELETE /cache/{key}
- Method:
DELETE - Description: Remove the value associated with the specified key from the cache.
- Response:
204 No Contenton success404 Not Foundif the key does not exist in the cache500 Internal Server Errorif an error occurs on the server
In this API design, the PUT API allows storing a value in the cache with a specified key. The value to be stored is provided in the request body.
The GET API retrieves the value associated with the specified key from the cache. If the key exists, the value is returned in the response body. If the key does not exist, a 404 Not Found response is returned.
The DELETE API removes the value associated with the specified key from the cache. If the key exists, it is deleted from the cache, and a 204 No Content response is returned. If the key does not exist, a 404 Not Found response is returned.
Complete Detailed Design
Coming soon! It will be covered on youtube channel.
Subscribe to youtube channel :
Complete Code implementation
Cache Replacement Policy:
class Cache:
    def __init__(self, max_size):
        self.max_size = max_size
        self.cache = {}
        self.replacement_policy = 'LRU'  # Default replacement policy
def set_replacement_policy(self, replacement_policy):
self.replacement_policy = replacement_policy def _evict_data(self):
if self.replacement_policy == 'LRU':
# Evict the least recently used data
key_to_evict = next(iter(self.cache))
del self.cache[key_to_evict]
elif self.replacement_policy == 'LFU':
# Evict the least frequently used data
key_to_evict = min(self.cache, key=self.cache.get)
del self.cache[key_to_evict]
elif self.replacement_policy == 'FIFO':
# Evict the first-in data
key_to_evict = next(iter(self.cache))
del self.cache[key_to_evict]b) Cache Coherency:
class Cache:
    def __init__(self, max_size):
        self.max_size = max_size
        self.cache = {}
        self.coherency = True  # Cache coherency enabled by default
def enable_coherency(self):
self.coherency = True def disable_coherency(self):
self.coherency = Falsec) Cache Partitioning:
class Cache:
    def __init__(self, max_size):
        self.max_size = max_size
        self.cache = {}
        self.partition_count = 1  # Default partition count
def set_partition_count(self, partition_count):
self.partition_count = partition_count def _get_partition(self, key):
# Calculate the partition based on the key
return hash(key) % self.partition_countd) Cache Persistence:
class Cache:
    def __init__(self, max_size, persistent=False):
        self.max_size = max_size
        self.cache = {}
        self.persistent = persistent
def set_persistence(self, persistent):
self.persistent = persistent def _load_cache_from_persistent_storage(self):
# Load cache data from persistent storage
pass def _save_cache_to_persistent_storage(self):
# Save cache data to persistent storage
passIn the code above:
- The
Cacheclass represents the cache mechanism system. - The
set_replacement_policymethod allows setting the replacement policy for cache eviction. - The
_evict_datamethod is responsible for evicting data based on the chosen replacement policy. - The
enable_coherencyanddisable_coherencymethods enable or disable cache coherency. - The
set_partition_countmethod allows specifying the number of cache partitions. - The
_get_partitionmethod calculates the partition based on the key. - The
set_persistencemethod enables or disables cache persistence. - The
_load_cache_from_persistent_storageand_save_cache_to_persistent_storagemethods handle loading and saving cache data to persistent storage if persistence is enabled.
import random

class Cache:
    def __init__(self, max_size):
        self.max_size = max_size
        self.cache = {}

    def get(self, key):
        if key in self.cache:
            return self.cache[key]
        else:
            return None

    def set(self, key, value):
        if len(self.cache) >= self.max_size:
            self._evict_data()
        self.cache[key] = value

    def delete(self, key):
        if key in self.cache:
            del self.cache[key]

    def clear(self):
        self.cache.clear()

    def cache_stats(self):
        # Calculate cache statistics (e.g., cache hits, misses, etc.)
        # Return the statistics as desired

    def _evict_data(self):
        # Implement cache eviction logic based on the desired replacement policy
        # For example, evict a random entry
        keys = list(self.cache.keys())
        key_to_evict = random.choice(keys)
        del self.cache[key_to_evict]
System Design — Todoist
We will be discussing in depth -
- What is Todoist
- Important Features
- Scaling Requirements
- Data Model — ER requirements
- High Level Design
- Basic Low Level Design
- API Design
- Complete Detailed Design
- Complete Code Implementation

What is Todoist
Important Features
Scaling Requirements — Capacity Estimation
Data Model — ER requirements
High Level Design
Basic Low Level Design
API Design
Complete Detailed Design
Coming soon! It will be covered on youtube channel.
Subscribe to youtube channel :
Complete Code implementation
System Design — Headspace
We will be discussing in depth -
- What is Headspace
- Important Features
- Scaling Requirements
- Data Model — ER requirements
- High Level Design
- Basic Low Level Design
- API Design
- Complete Detailed Design
- Complete Code Implementation

What is Headspace
Important Features
Scaling Requirements — Capacity Estimation
Data Model — ER requirements
High Level Design
Basic Low Level Design
API Design
Complete Detailed Design
Coming soon! It will be covered on youtube channel.
Subscribe to youtube channel :
Complete Code implementation
System Design — Mint
We will be discussing in depth -
- What is Mint
- Important Features
- Scaling Requirements
- Data Model — ER requirements
- High Level Design
- Basic Low Level Design
- API Design
- Complete Detailed Design
- Complete Code Implementation

What is Mint
Important Features
Scaling Requirements — Capacity Estimation
Data Model — ER requirements
High Level Design
Basic Low Level Design
API Design
Complete Detailed Design
Coming soon! It will be covered on youtube channel.
Subscribe to youtube channel :
Complete Code implementation
System Design — Freecharge
We will be discussing in depth -
- What is Freecharge
- Important Features
- Scaling Requirements
- Data Model — ER requirements
- High Level Design
- Basic Low Level Design
- API Design
- Complete Detailed Design
- Complete Code Implementation
What is Freecharge
Important Features
Scaling Requirements — Capacity Estimation
Data Model — ER requirements
High Level Design
Basic Low Level Design
API Design
Complete Detailed Design
Coming soon! It will be covered on youtube channel.
Subscribe to youtube channel :
Complete Code implementation
System Design — Notification System
We will be discussing in depth -
- What is Notification System
- Important Features
- Scaling Requirements
- Data Model — ER requirements
- High Level Design
- Basic Low Level Design
- API Design
- Complete Detailed Design
- Complete Code Implementation

What is Notification System
Important Features
Scaling Requirements — Capacity Estimation
Data Model — ER requirements
High Level Design
Basic Low Level Design
API Design
Complete Detailed Design
Coming soon! It will be covered on youtube channel.
Subscribe to youtube channel :
Complete Code implementation
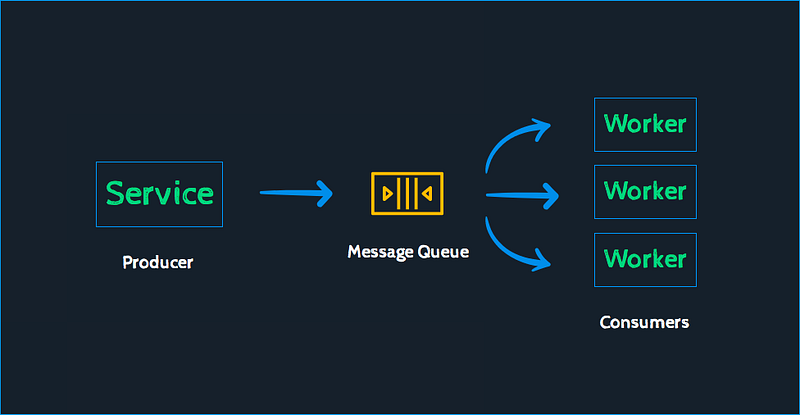
System Design — Message Queueing System
We will be discussing in depth -
- What is Message Queueing System
- Important Features
- Scaling Requirements
- Data Model — ER requirements
- High Level Design
- Basic Low Level Design
- API Design
- Complete Detailed Design
- Complete Code Implementation
What is Message Queueing System
Important Features
Scaling Requirements — Capacity Estimation
Data Model — ER requirements
High Level Design
Basic Low Level Design
API Design
Complete Detailed Design
Coming soon! It will be covered on youtube channel.
Subscribe to youtube channel :
Complete Code implementation
Read — how to Design Uber.
Let me know if you have any questions in the comment section below. Subscribe/ Follow, Like/Clap and Stay Tuned!!
Day 2 : SQL Basics, Query Structure, Built In functions Conditions
Day 4 : Set Theory Operations, Stored Procedures and CASE statements in SQL
Day 6 : Subqueries, Group by, order by and Having clauses in SQL and Analytical Functions
Day 7 : Window Functions, Grouping Sets and Constraints in SQL
Day 8 : BigQuery Basics, SELECT, FROM, WHERE and Date and Extract in BigQuery
Day 9 : Common Expression Table, UNNEST Clause, SQL vs NoSQL Databases
Day 10 : Triggers, Pivot and Cursors in SQL
Day 14 : MySQL in Depth
Day 15 : PostgreSQL inDepth
Anyways, For Day 15 of 15 days of Advanced SQL, we will cover —
PostgreSQL inDepth
Github for Advanced SQL that you can follow —
All the projects, data structures, algorithms, system design, Data Science and ML, Data Engineering, MLOps and Deep Learning videos will be published on our youtube channel ( just launched).
Subscribe today!
System Design Case Studies — In Depth
Complete Data Structures and Algorithm Series
Github —
Some of the other best Series —
30 days of Data Structures and Algorithms and System Design Simplified
Data Science and Machine Learning Research ( papers) Simplified **
100 days : Your Data Science and Machine Learning Degree Series with projects
Complete Data Visualization and Pre-processing Series with projects
Exceptional Github Repos — Part 1
Exceptional Github Repos — Part 2
Tech Newsletter —
If you are interested, you can join my newsletter through which I send tech interview tips, techniques, patterns, hacks — Software Development, ML, Data Science, Startups and Technology projects to more than 30K readers. You can subscribe to Tech Brew :
For Python Projects —
For complete 60 days of Data Science and ML : Day 1 — Day 60 : Quick Recap of 60 days of Data Science and ML
Follow for more updates. Stay tuned and keep coding!
For other projects, tune to —
Build Machine Learning Pipelines( With Code)
Recurrent Neural Network with Keras
Clustering Geolocation Data in Python using DBSCAN and K-Means
Facial Expression Recognition using Keras
Hyperparameter Tuning with Keras Tuner
Custom Layers in Keras


