
Day 28 of 30 days of Data Engineering Series with Projects
Welcome back peeps to Day 28 of Data Engineering Series with Projects!
In this we will cover —
REST API
Postman
Data API
Pre-requisite to Day 28 is to complete Day 1–27( link below):
Day 3 : Complete Advanced Python for Data Engineering — Part 2
Day 18 : Data Visualization basics, Data Visualization Projects, Data Visualization using Plotly and Bokeh, Data Profiling, Summary Functions, Indexing, Grouping, Linear Regression, Multi Linear Regression, Polynomial Regression, Regression, Support Vector Regression, Decision Tree Regression, Random Forest Regression, Feature Engineering, GroupBy Features, Categorical and Numerical Features, Missing Value Analysis, Fill the missing Values, Unique Value Analysis, Univariate Analysis, Bivariate Analysis, Multivariate Analysis, Correlation Analysis, Spearman’s ρ, Pearson’s r, Kendall’s τ, Cramér’s V (φc), Phik (φk)
Day 20 : ETL ( Extract, Tranform and Load) basics, Why ETL is important?, How ETL works, ETL Tools
Day 21 : Structured Data, Semi Structured Data, Unstructured Data, Data Warehouse, Data Mart, Data Lake
Day 25: Docker, Docker vs Virtual Machines, Most important Docker commands, Kubernetes, Snowflake
Day 26 : Data Pipelines, Transformation, Processing, Workflow, Monitoring, Airflow, DAG
Projects Videos —
All the projects, data structures, SQL, algorithms, system design, Data Science and ML , Data Analytics, Data Engineering, , Implemented Data Science and ML projects, Implemented Data Engineering Projects, Implemented Deep Learning Projects, Implemented Machine Learning Ops Projects, Implemented Time Series Analysis and Forecasting Projects, Implemented Applied Machine Learning Projects, Implemented Tensorflow and Keras Projects, Implemented PyTorch Projects, Implemented Scikit Learn Projects, Implemented Big Data Projects, Implemented Cloud Machine Learning Projects, Implemented Neural Networks Projects, Implemented OpenCV Projects,Complete ML Research Papers Summarized, Implemented Data Analytics projects, Implemented Data Visualization Projects, Implemented Data Mining Projects, Implemented Natural Leaning Processing Projects, MLOps and Deep Learning, Applied Machine Learning with Projects Series, PyTorch with Projects Series, Tensorflow and Keras with Projects Series, Scikit Learn Series with Projects, Time Series Analysis and Forecasting with Projects Series, ML System Design Case Studies Series videos will be published on our youtube channel ( just launched).
Subscribe today!
Tech Newsletter —
If you are interested, you can join my newsletter through which I send tech interview tips, techniques, patterns, hacks — Software Development, ML, Data Science, Startups and Technology projects to more than 30K readers. You can subscribe to Ignito:
System Design Case Studies — In Depth
Design Instagram
Design Netflix
Design Reddit
Design Amazon
Design Messenger App
Design Twitter
Design URL Shortener
Design Dropbox
Design Youtube
Design API Rate Limiter
Design Web Crawler
Design Amazon Prime Video
Design Facebook’s Newsfeed
Design Yelp
Design Uber
Design Tinder
Design Tiktok
Design Whatsapp
Most Popular System Design Questions
Mega Compilation : Solved System Design Case studies
Let’s get started!
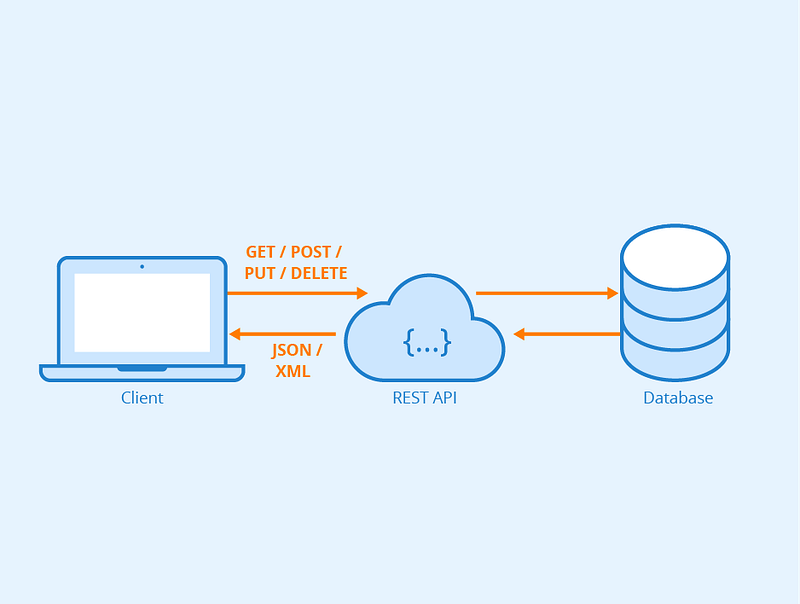
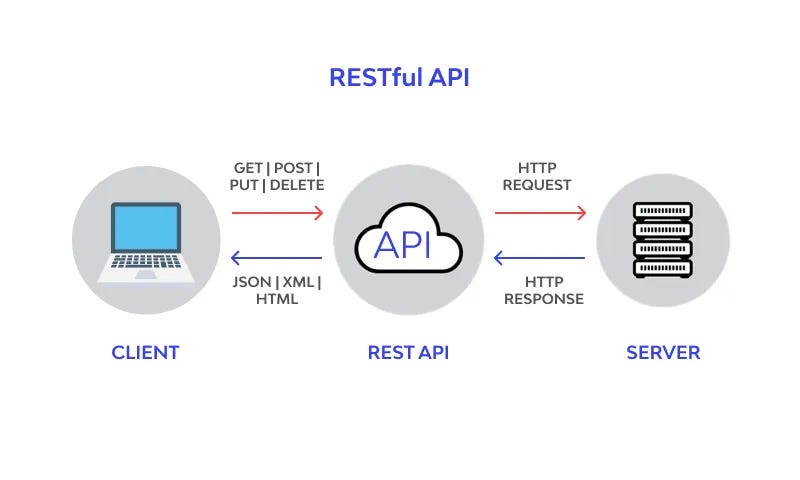
- REST (Representational State Transfer) is a software architectural style for creating web services. It defines a set of constraints to be used when creating web services.
- Postman is a tool that allows developers to easily test and manage APIs (Application Programming Interfaces). It can be used to send various types of HTTP requests (e.g. GET, POST, PUT, DELETE) to a specified endpoint and examine the response.
- A Data API is an API that allows developers to access data from a specific source (e.g. a database) over the internet. Data APIs are often used to retrieve or update information in a database, and they can be used to build a variety of applications.
REST API
REST is an architecture style protocol which uses JSONor XML to send and receive data over HTTP only.
API allows two programs to communicate on the web as it sits between an application and web server and facilitates transfer of data.
It’s very light weight, human readable and easy to build. Its operations are completely stateless and requires less bandwidth. Its functions are data driven and supports SSL and HTTPs for security.
1. REST client starts a REST call.
2. REST Server receives and REST API process starts
3. REST Server Replies back to the REST Call via HTTP response.
Features of REST —
- Scalable architecture
- Stateless
- Cacheable
- Has uniform Interface
- Layered System
- Simple to use and easily maintainable
REST Most Important Commands —
GET /jobs : To display all the jobs
POST /job : To create new job
GET /job{job_id} : To display a job by job Id
PUT /job{job_id} : To update a job by job id
DELETE /jobs/{job_id} : To delete a job by job id
The most important REST API commands are typically considered to be:
- GET: Retrieves information from the server. It’s considered to be a safe and idempotent method, meaning that it should not cause any side-effects on the server and can be called multiple times without changing the result.
- POST: Submits information to the server for further processing. It’s considered to be an unsafe and non-idempotent method, meaning that it can cause side-effects on the server and should not be called multiple times.
- PUT: Replaces an existing resource on the server with a new one. It’s considered to be a safe and idempotent method, meaning that it should not cause any side-effects on the server and can be called multiple times without changing the result.
- DELETE: Deletes a resource on the server. It’s considered to be a safe and idempotent method, meaning that it should not cause any side-effects on the server and can be called multiple times without changing the result.
- PATCH: partially updates a resource on the server.
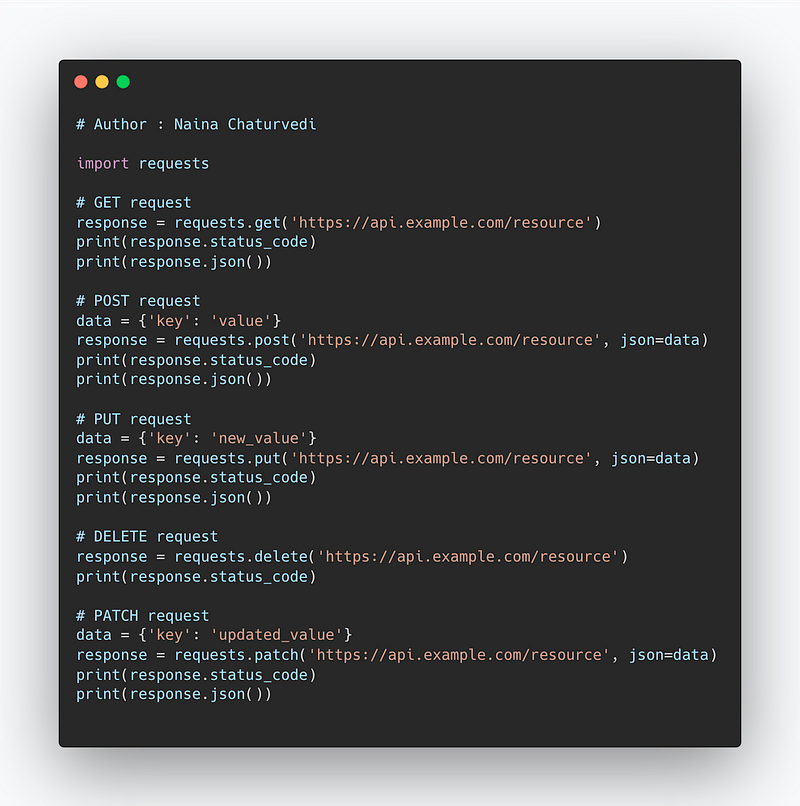
Code Implementation —
import requests

# GET request
response = requests.get('https://api.example.com/resource')
print(response.status_code)
print(response.json())

# POST request
data = {'key': 'value'}
response = requests.post('https://api.example.com/resource', json=data)
print(response.status_code)
print(response.json())

# PUT request
data = {'key': 'new_value'}
response = requests.put('https://api.example.com/resource', json=data)
print(response.status_code)
print(response.json())

# DELETE request
response = requests.delete('https://api.example.com/resource')
print(response.status_code)

# PATCH request
data = {'key': 'updated_value'}
response = requests.patch('https://api.example.com/resource', json=data)
print(response.status_code)
print(response.json())
Snippet —
Postman
To build, publish and test API, Postman is Used. It simplifies API ecosystem and lifecycle and helps collaborate.

Main advantage of using postman -
- Accessibility
- Automation Testing
- Debugging
- Create Tests
- Continuous Integration
- Collaboration
Just as an example — In order to work with GET Requests:
- Set HTTP request to GET
- Enter the link in request URL field
- Click Send
- You will see 200 OK Message
You can also parameterize requests and create tests.
The most important Postman commands include:
- Sending requests: Postman allows you to send various types of HTTP requests (GET, POST, PUT, DELETE, etc.) to a specified endpoint.
- Inspecting responses: Postman allows you to view the response body, headers, and status code of a request in an easy-to-read format.
- Creating and managing collections: Postman allows you to organize your requests into collections, which can be saved and shared with others.
- Managing environment variables: Postman allows you to create and manage environment variables, which can be used to store and reuse values across requests.
- Testing and pre-request scripts: Postman allows you to write test scripts and pre-request scripts that can be used to validate the responses and make complex requests.
- Collaborating and sharing: Postman also allows you to share collections, environments and even generate documentation for APIs with your teammates and other developers.
- Import and export: Postman also allows you to export and import collections, environments and even request history to and from different devices or platforms.
We will be covering postman in detail with a project here.
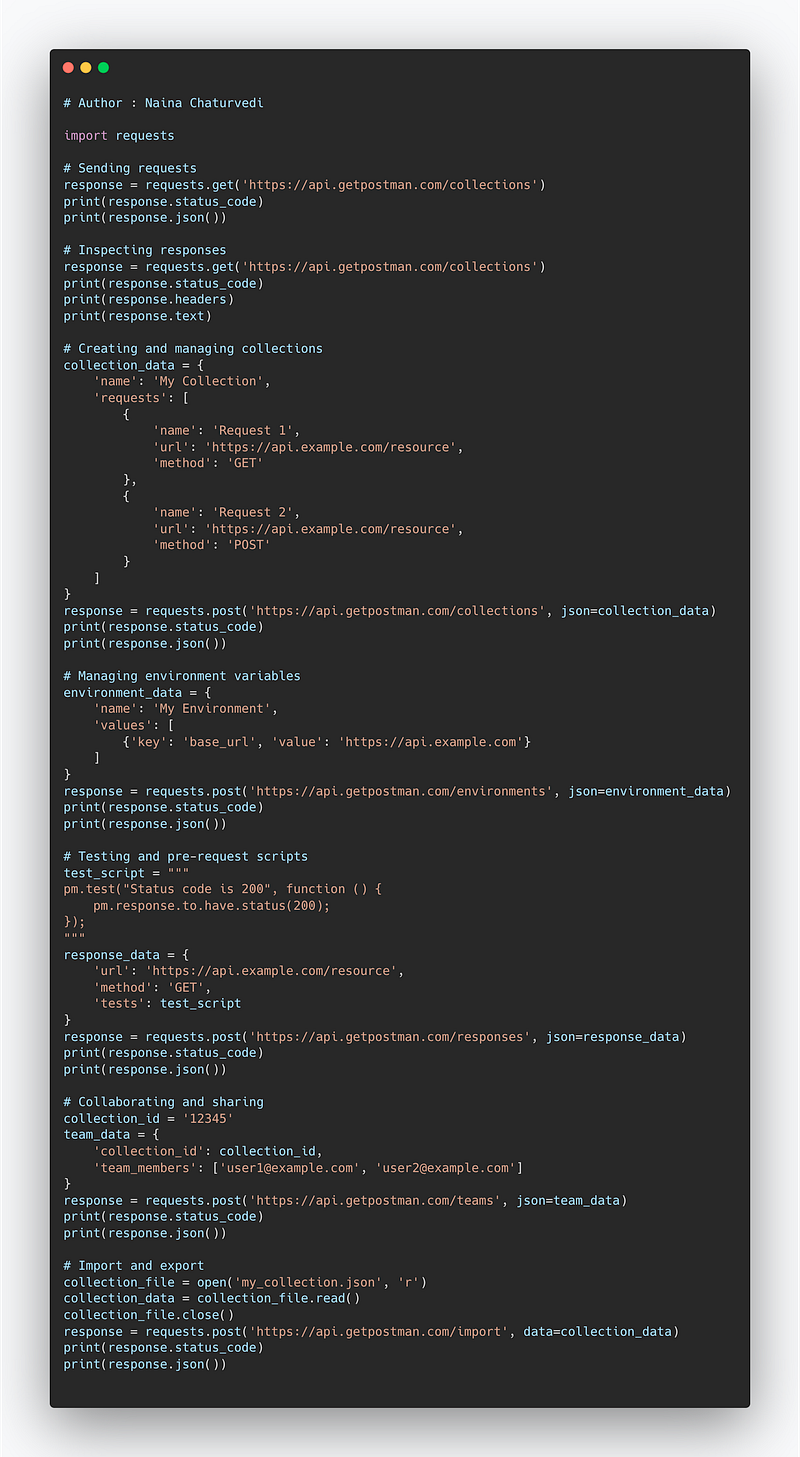
Code Implementation —
import requests

# Sending requests
response = requests.get('https://api.getpostman.com/collections')
print(response.status_code)
print(response.json())

# Inspecting responses
response = requests.get('https://api.getpostman.com/collections')
print(response.status_code)
print(response.headers)
print(response.text)

# Creating and managing collections
collection_data = {
    'name': 'My Collection',
    'requests': [
        {
            'name': 'Request 1',
            'url': 'https://api.example.com/resource',
            'method': 'GET'
        },
        {
            'name': 'Request 2',
            'url': 'https://api.example.com/resource',
            'method': 'POST'
        }
    ]
}
response = requests.post('https://api.getpostman.com/collections', json=collection_data)
print(response.status_code)
print(response.json())

# Managing environment variables
environment_data = {
    'name': 'My Environment',
    'values': [
        {'key': 'base_url', 'value': 'https://api.example.com'}
    ]
}
response = requests.post('https://api.getpostman.com/environments', json=environment_data)
print(response.status_code)
print(response.json())

# Testing and pre-request scripts
test_script = """
pm.test("Status code is 200", function () {
    pm.response.to.have.status(200);
});
"""
response_data = {
    'url': 'https://api.example.com/resource',
    'method': 'GET',
    'tests': test_script
}
response = requests.post('https://api.getpostman.com/responses', json=response_data)
print(response.status_code)
print(response.json())

# Collaborating and sharing
collection_id = '12345'
team_data = {
    'collection_id': collection_id,
    'team_members': ['[email protected]', '[email protected]']
}
response = requests.post('https://api.getpostman.com/teams', json=team_data)
print(response.status_code)
print(response.json())

# Import and export
collection_file = open('my_collection.json', 'r')
collection_data = collection_file.read()
collection_file.close()
response = requests.post('https://api.getpostman.com/import', data=collection_data)
print(response.status_code)
print(response.json())
Snippet —
Data API
In simple terms, Data API is the REST interface which allows for data accessibility, data management and securely flow of information.
Mongo DB Atlas Data API lets you read and write data over HTTPS. The API has endpoints in order to create, update, update, delete the clusters.
Example ( taken from Mongo db documentation) —
curl --request POST \
  'https://data.mongodb-api.com/app/data-abcde/endpoint/data/v1/action/insertOne' \
  --header 'Content-Type: application/json' \
  --header 'api-key: TpqAKQgvhZE4r6AOzpVydJ9a3tB1BLMrgDzLlBLbihKNDzSJWTAHMVbsMoIOpnM6' \
  --data-raw '{
      "dataSource": "Cluster10",
      "database": "db-cyc",
      "collection": "hey",
      "document": {
        "text": "Welcome",
      }
  }'
In order to setup and work with the Data API —
Enable Data API
Create a Data API key
Send a Data API Request
Configure the Data API with Data Access Permission and Authentication and API keys
Call Data API Endpoint
To create Data API —
- Design the API: Start by defining the endpoints and the data that will be returned by the API. Decide on the structure of the URLs and the types of data that will be accepted and returned.
- Set up the server: Choose a web server (e.g. Apache, Nginx) and a programming language (e.g. Node.js, Python, Ruby) to build the API on.
- Connect to the database: Connect the API to the database where the data will be stored. You can use an ORM (Object-Relational Mapping) library to interact with the database in your chosen language.
- Write the code: Write the code to handle requests and responses. Implement the logic for handling each endpoint, including retrieving and updating data from the database.
- Test the API: Test the API by sending requests and examining the responses. Make sure that the API is returning the expected data and that it is handling errors properly.
- Deploy the API: Deploy the API to a live server so that it can be accessed by others. Make sure to secure the API with proper authentication and authorization methods.
- Document the API: Create documentation for the API, including information on the endpoints, data structures, and any authentication or authorization requirements. This will make it easier for other developers to use the API.
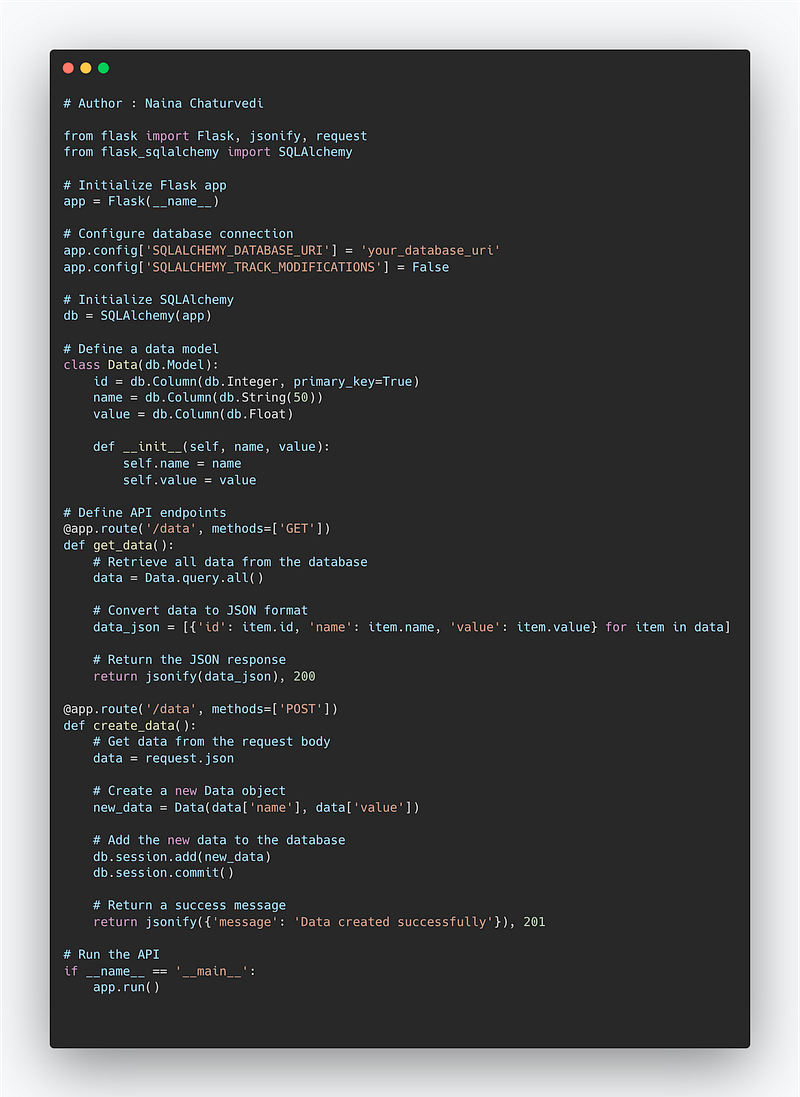
from flask import Flask, jsonify, request
from flask_sqlalchemy import SQLAlchemy

# Initialize Flask app
app = Flask(__name__)

# Configure database connection
app.config['SQLALCHEMY_DATABASE_URI'] = 'your_database_uri'
app.config['SQLALCHEMY_TRACK_MODIFICATIONS'] = False

# Initialize SQLAlchemy
db = SQLAlchemy(app)

# Define a data model
class Data(db.Model):
    id = db.Column(db.Integer, primary_key=True)
    name = db.Column(db.String(50))
    value = db.Column(db.Float)

    def __init__(self, name, value):
        self.name = name
        self.value = value

# Define API endpoints
@app.route('/data', methods=['GET'])
def get_data():
    # Retrieve all data from the database
    data = Data.query.all()

    # Convert data to JSON format
    data_json = [{'id': item.id, 'name': item.name, 'value': item.value} for item in data]

    # Return the JSON response
    return jsonify(data_json), 200

@app.route('/data', methods=['POST'])
def create_data():
    # Get data from the request body
    data = request.json

    # Create a new Data object
    new_data = Data(data['name'], data['value'])

    # Add the new data to the database
    db.session.add(new_data)
    db.session.commit()

    # Return a success message
    return jsonify({'message': 'Data created successfully'}), 201

# Run the API
if __name__ == '__main__':
    app.run()
Snippet —
Project Code —
Create a directory structure for your project:
project/
├── api/
│   ├── __init__.py
│   ├── models.py
│   ├── routes.py
├── app.py
├── config.py
├── requirements.txt
Set up your virtual environment and install the required dependencies:
$ cd project
$ python -m venv venv
$ source venv/bin/activate
$ pip install -r requirements.txt
Create a Flask application in app.py:
from flask import Flask
from api.routes import data_api_bp
app = Flask(__name__)
app.register_blueprint(data_api_bp)if __name__ == '__main__':
app.run()Configure your application in config.py:
import osclass Config:
SECRET_KEY = os.getenv('SECRET_KEY', 'your-secret-key')
SQLALCHEMY_DATABASE_URI = os.getenv('DATABASE_URI', 'your-database-uri')
SQLALCHEMY_TRACK_MODIFICATIONS = FalseDefine your data model in api/models.py:
from app import dbclass Data(db.Model):
id = db.Column(db.Integer, primary_key=True)
name = db.Column(db.String(50))
value = db.Column(db.Float) def __init__(self, name, value):
self.name = name
self.value = valueCreate routes for your Data API in api/routes.py:
from flask import Blueprint, jsonify, request
from api.models import Data
from app import db
data_api_bp = Blueprint('data_api', __name__)@data_api_bp.route('/data', methods=['GET'])
def get_data():
data = Data.query.all()
data_json = [{'id': item.id, 'name': item.name, 'value': item.value} for item in data]
return jsonify(data_json), 200@data_api_bp.route('/data', methods=['POST'])
def create_data():
data = request.json
new_data = Data(data['name'], data['value'])
db.session.add(new_data)
db.session.commit()
return jsonify({'message': 'Data created successfully'}), 201Run your Flask application:
$ python app.pyTest your Data API using Postman or any other REST client by sending requests to http://localhost:5000/data with appropriate HTTP methods (GET for retrieving data, POST for creating data).
A project video covering REST API, Postman, Data API coming soon ( subscribe today) —
That’s it for now.
Find Day 29 Below —
Let me know if you have questions in the comment section below. Subscribe/ Follow, Like/Clap as it would encourage me to write more in my free time
Stay Tuned!!
Read more —
All the Complete System Design Series Parts —
6. Networking, How Browsers work, Content Network Delivery ( CDN)
Github —
For Python Projects —
For complete 60 days of Data Science and ML : Day 1 — Day 60 : Quick Recap of 60 days of Data Science and ML
Follow for more updates. Stay tuned and keep coding!
For other projects, tune to —
Build Machine Learning Pipelines( With Code)
Recurrent Neural Network with Keras
Clustering Geolocation Data in Python using DBSCAN and K-Means
Facial Expression Recognition using Keras
Hyperparameter Tuning with Keras Tuner
Custom Layers in Keras


