
Day 26 of 30 days of Data Engineering Series with Projects
Welcome back peeps to Day 26 of Data Engineering Series with Projects!
In this we will cover —
Data Pipelines
Transformation
Processing
Workflow
Monitoring
Airflow
DAG
Pre-requisite to Day 26 is to complete Day 1–25( link below):
Day 3 : Complete Advanced Python for Data Engineering — Part 2
Day 18 : Data Visualization basics, Data Visualization Projects, Data Visualization using Plotly and Bokeh, Data Profiling, Summary Functions, Indexing, Grouping, Linear Regression, Multi Linear Regression, Polynomial Regression, Regression, Support Vector Regression, Decision Tree Regression, Random Forest Regression, Feature Engineering, GroupBy Features, Categorical and Numerical Features, Missing Value Analysis, Fill the missing Values, Unique Value Analysis, Univariate Analysis, Bivariate Analysis, Multivariate Analysis, Correlation Analysis, Spearman’s ρ, Pearson’s r, Kendall’s τ, Cramér’s V (φc), Phik (φk)
Day 20 : ETL ( Extract, Tranform and Load) basics, Why ETL is important?, How ETL works, ETL Tools
Day 21 : Structured Data, Semi Structured Data, Unstructured Data, Data Warehouse, Data Mart, Data Lake
Day 25: Docker, Docker vs Virtual Machines, Most important Docker commands, Kubernetes, Snowflake
Day 26 : Data Pipelines, Transformation, Processing, Workflow, Monitoring, Airflow, DAG
Projects Videos —
All the projects, data structures, SQL, algorithms, system design, Data Science and ML , Data Analytics, Data Engineering, , Implemented Data Science and ML projects, Implemented Data Engineering Projects, Implemented Deep Learning Projects, Implemented Machine Learning Ops Projects, Implemented Time Series Analysis and Forecasting Projects, Implemented Applied Machine Learning Projects, Implemented Tensorflow and Keras Projects, Implemented PyTorch Projects, Implemented Scikit Learn Projects, Implemented Big Data Projects, Implemented Cloud Machine Learning Projects, Implemented Neural Networks Projects, Implemented OpenCV Projects,Complete ML Research Papers Summarized, Implemented Data Analytics projects, Implemented Data Visualization Projects, Implemented Data Mining Projects, Implemented Natural Leaning Processing Projects, MLOps and Deep Learning, Applied Machine Learning with Projects Series, PyTorch with Projects Series, Tensorflow and Keras with Projects Series, Scikit Learn Series with Projects, Time Series Analysis and Forecasting with Projects Series, ML System Design Case Studies Series videos will be published on our youtube channel ( just launched).
Subscribe today!
Tech Newsletter —
If you are interested, you can join my newsletter through which I send tech interview tips, techniques, patterns, hacks — Software Development, ML, Data Science, Startups and Technology projects to more than 30K readers. You can subscribe to Ignito:
System Design Case Studies — In Depth
Design Instagram
Design Netflix
Design Reddit
Design Amazon
Design Messenger App
Design Twitter
Design URL Shortener
Design Dropbox
Design Youtube
Design API Rate Limiter
Design Web Crawler
Design Amazon Prime Video
Design Facebook’s Newsfeed
Design Yelp
Design Uber
Design Tinder
Design Tiktok
Design Whatsapp
Most Popular System Design Questions
Mega Compilation : Solved System Design Case studies
Let’s get started!
- Data pipelines refer to the process of extracting, transforming, and loading data from one or more sources to a destination, such as a data warehouse or a data lake.
import pandas as pd
from datetime import datetime
from sklearn.model_selection import train_test_split
from sklearn.linear_model import LinearRegression
import psycopg2


# Step 1: Extract data from a data source
def extract_data():
    # Extract data from a CSV file
    data = pd.read_csv("data.csv")
    return data


# Step 2: Transform data
def transform_data(data):
    # Perform data transformations, such as cleaning, filtering, and feature engineering
    data["date"] = pd.to_datetime(data["date"])
    data["year"] = data["date"].dt.year
    data["month"] = data["date"].dt.month
    data["day"] = data["date"].dt.day
    return data


# Step 3: Load data into a database
def load_data(data):
    # Connect to a PostgreSQL database
    conn = psycopg2.connect(
        host="localhost",
        port="5432",
        database="mydb",
        user="myuser",
        password="mypassword"
    )

    # Create a table in the database
    cursor = conn.cursor()
    cursor.execute("CREATE TABLE IF NOT EXISTS sales (date DATE, revenue FLOAT)")

    # Insert data into the table
    for _, row in data.iterrows():
        cursor.execute("INSERT INTO sales (date, revenue) VALUES (%s, %s)", (row["date"], row["revenue"]))

    # Commit the changes and close the connection
    conn.commit()
    cursor.close()
    conn.close()


# Step 4: Train a machine learning model
def train_model(data):
    # Split the data into features (X) and target variable (y)
    X = data[["year", "month", "day"]]
    y = data["revenue"]

    # Split the data into training and testing sets
    X_train, X_test, y_train, y_test = train_test_split(X, y, test_size=0.2, random_state=42)

    # Train a linear regression model
    model = LinearRegression()
    model.fit(X_train, y_train)

    # Evaluate the model
    score = model.score(X_test, y_test)
    print("Model Score:", score)


# Step 5: Orchestrate the pipeline
def run_data_pipeline():
    # Step 1: Extract data
    data = extract_data()

    # Step 2: Transform data
    transformed_data = transform_data(data)

    # Step 3: Load data into a database
    load_data(transformed_data)

    # Step 4: Train a machine learning model
    train_model(transformed_data)


# Execute the data pipeline
run_data_pipeline()- The transformation step involves cleaning, filtering, and manipulating the data to make it suitable for analysis.
import pandas as pd


# Step 2: Transform data
def transform_data(data):
    # Clean the data
    data.dropna(inplace=True)  # Drop rows with missing values
    data = data.apply(lambda x: x.strip() if isinstance(x, str) else x)  # Strip leading/trailing spaces

    # Filter the data
    data = data[data["revenue"] > 0]  # Filter out negative revenue values

    # Manipulate the data
    data["date"] = pd.to_datetime(data["date"])  # Convert date column to datetime format
    data["year"] = data["date"].dt.year
    data["month"] = data["date"].dt.month
    data["day"] = data["date"].dt.day

    return data


# Example usage
data = pd.DataFrame({
    "date": ["2022-01-01", "2022-01-02", "2022-01-03"],
    "revenue": [100, -50, 200],
    "product": ["A", "B", "C"]
})

transformed_data = transform_data(data)
print(transformed_data)- Processing refers to the actions taken on the data, such as running a computation or applying a machine learning model.
import pandas as pd
from sklearn.linear_model import LinearRegression


# Step 3: Process data
def process_data(data):
    # Perform computation
    revenue_sum = data["revenue"].sum()
    revenue_mean = data["revenue"].mean()

    # Apply machine learning model
    X = data[["year", "month", "day"]]
    y = data["revenue"]
    model = LinearRegression()
    model.fit(X, y)
    predicted_revenue = model.predict(X)

    # Add computed and predicted values to the data
    data["revenue_sum"] = revenue_sum
    data["revenue_mean"] = revenue_mean
    data["predicted_revenue"] = predicted_revenue

    return data


# Example usage
data = pd.DataFrame({
    "date": ["2022-01-01", "2022-01-02", "2022-01-03"],
    "revenue": [100, 200, 300],
    "product": ["A", "B", "C"],
    "year": [2022, 2022, 2022],
    "month": [1, 1, 1],
    "day": [1, 2, 3]
})

processed_data = process_data(data)
print(processed_data)- Workflow refers to the overall flow of tasks that make up the pipeline, including the order in which they are executed.
import pandas as pd
from sklearn.linear_model import LinearRegression


# Step 1: Extract data
def extract_data():
    # Perform data extraction logic here
    # For example, read data from a file or a database
    data = pd.read_csv("data.csv")
    return data


# Step 2: Transform data
def transform_data(data):
    # Perform data transformation logic here
    # For example, clean, filter, or manipulate the data
    transformed_data = data.dropna()
    transformed_data["revenue"] = transformed_data["revenue"] * 1000
    return transformed_data


# Step 3: Process data
def process_data(data):
    # Perform data processing logic here
    # For example, run computations or apply machine learning models
    X = data[["year", "month", "day"]]
    y = data["revenue"]
    model = LinearRegression()
    model.fit(X, y)
    predicted_revenue = model.predict(X)
    data["predicted_revenue"] = predicted_revenue
    return data


# Step 4: Load data
def load_data(data):
    # Perform data loading logic here
    # For example, store the data in a database or write it to a file
    data.to_csv("processed_data.csv", index=False)


# Workflow
def run_workflow():
    # Step 1: Extract data
    extracted_data = extract_data()

    # Step 2: Transform data
    transformed_data = transform_data(extracted_data)

    # Step 3: Process data
    processed_data = process_data(transformed_data)

    # Step 4: Load data
    load_data(processed_data)


# Run the workflow
run_workflow()- Monitoring refers to the process of keeping track of the pipeline’s performance and identifying any issues that arise.
import time
import logging

# Set up logging
logging.basicConfig(level=logging.INFO, format='%(asctime)s - %(levelname)s - %(message)s')

# Step 1: Extract data
def extract_data():
    # Perform data extraction logic here
    logging.info("Extracting data...")
    time.sleep(2)  # Simulating extraction process
    data = [1, 2, 3, 4, 5]
    return data

# Step 2: Transform data
def transform_data(data):
    # Perform data transformation logic here
    logging.info("Transforming data...")
    time.sleep(3)  # Simulating transformation process
    transformed_data = [x * 2 for x in data]
    return transformed_data

# Step 3: Process data
def process_data(data):
    # Perform data processing logic here
    logging.info("Processing data...")
    time.sleep(4)  # Simulating processing process
    processed_data = sum(data)
    return processed_data

# Step 4: Load data
def load_data(data):
    # Perform data loading logic here
    logging.info("Loading data...")
    time.sleep(2)  # Simulating loading process
    logging.info("Data loaded successfully")

# Monitoring
def monitor_pipeline():
    while True:
        try:
            # Step 1: Extract data
            extracted_data = extract_data()

            # Step 2: Transform data
            transformed_data = transform_data(extracted_data)

            # Step 3: Process data
            processed_data = process_data(transformed_data)

            # Step 4: Load data
            load_data(processed_data)

            # Log successful execution
            logging.info("Pipeline executed successfully")

        except Exception as e:
            # Log any exceptions or errors
            logging.error(f"Pipeline execution failed: {str(e)}")

        # Wait for a certain interval before executing the pipeline again
        time.sleep(10)


# Start monitoring the pipeline
monitor_pipeline()- Airflow is an open-source platform for authoring, scheduling, and monitoring workflows. It allows users to define workflows as directed acyclic graphs (DAGs) of tasks, where the edges represent dependencies between tasks.
from airflow import DAG
from airflow.operators.bash_operator import BashOperator
from datetime import datetime

# Define the DAG
default_args = {
    'owner': 'airflow',
    'start_date': datetime(2023, 5, 1),
}

dag = DAG('my_dag', default_args=default_args, schedule_interval='0 0 * * *')  # Runs daily at midnight

# Define tasks
task1 = BashOperator(
    task_id='task1',
    bash_command='echo "Running task 1"',
    dag=dag
)

task2 = BashOperator(
    task_id='task2',
    bash_command='echo "Running task 2"',
    dag=dag
)

task3 = BashOperator(
    task_id='task3',
    bash_command='echo "Running task 3"',
    dag=dag
)

# Set task dependencies
task1 >> task2 >> task3
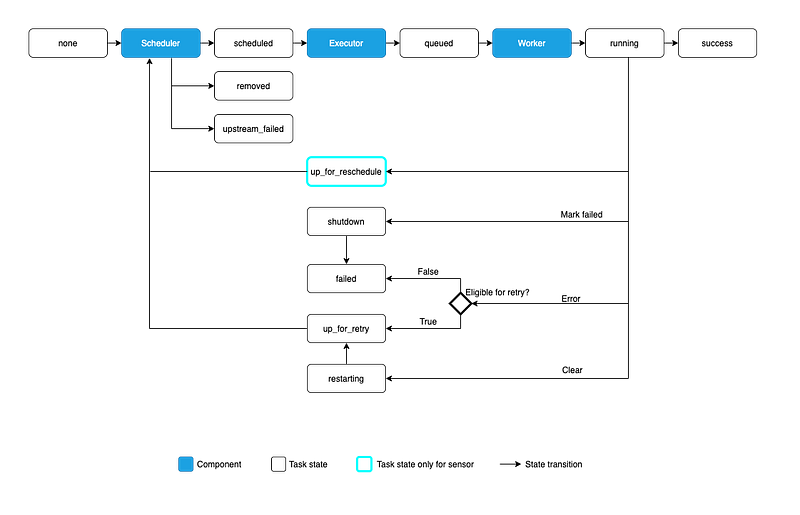
- DAGs are used to define the order and dependencies of the tasks in a workflow. Airflow also provides a web interface for monitoring and managing workflows, as well as tools for troubleshooting and alerting.
from airflow import DAG
from airflow.operators.bash_operator import BashOperator
from datetime import datetime

# Define the DAG
default_args = {
    'owner': 'airflow',
    'start_date': datetime(2023, 5, 1),
}

dag = DAG('my_dag', default_args=default_args, schedule_interval='0 0 * * *')  # Runs daily at midnight

# Define tasks
task1 = BashOperator(
    task_id='task1',
    bash_command='echo "Running task 1"',
    dag=dag
)

task2 = BashOperator(
    task_id='task2',
    bash_command='echo "Running task 2"',
    dag=dag
)

task3 = BashOperator(
    task_id='task3',
    bash_command='echo "Running task 3"',
    dag=dag
)

# Set task dependencies
task1 >> task2 >> task3
- Start the Airflow web server and scheduler by running the following command in your terminal:
airflow webserver -p 8080
airflow scheduler
2. Access the Airflow web interface by opening a web browser and navigating to http://localhost:8080 (assuming you're running it locally).
3. In the web interface, you’ll see the DAG my_dag listed. Toggle the switch icon to enable the DAG.
4. Airflow will automatically start executing the tasks based on the defined schedule interval. You can monitor the progress of the DAG, view logs, and manage the workflow from the web interface.
Data Pipelines
Data pipeline is a set of actions right from ingesting raw data from various sources/systems, process the data and move it to the end systems for data storage and analysis.
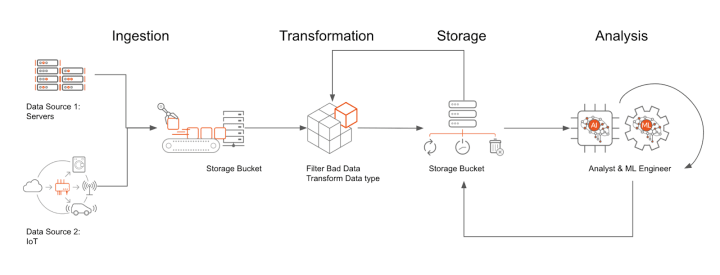
It consists of 5 stages —
1. Source
Data can be extracted and ingested from before sending it for transformation process.
Legacy systems
Mobile devices
Cloud environments
Data storage systems
Data warehouses
Data ingestion is the process of collecting raw data from various sources and loading it for further transformation/processing.
2. Transformation
Transform process is one of the most important step which involves —
Clean the data — Check for the missing or null values
Imputation — Use imputation methods to fill in the missing or null values
Verify the data and sources — Check and verify the sources of data
Sorting the data — Organize the data
Standardizing and removing the duplicates — Remove the redundant data and make sure the data is properly formatted/standardized according to the rules
import pandas as pd
import numpy as np

# Step 1: Clean the data
def clean_data(df):
    df_cleaned = df.dropna()  # Remove rows with missing or null values
    return df_cleaned

# Step 2: Imputation
def impute_data(df):
    # Use mean imputation to fill missing values
    df_imputed = df.fillna(df.mean())
    return df_imputed

# Step 3: Data verification
def verify_data(source):
    # Perform data verification steps for the given source
    # You can add your own verification logic here
    if source == 'Source A':
        # Perform verification steps for Source A
        pass
    elif source == 'Source B':
        # Perform verification steps for Source B
        pass
    else:
        raise ValueError("Invalid data source")

# Step 4: Sorting the data
def sort_data(df, column):
    df_sorted = df.sort_values(by=column)
    return df_sorted

# Step 5: Standardization and removing duplicates
def standardize_data(df):
    df_standardized = df.apply(lambda x: x.str.lower() if x.dtype == 'object' else x)  # Convert string columns to lowercase
    df_unique = df_standardized.drop_duplicates()  # Remove duplicate rows
    return df_unique

# Example usage
data = {'Name': ['John', 'Jane', 'Bob', np.nan],
        'Age': [25, 30, np.nan, 35],
        'Salary': [50000, np.nan, 60000, 70000]}
df = pd.DataFrame(data)

# Clean the data
df_cleaned = clean_data(df)
print("Cleaned data:")
print(df_cleaned)

# Impute the missing values
df_imputed = impute_data(df_cleaned)
print("Imputed data:")
print(df_imputed)

# Verify the data source
data_source = 'Source A'
verify_data(data_source)

# Sort the data by Age
df_sorted = sort_data(df_imputed, 'Age')
print("Sorted data:")
print(df_sorted)

# Standardize the data and remove duplicates
df_standardized = standardize_data(df_sorted)
print("Standardized data:")
print(df_standardized)
3. Processing
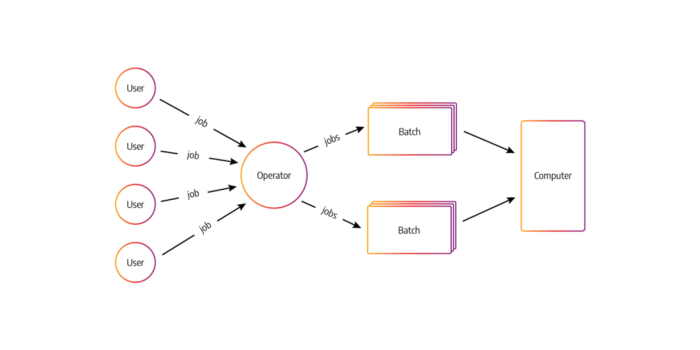
Processing is done in two ways —
Batch processing
Stream processing
In batch processing, the jobs with similar resource requirements are batched together, processed and run together as a group. It’s one of the simplest and economical method of job processing with no time limit for any batch.
The jobs/transactions are sorted and grouped/batched together then transaction files are created as well as sorted and lastly the master file is updated with the time of processing/run.
# Batch processing example
def process_batch_data(data):
# Perform batch processing on the given data
for item in data:
# Process each item in the batch
# Perform computations or apply transformations
processed_item = item + 1
print(processed_item)
# Example usage
batch_data = [1, 2, 3, 4, 5]
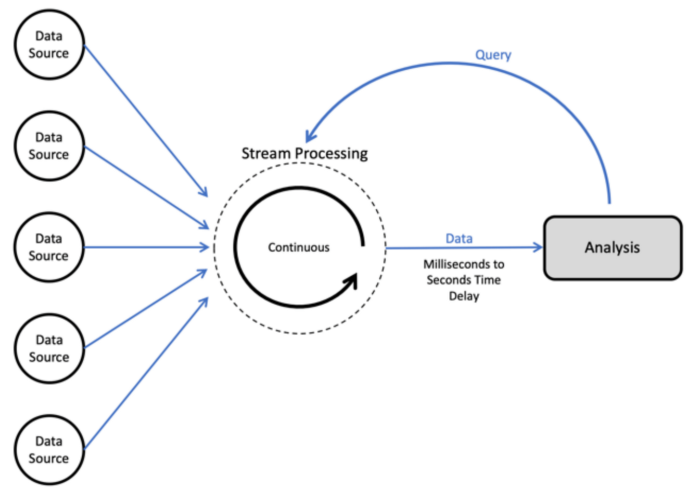
process_batch_data(batch_data)Stream Processing
This is also called as real time processing in which transactions/jobs are accepted and processed in the real time and with certain deadlines. It’s action or event oriented. Stream processing systems feed themselves on real time actions and the handles the records in micro batches.
# Stream processing example

import time

def process_stream_data(data):
    # Perform stream processing on the given data
    for item in data:
        # Process each item in the stream
        # Perform computations or apply transformations
        processed_item = item + 1
        print(processed_item)
        time.sleep(1)  # Simulate real-time processing delay

# Example usage
stream_data = [1, 2, 3, 4, 5]
process_stream_data(stream_data)
Workflow
It’s the process of resource and processes management and sequencing.
Monitoring
Monitoring is the process which helps maintain data integrity and troubleshoot any potential failure and alert the sys admins.
Destination
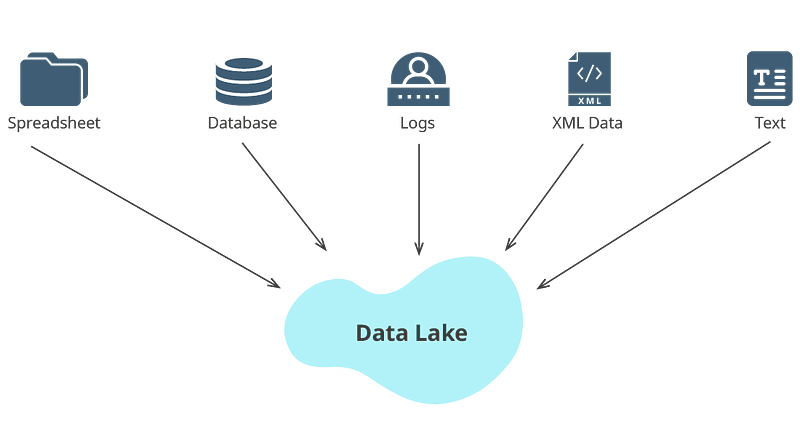
Destination can be a relational database, data store or data lake or a central repository where all the transformed and processed data is kept for further analytics/derive insights.
Building data pipelines involves several steps, including data extraction, transformation, and loading.
The specific steps and tools used will depend on the specific requirements of the pipeline and the type of data it is handling.
- Data Extraction: The first step in building a data pipeline is to extract data from various sources such as databases, APIs, or files. Extracting data can be done using various tools such as SQL, Python, or specialized ETL tools like Talend, Informatica, etc.
- Data Transformation: Once the data is extracted, it needs to be transformed to fit the requirements of the target system. This can involve cleaning and normalizing the data, as well as transforming it into a format that is suitable for loading into the target system. This step can be done using tools such as Python, Pandas or Apache Nifi.
- Data Loading: The final step in building a data pipeline is to load the data into the target system. This can be a data warehouse, a data lake, or any other type of data storage. This step can be done using various tools such as Apache Nifi, Apache Kafka, Apache Storm, Apache Spark, Apache Flink, etc.
- Data Quality Check: After the data is loaded, it is important to check the data quality, it can be done with some data quality check tools like Talend, Informatica, etc.
- Scheduling and Monitoring: Finally, it is important to schedule and monitor the pipeline to ensure that it is running correctly and that data is being delivered on time. This can be done using tools such as Apache Airflow, Apache Nifi, or cron jobs.
Code Implementation —
import pandas as pd
import sqlalchemy
from sqlalchemy import create_engine

# Data Extraction
# Extract data from a database using SQL and SQLAlchemy
engine = create_engine('database://username:password@host:port/database_name')
query = 'SELECT * FROM table_name'
data = pd.read_sql(query, engine)

# Data Transformation
# Perform data cleaning and transformation using Pandas
# Example: Cleaning and normalizing the data
cleaned_data = data.dropna()  # Remove rows with missing values
normalized_data = cleaned_data.apply(lambda x: x.lower() if isinstance(x, str) else x)

# Data Loading
# Load the transformed data into a target system
target_engine = create_engine('target_database://username:password@host:port/target_database_name')
normalized_data.to_sql('target_table', target_engine, if_exists='replace')

# Data Quality Check
# Perform data quality checks on the loaded data
target_data = pd.read_sql('SELECT * FROM target_table', target_engine)
data_quality = target_data.shape[0] > 0  # Check if data exists in the target table

# Scheduling and Monitoring
# Implement scheduling and monitoring using Apache Airflow or other tools
# Example: Scheduling a daily pipeline run
from airflow import DAG
from airflow.operators.python_operator import PythonOperator
from datetime import datetime

def run_pipeline():
    # Perform all the steps of the pipeline
    # Extraction, Transformation, Loading, Data Quality Check

dag = DAG('data_pipeline', description='Example Data Pipeline', start_date=datetime(2022, 1, 1), schedule_interval='@daily')

pipeline_task = PythonOperator(task_id='run_pipeline', python_callable=run_pipeline, dag=dag)
Big data Pipelines —
Big data pipelines has the ability to handle huge volumes of data coming in from multiple sources/systems at a high speed and in different formats.
Big data pipelines work by processing large amounts of data in parallel, across a distributed system. This allows for efficient processing of large data sets that would be impractical to handle on a single machine.
- Data Ingestion: The first step in a big data pipeline is to ingest large amounts of data from various sources such as logs, social media, IoT devices, and more. This step can be done using tools such as Apache Kafka, Apache Flume, or Apache Nifi.
- Data Processing: Once the data is ingested, it is processed using distributed computing frameworks such as Apache Hadoop, Apache Spark, or Apache Flink. These frameworks allow for parallel processing of large data sets, making it possible to handle big data in a reasonable amount of time.
- Data Storage: After the data is processed, it is stored in a distributed data storage system such as Apache Hadoop HDFS, Apache Cassandra, or Apache Hbase. These systems are designed to handle large amounts of data and can scale horizontally as the data size increases.
- Data Analysis: The final step in a big data pipeline is to analyze the data using tools such as Apache Hive, Apache Impala, or Apache Pig. These tools allow for querying and analyzing large data sets in a distributed manner, making it possible to gain insights from big data.
- Scheduling and Monitoring: To ensure the pipeline runs correctly and data is delivered on time, it is important to schedule and monitor the pipeline using tools such as Apache Airflow, Apache Oozie, or cron jobs.
Data pipelines can be deployed On premise or om the cloud as per the requirement.
Code Implementation —
from pyspark.sql import SparkSession
from pyspark.streaming import StreamingContext
from pyspark.streaming.kafka import KafkaUtils

# Data Ingestion
# Ingest data from Kafka using Apache Spark Streaming
spark = SparkSession.builder.appName('DataIngestion').getOrCreate()
ssc = StreamingContext(spark.sparkContext, batchDuration=10)

kafka_params = {
    'bootstrap.servers': 'kafka_server:9092',
    'group.id': 'data_pipeline_group',
    'auto.offset.reset': 'latest'
}

kafka_stream = KafkaUtils.createDirectStream(ssc, topics=['topic'], kafkaParams=kafka_params)

# Data Processing
# Process the data using Apache Spark
processed_data = kafka_stream.map(lambda x: process_data(x))

# Data Storage
# Store the processed data in a distributed data storage system
processed_data.foreachRDD(lambda rdd: rdd.toDF().write.format('parquet').mode('append').save('hdfs://namenode:9000/data'))

# Data Analysis
# Analyze the stored data using Apache Hive or other tools
hive_query = 'SELECT * FROM data WHERE condition'
hive_result = spark.sql(hive_query)

# Scheduling and Monitoring
# Implement scheduling and monitoring using Apache Airflow or other tools
# Example: Scheduling a daily pipeline run
from airflow import DAG
from airflow.operators.python_operator import PythonOperator
from datetime import datetime

def run_pipeline():
    # Perform all the steps of the pipeline
    # Ingestion, Processing, Storage, Analysis

dag = DAG('big_data_pipeline', description='Example Big Data Pipeline', start_date=datetime(2022, 1, 1), schedule_interval='@daily')

pipeline_task = PythonOperator(task_id='run_pipeline', python_callable=run_pipeline, dag=dag)

ssc.start()
ssc.awaitTermination()
Airflow
Airflow, developed by airbnb is an open source tool which is used to schedule, monitor and orchestrate workflows as well as data pipelines.
It can schedule and run complex data pipelines and workflows. It supports various data sources as well as custom python plugins to add new data sources.
- Airflow provides a web-based user interface for managing and monitoring workflows, as well as a command-line interface for managing the Airflow environment. It also includes an execution engine that manages the scheduling and execution of tasks, as well as a metadata database that stores information about the state of tasks and DAGs.
- When a DAG is created, it is placed in the DAGs folder where Airflow looks for DAGs to schedule and execute. The DAGs are scheduled to run based on their schedule_interval setting. When the time comes for a DAG to run, the execution engine retrieves the DAG and its tasks from the metadata database, and then determines the order in which to execute the tasks based on their dependencies.
- After a task is executed, the execution engine updates the metadata database with the status of the task, such as whether it succeeded or failed. If a task fails, the execution engine will retry the task a certain number of times before marking it as a failure. The user can also trigger a DAG or task manually.
- With Airflow, you can also monitor the status of DAGs and tasks via the web UI, which provides information such as the status of tasks, the duration of tasks, and the number of retries for failed tasks. Additionally, Airflow allows you to set up alerts and notifications for specific events, such as when a task fails or when a DAG completes.
It’s beneficial for the companies/organizations which are looking to schedule their automated workflows via CLI.
Some of the most important Airflow commands —
- airflow initdb: Initializes the database where Airflow stores its metadata.
- airflow list_dags: Lists all the DAGs that are available in the DAGs folder.
- airflow list_tasks dag_id: Lists all the tasks in a specific DAG.
- airflow clear dag_id: Clears all the tasks and instances for a specific DAG.
- airflow test dag_id task_id execution_date: Tests a specific task in a DAG by running it with the specified execution date.
- airflow pause dag_id: Pauses a specific DAG and prevents it from being scheduled and executed.
- airflow unpause dag_id: Unpauses a specific DAG and allows it to be scheduled and executed.
- airflow trigger_dag dag_id: Triggers a specific DAG to run.
- airflow backfill dag_id -s start_date -e end_date: Runs a DAG from a specific start date to end date.
- airflow webserver: Starts the Airflow web server, which allows you to view the DAGs, tasks, and instances via the web UI.
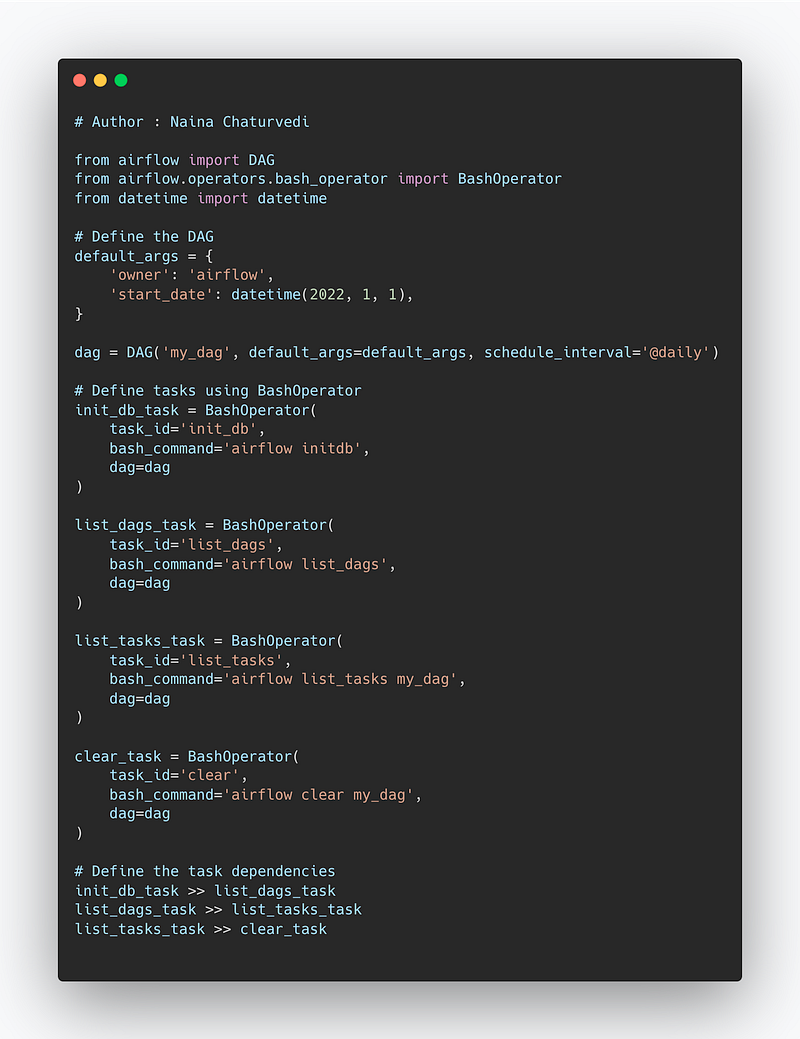
Implementation —
from airflow import DAG
from airflow.operators.bash_operator import BashOperator
from datetime import datetime

# Define the DAG
default_args = {
    'owner': 'airflow',
    'start_date': datetime(2022, 1, 1),
}

dag = DAG('my_dag', default_args=default_args, schedule_interval='@daily')

# Define tasks using BashOperator
init_db_task = BashOperator(
    task_id='init_db',
    bash_command='airflow initdb',
    dag=dag
)

list_dags_task = BashOperator(
    task_id='list_dags',
    bash_command='airflow list_dags',
    dag=dag
)

list_tasks_task = BashOperator(
    task_id='list_tasks',
    bash_command='airflow list_tasks my_dag',
    dag=dag
)

clear_task = BashOperator(
    task_id='clear',
    bash_command='airflow clear my_dag',
    dag=dag
)

# Define the task dependencies
init_db_task >> list_dags_task
list_dags_task >> list_tasks_task
list_tasks_task >> clear_task
Snippet —
DAG
Airflow runs on DAG ( Directly acyclic graphs) which is nothing but a collection of all the jobs/tasks that you want to schedule, run and monitor which are related to eachother ( i.e have relationship and dependencies)
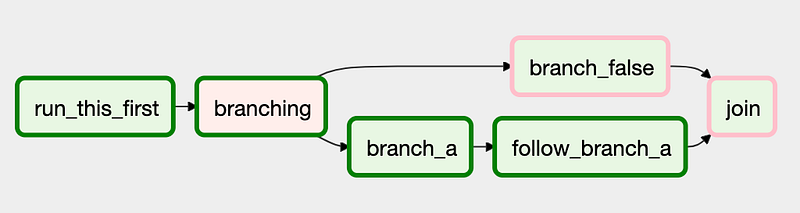
Once can create context manager DAG, Parallel task DAG, Dynamic tasks DAG and Branching DAG.
- A DAG defines the relationships between tasks by specifying which tasks must be executed before or after other tasks. These relationships are used by the Airflow execution engine to determine the order in which tasks should be executed.
- A DAG is defined using Python code and is placed in the DAGs folder where Airflow looks for DAGs to schedule and execute. A DAG has a unique id, which is used to identify the DAG in the Airflow web UI and CLI.
- When a DAG is created, it is assigned a schedule_interval, which determines how frequently the DAG should be executed. For example, a DAG with a schedule_interval of “daily” will be executed every day at the specified time.
- A DAG can also have a start_date and an end_date, which determine the range of dates for which the DAG should be scheduled and executed.
- When the time comes for a DAG to run, the Airflow execution engine retrieves the DAG and its tasks from the metadata database, and then determines the order in which to execute the tasks based on their dependencies.
- A task can have multiple upstream and downstream tasks, which can be defined using the set_upstream and set_downstream methods. And also a task has a specific operator which determines what action should be performed when the task is executed.
- With Airflow, you can also monitor the status of DAGs and tasks via the web UI, which provides information such as the status of tasks, the duration of tasks, and the number of retries for failed tasks. Additionally, Airflow allows you to set up alerts and notifications for specific events, such as when a task fails or when a DAG completes.
Most important DAG commands —
- airflow list_dags: Lists all the DAGs that are available in the DAGs folder
- airflow list_tasks dag_id: Lists all the tasks in a specific DAG
- airflow clear dag_id: Clears all the tasks and instances for a specific DAG
- airflow test dag_id task_id execution_date: Tests a specific task in a DAG by running it with the specified execution date
- airflow pause dag_id: Pauses a specific DAG and prevents it from being scheduled and executed
- airflow unpause dag_id: Unpauses a specific DAG and allows it to be scheduled and executed
- airflow trigger_dag dag_id: Triggers a specific DAG to run
- airflow backfill dag_id -s start_date -e end_date: Runs a DAG from a specific start date to end date
- airflow run dag_id task_id execution_date: Runs a specific task in a DAG
- airflow show_dag dag_id: Show the DAG details in the console
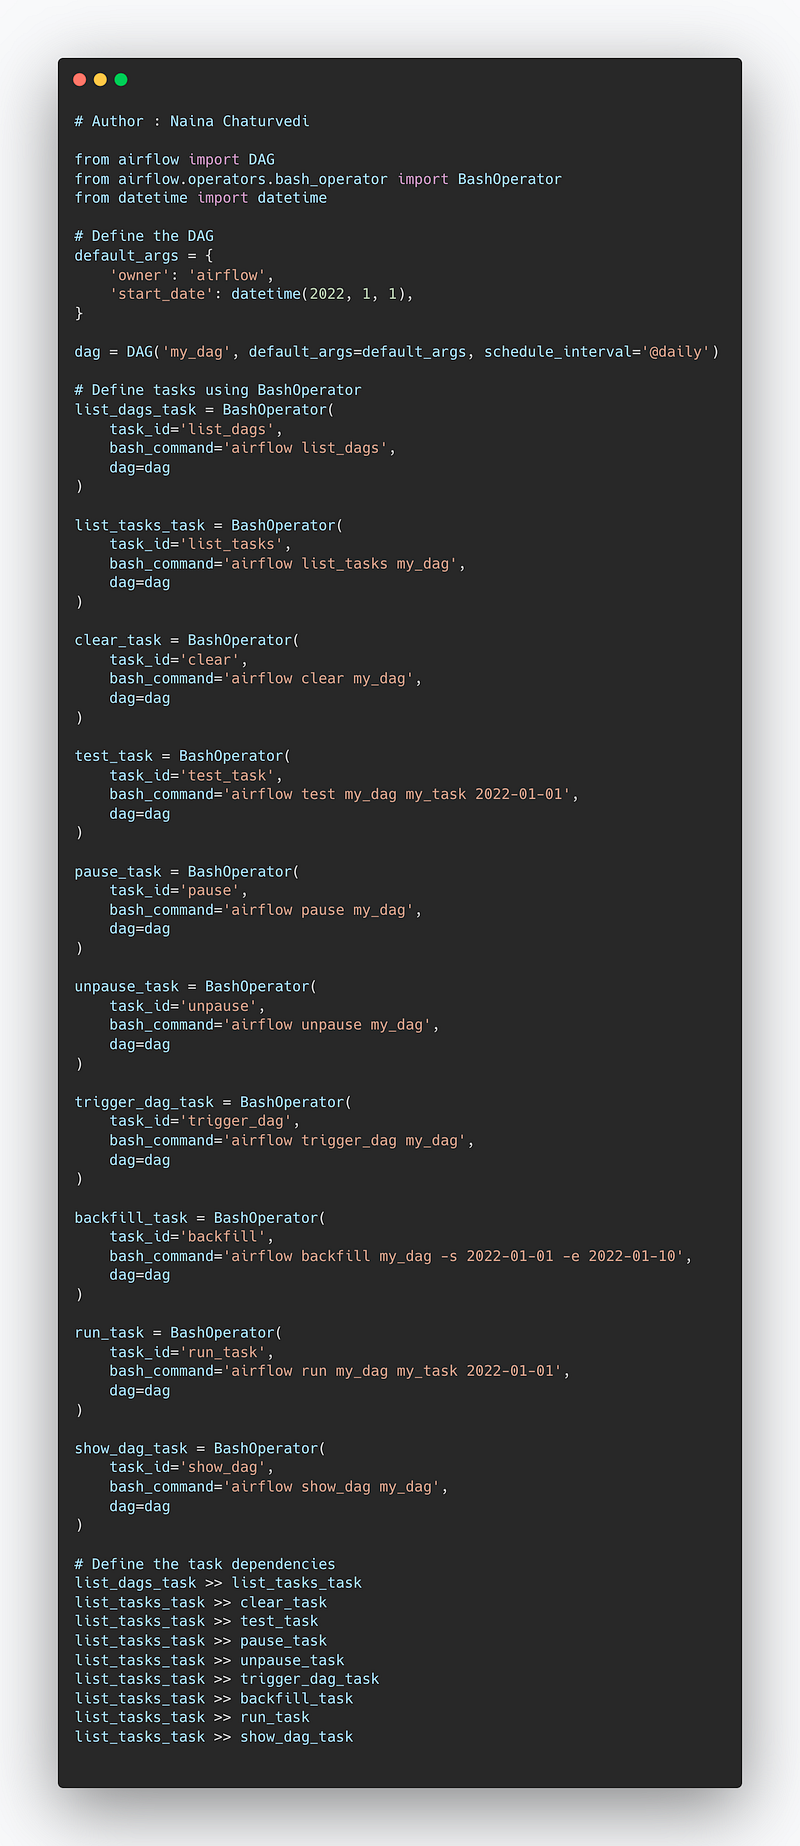
Code Implementation —
from airflow import DAG
from airflow.operators.bash_operator import BashOperator
from datetime import datetime

# Define the DAG
default_args = {
    'owner': 'airflow',
    'start_date': datetime(2022, 1, 1),
}

dag = DAG('my_dag', default_args=default_args, schedule_interval='@daily')

# Define tasks using BashOperator
list_dags_task = BashOperator(
    task_id='list_dags',
    bash_command='airflow list_dags',
    dag=dag
)

list_tasks_task = BashOperator(
    task_id='list_tasks',
    bash_command='airflow list_tasks my_dag',
    dag=dag
)

clear_task = BashOperator(
    task_id='clear',
    bash_command='airflow clear my_dag',
    dag=dag
)

test_task = BashOperator(
    task_id='test_task',
    bash_command='airflow test my_dag my_task 2022-01-01',
    dag=dag
)

pause_task = BashOperator(
    task_id='pause',
    bash_command='airflow pause my_dag',
    dag=dag
)

unpause_task = BashOperator(
    task_id='unpause',
    bash_command='airflow unpause my_dag',
    dag=dag
)

trigger_dag_task = BashOperator(
    task_id='trigger_dag',
    bash_command='airflow trigger_dag my_dag',
    dag=dag
)

backfill_task = BashOperator(
    task_id='backfill',
    bash_command='airflow backfill my_dag -s 2022-01-01 -e 2022-01-10',
    dag=dag
)

run_task = BashOperator(
    task_id='run_task',
    bash_command='airflow run my_dag my_task 2022-01-01',
    dag=dag
)

show_dag_task = BashOperator(
    task_id='show_dag',
    bash_command='airflow show_dag my_dag',
    dag=dag
)

# Define the task dependencies
list_dags_task >> list_tasks_task
list_tasks_task >> clear_task
list_tasks_task >> test_task
list_tasks_task >> pause_task
list_tasks_task >> unpause_task
list_tasks_task >> trigger_dag_task
list_tasks_task >> backfill_task
list_tasks_task >> run_task
list_tasks_task >> show_dag_task
Snippet —
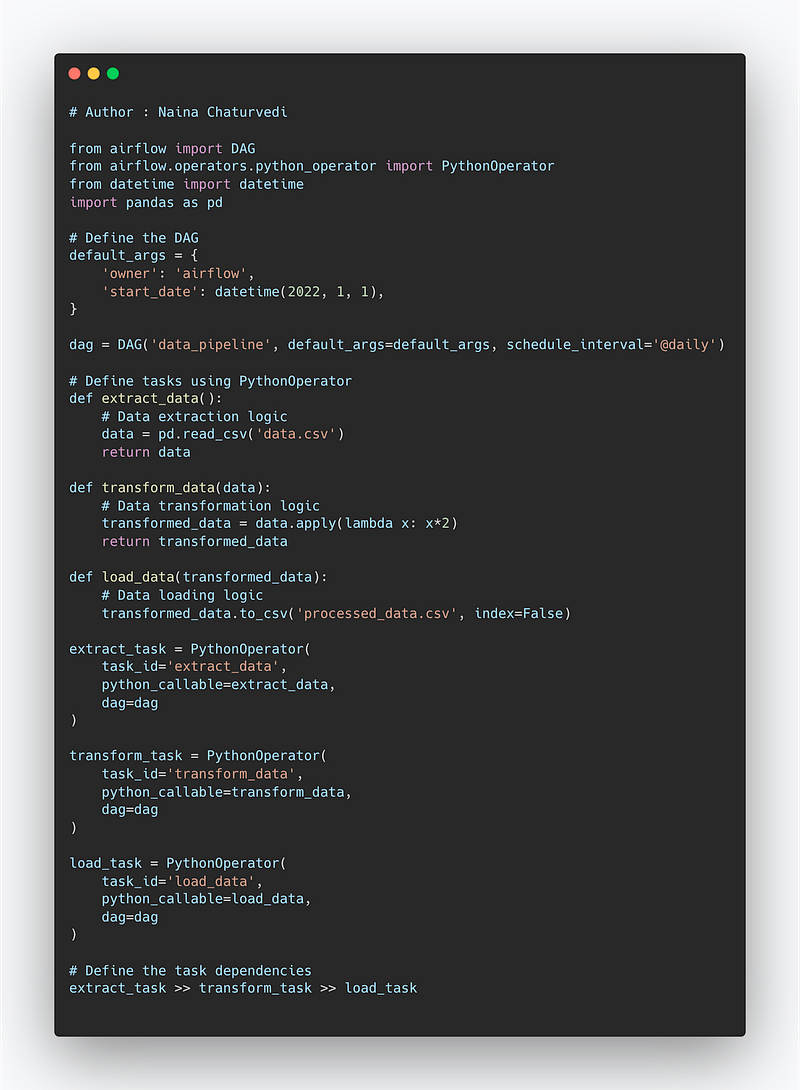
Project code —
from airflow import DAG
from airflow.operators.python_operator import PythonOperator
from datetime import datetime
import pandas as pd

# Define the DAG
default_args = {
    'owner': 'airflow',
    'start_date': datetime(2022, 1, 1),
}

dag = DAG('data_pipeline', default_args=default_args, schedule_interval='@daily')

# Define tasks using PythonOperator
def extract_data():
    # Data extraction logic
    data = pd.read_csv('data.csv')
    return data

def transform_data(data):
    # Data transformation logic
    transformed_data = data.apply(lambda x: x*2)
    return transformed_data

def load_data(transformed_data):
    # Data loading logic
    transformed_data.to_csv('processed_data.csv', index=False)

extract_task = PythonOperator(
    task_id='extract_data',
    python_callable=extract_data,
    dag=dag
)

transform_task = PythonOperator(
    task_id='transform_data',
    python_callable=transform_data,
    dag=dag
)

load_task = PythonOperator(
    task_id='load_data',
    python_callable=load_data,
    dag=dag
)

# Define the task dependencies
extract_task >> transform_task >> load_task
Snippet —
A project video Data Pipelines, Airflow and DAG covering coming soon ( subscribe today) —
That’s it for now.
Find Day 27 Below —
Let me know if you have questions in the comment section below. Subscribe/ Follow, Like/Clap as it would encourage me to write more in my free time
Stay Tuned!!
Read more —
All the Complete System Design Series Parts —
6. Networking, How Browsers work, Content Network Delivery ( CDN)
Github —
For Python Projects —
For complete 60 days of Data Science and ML : Day 1 — Day 60 : Quick Recap of 60 days of Data Science and ML
Follow for more updates. Stay tuned and keep coding!
For other projects, tune to —
Build Machine Learning Pipelines( With Code)
Recurrent Neural Network with Keras
Clustering Geolocation Data in Python using DBSCAN and K-Means
Facial Expression Recognition using Keras
Hyperparameter Tuning with Keras Tuner
Custom Layers in Keras


