
Day 2 of System Design Case Studies Series
How to solve any System Design Question…
Welcome back peeps! Hope all’s well.
This is one of the most important post wrt System Design where we will discuss how to solve any System Design Question (approach that you should take).
Note : Please read System Design Important Terms you MUST know before reading this post.
Day 1 of System Design Case Studies can be found below —
Projects Videos —
All the projects, data structures, SQL, algorithms, system design, Data Science and ML , Data Analytics, Data Engineering, , Implemented Data Science and ML projects, Implemented Data Engineering Projects, Implemented Deep Learning Projects, Implemented Machine Learning Ops Projects, Implemented Time Series Analysis and Forecasting Projects, Implemented Applied Machine Learning Projects, Implemented Tensorflow and Keras Projects, Implemented PyTorch Projects, Implemented Scikit Learn Projects, Implemented Big Data Projects, Implemented Cloud Machine Learning Projects, Implemented Neural Networks Projects, Implemented OpenCV Projects,Complete ML Research Papers Summarized, Implemented Data Analytics projects, Implemented Data Visualization Projects, Implemented Data Mining Projects, Implemented Natural Leaning Processing Projects, MLOps and Deep Learning, Applied Machine Learning with Projects Series, PyTorch with Projects Series, Tensorflow and Keras with Projects Series, Scikit Learn Series with Projects, Time Series Analysis and Forecasting with Projects Series, ML System Design Case Studies Series videos will be published on our youtube channel ( just launched).
Subscribe today!
Solved System Design Case Studies — In depth
Design Instagram
Design Messenger App
Design Twitter
Design URL Shortener
Design Dropbox
Design Youtube
Design API Rate Limiter
Design Web Crawler
Design Facebook’s Newsfeed
Design Yelp
Design Uber
Design Tinder
Design Tiktok
Design Whatsapp
Most Popular System Design Questions
Mega Compilation : Solved System Design Case studies
Complete Data Structures and Algorithm Series
Github —
But before moving forward, first understand why companies have System design interview round at all?
To put it simply, there are 5 reasons —
1. To check problem solving skills — how you can spot the most important pieces of the problem, make pragmatic assumptions.
2. To check if you can identify a complex or simplify a vague problem — do you discuss the different ideas that you get with others, evaluate the tradeoffs and optimize the solution.
3. To check if you can clearly communicate your solutions with other people. Discussion is an important part of software engineering.
4. To check if you can follow the clues and develop the idea further with your own understanding of the most important system design concepts.
5. To understand if you are the person who over engineers a problem which can be abstracted in simple steps.
Once you understand the objective behind the system design interview round, you whole strategy should be aligned towards above 5 points.
Now let’s understand the technical side of system design. You are tested —
To check if you know how to design a simple architecture and after figuring out the most important features, can you take your approach a notch up.
Once you have designed the architecture and understood the tradeoffs, can you scale it from zero to a million users?
Do you clearly understand the 11 most important concepts of system design pragmatically?
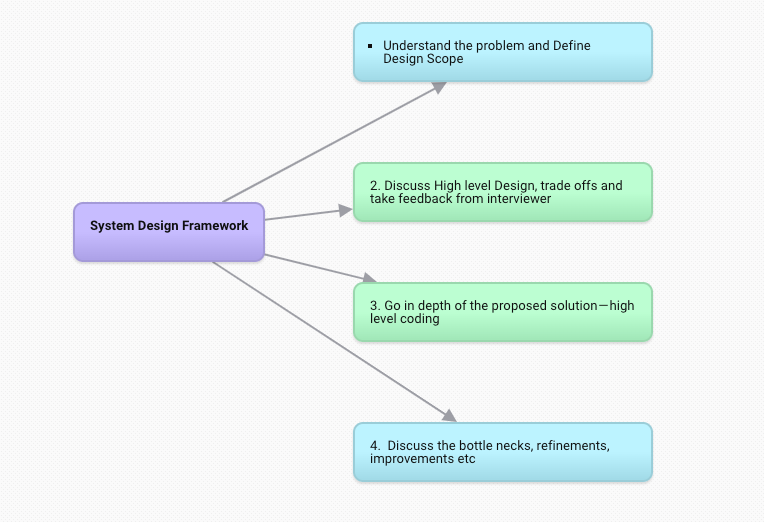
Alright! So, let’s talk about the approach to any System Design Questions that you can follow.
Build a framework + Think objectively + Discuss Strategically
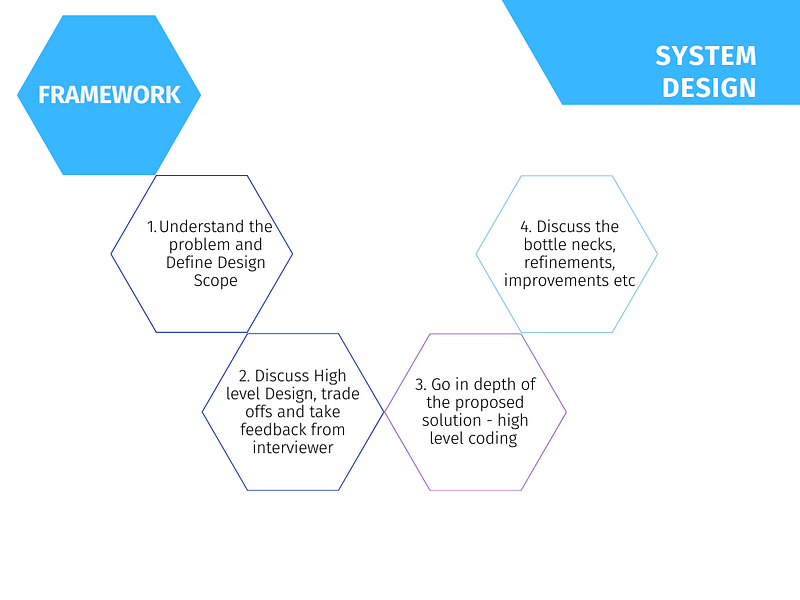
For every step, 4 most important points —
1. Understand the problem and Define Design Scope ( 11- 15 minutes)
Specific Features ( max 4 features)
Practical Estimates (numerical)( Users, resources etc)
Tech Stack
Scaling requirements ( say for x months)
2. Discuss High level Design, trade offs and take feedback from interviewer ( 15 minutes)
Basic Blueprint
Key Resources and services
Use cases
Feedback from the interviewer
3. Go in depth of the proposed solution — high level coding( 15 minutes)
Identify important components in the proposed architecture
Resources and scaling estimations ( calculations to meet the scaling requirements)
API Design
Database schema
4. Discuss the bottle necks, refinements, improvements etc ( 7–10 minutes)
System Bottlenecks and failure/error points
Operational metrics and issues
Refinements
Future of your proposed solution
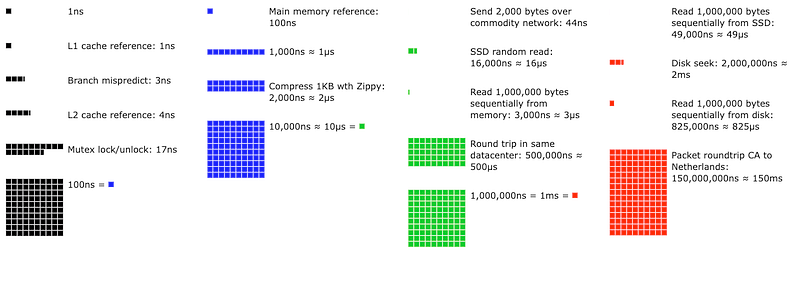
Know your numbers
In one of the presentations at Stanford, Dr. Jeff Dean from Google gave these numbers that you should know before designing a system —
To evaluate design options, you should have a good sense of how long typical operations will take:
- Read 1 MB sequentially from memory: 250,000 ns
- Round trip within same datacenter: 500,000 ns
- Disk seek 10,000,000: ns
- Read 1 MB sequentially from network: 10,000,000 ns
- Read 1 MB sequentially from disk : 30,000,000 ns
- Send packet CA->Netherlands->CA : 150,000,000 ns
- L1 cache reference: 0.5 ns
- Branch mispredict: 5 ns
- L2 cache reference : 7 ns
- Mutex lock/unlock : 100 ns
- Main memory reference: 100 ns
- Compress 1K bytes with Zippy: 10,000 ns
- Send 2K bytes over 1 Gbps network : 20,000 ns
Latency refers to the amount of time it takes for a request to be processed and for a response to be received. In system design, it’s important to consider latency because it can have a significant impact on the overall performance and user experience of a system. High latency can lead to slow response times, decreased user engagement, and reduced productivity.
Here’s a simple code example in Python that demonstrates how to measure latency:
import time
import requests
start = time.time()
response = requests.get("http://www.example.com")
end = time.time()latency = end - start
print("Latency:", latency, "seconds")In this example, the time module is used to record the start and end times of the request, and the requests library is used to send the request to the specified URL. The difference between the end time and the start time is calculated and used as a measure of the latency of the request.
Disk seek refers to the process of moving the disk arm to the correct physical location on a disk drive where data can be read or written. In system design, disk seek time can be a significant performance bottleneck, especially for systems that frequently access large amounts of data stored on disk.
Here’s a simple code example in Python that demonstrates how to measure disk seek time:
import time
import os
def disk_seek_time(filename):
start = time.time()
with open(filename, 'r') as f:
f.read(1024)
end = time.time() disk_seek_time = end - start
return disk_seek_timefilename = "/path/to/file.txt"
print("Disk Seek Time:", disk_seek_time(filename), "seconds")In this example, the time module is used to record the start and end times of the disk seek operation, and the open function from the os module is used to open a file stored on disk. The read method is used to read the first 1024 bytes of the file, which triggers a disk seek operation. The difference between the end time and the start time is calculated and used as a measure of the disk seek time for this operation.
L1 cache refers to the level 1 cache, which is the fastest cache memory in a computer’s memory hierarchy. It acts as a buffer between the CPU and the main memory, allowing the CPU to access frequently used data quickly. The L1 cache is typically implemented as a small amount of fast SRAM (Static Random Access Memory) that is integrated directly on the CPU chip.
Here’s a code example in C++ to demonstrate the use of L1 cache:
#include <iostream>
#include <chrono>
const int N = 100000000;int main() {
int *a = new int[N];
int sum = 0; // Initialize the array
for (int i = 0; i < N; i++) {
a[i] = i;
} // Start the timer
auto start = std::chrono::high_resolution_clock::now(); // Access the array in a way that is optimized for the L1 cache
for (int i = 0; i < N; i+= 16) {
sum += a[i];
} // Stop the timer
auto end = std::chrono::high_resolution_clock::now();
auto elapsed = std::chrono::duration_cast<std::chrono::milliseconds>(end - start); std::cout << "Time taken: " << elapsed.count() << "ms" << std::endl; delete[] a; return 0;
}In this example, the array a is initialized with 100 million elements and then accessed in a way that is optimized for the L1 cache. The program measures the time it takes to access the elements of the array, which is an indirect measure of the latency of accessing the L1 cache. By incrementing the index by 16, we ensure that each cache line is only loaded once, which minimizes cache misses and maximizes the performance benefits of the L1 cache.
L2 cache is a higher-level cache that serves as a larger but slower intermediary between the processor and the L1 cache. The purpose of L2 cache is to reduce the number of misses in the L1 cache, which can slow down the processing speed. L2 cache is larger in size and has a longer latency than L1 cache, but it is still faster than main memory.
Here is an example of how you could use L2 cache in code:
import time# Function to simulate access to L2 cache
def access_l2_cache(data):
# Simulating L2 cache access time
time.sleep(0.01)
return data# Function to simulate access to main memory
def access_memory(data):
# Simulating main memory access time
time.sleep(0.1)
return data# Function to demonstrate L2 cache usage
def use_l2_cache(data):
# Checking if data is present in L2 cache
cached_data = access_l2_cache(data)
if cached_data:
return cached_data
else:
# If data is not present in L2 cache, fetching it from main memory
data = access_memory(data)
# Storing data in L2 cache for future use
access_l2_cache(data)
return data# Example usage
data = "example_data"
result = use_l2_cache(data)
print(result)In this example, the function use_l2_cache is used to demonstrate the usage of L2 cache. The function first checks if the data is present in the L2 cache. If it is, it returns the data. If not, it fetches the data from main memory and stores it in the L2 cache for future use. The access_l2_cache and access_memory functions are used to simulate the access time to the L2 cache and main memory, respectively.
A Mutex (short for “mutual exclusion”) is a synchronization mechanism used to ensure that only one thread can access a shared resource at a time. In other words, it ensures that multiple threads don’t attempt to modify the same data simultaneously.
Here’s an example of how a mutex lock/unlock could be implemented in Python:
import threading# Mutex for controlling access to shared resource
mutex = threading.Lock()# Function that acquires the lock before accessing shared resource
def access_shared_resource():
mutex.acquire()
# Access shared resource
# ...
mutex.release()# Create and start two threads
thread1 = threading.Thread(target=access_shared_resource)
thread2 = threading.Thread(target=access_shared_resource)
thread1.start()
thread2.start()# Wait for both threads to finish
thread1.join()
thread2.join()In this example, the mutex lock is created using the threading.Lock() class. The access_shared_resource function acquires the lock with the acquire method before accessing the shared resource. This ensures that only one thread can access the shared resource at a time. When the function has finished accessing the shared resource, it releases the lock with the release method.
Here is an example of measuring the round trip time of network packets in Python using the socket library:
import socket
import time
# Create a UDP socket
sock = socket.socket(socket.AF_INET, socket.SOCK_DGRAM)# Send a packet to the server
server_address = ('localhost', 12345)
message = b'hello'
start_time = time.time()
sent = sock.sendto(message, server_address)# Receive the response from the server
data, server = sock.recvfrom(4096)
end_time = time.time()# Calculate the round trip time
round_trip_time = end_time - start_time
print("Round trip time: ", round_trip_time)This code sends a packet to a server running on localhost at port 12345, and measures the time it takes for a response to be received. The round trip time, which is the time it takes for a packet to be sent and a response to be received, is calculated by subtracting the start time from the end time.
That’s it for now! Refresh your system design basics below i.e 10 most important concepts in System Design and be ready to build system design case studies as we move forward.
Day 2 : SQL Basics, Query Structure, Built In functions Conditions
Day 4 : Set Theory Operations, Stored Procedures and CASE statements in SQL
Day 6 : Subqueries, Group by, order by and Having clauses in SQL and Analytical Functions
Day 7 : Window Functions, Grouping Sets and Constraints in SQL
Day 8 : BigQuery Basics, SELECT, FROM, WHERE and Date and Extract in BigQuery
Day 9 : Common Expression Table, UNNEST Clause, SQL vs NoSQL Databases
Day 10 : Triggers, Pivot and Cursors in SQL
Day 14 : MySQL in Depth
Day 15 : PostgreSQL inDepth
Anyways, For Day 15 of 15 days of Advanced SQL, we will cover —
PostgreSQL inDepth
Github for Advanced SQL that you can follow —
All the projects, data structures, algorithms, system design, Data Science and ML, Data Engineering, MLOps and Deep Learning videos will be published on our youtube channel ( just launched).
Subscribe today!
System Design Case Studies — In Depth
Complete Data Structures and Algorithm Series
Github —
Complete System Design Series.
6. Networking, How Browsers work, Content Network Delivery ( CDN)
Github —
Subscribe/ Follow, Like/Clap and Stay Tuned!!
Some of the other best Series —
30 days of Data Structures and Algorithms and System Design Simplified
Data Science and Machine Learning Research ( papers) Simplified **
100 days : Your Data Science and Machine Learning Degree Series with projects
Complete Data Visualization and Pre-processing Series with projects
Exceptional Github Repos — Part 1
Exceptional Github Repos — Part 2
Tech Newsletter —
If you are interested, you can join my newsletter through which I send tech interview tips, techniques, patterns, hacks — Software Development, ML, Data Science, Startups and Technology projects to more than 30K readers. You can subscribe to Tech Brew :
For Python Projects —
For complete 60 days of Data Science and ML : Day 1 — Day 60 : Quick Recap of 60 days of Data Science and ML
Follow for more updates. Stay tuned and keep coding! Disclosure: Some of the links are affiliates.
For other projects, tune to —
Build Machine Learning Pipelines( With Code)
Recurrent Neural Network with Keras
Clustering Geolocation Data in Python using DBSCAN and K-Means
Facial Expression Recognition using Keras
Hyperparameter Tuning with Keras Tuner
Custom Layers in Keras


