
Blazor Server Project #12: Installing ASP.NET Core Identity
An initial guide to security: installing Identity and adding its database to the existing project
Table of Contents
- Introduction
- Downloading and Opening the BookApp Project
- Creating the BookDB Database
- Installing ASP.NET Core Identity ▸ Checking installed packages ▸ Installing Core Identity ▸ Creating the IdentityHostingStartup.cshtml file ▸ Core Identity installation results
- Generating Identity Database ▸ Creating migration ▸ Applying migration
- Summary
- References

This article is the twelfth in a series covering the Blazor Server Project: (1) How to create a CRUD operation using Dapper (2) Building a dropdown list involves a 1:N relationship (3) How to implement a checkbox list involving an M:N relationships (4) Understanding URL routing and navigation (5) Creating and using page layout (6) How to create a reusable modal dialog component (7) Practical guide to making a master-detail page (8) Master-detail page using dynamic query (9) How to avoid SQL injection attacks (10) Hiding/showing HTML elements (11) Migrate to ASP.NET Core 6.0 (12) Installing ASP.NET Core Identity (13) Integrating Identity tables into the existing project database (14) Authentication and authorization (15) Role-based authorization (16) How to implement Google Authentication (17) Facebook Authentication and Authorization (18) How to configure Twitter Authentication (19) How to Customize Password Policy (20) Account Lockout Policy
These articles are for anyone who wants to learn how to build Blazor Server applications in a practical approach through some sample projects. It will be straightforward if you have some experience with C#, HTML, CSS, and SQL.
Introduction
Authentication is one of the most important security aspects of an application. Authentication is the process of verifying the identity of a user, whether or not he is allowed to use the application. Users who are not confirmed are sometimes allowed to use the application on a limited basis.
In the ASP.NET Core Security article, we specified authentication at the beginning when creating a new project.
For now, we do it in an existing project. Before implementing authentication, you must first install ASP.Net Core Identity.
What is ASP.Net Core Identity?
ASP.NET Core Identity: • Is an API that supports user interface (UI) login functionality. • Manages users, passwords, profile data, roles, claims, tokens, email confirmation, and more.
Users can create an account with the login information stored in Identity or they can use an external login provider. Supported external login providers include Facebook, Google, Microsoft Account, and Twitter. (https://docs.microsoft.com/en-us/aspnet/core/security/ authentication/identity)
We will install the ASP.NET Core Identity into the Blazor Server #11 project. The steps are: ⦁ download and open the BookApp project ⦁ create the BookDB database ⦁ install ASP.NET Core Identity ⦁ generate Identity database.
Downloading and Opening the BookApp Project
- Please download the Blazor Server Project #11 via the link below.
- Right-click the file:
BookApp.slnto display the context menu. - To open the project in Visual Studio 2022, select the Open menu.
Creating the BookDB Database
Please read the Blazor Server Project #8 article in detail.
Installing ASP.NET Core Identity
Maybe you want to know the installed packages before and after installing ASP.NET Core Identity.
Checking installed packages
- In the Solution Explorer pane, select BookApp > Dependencies > Packages
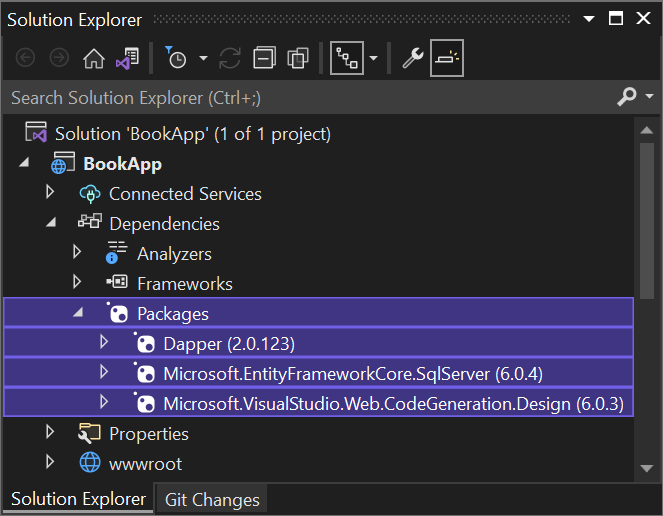
- The
BookApp.csprojfile content shows the installed packages.
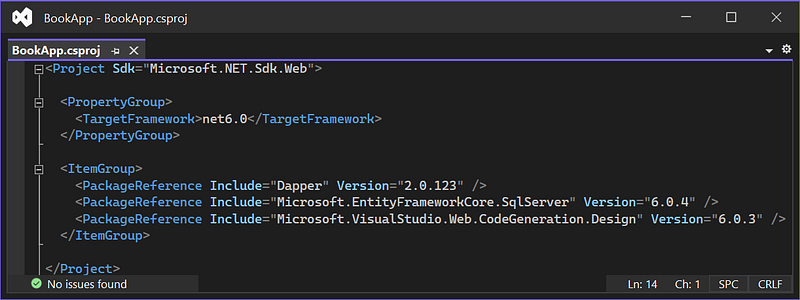
BookApp.csproj file contentInstalling Core Identity
The following is the Solution Explorer pane in Visual Studio.
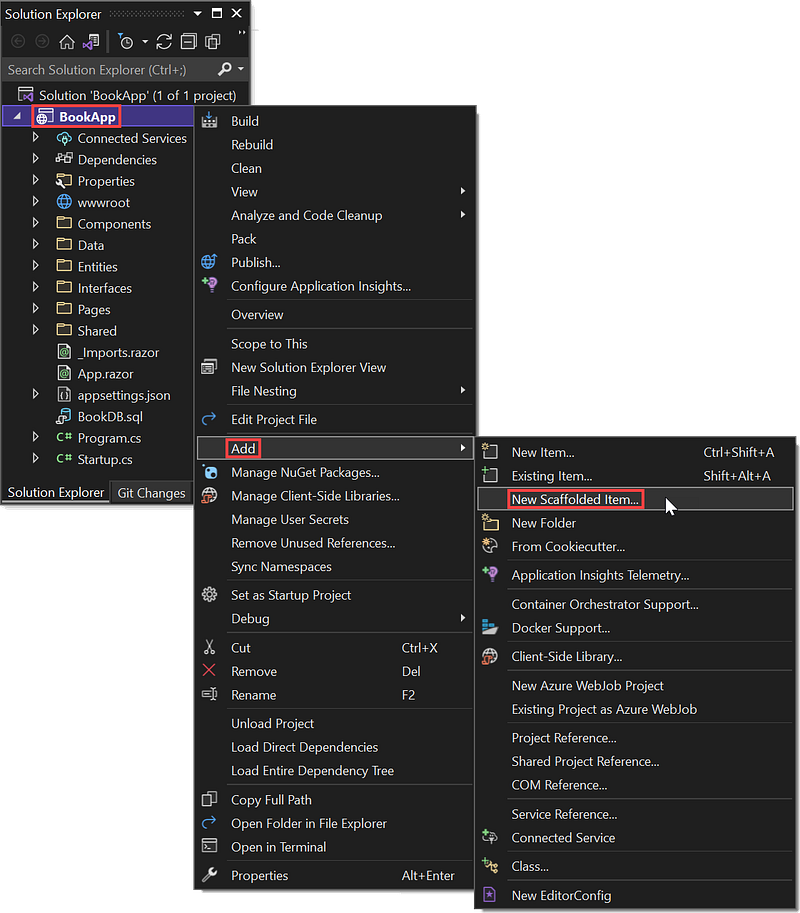
- Right-click the BookApp project in the Solution Explorer pane, then select Add > New Scaffolded Item...
- The dialog below appears.
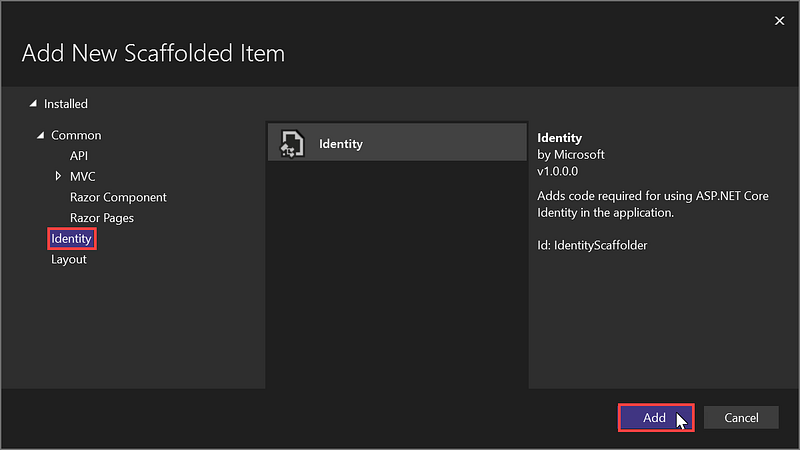
- Select Identity > Add. Scaffolding is in progress.

- Next, the Add Identity dialog appears.
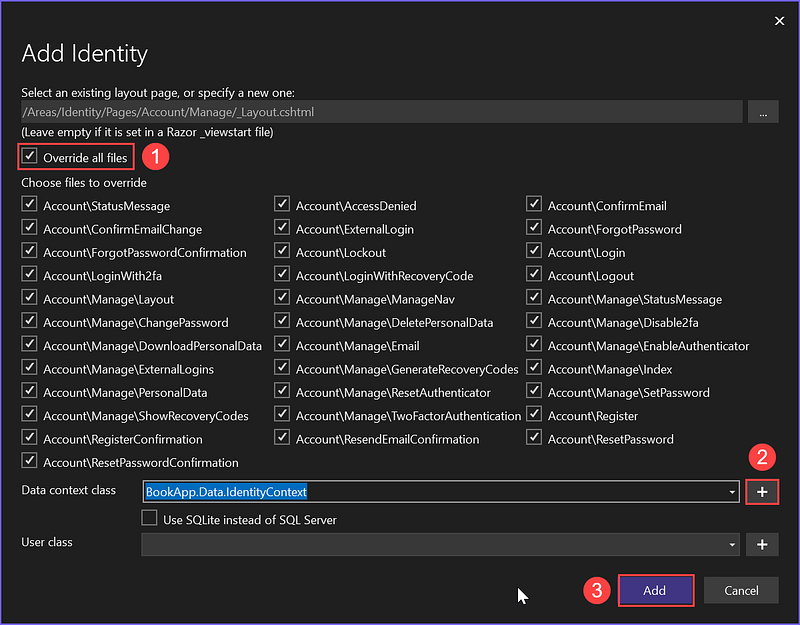
- Select the options you want, for example, Account\Login, Account\Logout, Account\Register. Of course, you can choose all the options by checking the Override all files checkbox.
- Click + button to create a data context class.
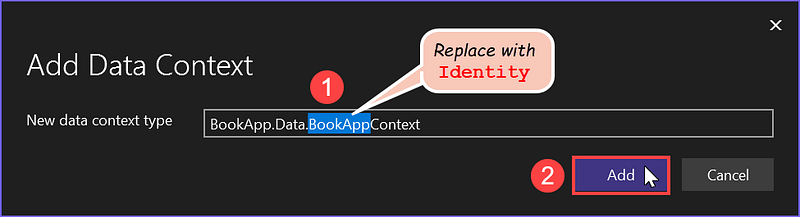
- Instead of using the default
BookAppContextdata context, we useIdentityContext. Click in the textbox, and replaceBookAppwithIdentity. - Click Add button.
- In the Add Identity dialog, click Add button. Scaffolding is in progress.

- Does the following error message appear?
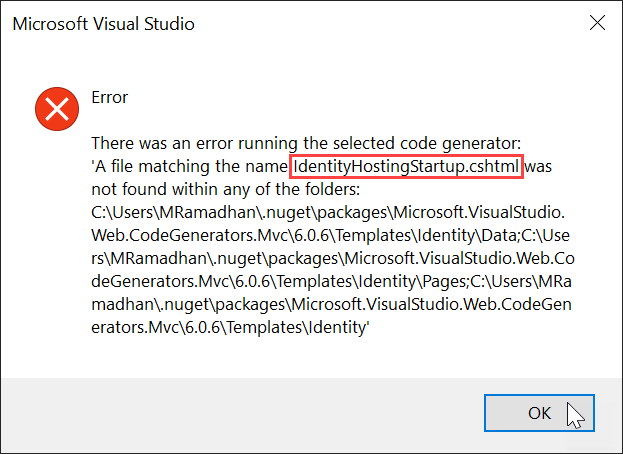
- If it does not, continue to (d).
Creating the IdentityHostingStartup.cshtml file
Create this file to avoid errors. The file contains the following code.
@inherits Microsoft.VisualStudio.Web.CodeGeneration.
Templating.RazorTemplateBase
@using System.Collections.Generic
@using System.Linq
using System;
@{
   var namespaceSet = new HashSet<string>(
      new string[]
      {
         "Microsoft.AspNetCore.Identity",
         "Microsoft.AspNetCore.Identity.UI",
         "Microsoft.AspNetCore.Hosting",
         "Microsoft.EntityFrameworkCore",
         "Microsoft.Extensions.Configuration",
         "Microsoft.Extensions.DependencyInjection",
      });
   var thisNamespace = @Model.Namespace + ".Areas.Identity";
if (!string.IsNullOrEmpty(Model.UserClassNamespace)
&& thisNamespace != Model.UserClassNamespace)
{
namespaceSet.Add(Model.UserClassNamespace);
}
else
{
namespaceSet.Add
("Microsoft.AspNetCore.Identity.EntityFrameworkCore");
}
if (thisNamespace != Model.DbContextNamespace)
{
namespaceSet.Add(Model.DbContextNamespace);
}
foreach(var name in namespaceSet.OrderBy(n => n))
{
@:using @name;
}
}[assembly: HostingStartup(typeof(@(thisNamespace).IdentityHostingStartup))]
namespace @(thisNamespace)
{
public class IdentityHostingStartup : IHostingStartup
{
public void Configure(IWebHostBuilder builder)
{
@{
@: builder.ConfigureServices((context, services) => {if (!Model.IsUsingExistingDbContext)
{
if (Model.UseSQLite)
{
@: services.AddDbContext<@Model.DbContextClass>(options =>
@: options.UseSqlite(
@: context.Configuration.GetConnectionString
("@(Model.DbContextClass)Connection")));
} // End if Model.UseSQLite
else
{
@: services.AddDbContext<@Model.DbContextClass>(options =>
@: options.UseSqlServer(
@: context.Configuration.GetConnectionString
("@(Model.DbContextClass)Connection")));
} // End else
@:@: services.AddDefaultIdentity<@(Model.UserClass)>(options => options.SignIn.RequireConfirmedAccount = true)
@: .AddEntityFrameworkStores<@Model.DbContextClass>();} // End Model.IsUsingExstingDbContext@: });
}
}
}
}- You can also download the code from github.com.
- Save the file with the name
IdentityHostingStartup.cshtmlinto the folder: C:\Users\YourName\.nuget\packages\microsoft.visualstudio.web.codegenerators.mvc\6.0.6\Templates\Identity - Repeat step (b) above to reinstall ASP.NET Core Identity.
Core Identity installation results
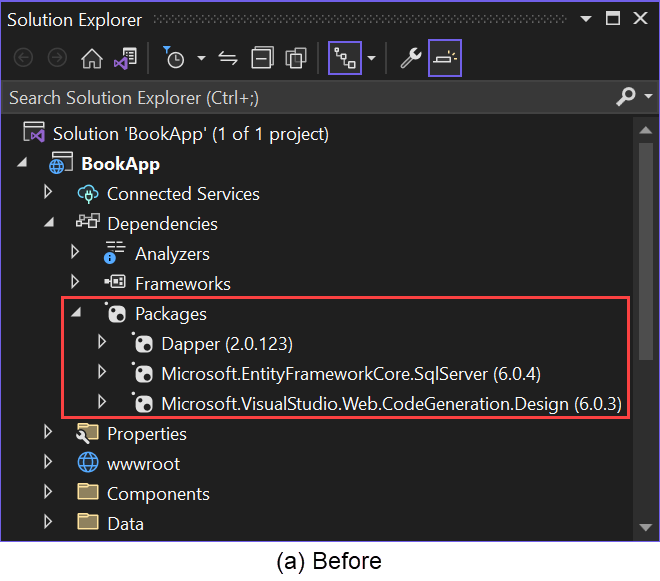
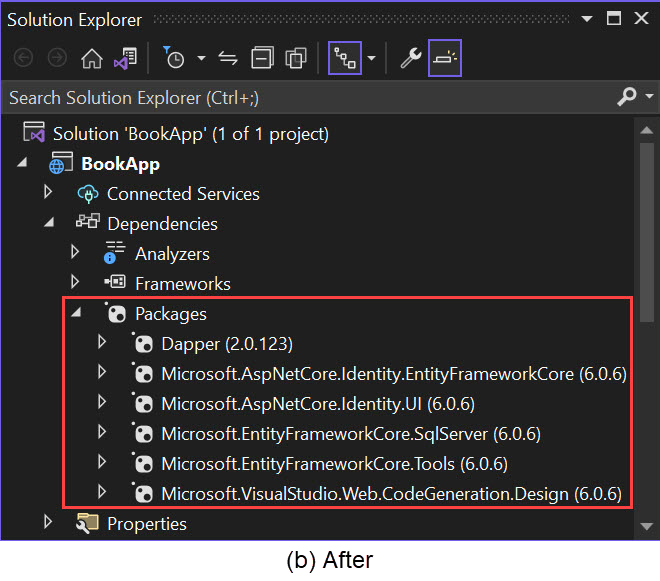
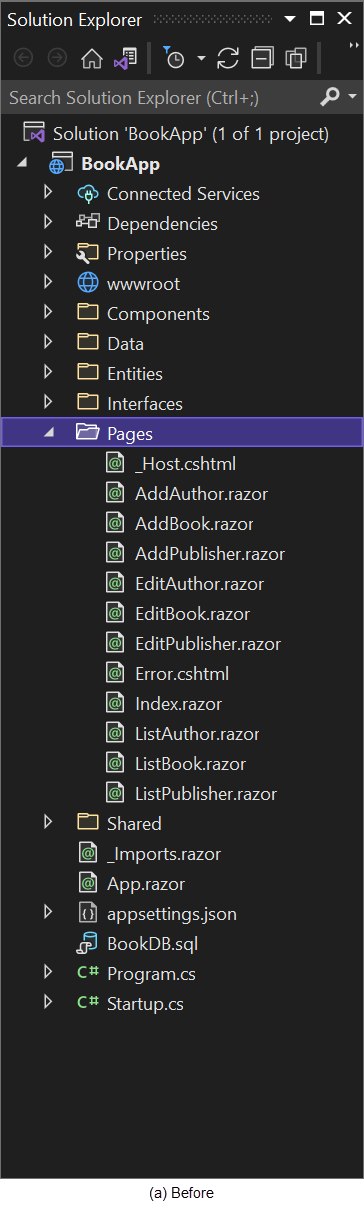
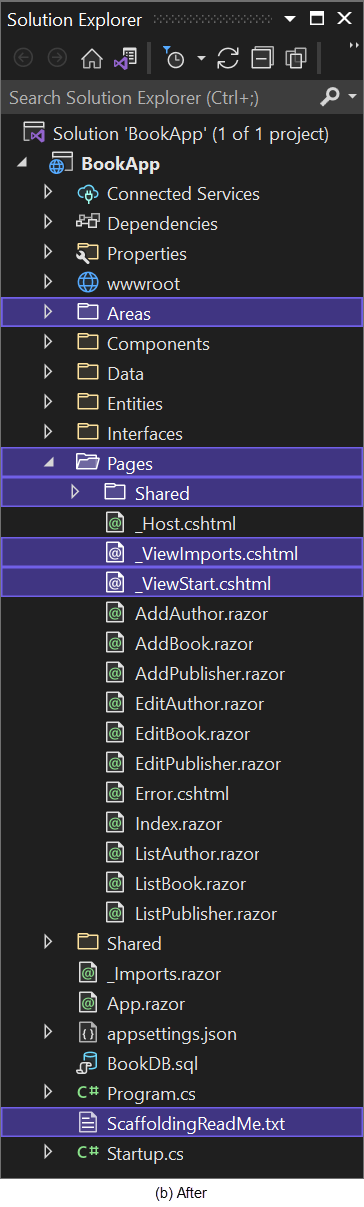
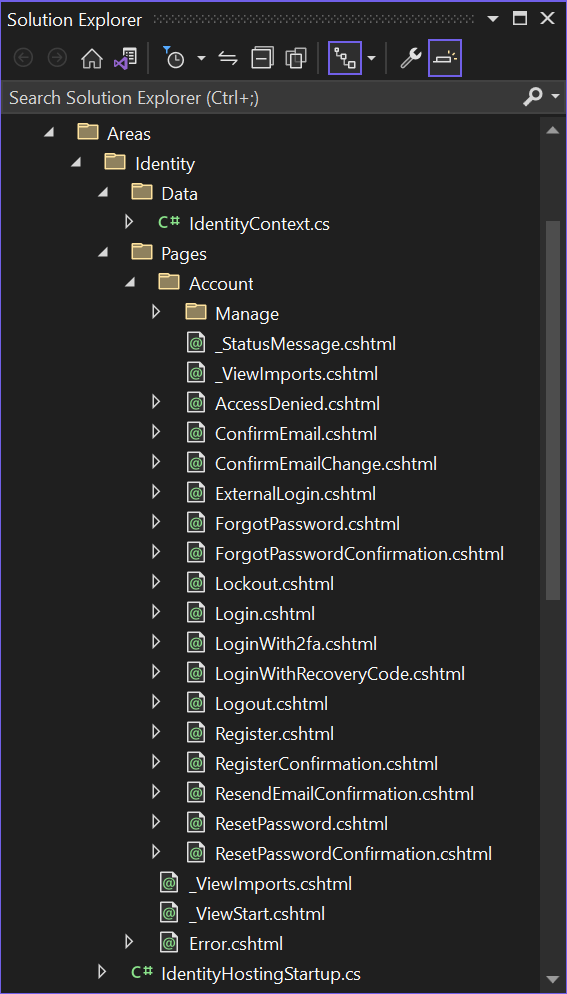
There is the addition of packages, a new folder: Areas, and files after installing Identity. See Figures 10, 11, and 12.
Packages
Folders and files
Folders and files in the Areas folder
Now, the project has additions:
- some files, such as
IdentityHostingStartup.cs,ScaffoldingReadMe.txt, etc. - Razor pages in the
Areas.Identity.Data.Pagesfolder - data context,
IdentityContext, in theAreas.Identity.Datafolder - connection string,
"IdentityContextConnection", inappsettings.jsonfile as shown in bold below.
appsettings.json
{
  "ConnectionStrings": {
    "DefaultConnection": "Data Source=PRIMARY-PC;Initial Catalog=BookDB;Integrated Security=True;Connect Timeout=30;Encrypt=False;TrustServerCertificate=False;ApplicationIntent=ReadWrite;MultiSubnetFailover=False",
    "IdentityContextConnection": "Server=(localdb)\\mssqllocaldb;Database=BookApp;Trusted_Connection=True;MultipleActiveResultSets=true"
  },
  "Logging": {
    "LogLevel": {
      "Default": "Information",
      "Microsoft": "Warning",
      "Microsoft.Hosting.Lifetime": "Information"
    }
  },
  "AllowedHosts": "*"
}
Generating Identity Database
By default, the identity database name is BookApp as specified in the connection string in the appsetting.json file.
"IdentityContextConnection": "Server=(localdb)\\mssqllocaldb;Database=BookApp;Trusted_Connection=True;MultipleActiveResultSets=true"- You can rename it, for example, to
IdentityDB.
"IdentityContextConnection": "Server=(localdb)\\mssqllocaldb;Database=IdentityDB;Trusted_Connection=True;MultipleActiveResultSets=true"The steps to generate the identity database are creating and applying migration.
Creating migration
Opening the Package Manager Console.
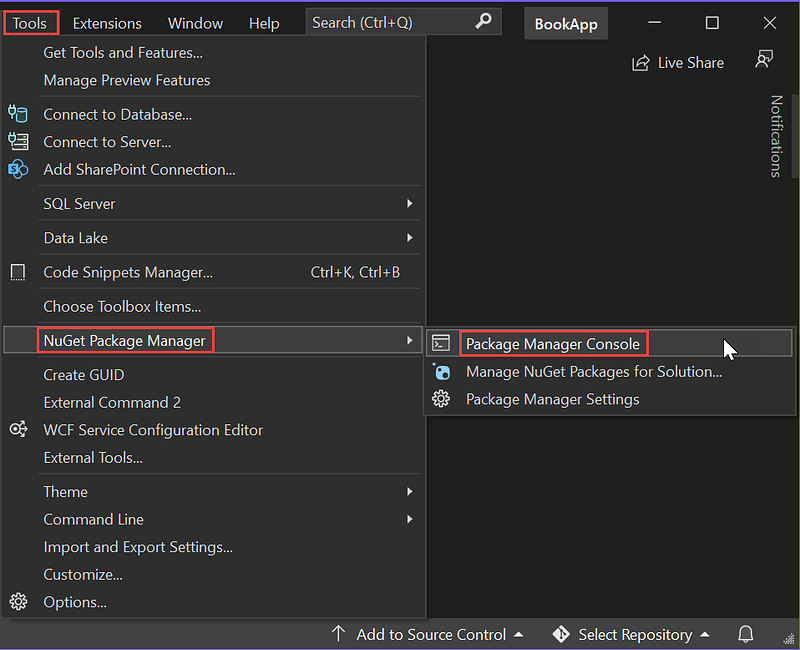
- Select menu: Tools > NuGet Package Manager > Package Manager Console.
- Type
Add-Migration CreateIdentitySchema⏎ - The following error message appears.
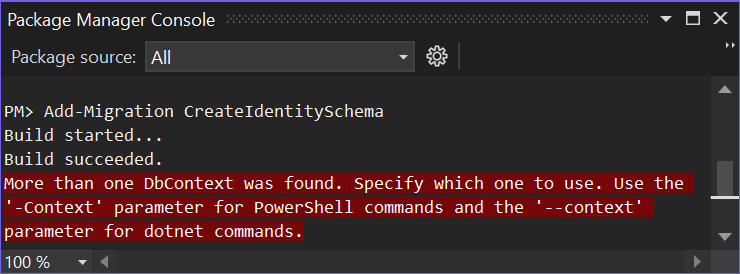
- The project has two DbContexts: IdentityContext and AppContext.
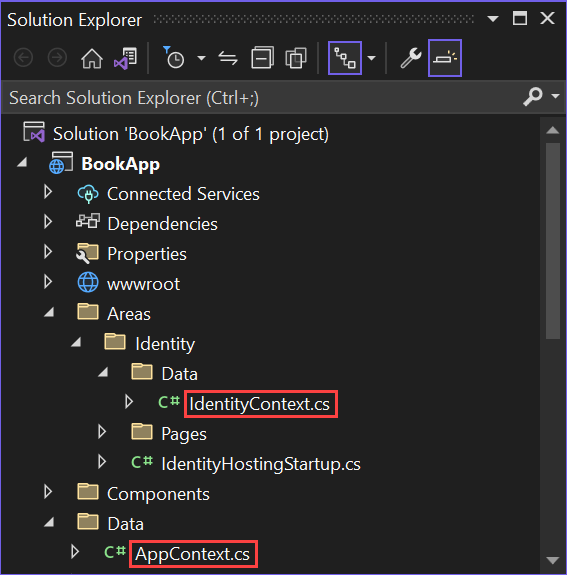
- Every DbContext has its migrations. So we must specify which one to use.
- Creating migration to generate the Identity database uses IdentityContext. in the Package Manager Console, retype:
Add-Migration CreateIdentitySchema -Context IdentityContext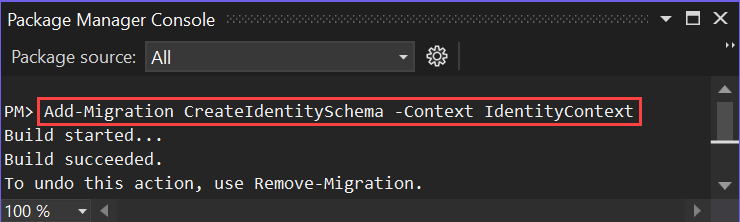
- Creating migration succeeds.
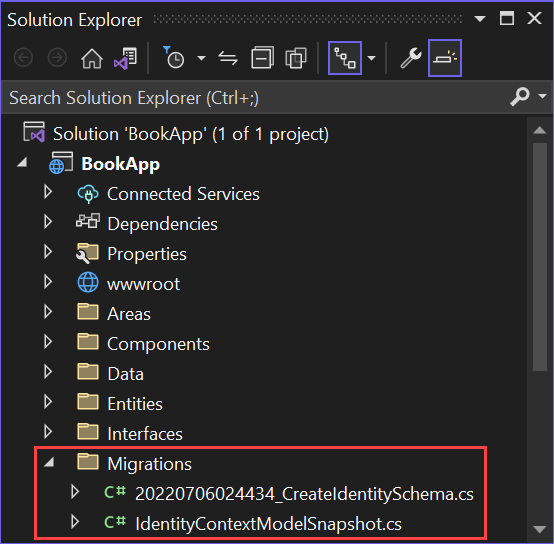
The results are in two files.
20220706024434_CreateIdentitySchema.cs. The file name follows the datetime_MigrationName.cs format.IdentityContextModelSnapshot.cs. The file name corresponds to the DBContextName.ModelSnapshot.cs format.
Applying migration
- Applying migration based on IdentityContext, so in the Package Manager Console, type the following command:
Update-Database CreateIdentitySchema -Context IdentityContext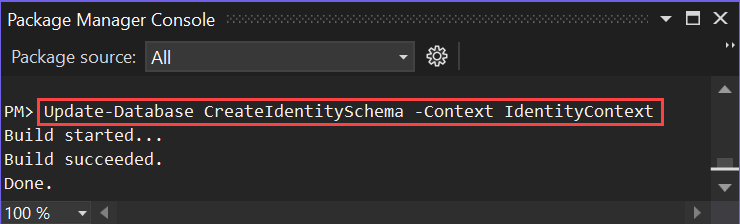
- The results are seven identity tables and one migrations history in the IdentityDB database.
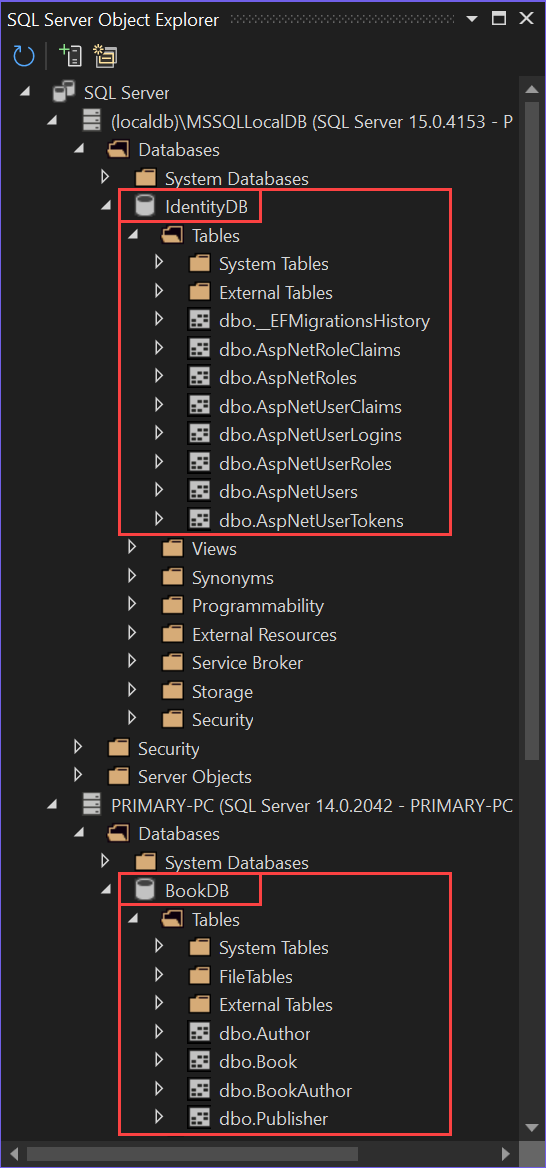
- Now the project has two databases,
BookDBandIdentityDB.
Summary
To secure your existing Blazor project, you must first install ASP.Net Core Identity. The installation updates and adds some packages and files. By default, it generates a separate identity database from the existing project database.
The next article will cover how to integrate identity tables into the database of the existing project. So, the project has only one database, one DbContext, and one connection.
Thanks for reading. Your feedback will be precious.


