
Blazor Server Project #4: Understanding URL Routing and Navigation
Four ways to navigate between different components.
This article is the fourth in a series covering the Blazor Server Project: (1) How to create a CRUD operation using Dapper (2) Building a dropdown list involves a 1:N relationship (3) How to implement a checkbox list involving an M:N relationships (4) Understanding URL routing and navigation (5) Creating and using page layout (6) How to create a reusable modal dialog component (7) Practical guide to making a master-detail page (8) Master-Detail Page Using Dynamic Query (9) How to avoid SQL injection attacks (10) Hiding/showing HTML elements (11) Migrate to ASP.NET Core 6.0 (12) Installing ASP.NET Core Identity (13) Integrating Identity tables into the existing project database (14) Authentication and authorization (15) Role-based authorization (16) How to implement Google Authentication (17) Facebook Authentication and Authorization (18) How to configure Twitter Authentication (19) How to Customize Password Policy (20) Account Lockout Policy
These articles are for anyone who wants to learn how to build Blazor Server applications in a practical approach through some sample projects. It will be straightforward if you have some experience with C#, HTML, CSS, and SQL.
Introduction
Blazor Server and Blazor WebAssembly support URL routing so users can navigate to select the component to be shown on screen. URL routing allows you to configure an application to accept request URLs that do not map to physical files but use a semantically meaningful route.
What is a URL? URL stands for Uniform Resource Locator. A URL is nothing more than the address of a given unique resource on the Web. In theory, each valid URL points to a unique resource. Such resources can be an HTML page, a CSS document, an image, etc. (https://developer.mozilla.org/en-US/docs/Learn/Common_questions/What_is_a_URL)
This article shows you how to: • define routes • navigate between different components • use parameters in routes • create dynamic navigation
All of the following reviews base on the application built in the previous article, Blazor Server Project #3. Please download the source code via the link below.
Route Templates
When you create a Blazor Server project, the router is automatically installed. The Router component with two templates is inside the App.razor file.
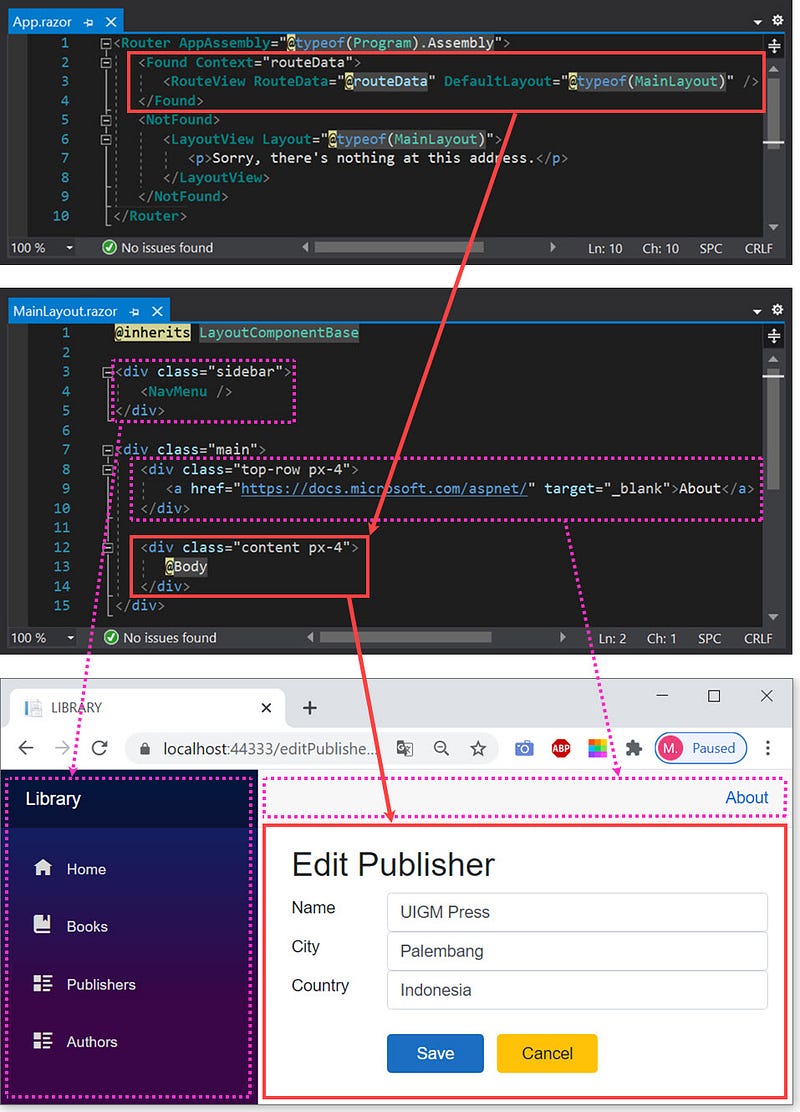
App.razor
<Router AppAssembly="@typeof(Program).Assembly">
   <Found Context="routeData">
      <RouteView RouteData="@routeData"
                 DefaultLayout="@typeof(MainLayout)" />
   </Found>
   <NotFound>
      <LayoutView Layout="@typeof(MainLayout)">
         <p>Sorry, there's nothing at this address.</p>
      </LayoutView>
   </NotFound>
</Router>
Both templates use @Body element inside the MainLayout.razor component.
MainLayout.razor
@inherits LayoutComponentBase<div class="sidebar">
<NavMenu />
</div><div class="main">
<div class="top-row px-4">
<a href="https://docs.microsoft.com/aspnet/"
target="_blank">About</a>
</div> <div class="content px-4">
@Body
</div>
</div>In the Found template, the RouteView component is responsible for displaying the component matched by the current route. For example, the current route — /editPublisher — matches the editPublisher.razor component. The RouteView component in the Found template uses the @Body in the MainLayout.razor component to specify the location in the layout markup where the content is rendered. The figure below shows it.
Found templateThe NotFound template displays a message when no component can be found for the current route. Let’s look at the following figure.

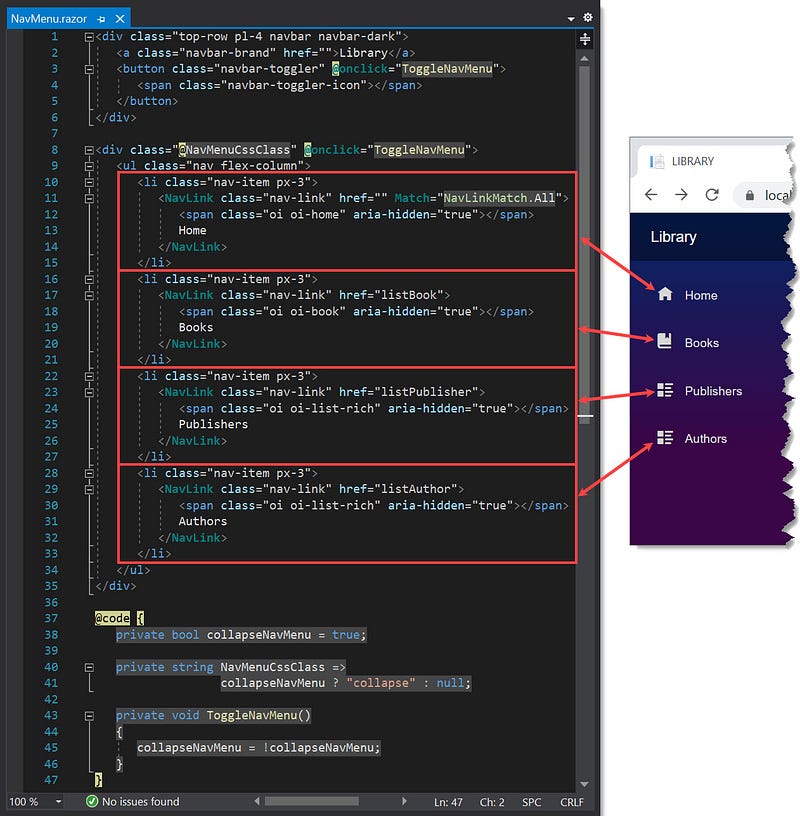
NotFound templateThe NavMenu Component
Open the BookApp solution explorer. This component exists in the Shared folder. It contains the links to navigate between components.
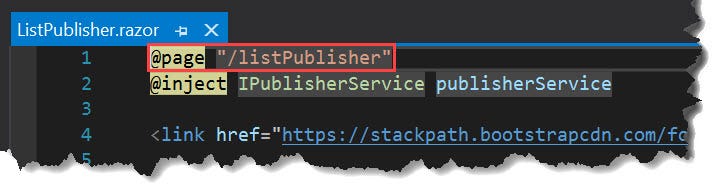
Defining Routes
Each page component must have at least one route, so users can navigate to select the component to be shown on screen. Use the @page directive to define it. Here’s an example of defining /listPublisher as the route for the ListPublisher.razor component.
Default Component Route
- Open the BookApp application.
- The application displays the
Index.razorcomponent as the homepage in which the route is/.

The content of Index.razor file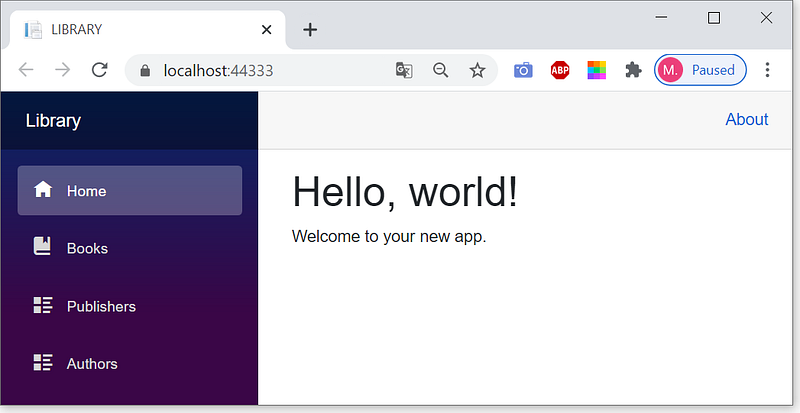
- The
/route is the starting point for any Blazor application; as soon as the application starts, it displays the page component in which the route is/.
Routed Components Navigation
There are four options to navigate between different components.
(1) using an URL text
(2) using the NavLink component
(3) using a standard anchor element
(4) using NavigateTo method.
(1) Navigating using an URL text
- Open the BookApp application.
- Type an URL text in the address bar, for example,
localhost:44333/addBookto display a page for adding new book data.

(2) Navigating using the NavLink component
Instead of typing an URL, it’s easier to use the NavLink components inside NavMenu.razor.
Displaying List of Books
- Click the
Booksmenu to display the list of books. - The figure below shows navigating using the
NavLinkcomponent and its route.

(3) Navigating using an anchor
Displaying the page for editing data of a book
- On the page of the book list, click the
Editbutton. - The figure below shows navigating using the anchor,
href='/editBook/@book.ISBN'that rendersEditBook.razorcomponent.

(4) Navigating using NavigateTo method
Back to booklist page from the edit book page (EditBook.razor)
- When a user clicks the
Cancelbutton on theEdit Bookpage, the application calls theCancel()method at line 154 in theEditBook.razorfile and runs the statement:navigationManager.NavigateTo("/listBook") - The
EditBook.razorfile needs an instance of the NavigationManager class through dependency injection at line 5.
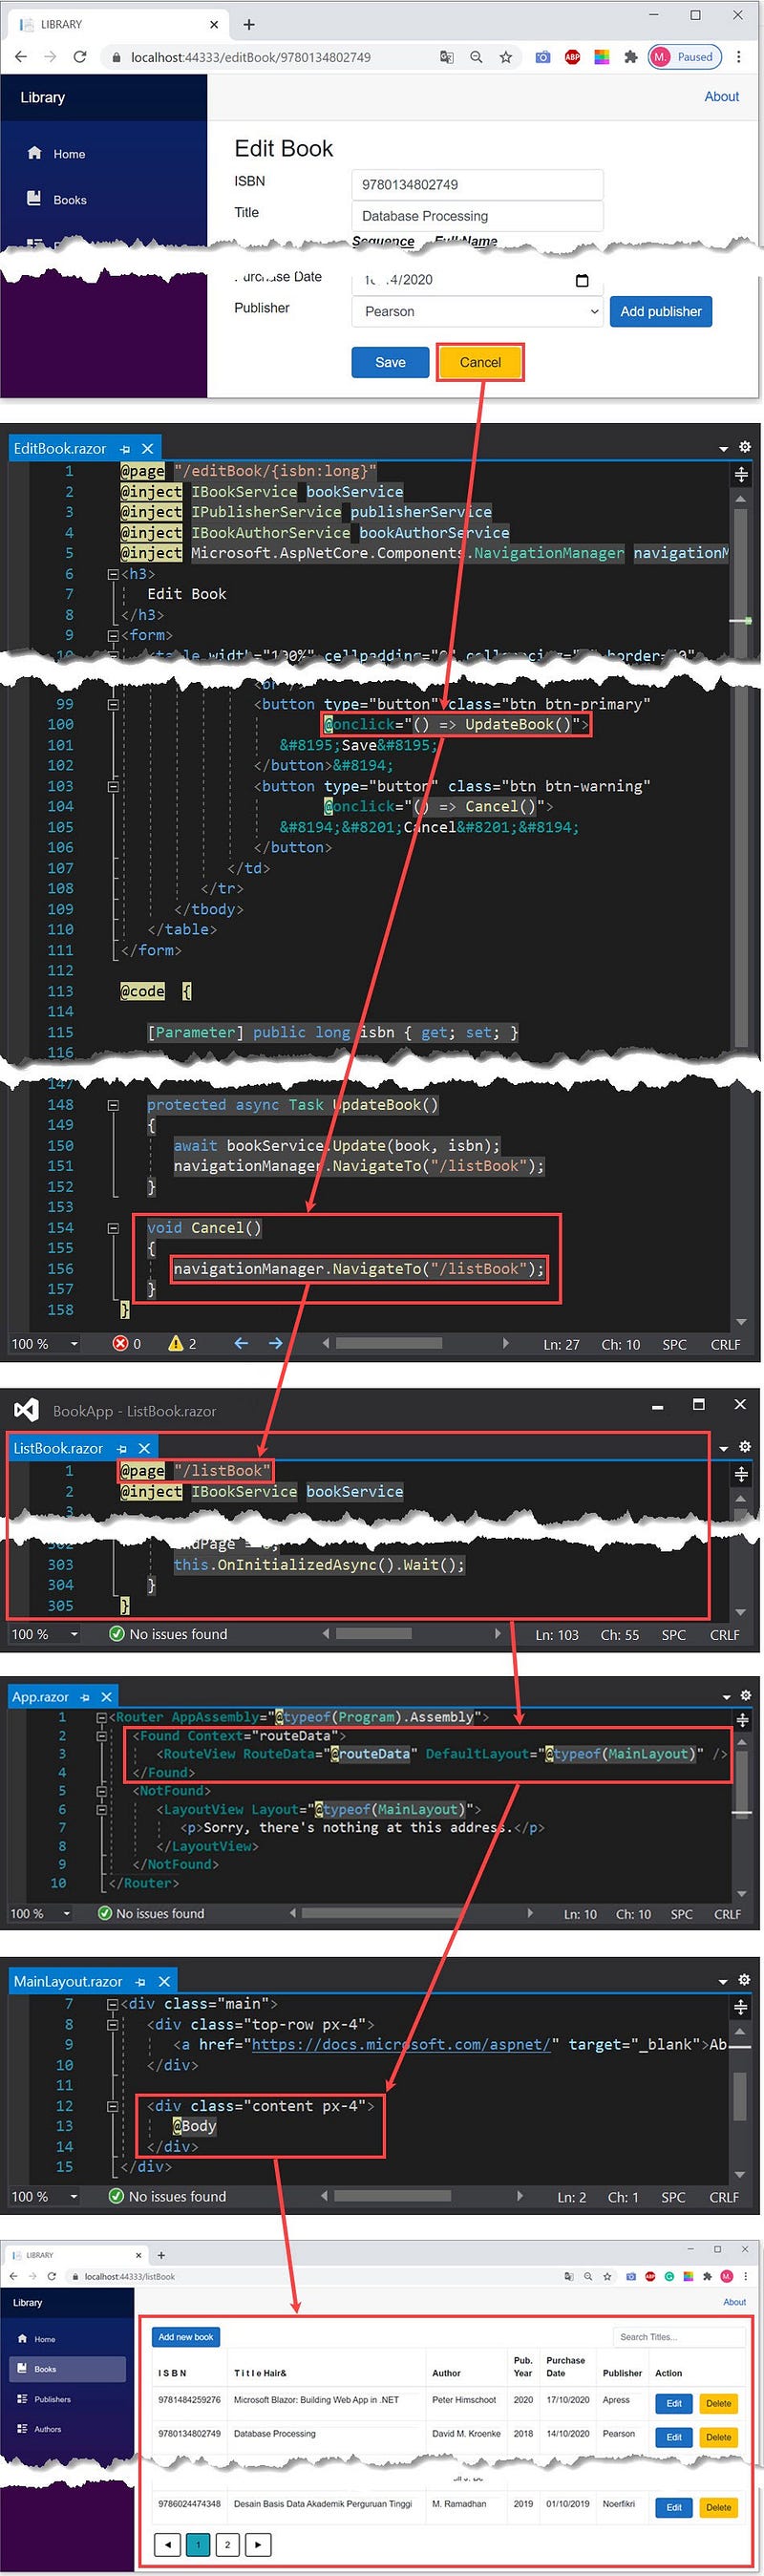
NavigateTo methodParameterized Route
You could pass parameters in the route to display a page component with different data dynamically. For example, suppose a user needs to edit book data. The question is, which book? It must base on theISBN primary key value. You have to define the route with the isbn parameter on the first line in the EditBook.razor component file.
@page "/editBook/{isbn:long}"The isbn is a formal parameter, its type is long. Next, create a property in the @code section with the following statement.
[Parameter] public long isbn { get; set; }The contents of the EditBook.razor file are as follows.
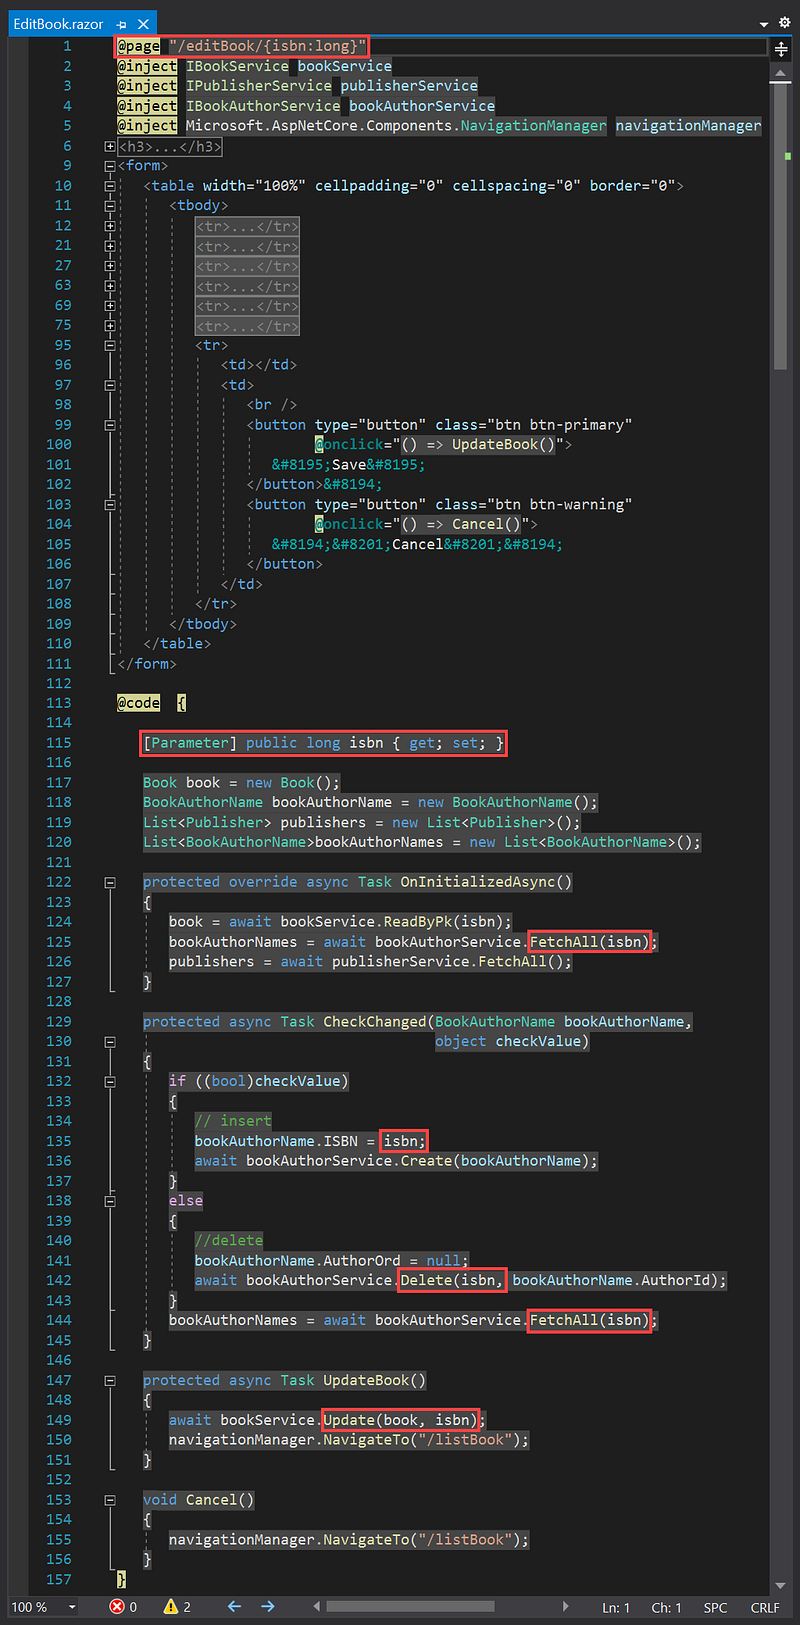
Pay attention to the @code section. All methods use the isbn parameter, except the Cancel(),
Let’s see Figure 9. When a user clicks the Edit button on the list of books, the href = '/editBook/@book.ISBN' anchor at line 103 navigates the EditBook.razor component. The value of the @book.ISBN actual parameter is the ISBN value of the selected book, which is 9780134802749. Thus the route is /editBook/9780134802749.
Parameter Data Types
The default data type of a parameter is a string. If you use the others, you must explicitly write the data type. Let’s look at the following table.
Data Type          Example
bool               {isActive:bool}}
datetime           {dob:datetime}
decimal            {gpa:decimal}
double             {height:double}
float              {weight:float}
guid               {id:guid}
int                {id:int}
long               {isbn:long}
Dynamic Navigation
Let’s look at the figure below.

You can navigate to the AddPublisher.razor via one of the two components, EditBook.razor or ListPublisher.razor. When you click the Save button or Cancel button, the application should be able to return to the previous component, EditBook.razor or ListPublisher.razor.
The route of AddPublisher.razor component is /addPublisher/{isbnDummy:long}. The component needs the {isbnDummy:long} parameter to handle both conditions.
if (isbnDummy > 0)
   navigationManager.NavigateTo("/editBook/" + isbnDummy);
else
   navigationManager.NavigateTo("/listPublisher");
When a user clicks the Add publisher button on the EditBook.razor component, the anchor:
href='/addPublisher/@book.ISBN'at line 92 navigates to the AddPublisher.razor component with the value of @book.ISBN>0. So, when the user clicks the Save or Cancel button, navigation returns to EditBook.razor component.
When a user clicks the Add new publisher button on the ListPublisher.razor component, the anchor:
href='/addPublisher/0at line 26 navigates to the AddPublisher.razor component with the value of the parameter is zero. Thus, when the user clicks the Save or Cancel button, navigation returns to ListPublisher.razor component.


