
Blazor Server Project #14: Authentication and Authorization
An essential guide to security: enabling authentication, applying authorization, and utilizing Razor pages for registration, login, and logout
Table of Contents
- Overview
- Opening the BookApp Project
- Enabling Authentication
- Applying Authorization ▸ Menu authorization ▸ Element authorization ▸ Page authorization
- Testing Authorization ▸ Create a new account ▸ Login ▸ Logout
- Utilizing Razor Pages ▸ Creating LoginDisplay.razor ▸ Modifying MainLayout.razor ▸ Modifying Logout.razor file
- Summary
- References
Table of Code Listings
Listing 1 BookApp\Startup.cs Listing 2 BookApp\App.razor Listing 3 BookApp\Shared\NavMenu.razor Listing 4 BookApp\Pages\ListPublisher.razor Listing 5 BookApp\Pages\ListAuthor.razor Listing 6 BookApp\Shared\LoginDisplay.razor Listing 7 BookApp\Shared\MainLayout.razor Listing 8 BookApp\Areas\Identity\Pages\Account\Logout.cshtml

This article is the fourteenth in a series covering the Blazor Server Project: (1) How to create a CRUD operation using Dapper (2) Building a dropdown list involves a 1:N relationship (3) How to implement a checkbox list involving an M:N relationships (4) Understanding URL routing and navigation (5) Creating and using page layout (6) How to create a reusable modal dialog component (7) Practical guide to making a master-detail page (8) Master-detail page using dynamic query (9) How to avoid SQL injection attacks (10) Hiding/showing HTML elements (11) Migrate to ASP.NET Core 6.0 (12) Installing ASP.NET Core Identity (13) Integrating Identity tables into the existing project database (14) Authentication and authorization (15) Role-based authorization (16) How to implement Google Authentication (17) Facebook Authentication and Authorization (18) How to configure Twitter Authentication (19) How to Customize Password Policy (20) Account Lockout Policy
These articles are for anyone who wants to learn how to build Blazor Server applications in a practical approach through some sample projects. It will be straightforward if you have some experience with C#, HTML, CSS, and SQL.
Overview
In the Blazor Server Project #12 and #13, we’ve installed ASP.NET Core Identity and generated its database. Now is the time to authenticate and authorize the user.
Authentication is the process of verifying the Identity of a user, whether or not he is allowed to use the application. Users who are not confirmed are sometimes allowed to use the application on a limited basis. There are various ways of authentication. The most common for applications is checking the username and password. Another example is using fingerprints on smartphones or pin codes when using a debit card at an ATM.
When a user opens a website that requires authentication for the first time, he will register on that website. All relevant information, such as usernames, passwords, emails, etc., will be stored in the database. When users enter their names and passwords, the website will check the data in the database. If the data matches the database, the user is valid and authenticated. If the user enters a name or password that does not match the database, the login page will respond, for example, giving the message “Invalid login attempt.”
Authorization is done after authentication. Authorization checks the user’s access rights to the resource whether (a) a user is authenticated, (b) a user is in a role, (c) a user has a claim, or (d) a policy is satisfied. For now, we will apply simple authorization based on authenticated users only.
Opening the BookApp Project
- This article is a continuation of the Blazor Server Project #13.
- Open the project in Visual Studio 2022.
Before applying authorization, we must enable authentication first. Then we utilize the installed Razor pages to simplify security and user account management, such as registering, logging in, and logging out.
Enabling Authentication
To enable authentication, we modify the code in the files Startup.cs
and App.razor. The texts in bold are the added/modified code.
Listing 1 BookApp\Startup.cs
...
      app.UseHttpsRedirection();
app.UseStaticFiles(); app.UseRouting(); app.UseAuthentication();
app.UseAuthorization(); app.UseEndpoints(endpoints =>
{
endpoints.MapControllers();
endpoints.MapBlazorHub();
endpoints.MapFallbackToPage("/_Host");
});
...Listing 2 BookApp\App.razor
<CascadingAuthenticationState>
   <Router AppAssembly="@typeof(Program).Assembly">
      <Found Context="routeData">
         <AuthorizeRouteView RouteData="@routeData"
         DefaultLayout="@typeof(MainLayout)" />
      </Found>
      <NotFound>
         <LayoutView Layout="@typeof(MainLayout)">
            <p>Sorry, there's nothing at this address.</p>
         </LayoutView>
      </NotFound>
   </Router>
</CascadingAuthenticationState>
Applying Authorization
Start the project without debugging by pressing Ctrl + F5. Try clicking the Home, Books, Publishers, or Authors menu item. It turns out that even without logging in, we can access all the pages. Of course, the project has not yet applied for authorization.
We will apply simple authorization to show the user interface content depending on whether the user is authenticated. We only need to display data for the user and don’t need to use the user’s Identity in procedural logic.
Menu authorization
A simple way to restrict page access is by menu authorization. Determine what menu items are displayed only for authenticated users and what menu items are for all users.
The following modified navMenu.razor displays the Authors menu item only for authenticated users; meanwhile, the others are for the public.
Listing 3 BookApp\Shared\NavMenu.razor
...
   <li class="nav-item px-3">
      <NavLink class="nav-link" href="listPublisher">
         <span class="oi oi-list-rich" aria-hidden="true">
         </span>Publishers
      </NavLink>
      </li>
   <AuthorizeView>
      <li class="nav-item px-3">
         <NavLink class="nav-link" href="listAuthor">
            <span class="oi oi-people" aria-hidden="true">
            </span>Authors
         </NavLink>
      </li>
   </AuthorizeView>
...
Markup in the AuthorizedView block is executed only if the user is authenticated.
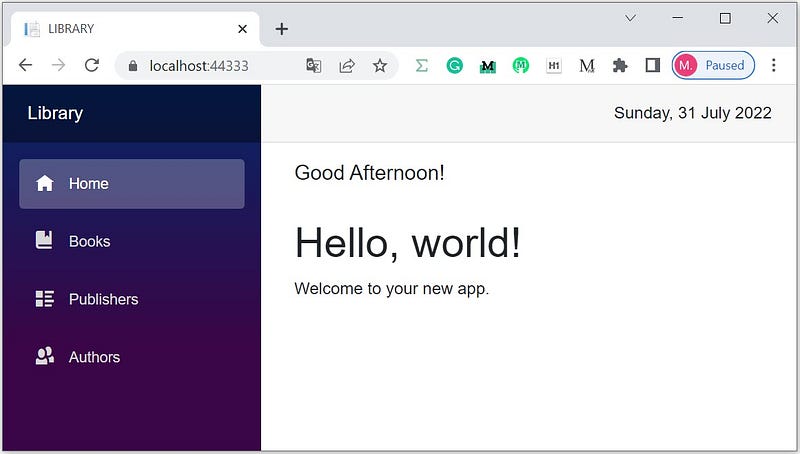
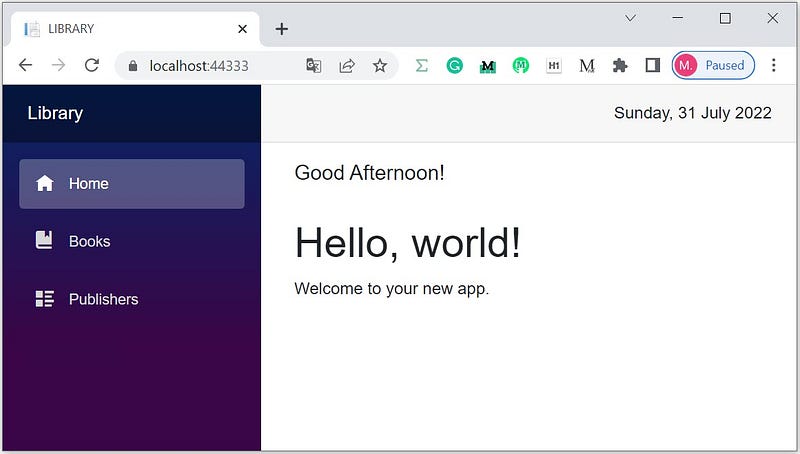
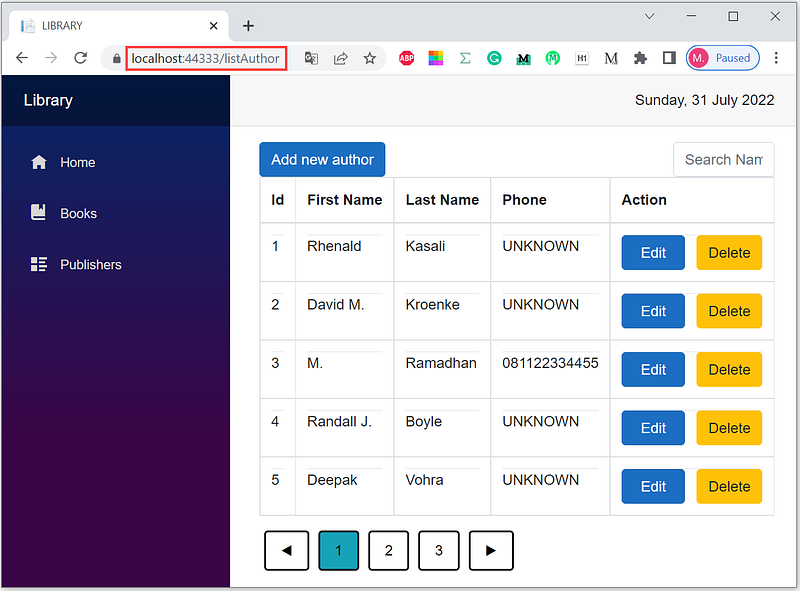
Using AuthorizeView in the navMenu only hides menu items but can’t prevent users from navigating the page. In this case, you can navigate to the Authors page by typing https://localhost:44333/listAuthor in the address bar.
Element authorization
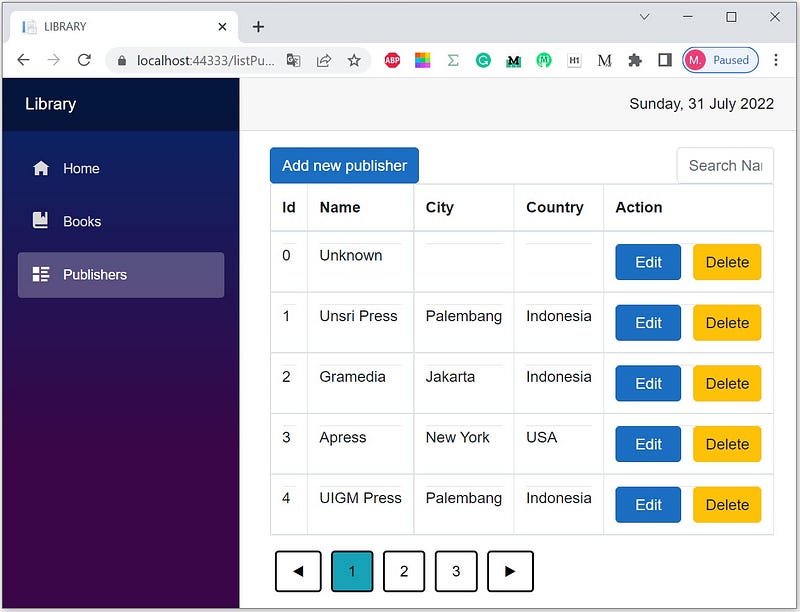
The AuthorizeView component can also restrict access to elements of a page. Determine what elements are displayed only for authenticated users and what elements are for all users.
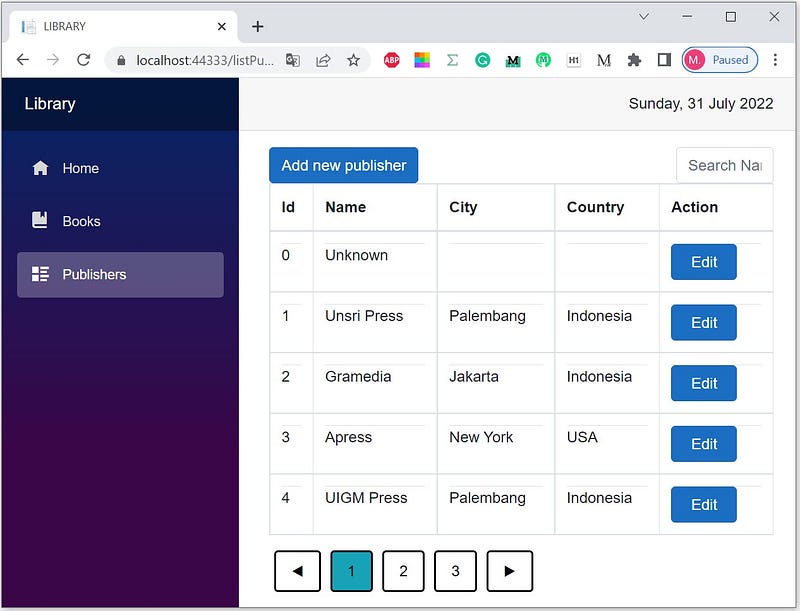
For example, only authenticated users are allowed to delete publishers. To apply it, we modify the code in the ListPublisher.razor file. The texts in bold are the added code.
Listing 4 BookApp\Pages\ListPublisher.razor
...
<tr>
...
<td>
<hr style="padding:0px; margin:0px;">
<a class="btn btn-primary"
href='/editPublisher/@publisher.Id'>
 Edit 
</a> 
<AuthorizeView>
<a class="btn btn-warning" @onclick="() =>
OpenDialog(publisher.Id,publisher.Name)">Delete</a>
</AuthorizeView>
</td>
</tr>
...
Page authorization
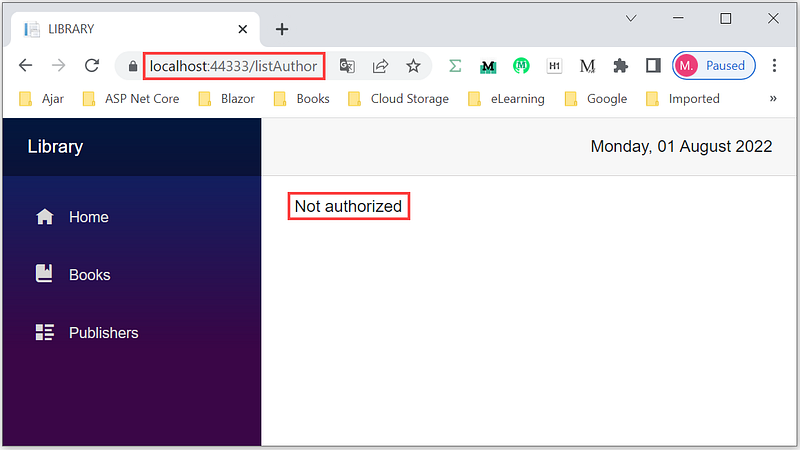
Figure 2 shows that we can bypass the menu authorization to navigate the Authors page via the address bar. Use the [Authorize] attribute to restrict unauthorized users from navigating through it. Modify the code in the ListAuthor.razor file by adding @attribute [Authorize] to it.
Listing 5 BookApp\Pages\ListAuthor.razor
@page "/listAuthor"
@attribute [Authorize]
...
Now, if you retry navigating to the Authors page, the following message appears.
Testing Authorization
Create a new account
- Before logging in for the first time, you must register first. Type
https://localhost:44333/Identity/Account/Registerin the address bar.
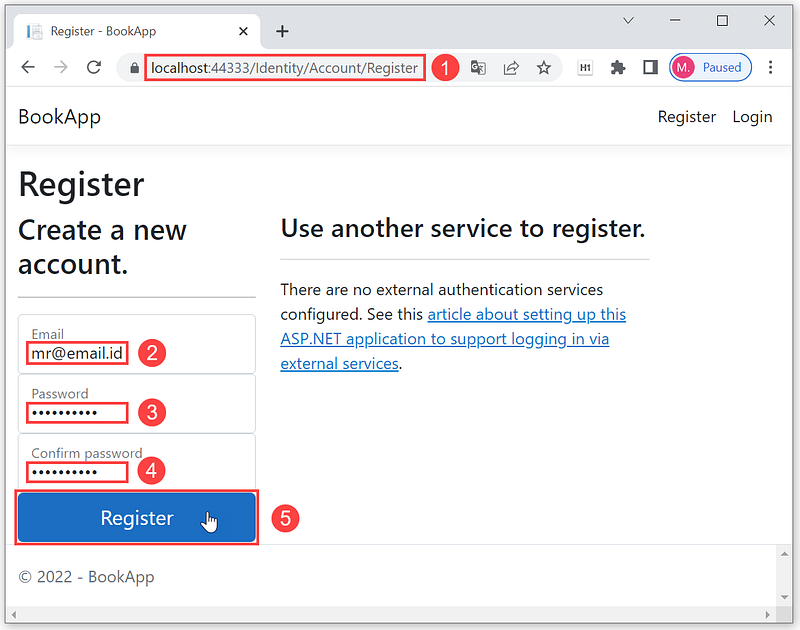
- Enter your email and password.
- After confirming the password, click the Register button.
- The following Register confirmation page appears.
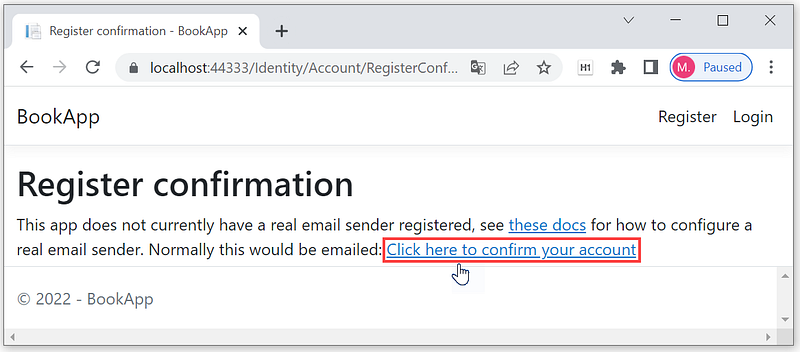
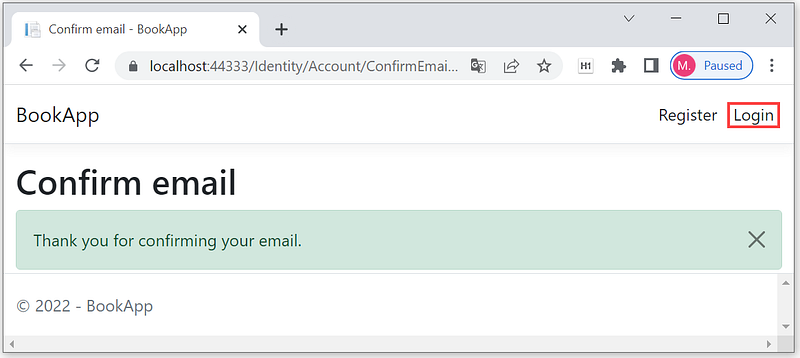
- Confirm your account.
Login
- On the Confirm email page, click login.
- The following Login page appears.
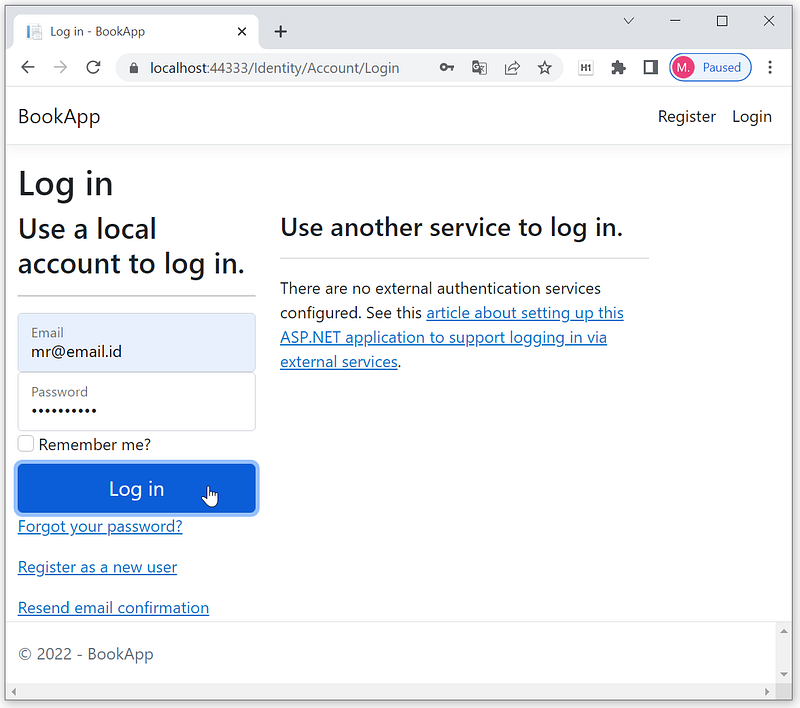
- If you enter an incorrect email or password, Invalid login attempt error message appears.
- Conversely, the user is authenticated, and the homepage appears and displays all menu items.
Logout
- Type
https://localhost:44333/Identity/Account/Logoutin the address bar.
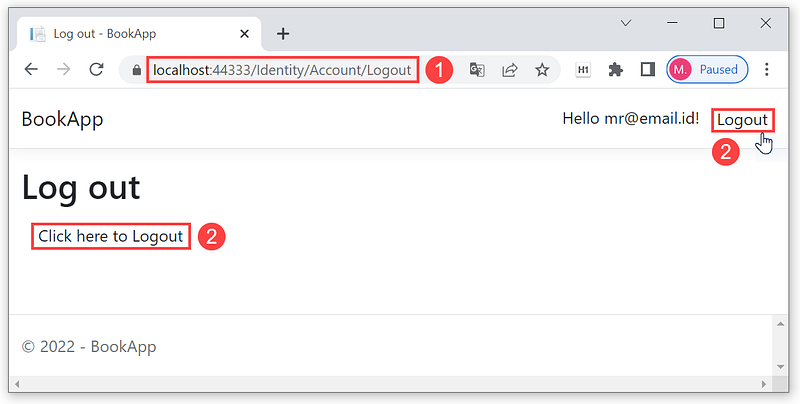
- Click Logout or Click here to Logout.
Utilizing Razor Pages
It’s very inefficient to register, log in, and log out; the user has to type the URL in the address bar. You can use the UI by utilizing the installed Razor pages by:
⦁ Creating a new component: LoginDisplay.razor file
⦁ Modifying the MainLayout.razor file
⦁ Modifying the Logout.razor file.
Creating LoginDisplay.razor
Listing 6 BookApp\Shared\LoginDisplay.razor
<AuthorizeView>
   <Authorized>
      <a href="Identity/Account/Manage">
      <form method="post" action="Identity/Account/LogOut">
         <button type="submit"
         class="nav-link btn btn-link">Log out</button>
      </form>
   </Authorized>
   <NotAuthorized>
      <a href="Identity/Account/Register">Register</a>
      <a href="Identity/Account/Login">Login</a>
   </NotAuthorized>
</AuthorizeView>
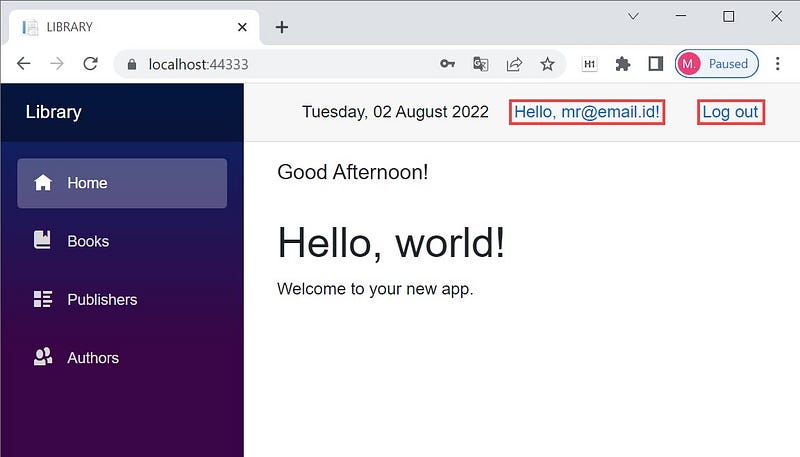
If the user is authenticated, markup in the Authorized block is executed. The user may log out or manage the account. Conversely, if the user is not authenticated, the markup in the NotAuthorized block is executed. The user may log in or register.
Modifying MainLayout.razor
Listing 7 BookApp\Shared\MainLayout.razor
@inherits LayoutComponentBase<div class="sidebar">
<NavMenu />
</div><div class="main">
<div class="top-row px-4">
<a>@today.ToString("dddd, dd MMMM yyyy")</a>
<LoginDisplay />
</div> <div class="content px-4">
@Body
</div>
</div>@code {
DateTime today = DateTime.Today;
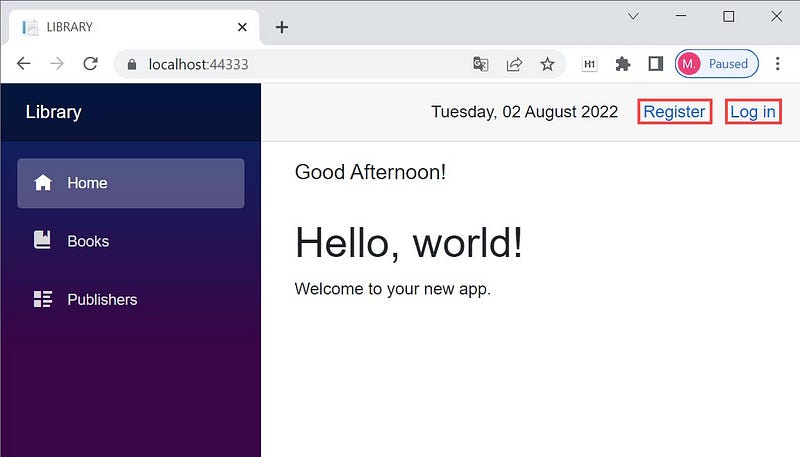
}By inserting <LoginDisplay /> into MainLayout.razor all pages provide links:
⦁ to register and login if the user is not authenticated, and
⦁ to manage the user account and log out if the user is authenticated.
Modifying Logout.razor file
Replace the content of the Logout.cshtml file with the code below.
Listing 8 BookApp\Areas\Identity\Pages\Account\Logout.cshtml
@page
@using Microsoft.AspNetCore.Identity
@attribute [IgnoreAntiforgeryToken]
@inject SignInManager<IdentityUser> SignInManager
@functions {
   public async Task<IActionResult> OnPost()
   {
      if (SignInManager.IsSignedIn(User))
      {
         await SignInManager.SignOutAsync();
      }
return Redirect("~/");
}
}Summary
Before applying authorization, we must enable authentication first. We utilize the installed Razor pages to simplify security and user account management.


