How to Route Your Home Network or Business Network Traffic Through AWS and Why
ACM.464 pfSense > AWS Site to Site VPN > Transit Gateway > NAT > Internet
~~~~~~~~~~~~~~~~~~~~~~~~~~~~~~~~~~~~~~~~~~~~~~~~~~~~~~~~~
⚙️ Check out my series on Automating Cybersecurity Metrics. The Code.
🔒 Related Stories: Network Security | AWS Security | Cloud Architecture
💻 Free Content on Jobs in Cybersecurity | ✉️ Sign up for the Email List
~~~~~~~~~~~~~~~~~~~~~~~~~~~~~~~~~~~~~~~~~~~~~~~~~~~~~~~~~
In the last post I wrote about mysterious routing problems with no corresponding error messages. It’s related to this post where I was trying to set up a Transit Gateway to route to a NAT and had no way to tell what I was doing wrong based on logs. The only way to sort it out was to dig through the documentation and use trial and error to get it right.
In this post, I’ll provide an overview of what I was finally able to accomplish at a high level. The process involves many steps and trials and tribulations along the way. I’ll provide the details of each step in a separate post so you can pick and choose what you would like to do based on what you are trying to accomplish.
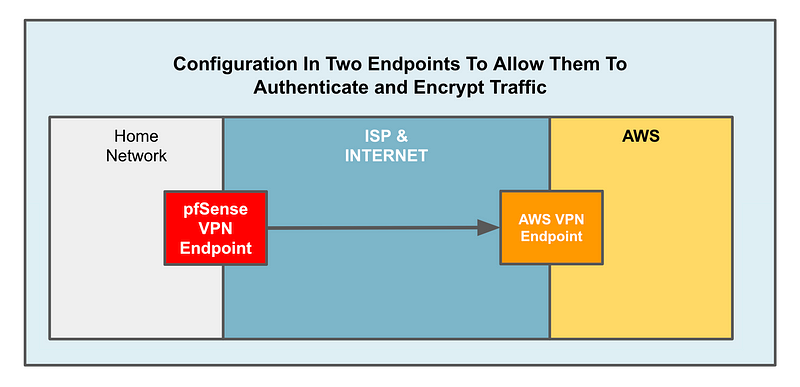
In my case I set up a VPN on a pfSense and use that to connect to a VPC in AWS, so my diagrams and steps will be those of setting up a VPN connection with pfSense.
Why would you want to route traffic through AWS over a VPN?
It helps to understand what happens when you set up a VPN and something about network protocols and packets to answer this question.
When you send data across the Internet, network devices use network protocols to understand how to get the data from you to your desired destination. The networking protocols are basically a set of rules for how your network packets are structured to send them over the Internet. All the devices that are communicating have to follow the same rules or things go wrong. The rules for how protocols communicate are defined in RFCs.
Network protocols are like languages for computers. It’s like if I’m trying to speak to you in Japanese and you only speak German. That’s not going to work out too well. Network devices that need to communicate and transfer data back and forth need to speak the same protocol and have a matching configuration. If they don’t, packets will be dropped, rejected or potentially an attacker is manipulating the packets to get through firewalls or perform other nefarious actions.
The information that routes your from your device to the destination device are like the addresses on the envelope of a letter. The devices that route your packets over the Internet from an endpoint at your location to your specified destination are called routers. Routers send packets between networks to get them to the proper destination. Routers need to see certain information in your network packets — like where to send the packets. But they don’t need to see the data you are sending to the remote device.
When you connect to your ISP, you connect your router to their network. They have a bunch of routers in their network. They may route traffic to some other network which has a bunch of routers. That network may then finally route the packets to the destination network you are trying to reach.
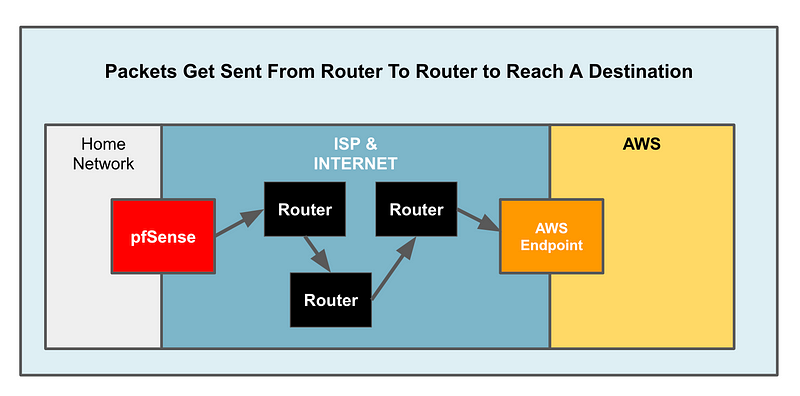
In reality there’s something else in my home network connecting my network to my ISP. I use a cable modem to connect to my ISP and then I connect my pfSense device to that as I wrote about in another post. But the main point here is that your data passes over a bunch of other devices not belonging to you or the destination network potentially as it traverses the Internet.
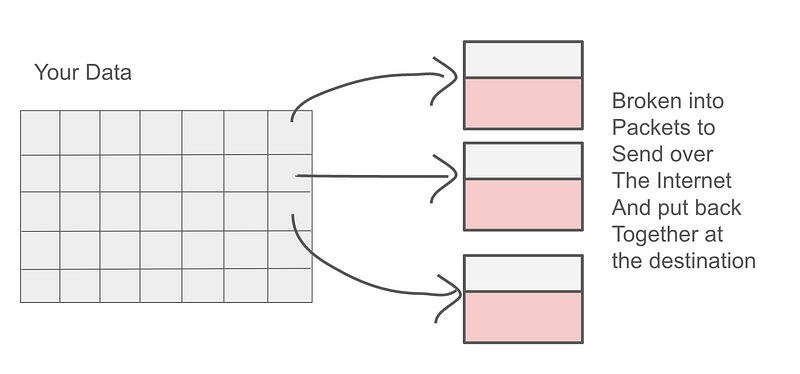
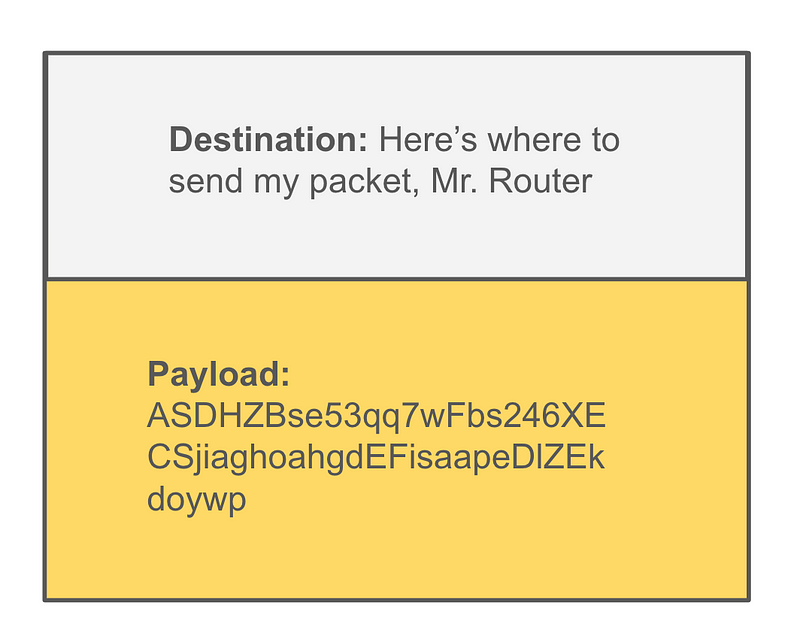
The payload is the data in the packet. It’s like the letter inside an envelope. You have to give the post office the address where to send the letter but they don’t need to see the contents. The difference when you send data from one network device to another is that your letter is broken up into a bunch of tiny pieces that get sent out over the network and get put back together on the other side by the device that receives the traffic.
I wrote about protocols that route packets around the Internet in more detail in some of my other networking posts like math in network packets.
Without getting into all the details, we can break down a packet into two primary parts — the information required to get the packet to the destination and the part that contains your data.
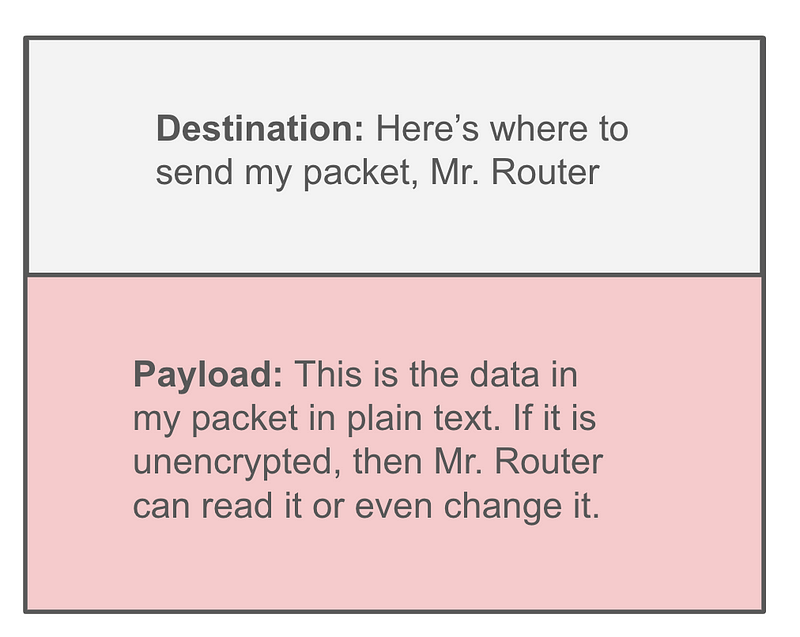
As your packets are sent over the network they traverse various network devices like security appliances, routers, firewalls, and other types of networking equipment. If your data is unencrypted, software on the intermediary devices may be able to read your data.
I showed how a device might read DNS packets in this post, but DNS is not the only thing you need to worry about. And simply encrypting DNS payloads may cause other security problems.
One way to fix the problem of intermediary devices reading your data is to encrypt the payload. Now your packet looks like this and the devices sending the packets along can’t decipher what’s in the payload because the packet doesn’t contain the key to decrypt the data. Only the sender and the receiver have the necessary keys to decrypt and view the data.
Well, that’s better. Now the payload is encrypted so the attacker can’t tell what’s in the payload. That’s good. But the routers still need the source and destination information so they can figure out where to send the packet. And in some cases, encrypting the payload on the client (the laptop) causes security problems for devices that attempt to inspect those packets for malicious activity.
The push for DNS over HTTPS is a good thing in a way as it hides your DNS requests from view as I explained in my prior post above as to why you might want to use a VPN. But that only solves the problem for one protocol — DNS.
At the same time, it makes it hard for network security appliances to inspect the traffic and block access to know malicious domain names or anomalous DNS requests. Looking at DNS requests and domain names is one of the easiest ways to spot an attack.
I showed how I realized something was wrong on one of my own computers due to a particular domain the host was visiting here:
By the way, a quick fix to protect yourself from malware using known malicious domain names is to use a service that prevents your computers from obtaining the IP addresses related to those domain names:
The reason this approach makes it hard for network security appliances to inspect packets is the same reason it makes it hard for routers to view encrypted payloads sent out over the Internet. The data is encrypted on your laptop or phone before it ever reaches the security inspection device such as a pfSense firewall. I’ve shown how I look at DNS traffic to see what devices connect to in other posts and you can’t do that if the DNS payloads are encrypted with HTTPS.
So, you make a choice. Configure your systems to not use DNS over HTTPS so you can inspect the traffic — but maybe then so can attackers. Or, use HTTPS to encrypt the packets but you can’t inspect them on the network.
Or perhaps you use a VPN to encrypt the packets as they leave your network and decrypt and send them from some other network where the request is forwarded but the endpoint IP address making the request is hidden perhaps. But wiht this latter approach you have to keep in mind that the traffic will be unecrypted at the VPN Endpoint and sent in plain text from that point forward if not further encrytped with TSL.
What would be interesting would be to send the traffic through the VPN tunnel unencrypted, inspect it, and then encyrpt it with TLS if you’re forwarding it outside your own network to some third-party DNS provider. But even if you send it unencrypted, the Internet can only see that the request is made from the NAT, not from the original source IP address.
Decisions, decisions.
What can an attacker glean from the connection information?
The other thing is, someone inspecting your network traffic can tell what you’re connecting to based on IP addresses and glean information based on the protocols you are using. For example, are you connecting to port 443, 137, 139, etc.? Those ports for netbios and SMB have been leveraged in many attacks as I’ve written about before.
Are you connecting to a particular host that may manage authentication for your company? Are you connecting to an EC2 instance on SSH or RDP ports? Maybe the attacker can glean information about remote users to attack who are connecting to corporate resources at a target company, for example.
Once I was working for a company a long time ago that gave me an insecure FTP account to upload code to their e-commerce website. I didn’t like that one bit but I had to get the work done. So I started working but I tend to monitor things as I work. Shortly after I noticed that someone had already figured out that my home computer was connecting to their website via FTP on a random website. Yes, people are tracking these things and generally not the people you want to have this information.
Configuring a VPN
When you set up a VPN or Virtual Private Network it uses a specific protocol to communicate with the device on the other end of the connection. There are different types of VPN protocols and they work in different ways. You can read how they work in the network protocol specification as explained in prior posts.
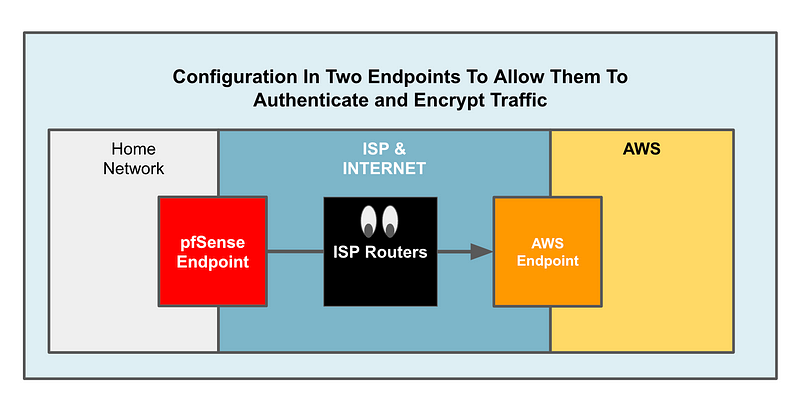
The configuration of the device on each side of the VPN connection needs to match so the devices can authenticate and communicate. You configure the devices to authenticate because you don’t want any old device connecting to your endpoints. You want to make sure only the right devices can connect. I’m going to start with something called a pre-shared key but hope to show more about certificates later.
The data gets encrypted between the two endpoints so the devices need to agree on an encryption protocol which specifies how they will protect the data flowing between the two devices. I’ll explain more about how to do that using a pfSense connecting to AWS but the same principles apply no matter what type of device you use. You want to use the strongest configuration and prevent downgrade attacks that trick your device into using a weaker encrypt protocol
How VPNs offer more privacy for network traffic
What else might concern us even if we are encrypting the payload in our packets? Attackers on the Internet can’t read our data as it traverses routers, but they can still obtain other information about the sites we are visiting via the source and destination IP addresses. Even though we have hidden a DNS request, the attackers can still see the IP address we make our request to after the DNS address is resolved to an IP address. What if you don’t want to expose all that information?
When you use an IPSEC VPN it wraps all your traffic in a tunnel. Like I said above you have to understand which networking protocols you are using and how they work.
Some VPN tunnels do not encrypt the entire packet or all protocols sent over your network. But in the case of IPSEC it’s creating a tunnel between two devices and sending all the traffic from your device to that other network through that tunnel. I’ll show you what I mean.
In order for someone to connect to the VPN, they have to have the private information used by the two devices to authenticate and connect to each other via an IPSEC connection.
In this case, I am creating what is called a Site to Site VPN (Virtual Private Network) which means I’m connecting a network device at one location to another networking device at another location and the two devices are encrypting the data sent back and forth. So for this type of VPN I might know the IP addresses of the two endpoints and I could further restrict the VPN connection to specific devices via network IP addresses.
When you’re using a client VPN you might not do that because part of the purpose of a client VPN might be to allow someone to connect to your network as they roam. In other words, they can connect to the VPN from an airplane, their home, a client office, or a coffee shop. But for a site to site VPN we generally have static IP addresses on either side and we know what they are, so we can lock down a specific VPN connection to work only between those two IP addresses.
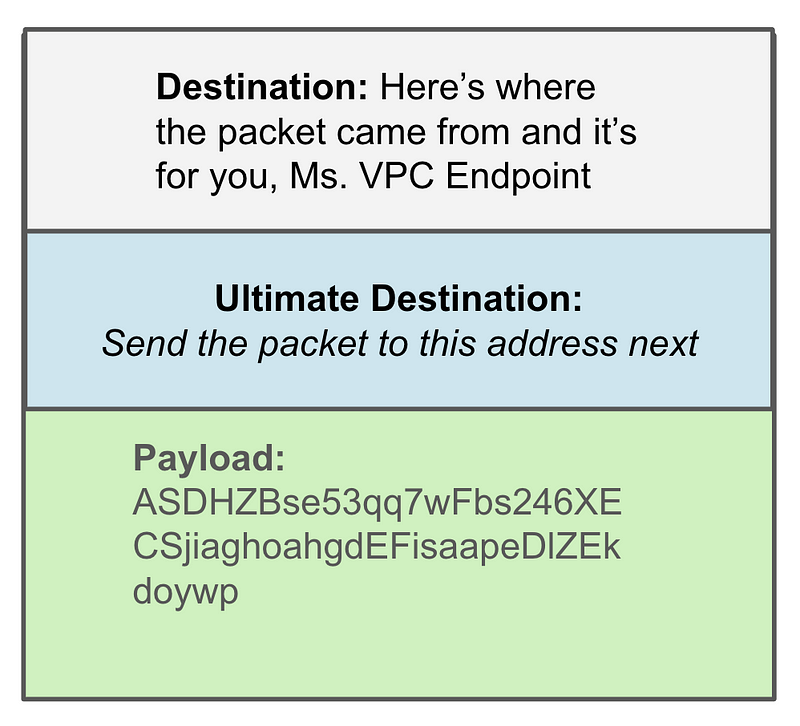
When you send a packet from your laptop over an IPSEC VPN connection, an additional header or wrapper is added to the packet. The header includes the VPN endpoint that is sending the packet as the source and the VPN endpoint to which the packet should be sent as the destination. The routers along the way use that wrapper information to send the packet from the source VPN endpoint to the destination VPN endpoint.
The packet you sent had a source and destination as well which is included in the packet but not used by the routers. In fact, all that information gets encrypted, not just the payload. Again, you have to understand how the specific VPN protocol you are using works. But for IPSec, any packet you send should be handled this way when it’s sent over the VPN connection. That includes DNS, TCP, UDP, ICMP, IPv4, IPv6, or whatever traffic or network protocol exists in the packet sent between the two VPN endpoints.
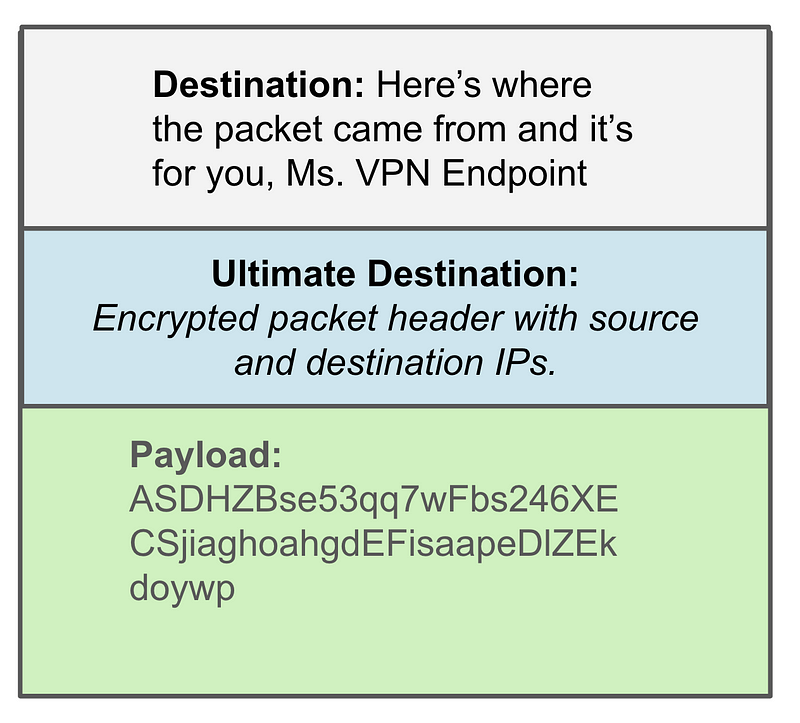
After the two devices are connected via a VPN, all the traffic they send back and forth is encrypted that way. Here’s what an ISP router sees:
When the payload gets to the VPN endpoint, the entire original packet has been encapsulated and encrypted as payload it can decrypt the part of the payload that tells the VPN endpoint where to send the packet next once it reaches the destination network:
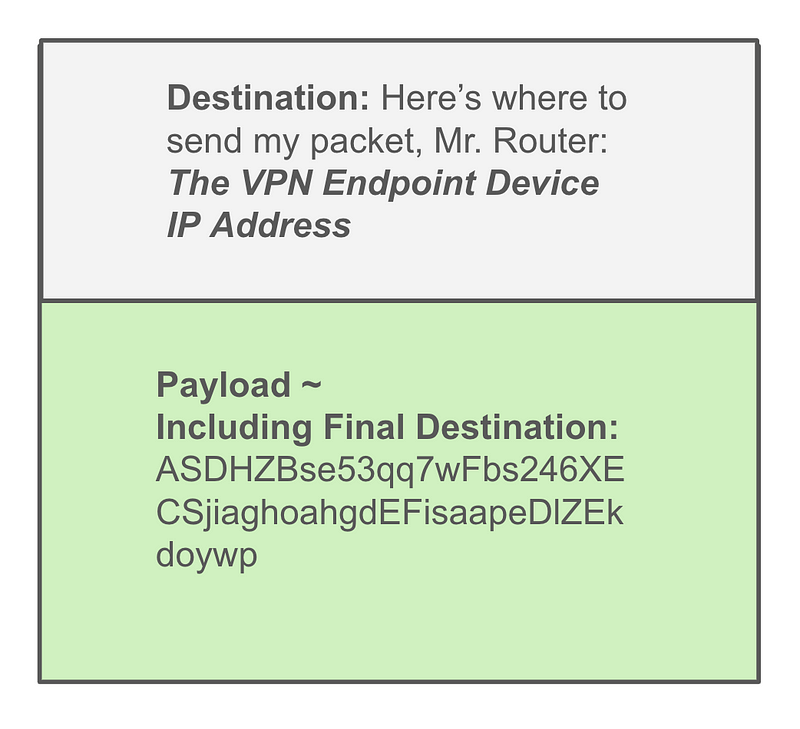
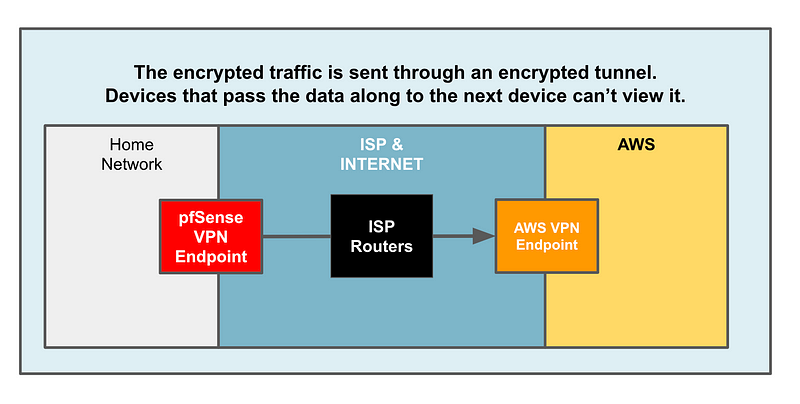
Now as my packets pass from my pfSense device to the AWS VPN endpoint, my traffic is still visible for inspection by the pfSense device, but neither the payload or the ultimate destination is available to the ISP routers and other devices along the path.
Protecting your administrative endpoints from zero days
I wrote in a prior post about how you can protect yourself from the Terrapin attack that affected SSH encryption protocols.
When this attack came out, what if you had to first connect to a VPN to get to your SSH hosts? The attackers can no longer simply attack SSH. First they have to get onto your endpoint or onto the VPN. A VPN adds another layer of protection over and above that provided by SSH and other mechanisms used to protect endpoints and applications.
Of course the VPN endpoints themselves now become a point of attack so you’ll want to monitor them closely and make sure the software remains up to date on both ends and that you use the strongest possible configuration supported by both endpoints.
Why use an AWS NAT Gateway?
Once your traffic reaches AWS, your packet is routed to the destination IP address you specified in the original packet. In the case of my prior post I was trying to route traffic to two places. One was an IP address in the AWS network for my website. The other was in the 20.0.0.0/8 range to get to microsoft.com.
If I connect to those two hosts from my home network, they will see the public IP address provided to me by my ISP. You can see this IP address by searching for “what is my ip address” in Google and scrolling down. Google will show you the IP address that devices on the Internet see when you visit their websites.
Let’s say you don’t want people to see that IP address for whatever reason. There are many that I won’t get into here right now. A NAT basically takes a private IP address and translates it to some other IP address and sends it out on the Internet. When I’m using my home network, I have a private IP address that gets translated to the public IP address assigned my ISP and that’s what people see. If I send this traffic through AWS, that private IP address will be translated to the public IP address of the NAT Gateway instead.
What if you want to add another layer of inspection or centralize inspection for all network devices?
I spoke about this idea a long time ago before transit gateways, network firewalls, or packet inspection existed as AWS services. The idea is that you can route all your traffic through one inspection point and ensure traffic can’t flow any other place in order to inspect what your devices are doing.
If you want to add an additional point where you can inspect traffic through the flow from your home or office network to the Internet, the solution I’m about to show you can help with that.
AWS VPN and VPN-Like Options
I’ll show you how to set up a Site to Site VPN with a Virtual Private Gateway. Use a Virtual Private Gateway when you only want to connect your network to a single VPC and you don’t want to route traffic from that VPC to other VPCs or the Internet.
If you want to reach the Internet from your home network via AWS you’ll need a Transit Gateway. You’ll also want to use a transit gateway if you want to set up a VPN connection that can reach a number of VPCs in your AWS network. Instead of setting up a separate VPN connection to each VPC you set up a VPN to the Transit Gateway and route traffic from there to your VPCs.
If you want to connect multiple locations outside of AWS so they can talk to each other over a VPN you might want to look into CloudHub which is like a branch VPN or hub and spoke VPN. I’m not going to do that in these posts.
If you have remote users that connect to your AWS from non-fixed locations or locations without a dedicated remote networking device for a site to site VPN connection then you’ll want to look into a Client VPN. Note that the AWS Client VPN is an SSL VPN which works differently than an IPSec VPN. I covered that in some other posts. IPSec Client VPNS are available from other vendors.
If you want to connect your location to AWS with a private network option that does not traverse routers on the Internet then you want Direct Connect. However, a Direct Connect does not encrypt the data as it passes over the private line. You might still want to use some form of encryption to ensure that all data passing over the private line is encrypted so any devices in between cannot view it.
AWS also offers something called Secure Remote Access which some say is a “VPN Replacement.” Is it? Take a look at how it works and compare it to the protections and purpose for which you might want to use a Site to Site VPN. Does it provide the same level of protections the IPSec provides above. It does not. It offers a way to connect to a single application in a secure manner.
Secure Remote Access has some benefits because you can give someone access to an application in a way that they do not have full access to everything on your network. For example, if you grant access to a single application, the user cannot scan your network (presuming there’s no application vulnerability that allows them to do so.) However, it does not replace all the reasons you might want to use a VPN. It works in a completely different way. It has a different purpose and may be something you want to use in addition to a VPN, not to replace a VPN.
Accessing the Internet through an AWS Site to Site VPN
Alright, now that you know what we are going to do and why, here is a list of steps to get it done. If you don’t know what all these things mean, I’ll show you with screen shots in upcoming posts. I went ahead and did this manually for my initial attempt to make sure it works before I spent time automating it.
Analyzing the costs
- Select a region and availability zone and stick to it unless you really need to do otherwise
- Understand pricing formulas
- Test your assumptions.
- Also, why regions are an important security factor
Create a VPC
- Create a VPC in your selected region.
- Enable Flow Logs so you can see traffic passing through Network Interfaces associated with the VPC.
Taking a look at the pfSense AWS VPN Wizard
… and why I’m not using it
Creating an AWS VPN with a Virtual Private Gateway
- If all you want to do is reach hosts in AWS, then this you can use an AWS Virtual Private Gateway instead of a Transit VPC. Then the hosts in the VPC can reach the Internet via a NAT if you want as I’ll show in other posts, but your hosts in your remote network can’t send traffic out to the Internet via the AWS NAT with this solution.
- Public and Private ASNs explained here
- Select encryption options that work on both pfSense and in the AWS Site to Site VPN.
- Set firewall rules on the IPSEC Interface created with the VPN.
- Configure Phase 1 for each tunnel.
- Configure Phase 2 for each tunnel.
- To reset after tunnel changes Status > IPSec > Disconnect and reconnect
Create a Public Subnet with an Internet Gateway and a NAT
This post explains how to create a public and private subnet to work with a NAT properly. I also explain why other things won’t work such as sending your traffic from your home or office network with a VPN and not Transitive Gateway.
- Create Internet Gateway
- Attach to the VPC
- Create a public route table that routes 0.0.0.0/0 to the Internet Gateway.
- Create public subnet(s) in VPC and choose the selected AZ(s).
- Attach the public route table to the public subnet(s).
- Create a NAT in the public subnet. It will reach the Internet via IGW in the route table. The NAT and the IGW need to be in the same VPC.
- Create a private route table.
- Add a route to the Internet through the NAT.
- Create private subnet(s) in VPC and choose the selected AZ(s).
- Attach the private route table to the private subnet(s) with a NAT route.
Create Transit Gateway
- Create a Transit Gateway
- Create VPN Attachment for Site to Site VPN > that creates a Site to Site VPN in AWS
- Modify the Site to Site VPN in AWS.
- Change the configuration options to match pfSense.
- Verify that your tunnel(s) are up.
- Create a VPC attachment and select the private subnet for your VPC.
- Add a route to send your remote private IP range to the VPN attachment.
- Add a route in the public and private subnet route tables to point the private remote VPN range to the TGW VPC Attachment.
Why some services touted as VPN replacements are not replacements at all. So should you use them?
Checking what traffic attackers can see once you’re on a VPN.
Fun with packets
Once that’s working there are lots of things we can do with the information flowing through AWS.
Larger companies with bigger budgets might add an AWS Network Firewall to the mix. I looked at the cost of this and holding off for the moment.
You can process network traffic in your VPC Flow Logs with a Lambda function as I did in this white paper:
You could use open source tools with AWS Traffic Mirroring to inspect packets:
Visualize your data with OpenSearch:
Leverage AWS Security Data Lake
So many possibilities — so little time! Mind the cost of any of these options, as always. I find that this solution above is a little rich for a small home network. I’m going to monitor the costs over time and see if there’s anything I can do to keep it manageable. Or if I get a lot more hits on this blog (more money from it) or additional consulting calls, pentests, and assessment projects, I might be able to do more. But I’m going to be busy on other things for a bit.
Just a reminder if you you have questions, you can schedule a consulting call. IANS customers can schedule through them or schedule directly if you’re not using the link on my website. As always, don’t ask me what other companies are doing. Ask me what you should do for your particular requirements. Send me any links and documentation in advance of the call for review.
Follow for updates.
Teri Radichel | © 2nd Sight Lab 2024
About Teri Radichel:
~~~~~~~~~~~~~~~~~~~~
⭐️ Author: Cybersecurity Books
⭐️ Presentations: Presentations by Teri Radichel
⭐️ Recognition: SANS Award, AWS Security Hero, IANS Faculty
⭐️ Certifications: SANS ~ GSE 240
⭐️ Education: BA Business, Master of Software Engineering, Master of Infosec
⭐️ Company: Penetration Tests, Assessments, Phone Consulting ~ 2nd Sight Lab
Need Help With Cybersecurity, Cloud, or Application Security?
~~~~~~~~~~~~~~~~~~~~~~~~~~~~~~~~~~~~~~~~~~~~~~~~~~~~~~~~~~~~~
🔒 Request a penetration test or security assessment
🔒 Schedule a consulting call
🔒 Cybersecurity Speaker for PresentationFollow for more stories like this:
~~~~~~~~~~~~~~~~~~~~~~~~~~~~~~~~~~~~~~~~~~~~~~~~~~~~~~~~~~~~~
❤️ Sign Up my Medium Email List
❤️ Twitter: @teriradichel
❤️ LinkedIn: https://www.linkedin.com/in/teriradichel
❤️ Mastodon: @teriradichel@infosec.exchange
❤️ Facebook: 2nd Sight Lab
❤️ YouTube: @2ndsightlab