Creating an AWS Site to Site VPN for pfSense with a Virtual Private Gateway
ACM.468 Configuring specific encryption options to prevent downgrade attacks
~~~~~~~~~~~~~~~~~~~~~~~~~~~~~~~~~~~~~~~~~~~~~~~~~~~~~~~~~~~
⚙️ Check out my series on Automating Cybersecurity Metrics. The Code.
🔒 Related Stories IAM | AWS Security | pfSense | Network Security
💻 Free Content on Jobs in Cybersecurity | ✉️ Sign up for the Email List
~~~~~~~~~~~~~~~~~~~~~~~~~~~~~~~~~~~~~~~~~~~~~~~~~~~~~~~~~~~
In the last post I was looking at the cost of my ultimate solution to connect my private network to an AWS NAT Gateway.
Initially I tried to do this without the Transit Gateway but I’ll explain why that didn’t work later. But let’s just say you only want to connect to AWS to reach instances in AWS via the VPN. You don’t need to make requests from your laptop to the Internet through AWS because you aren’t going to inspect traffic and you don’t need to connect multiple VPCs.
In that case, all you really need is an AWS Site To Site VPN with a Customer Gateway and a Virtual Private Gateway instead of a Transit Gateway. I’m going to configure that in this post — but also, the VPN portion of the configuration in this post is the same whether you’re using a Virtual Private Gateway or a Transit Gateway. I will be referring back to this post later when I explain how to set up the Transit Gateway.
This is all part of this series on connecting a local network through AWS to the Internet. I explain why you might want to do that here:
I already created the AWS VPC and configured AWS Flow Logs in this prior post:
Now we need to configure a Site to Site VPN with a Virtual Private Gateway to reach AWS from our pfSense over an encrypted tunnel.
How an AWS Site to Site VPN works
You can read about AWS Site to Site VPNs here.
I think the documentation is a tad confusing for people who don’t already know what all those resources are on AWS. I am not going to use a Transit Gateway in this post. A Transit Gateway is used to connect multiple VPCs to your on-premises environment or potentially to connect multiple VPCs to use one NAT (yet).
Here’s what we need to create on the AWS side for this solution:
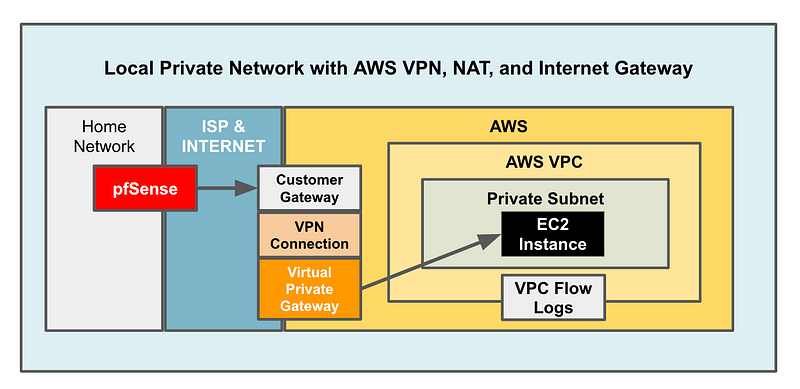
- We already created the VPC and VPC Flow Logs in the prior post.
- A Private Subnet (no route to the Internet)
- The Customer Gateway configuration in AWS for the pfSense device.
- The Virtual Private Gateway that attaches to the VPC.
- A Site to Site VPN resource on AWS.
- An EC2 Instance to test our VPN.
The VPN itself doesn’t send traffic. It is a tunnel. You have something behind the pfSense to send traffic to AWS (like my laptop) and something in AWS to receive the traffic from the VPN Gateway (like an EC2 instance).
Some resources for configuring the VPN
I found this post which may be helpful. It’s using static routes, not BGP.
Here’s the AWS getting started documentation:
And here are tunnel options:
Ok let’s go.
Create an AWS Virtual Private Gateway
Head over to the VPC dashboard as we did in the last post to create the VPC. I created the AWS Virtual Private Gateway first because that’s easy.
Click on Virtual Private Gateways on the left.
Click on Create Virtual Private Gateway.

Give your VPG a name and create it. I’m using the AWS default ASN.
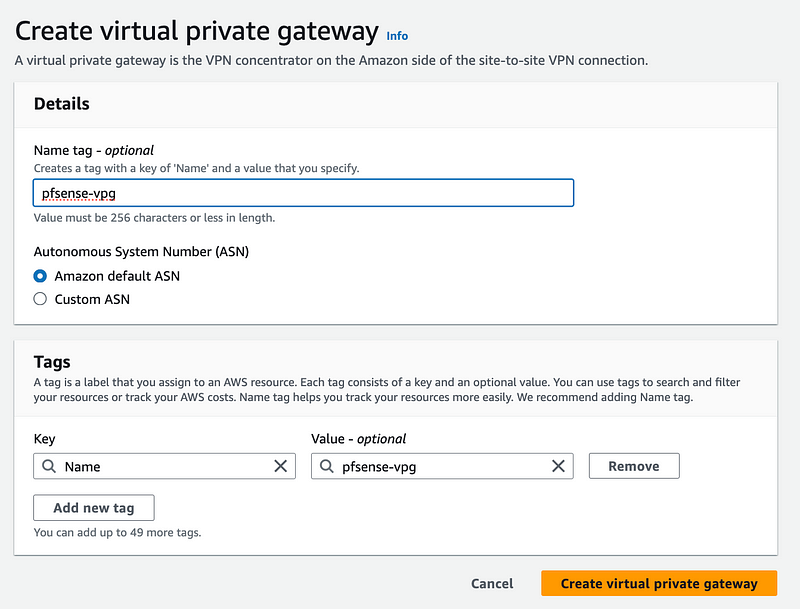
I explained what ASNs are here:
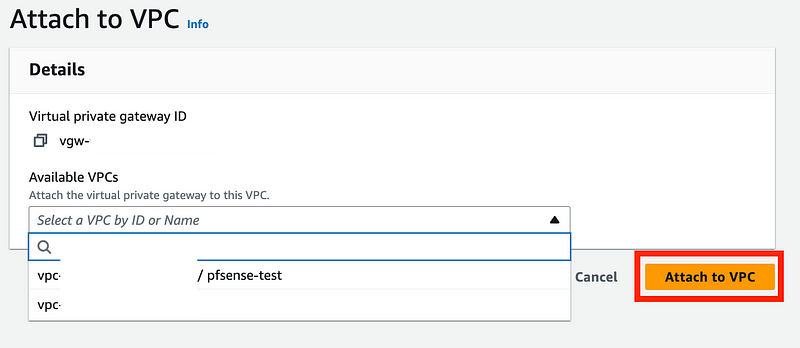
On the top right choose Actions > Attach to VPC.

Choose your VPC from the last post and click Attach to VPC.
Create a Private Subnet in your VPC
A private subnet doesn’t have an Internet Gateway. More on that in my other networking posts:
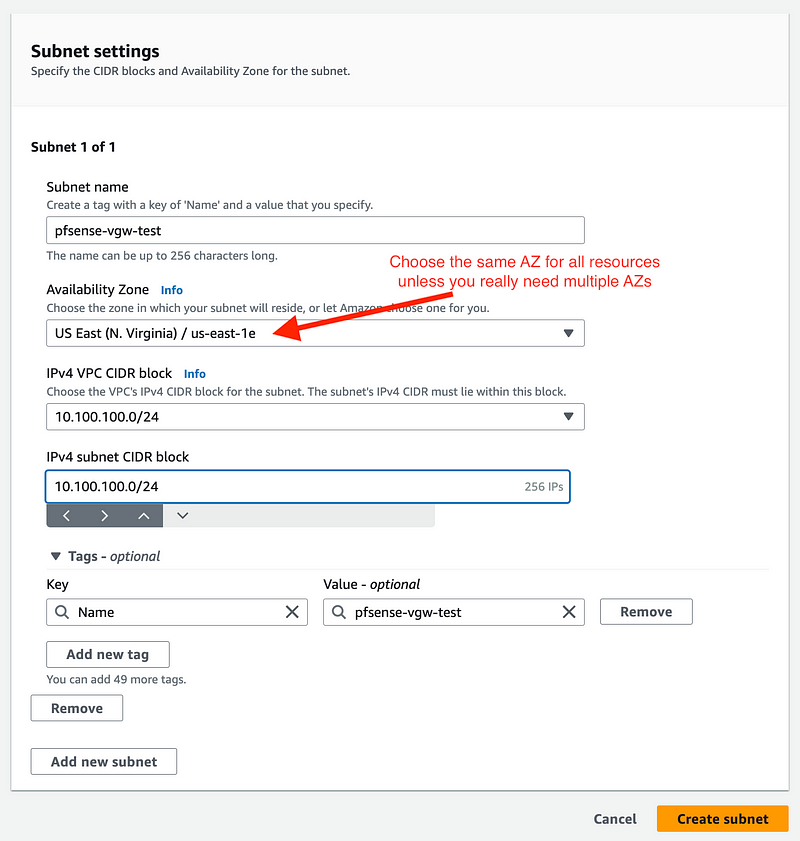
Create a private subnet where your resources that you will connect to through the VPN will exist.
On the VPC dashboard click Subnets on the left. Click on Create subnet.

Choose your VPC.
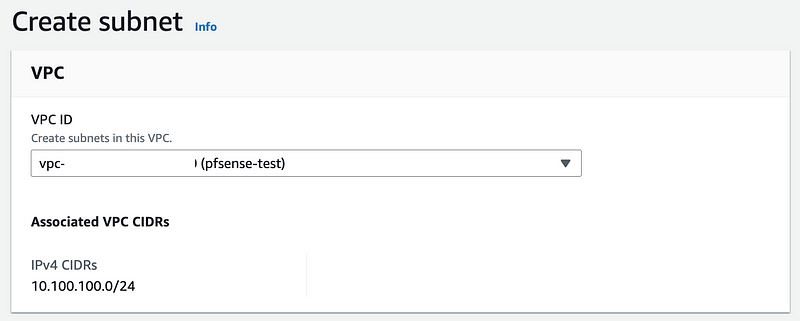
Configure the subnet.
- Give it a name
- Choose a region and an AZ
- Select the VPC CIDR you want to use.
- A subnet can be a portion of the VPC CIDR but I’m using the whole range below.
- The name is populated automatically.
- Click Create subnet.
Add a private route table
On the VPC dashboard click Route tables on the left.
Click Create route table.

Enter the route table name, select your VPC and click Create route table.

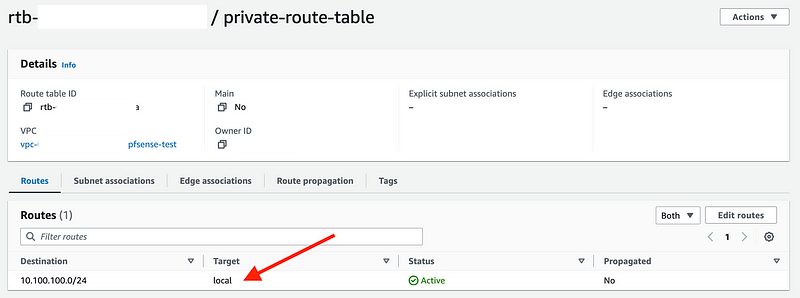
Add a route in the route table to the VPG
In the AWS dashboard click on Route tables on the left.
Click on the route table ID for the route table you just created.
Notice that there is one route already and the target is local. That is the default route in any VPC route table. It allows anything in the VPC to send packets over this route to anything else in the VPC.
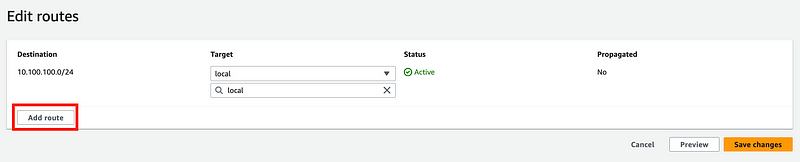
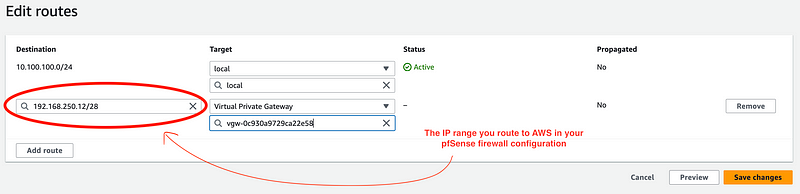
Click Edit Routes.
Click Add Route.
This is the point where you need to know something about your pfSense network. You want to make sure you are not using an IP block for your VPC network that overlaps your local pfSense IP range. You select a range on pfSense that you want to allow to communicate to AWS.
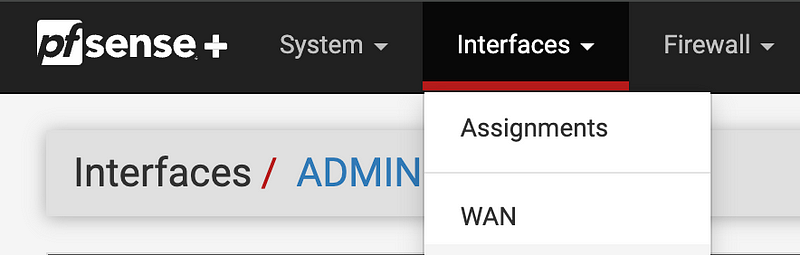
Head over to your Interfaces. Select the interface that you want to allow to reach the VPN, or create a new one. In the settings there’s an IP range assigned to that Interface.
I explained interfaces and the IP ranges associated with them in more detail in other posts:
Let’s say I have an interface on pfSense and I gave it this IP range: 192.168.250.12/24.
OK I could assign that entire range to my VPN. I could enter that CIDR block below. Or, I could assign only a part of the range to the VPN. Why might I only assign a part of the range to the VPN? Well, if I do that, I can still connect my laptop via an IP in that range that is not in the VPN range and connect to the Internet without the VPN.
So let’s say instead of that entire range I use this subset:
192.168.25.12/28
I showed in a prior post how to calculate the IPs in that range:
192.168.25.0 — 192.168.25.15
Well I picked a weird range but anyway, what is the range for the entire subnet I assigned to the pfSense Interface?
192.168.25.0–192.168.25.255
So if I want to be on the VPN I could use an IP in the first range like 192.168.2.15.
If I want to connect without being on the VPN, I can set my IP address to be within the second range, but outside the first range like 192.168.25.16.
Note that to do this I disabled DHCP on this interface by choosing Services > DHCP Server and:

Then I manually set my IP configuration in my laptop by going to Networking services on my Mac, selecting the method by which I’m connected to the network, and manually configuring my IP address. (I have other things that require DHCP on a separate interface.)

So anyway, you can select the entire IP range in your pfSense subnet associated with the Interface to connect to the VPN or part of it.
In your AWS route table you have to route any traffic that any host wants to send to that IP range to the Virtual Private Gateway.
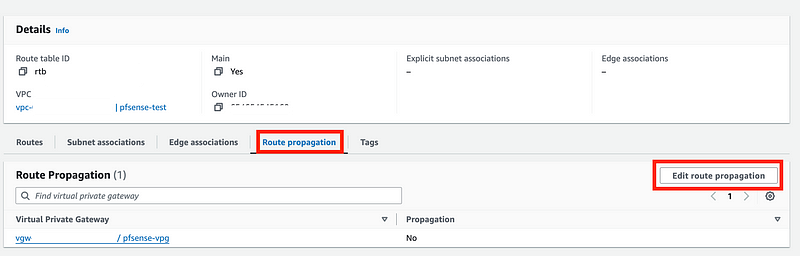
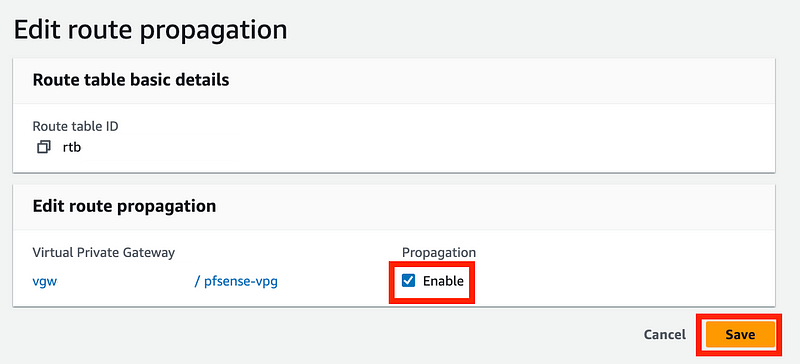
Click Route propagation. Click Edit route propagation.
Check Enable. Click Save.
Security Group Rules
You don’t need a security group for the VPN connection, Customer Gateway, or Virtual Private Gateway. The pfSense documentation on this point is vague and confusing. What you will need to do, if you create a resource such as an EC2 instance in AWS and you want to connect to it via SSH from your local network, is allow that same private IP range to access your EC2 instance. Now the IP is going to be a private IP, not a public IP like it is when you’re not on the VPN.
As noted above, I set my laptop to a specific IP address. If I set it outside the range assigned in the route table, any traffic from my laptop can’t reach AWS because there’s no route for it to get there. I only allowed IPs in a certain range to reach AWS.
If I assign the IP address within the VPC range, now I can reach AWS because the route allows my traffic to pass over to AWS. However, I still cannot connect to an EC2 instance if the security group doesn’t have a rule that allows my IP address to connect on port 22 for SSH (or whatever port you are trying to use if you are using a different protocol to connect to that EC2 instance like RDP on port 3389 or HTTPS on port 443.)
Create the Customer Gateway for the VPC
Head over to the VPC Dashboard like we did in the post where I created the VPC and VPC Flow Logs.
Click on Customer Gateways. Click .

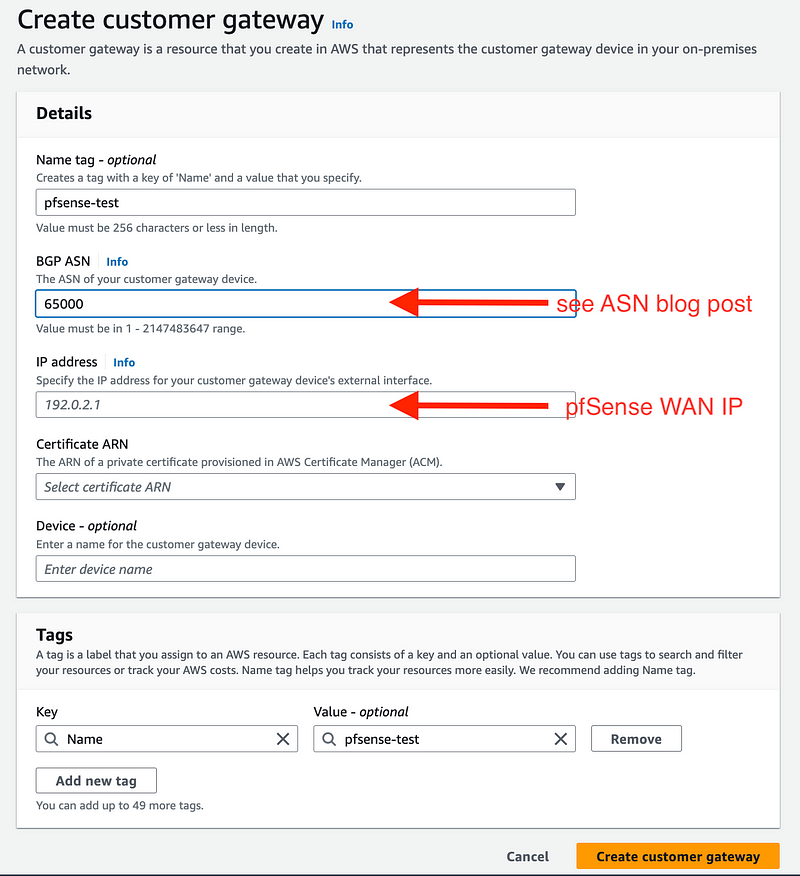
For the customer gateway, enter a name, an ASN, and the public WAN IP address of your pfSense. I’m not adding a certificate for this test, though that would be better security if you can do it, and the device name is optional. More on certificates later, hopefully.
Once again, refer to my post above if you are not familiar with ASNs.
You will need to know the WAN IP address of your pfSense device and enter it where specified below. Typically you will be entering a public IP address that you see when you search for What is my IP in Google and scroll down for a home network. You’ll see the public IP address that the Internet sees when you connect to their web sites. That’s the public IP address assigned to you by your Internet Service Provider and that is used by your pfSense firewall to access the Internet.
Unless you purchased a static IP address from your ISP, that IP address can change. If it does, you won’t be able to connect via your VPN. So you need to get a static IP address or at least monitor your IP address and have a way to get to AWS that does not require you to be on the VPN if it does. That’s why I only used a subset of IP addresses to connect the VPN above.
Click Create customer gateway.
For more on ASNs see this post:
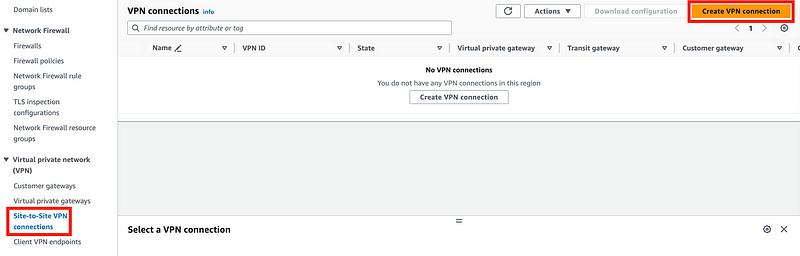
Create the Site to Site VPN connection
Return to the VPC dashboard.
Click Site-to-Site VPN connections. Click Create VPN connection.
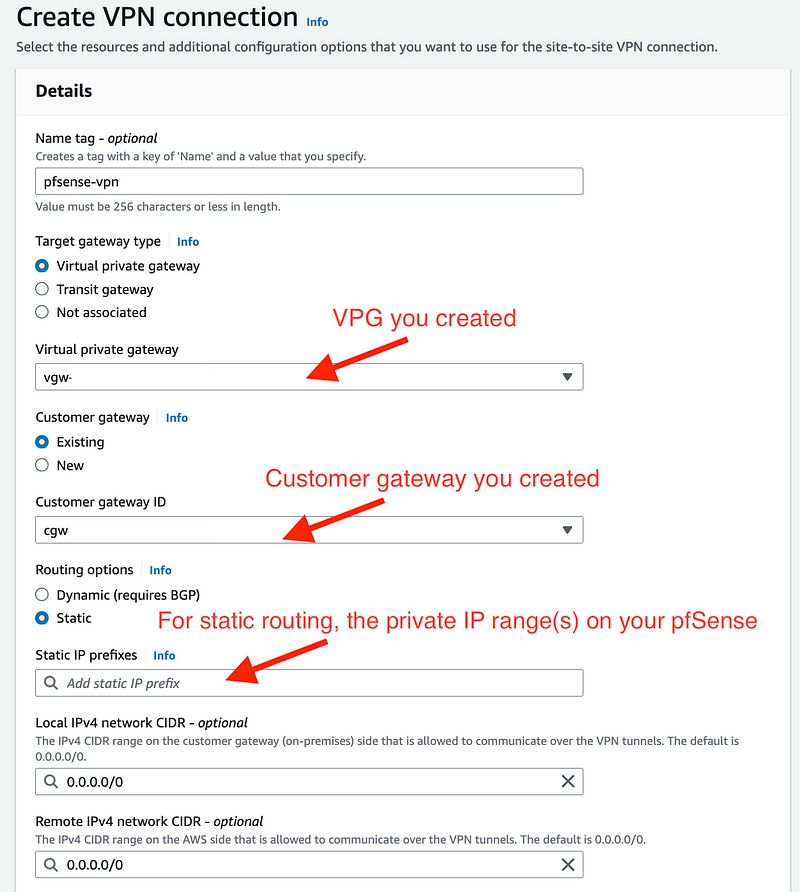
- Enter a name
- Select Virtual private gateway
- Select the ID for the virtual private gateway we created above.
- Select Existing under Customer gateway
- Select the gateway id we created above
- Select static
Note that AWS recommends BGP for the following reason:
We recommend that you use BGP-capable devices, when available, because the BGP protocol offers robust liveness detection checks that can assist failover to the second VPN tunnel if the first tunnel goes down. Devices that don’t support BGP may also perform health checks to assist failover to the second tunnel when needed.
“Robust liveness detection” is an odd way to phrase it but that is what it is called in a lot of other VPN documentation.
I’m going to start with static routes and see how that works out and change if needed.
For the static IP prefixes I entered my remote private CIDR(s) that needs to be advertised to the VPG:
If you use a device that doesn’t support BGP advertising, you must select static routing and enter the routes (IP prefixes) for your network that should be communicated to the virtual private gateway.
In pfSense click interfaces and select the interface you want to route to the VPN. Select the private IP range of that interface or a subset of that range as I explained above. Use the same range that you used for your route in the private route table.
- I left local and remote as the defaults so all available traffic will pass through the VPN.
Here’s what I entered for Tunnel 1 options.
For encryption options, I took a look at what was available in pfSense.
I’m going to select AES256-GCM.

In light of recent events you might not want to use the last one.
We also might not want to use CBC mode which I don’t see there — but what mode is the AES option using? It doesn’t say. CBC?
Not sure, but this post seems to suggest that may be the case. I don’t want to reverse engineer this to try to figure it out so I’m going to go with AES256-GCM.
I started to look at NIST guidance but it wasn’t easy to find something that clearly specifies use of GCM over CBC but there are plenty of other resources that do.
That side tracked me a bit — I had to look into quantum computing and new algorithms coming out in 2024 from NIST. If you haven’t started talking to vendors about this, you should:
But back to what we are working on. I’m going to choose the highest options that match on both the pfSense and AWS and remove the rest. That way my devices cannot be tricked to fall back to an insecure algorithm, which is a common attack. The only caveat is that the higher the key length and the stronger the algorithm, the more processing power it will require to process the data so it might slow down pfSense. If it does, I can adjust it. And that’s why I’m testing.
I can choose a key length of up to 128 bits with AES256-GCM. Note that with AES you can choose other options up to 512.

I can choose SHA 512:

I have a lot of options for the DH groups. pfsense offers this note:
Note: SHA1 and DH groups 1, 2, 5, 22, 23, and 24 provide weak security and should be avoided.
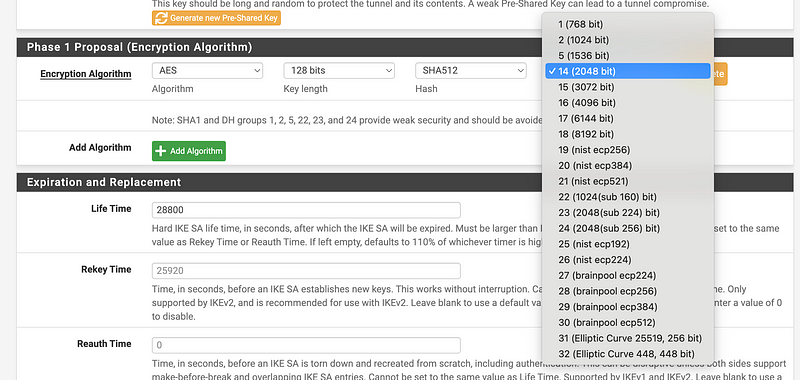
Well, for now I’m going with 21 — nist ecp521.
I want to use IKEv2. Why? IKEv2 provides better network attack resilience among other things.
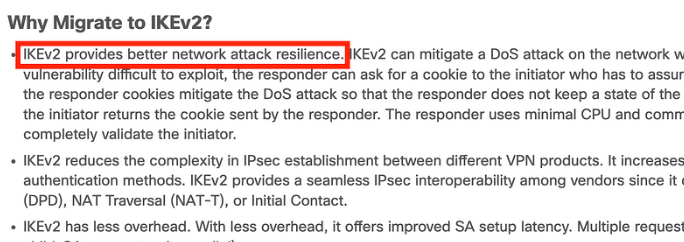
Here’s a summary of the differences:
You can verify that in the specifications.
So here are my tunnel options on AWS:

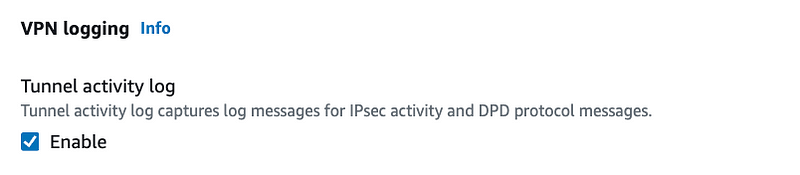
I also enabled logging:
I selected the CloudWatch Log Group I created for VPC Flow Logs in the prior post:

I left the rest as the default.
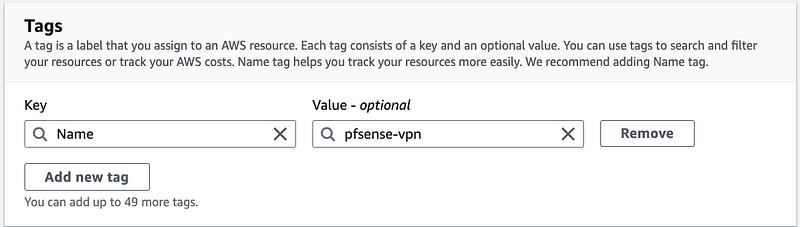
Name tag:
Click Create Vpn connection.

Download the configuration file to use with pfSense
On the VPC Dashboard click on Site-to-VPN connections.
Select your VPN connection.
Click Download configuration.

Choose your options. Note this is only a sample. I’m disappointed that AWS does not include IKEv2 here.
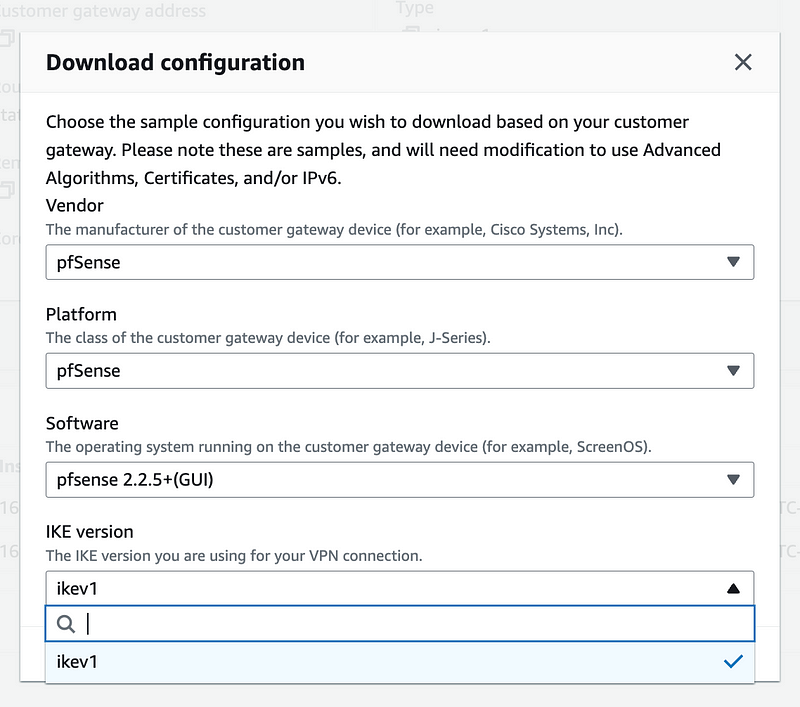
Click Download.

Take a look at the configuration file. It has some of the settings you will need, though we may change a few things.
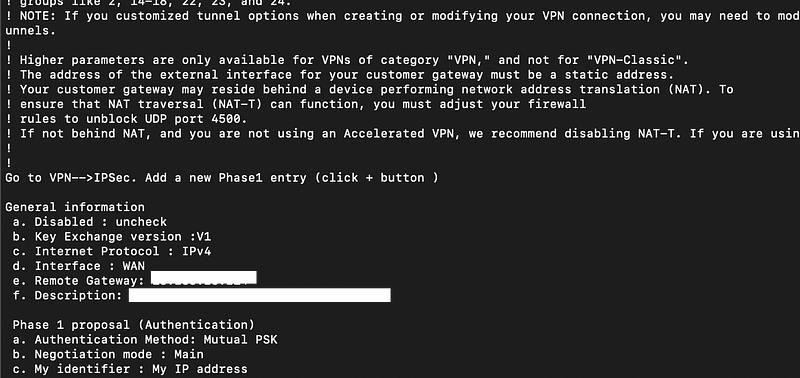
Configure pfSense
Note that on the pfSense side we are going to configure something called phase 1 (p1) and phase 2 (p2) for each tunnel.
Phase one is getting the VPN connected to AWS.
Phase two is where you specify which IP ranges you want to route to AWS. So for example, while I was testing, I chose two specific IP ranges to route to the AWS VPN. That way, I could get to everything else on the Internet until I figured out what the problem was in this post:
Moving on — let’s configure phase 1 and phase 2 for our VPN.
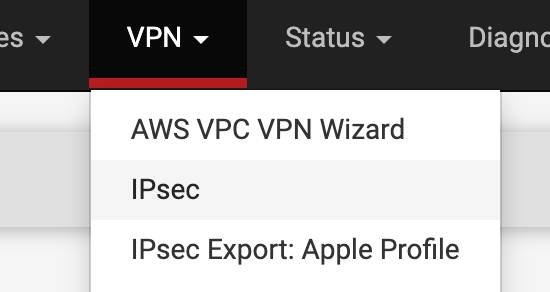
Log into pfSense. Click VPN > IPSec.
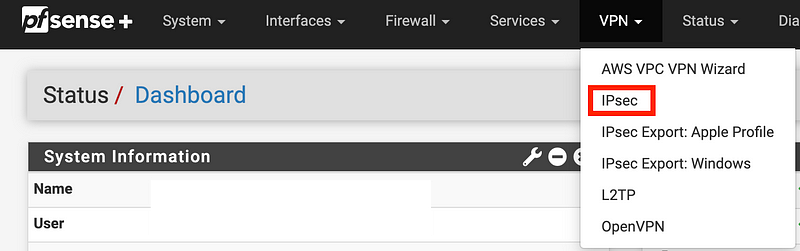
Add P1 (phase 1)

General Information: Add a name
IKE Endpoint Configuration:
- IKEv2
- IPv4
- Outside Interface (typically WAN)
- Remote Gateway from the configuration file you downloaded

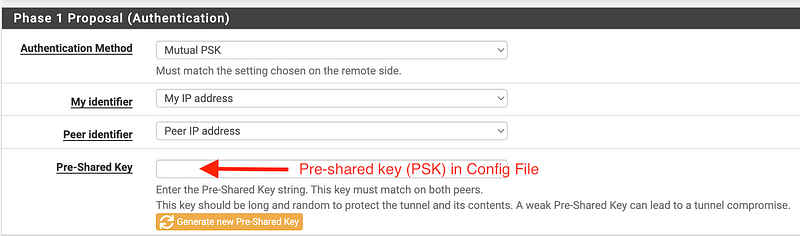
Phase 1 Proposal (Authentication):
Enter the pre-shared key (PSK) from the configuration file.
Phase 1 Proposal (Encryption Algorithm):
Select the options we configured above.

Set max failures to 3, though it says in pfsense this only applies to IKEv2.
Click Save. Click Apply changes at the top of the screen.

Click Show Phase 2 entries.

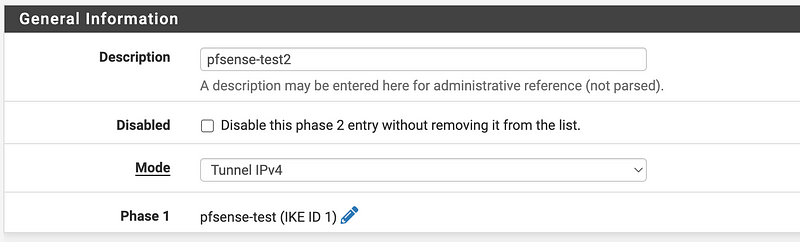
Click Add P2.

Enter a name and choose IPv4 (unless you are using IPv6):
Networks:

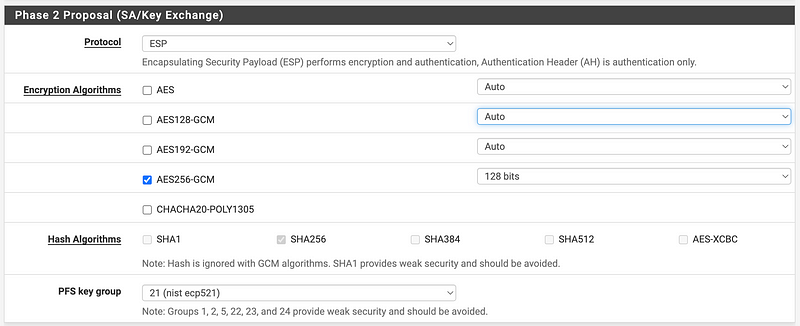
Choose the same encryption algorithms we chose in AWS — except that I cannot change the Hash algorithm here. The interface says that hash is ignored in phase 2 for GCM.
Activate the tunnel interface
To turn on the tunnel interface, complete the following steps:
Go to VPN, and then choose IPsec.
Make sure the tunnel you created is enabled.
You can click the Disable button to see that the button changes to Enable.

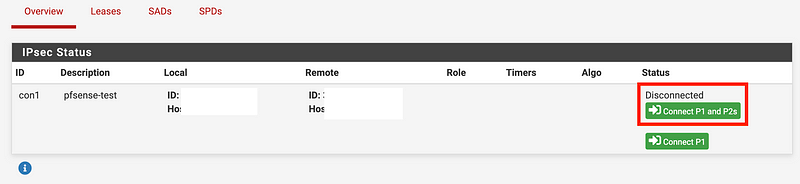
Go to Status > IPsec

Select the Connect P1 and P2 option to initiate the tunnel negotiations.
Now if you try to connect it won’t work just yet.
Allow IPSec traffic for new IPSEC interface
When you create a VPN this way on pfSense, a new interface named IPSec gets added.
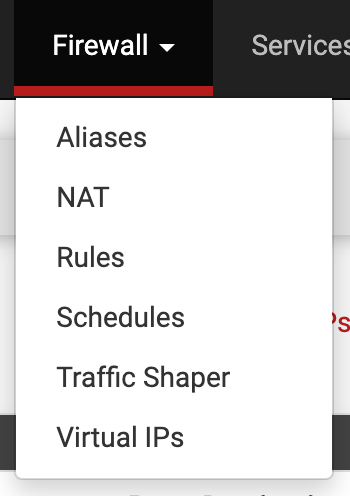
Head over to Firewall > Rules.
Click on IPSec. You can allow any/any here. I’ve added a few additional rules to block traffic I know I don’t want coming from or going to AWS.
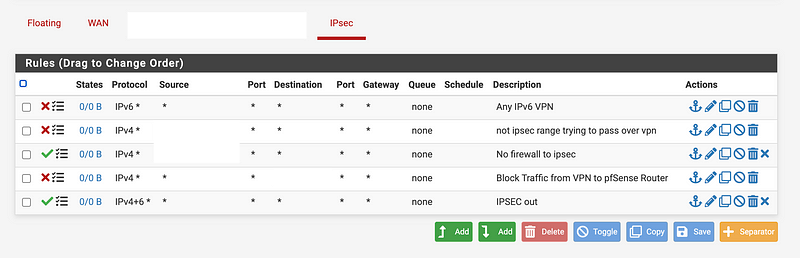
In addition to those rules, any other rules that apply to the IP Range that is used for the VPN still seem to be applied as per usual.
Set up an EC2 instance in AWS in your private subnet and ping it
There’s one last thing I had to do to get this working. I saw this problem while trying to help a firewall vendor I worked for fix a problem with VPN connectivity between their product and AWS. For some products you need to have a host that the VPN tunnel constantly pings to keep it up and running.
In my case, I set up the pfSense VPN, set up an EC2 instance it could ping, and once the tunnel was established I didn’t need the EC2 instance anymore. But be aware of this issue if you are using certain network appliances and cannot keep your VPN tunnels up and running.
I’ve explained how to create an EC2 instance in many other posts.
I created a very small EC2 instance so minimal charges would apply. I made sure that the rules in the interface associated with my private IP range, the IPSEC interface in pfSense, the AWS NACL assigned to my subnet, and my security associated with the EC2 instance all allowed ICMP request and reply traffic.
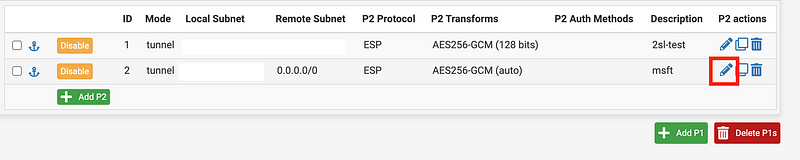
Edit your P2 entry for your VPN.
VPN > IPSEC > Click Show Phase 2 Entries.
You will probably only have one.

Click the pencil next to the one you want to edit.
Scroll to the bottom and enter the private IP address for your EC2 instance.
Check Enable periodic keep alive check.
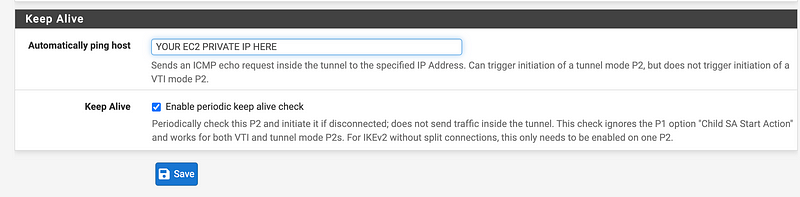
Save and Apply.
Connect Your VPN
With all that in place you should be able to connect your VPN.
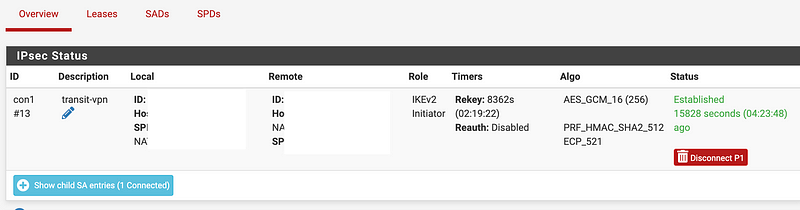
Head over to Status > IPSec in pfSense. Click Connect P1 and P2s.
Once connected you should see something like this:
Making changes
If you make changes to your P2 IP ranges, disconnect it and reconnect it and your changes should show up. While testing, I added two P2 entries for two different IP ranges, for example. After resolving the problem, I changed that to one P2 range for 0.0.0.0/0 to route (send) all my traffic while on that IP range the AWS VPN.
Troubleshooting — strange logs issue that resolved itself
I had some issues so I went to CloudWatch and I see this error — however the next day I came back and this error was gone. I don’t know if it was some issue within AWS at that moment in time or what.

I spent some time troubleshooting and then….Oh…what? It’s working now.
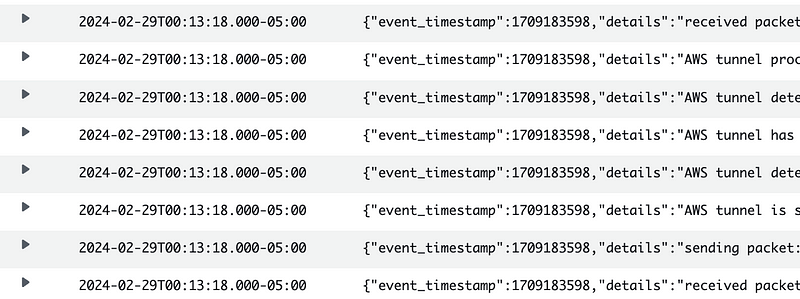
Not sure what caused that but FYI, in case it happens to you while setting this up.
Ok that’s how to set up a private VPN connection with a Virtual Private Gateway. Let’s see what we can do with that from our local network.
Follow for updates.
Follow for updates.
Teri Radichel | © 2nd Sight Lab 2024
About Teri Radichel:
~~~~~~~~~~~~~~~~~~~~
⭐️ Author: Cybersecurity Books
⭐️ Presentations: Presentations by Teri Radichel
⭐️ Recognition: SANS Award, AWS Security Hero, IANS Faculty
⭐️ Certifications: SANS ~ GSE 240
⭐️ Education: BA Business, Master of Software Engineering, Master of Infosec
⭐️ Company: Penetration Tests, Assessments, Phone Consulting ~ 2nd Sight Lab
Need Help With Cybersecurity, Cloud, or Application Security?
~~~~~~~~~~~~~~~~~~~~~~~~~~~~~~~~~~~~~~~~~~~~~~~~~~~~~~~~~~~~~
🔒 Request a penetration test or security assessment
🔒 Schedule a consulting call
🔒 Cybersecurity Speaker for PresentationFollow for more stories like this:
~~~~~~~~~~~~~~~~~~~~~~~~~~~~~~~~~~~~~~~~~~~~~~~~~~~~~~~~~~~~~
❤️ Sign Up my Medium Email List
❤️ Twitter: @teriradichel
❤️ LinkedIn: https://www.linkedin.com/in/teriradichel
❤️ Mastodon: @teriradichel@infosec.exchange
❤️ Facebook: 2nd Sight Lab
❤️ YouTube: @2ndsightlab