How To Recreate Wonders Using AI?
AI image generation with ControlNet. You will be amazed by the output.
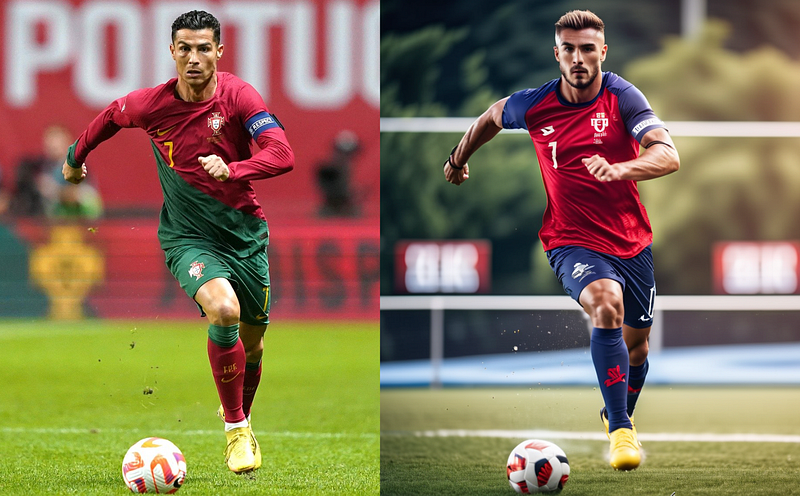
Check out the above image, The generated image on the right side has the same Pose and characteristics as the Left side image (Christiano Ronaldo).
How could we do that precisely? Let us have a deep look into it.
Most of you might have heard of or tried AI image generation. We get awesome mindblowing images with just simple prompt texts. Which one is easier, generating images from long detailed prompt texts or just providing sample reference images?
To get your desired image with the desired pose, detailed characteristics actions, how much effort we might need to put into building the prompt texts? It's not very practical always.
Even though we can change the prompt, settings, and filters it has a limitation when it comes to the case of complex layouts, poses, shapes, and forms.
ControlNet is a “Game Changer”, which brings artistic and structural control in generating images.
ControlNet + Intelligent Prompt = Makes Wonder
Subscribe to this publication for the latest updates in the world of Generative AI, ensuring you don’t miss any significant updates.
Previous Articles.
If you are reading this article for the first time, it would be nice if you go through my previous articles, part 1, part 2, and part 3 to learn the fundamentals.
Part 1: Want To Create Stunning AI Images Exactly as You Imagined?
Part 2: Want to Master AI Image Prompt Engineering?
Part 3: Image-to-Image: How Can You Take the Best out of AI?
My article is based on the platform PlaygroundAI. Most of the features and prompts apply to any AI platform, where you are trying to generate images.
What is ControlNet?
ControlNet is a group of neural networks that add spatial controls to pre-trained text-to-image diffusion models.
This controls the image generation — it can control Pose, Edge, and Depth properties based on the reference image.
Normal text-to-image models have only limited control over the output image’s Pose, Depth, and Edge.
It can be simply defined as an “Advanced image-to-image feature with more control”
What are Pose, Edge, and Depth Controls?
Here in this example, I’m using a running pose of Christiano Ronaldo to generate an output of a football player with the same pose, Edge, and Depth.
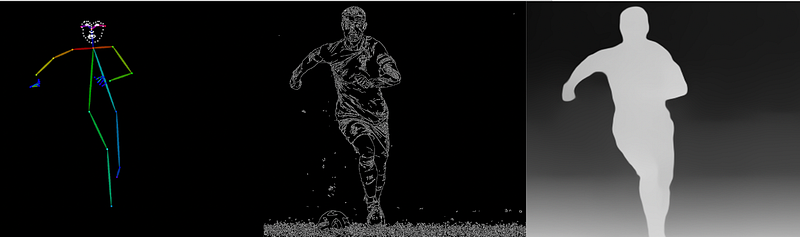
Below you can see the 3 guiding Skeleton that we just discussed.
When we upload a reference image, the PlaygroundAI platform can generate these 3 types of controls from the reference.
Pose — Identifies the face points, shoulder, hand & finger points, knee position, and legs and sketches them down.
Edge- Detects and outlines the entire body, dress folds, hair everything, including the major background elements (Here the grass)
Depth- This calculates how near and far the objects and background are, and grayscales it accordingly(White — nearest, and Black — furthest).
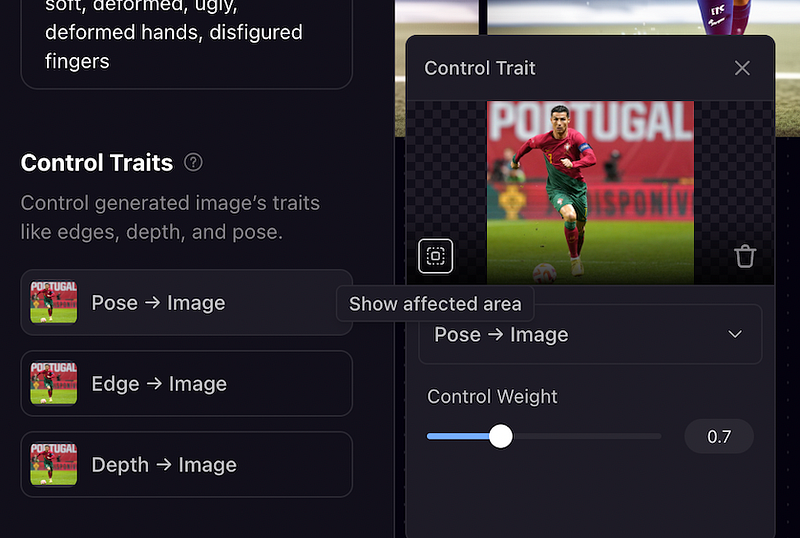
Note: We Just need to upload the image and choose Pose, Edge, or Depth to decide which type of controls you need before generating the output.
A preview of the affected area by each control trait can be viewed as given in the image, by clicking the lens button inside the uploading area.
Control the Pose — Iteration 1
The Prompt used for the below image is: [Photographic, athletic, A handsome football player kicking the ball, running fast, looking at the ball, 35mm photograph, film, bokeh, professional, 4k, highly detailed]
Here, we have configured the ControlNet to change the pose similar to the reference image[Ronaldos pose] by using control weights 0.5 and 0.7 Let's see the output.
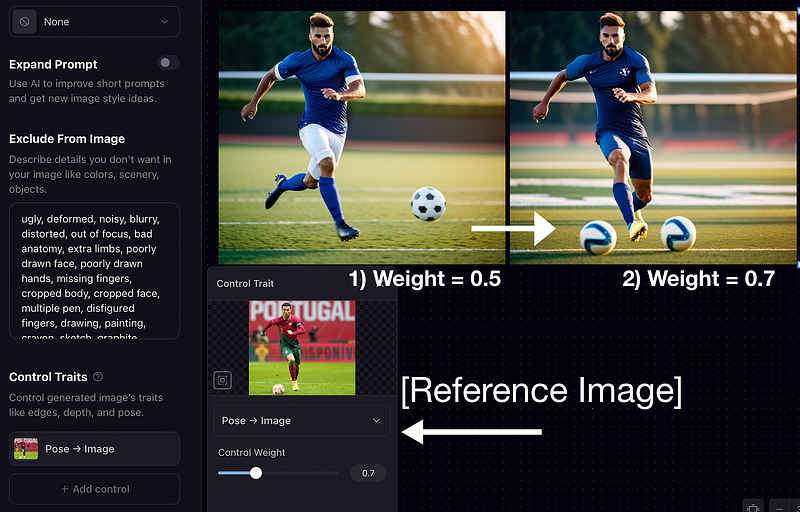
You can observe that the more complex the pose is — the higher the weight we need to use and if the pose is simple we need to use less weight to get the right output.
Even then it has problems (multiple footballs and minor imperfections) but you can see we were able to get the right pose as in the reference image.
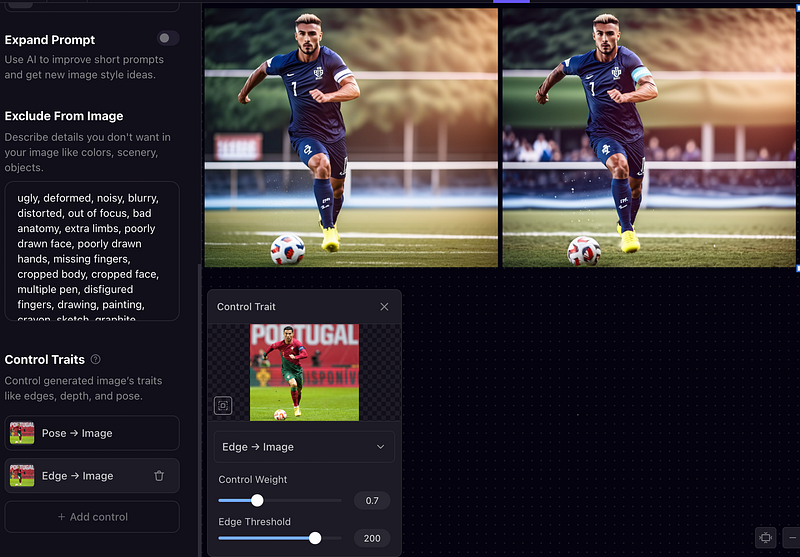
Controlling Edge — Iteration 2
How does the Edge make a difference to the image, let's see. In this case, we can try out different weights to get the desired output. By changing weight from 0.5 to 0.7, the output’s edges and details get more perfect.
Note: The extreme values for weight may bring some disfiguration.
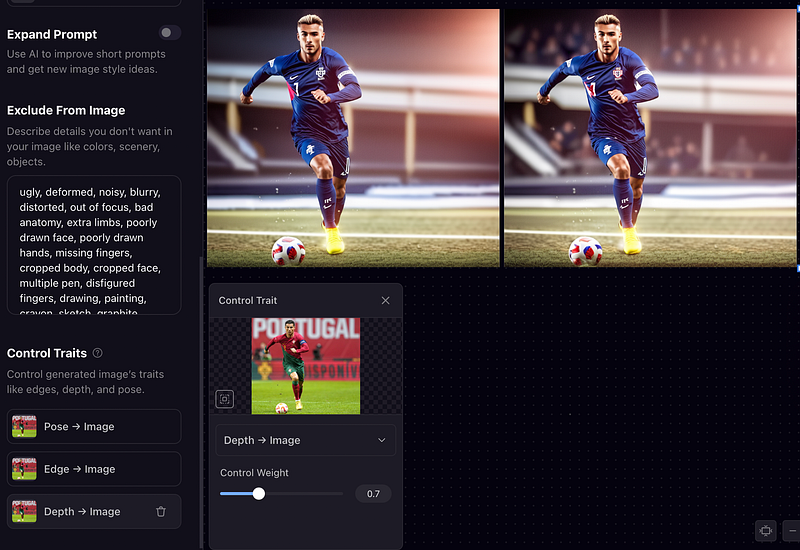
Controlling Depth — Iteration 3
Now the final trait — Depth. We can upload the same reference image and change the weight to see how it looks. Here you can see the background of the player becomes better with details.
Fine tuning.
I have just explained how the ControlNet (Control traits) feature can be used along with prompts to get the images with the desired Pose, Edge, and Depth. Fine-tuning and adjusting the weight to find the exact combination will help you get the perfect result.
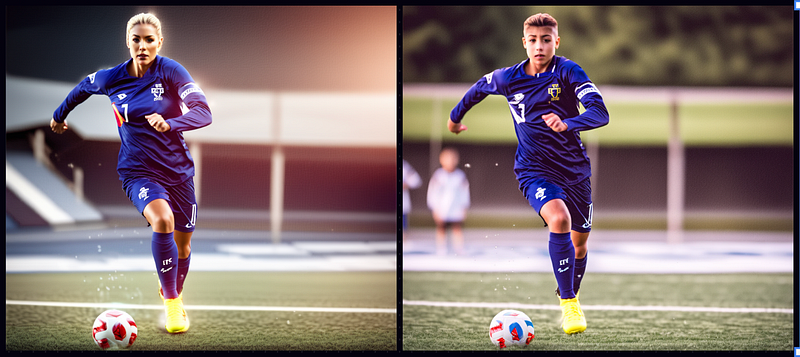
Some final Tweaks.
Just by changing the prompt a little bit, you can generate different awesome images from the same settings and Control Traits.
Prompts :
[Photographic, athletic, A beautiful woman football player kicking the ball, running fast, looking at the ball, 35mm photograph, film, bokeh, professional, 4k, highly detailed]
[Photographic, athletic, A handsome under 13 football player kicking the ball, running fast, looking at the ball, 35mm photograph, film, bokeh, professional, 4k, highly detailed]
Those who want some deep study on this topic can refer to this study — ControlNet
Stay tuned and Subscribe for more about AI image generation tips.
If you like my article, please don’t forget to support me by clapping and sharing your comments.
Here are some other articles you may be interested in: