
NumPy Arrays & Jupyter Notebook
Arithmetic Operations, Indexing & Slicing, and Conditional Selection w/ np arrays — #PySeries#Episode 06
Hi, this is a transcript of my Jupyter Notebook ‘bout NumPy!

Here we will discuss Arithmetic Operations with NumPy arrays, Indexing & Slicing, and Conditional Selection using NumPy Library for Python!
Let’s get it on!
Creating NumPy Arrays
From a Python List:
import numpy as np
my_list = [0,1,2,3,4,5,6,7,8,9,10]
nparr = np.array(my_list)
print(nparr)
[ 0 1 2 3 4 5 6 7 8 9 10]or From Build-in Method:
nparr=np.arange(0,11)
print(arr)
[ 0 1 2 3 4 5 6 7 8 9 10]UNIVERSAL FUNCTION — ufunc
ARITHMETIC OPERATIONS WE CAN PERFORM WITH NUMPY ARRAYS
https://docs.scipy.org/doc/scipy/tutorial/ https://numpy.org/doc/stable/reference/ufuncs.html
ADDING ARRAYS
nparr_added = nparr + nparr
print(nparr_added)
[ 0 2 4 6 8 10 12 14 16 18 20]SUBTRACTING ARRAYS
nparr_sub= nparr — nparr
print(nparr_sub)
[0 0 0 0 0 0 0 0 0 0 0]MULTIPLICATING OR DIVISION ARRAYS
nparr_mult = nparr * nparr
print(nparr_mult)
[ 0 1 4 9 16 25 36 49 64 81 100]# Note: division zero by zero yields no error,
# but nan (absence of an object, equal to null)
nparr_div = nparr / nparr
print(nparr_div)[nan 1. 1. 1. 1. 1. 1. 1. 1. 1. 1.]MULTIPLY BY A SCALARS
nparr_esc = nparr * 10
print(nparr_esc)
[ 0 10 20 30 40 50 60 70 80 90 100]ONE DIVIDED BY ZERO
# inf signifies infinity for one divided
# by zero at the very first element
nparr_one_div = 1/nparr
print(nparr_one_div)
[ inf 1. 0.5 0.33333333 0.25 0.2 0.16666667 0.14285714 0.125 0.11111111 0.1 ]EXPONENT — ARRAYS — Squaring everything — Two options
np_arr_exp1 = nparr ** 2
print(np_arr_exp1)
np_arr_exp2 = np.square(nparr)
print(np_arr_exp2)
[ 0 1 4 9 16 25 36 49 64 81 100] [ 0 1 4 9 16 25 36 49 64 81 100] [1.00000000e+00 2.71828183e+00 7.38905610e+00 2.00855369e+01 5.45981500e+01 1.48413159e+02 4.03428793e+02 1.09663316e+03 2.98095799e+03 8.10308393e+03 2.20264658e+04]SQUARE ROOT
nparr_sr = np.sqrt(nparr)
print(nparr_sr)[0. 1. 1.41421356 1.73205081 2. 2.23606798 2.44948974 2.64575131 2.82842712 3. 3.16227766]EXPONENTIAL WITH ARRAYS
np_arr_exp3 = np.exp(nparr)
print(np_arr_exp3)[1.00000000e+00 2.71828183e+00 7.38905610e+00 2.00855369e+01 5.45981500e+01 1.48413159e+02 4.03428793e+02 1.09663316e+03 2.98095799e+03 8.10308393e+03 2.20264658e+04]MAX & MIN
nparr_max = np.max(arr)
print(nparr_max)
10
nparr_min = np.min(arr)
print(nparr_min)

0
TRIGONOMETRIC FUNCTIONS — Passing every element into sine function
nparr_sin = np.sin(nparr)
print(nparr_sin)
[ 0. 0.84147098 0.90929743 0.14112001 -0.7568025 -0.95892427 -0.2794155 0.6569866 0.98935825 0.41211849 -0.54402111]LOGARITHMIC — Note: the very first one is minus infinity
nparr_log = np.log(nparr)
print(nparr_log)
[ -inf 0. 0.69314718 1.09861229 1.38629436 1.60943791 1.79175947 1.94591015 2.07944154 2.19722458 2.30258509]NUMPY PRACTICING EXERCISES
1. Creates an array of the integers from 10 to 50
arr_10to50 = np.arange(10,51)
print(arr_10to50)
[10 11 12 13 14 15 16 17 18 19 20 21 22 23 24 25 26 27 28 29 30 31 32 33 34 35 36 37 38 39 40 41 42 43 44 45 46 47 48 49 50]2. Create an array of the even integers from 10 to 50
arr_10to50_even = np.arange(10,51,2)
print(arr_10to50_even)
[10 12 14 16 18 20 22 24 26 28 30 32 34 36 38 40 42 44 46 48 50]3. Creates a 3x3 matrix with values ranging from 1 to 9
np.arange(1,10).reshape(3,3)array([[1, 2, 3],
[4, 5, 6],
[7, 8, 9]])4. Use NumPy to generate a random number between 0 and 1
np.random.rand(1)array([0.9293055])5. Use NumPy to generate 25 random numbers sampled from a standard normal distribution
np.random.randn(25)array([-1.47093051, 0.14332231, -0.82546753, -0.2788275 , -1.41869546,2.83129676, 2.23456237, 0.43810358, -0.93159008, 0.69855699,-0.38841985, -0.08614515, -0.46730151, -1.29781327, -0.26477789,-0.06241016, -0.86072499, -0.80564064, -0.56745696, 0.7690222 ,-0.49046738, -1.85995422, 0.68328618, -2.46422797, 0.21964493])6. Create a matrix of 100 items spaced evenly at 0.01 steps ranged from 0.01 to 1
np.arange(1,101).reshape(10,10)/100array([[0.01, 0.02, 0.03, 0.04, 0.05, 0.06, 0.07, 0.08, 0.09, 0.1 ],
[0.11, 0.12, 0.13, 0.14, 0.15, 0.16, 0.17, 0.18, 0.19, 0.2 ],
[0.21, 0.22, 0.23, 0.24, 0.25, 0.26, 0.27, 0.28, 0.29, 0.3 ],
[0.31, 0.32, 0.33, 0.34, 0.35, 0.36, 0.37, 0.38, 0.39, 0.4 ],
[0.41, 0.42, 0.43, 0.44, 0.45, 0.46, 0.47, 0.48, 0.49, 0.5 ],
[0.51, 0.52, 0.53, 0.54, 0.55, 0.56, 0.57, 0.58, 0.59, 0.6 ],
[0.61, 0.62, 0.63, 0.64, 0.65, 0.66, 0.67, 0.68, 0.69, 0.7 ],
[0.71, 0.72, 0.73, 0.74, 0.75, 0.76, 0.77, 0.78, 0.79, 0.8 ],
[0.81, 0.82, 0.83, 0.84, 0.85, 0.86, 0.87, 0.88, 0.89, 0.9 ],
[0.91, 0.92, 0.93, 0.94, 0.95, 0.96, 0.97, 0.98, 0.99, 1. ]])Returning the exact same result as above:
np.linspace(0.01,1, 100).reshape(10,10)array([[0.01, 0.02, 0.03, 0.04, 0.05, 0.06, 0.07, 0.08, 0.09, 0.1 ],
[0.11, 0.12, 0.13, 0.14, 0.15, 0.16, 0.17, 0.18, 0.19, 0.2 ],
[0.21, 0.22, 0.23, 0.24, 0.25, 0.26, 0.27, 0.28, 0.29, 0.3 ],
[0.31, 0.32, 0.33, 0.34, 0.35, 0.36, 0.37, 0.38, 0.39, 0.4 ],
[0.41, 0.42, 0.43, 0.44, 0.45, 0.46, 0.47, 0.48, 0.49, 0.5 ],
[0.51, 0.52, 0.53, 0.54, 0.55, 0.56, 0.57, 0.58, 0.59, 0.6 ],
[0.61, 0.62, 0.63, 0.64, 0.65, 0.66, 0.67, 0.68, 0.69, 0.7 ],
[0.71, 0.72, 0.73, 0.74, 0.75, 0.76, 0.77, 0.78, 0.79, 0.8 ],
[0.81, 0.82, 0.83, 0.84, 0.85, 0.86, 0.87, 0.88, 0.89, 0.9 ],
[0.91, 0.92, 0.93, 0.94, 0.95, 0.96, 0.97, 0.98, 0.99, 1. ]])7. Create an array of 20 linearly spaced points between 0 and 1
np.linspace(0,1, 20)array([0. , 0.05263158, 0.10526316, 0.15789474, 0.21052632,
0.26315789, 0.31578947, 0.36842105, 0.42105263, 0.47368421,
0.52631579, 0.57894737, 0.63157895, 0.68421053, 0.73684211,
0.78947368, 0.84210526, 0.89473684, 0.94736842, 1. ])INDEXING & SLICING NOTATION in PYTHON
What does indexing mean in Python?
An index refers to a position within an ordered list.
And what about Slicing?
Slicing in python means taking elements from one given index to another given index. We pass slice instead of an index like this: [start:end]. We can also define the step, like this: [start:end:step].
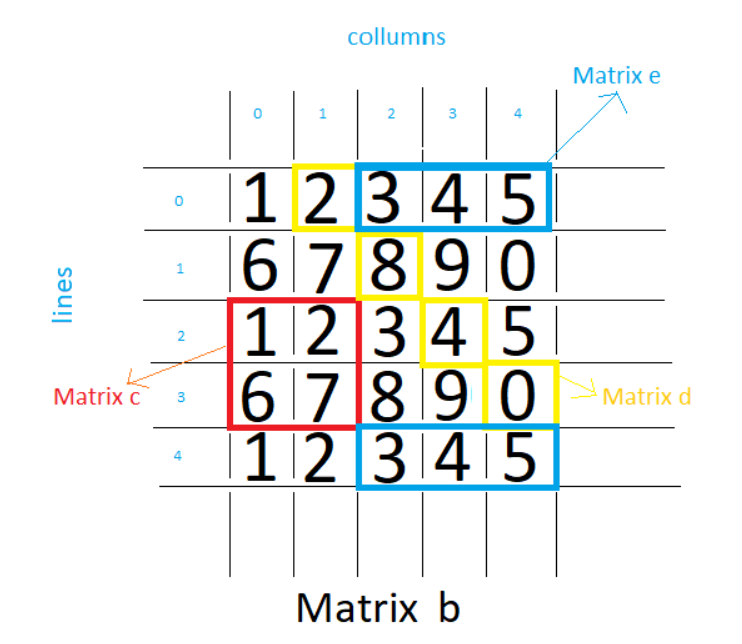
Two-Dimensional Array: arr_2_d
There are 2 general formats for GRABBING ELEMENTS from a 2-d array (matrix):DOUBLE BRACKET FORMAT mat[row][column]SINGLE BRACKET FORMAT mat[row,column](w/ comma, this is least prone to error!)Indexing & Slicing Notation (mnemonic):
[ row : Column ]Indexing:[ Grab just the ] , [ and just the ]Slicing(bni):[ Grab all from the : up to the ] : [ and all from the : up to the ]
[ but not including (bni)]: [ but not including (bni)]PRACTICING EXERCISES:
(for Indexing & Slicing in Python & NumPy)
For more training exercises look for, in addition to this post, head over for this link: QUICK FUN QUIZ :)
For This Exercises we Gonna Use the Following Matrix:)
# Use this 2-Dimensional Array for this exercises
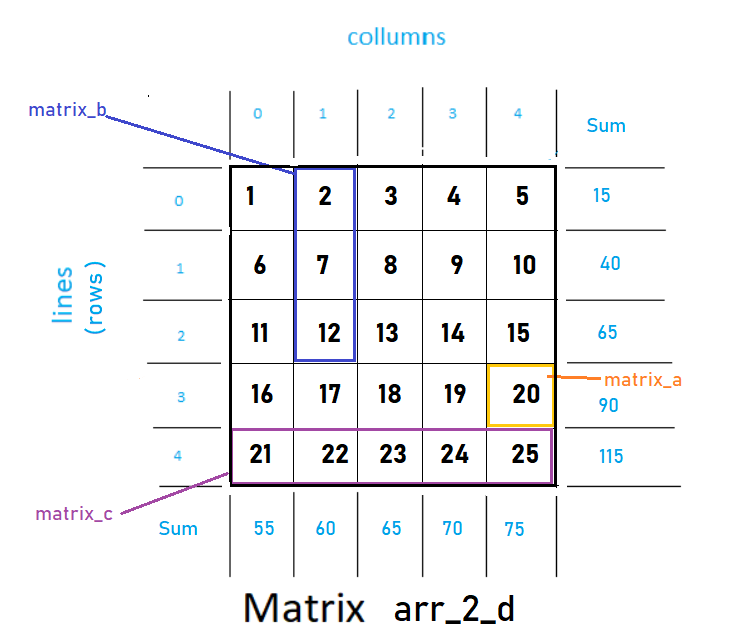
arr_2_d = np.arange(1,26).reshape(5,5)
print(arr_2_d)[[ 1 2 3 4 5]
[ 6 7 8 9 10]
[11 12 13 14 15]
[16 17 18 19 20]
[21 22 23 24 25]]1. Using Indexing & Slicing, grab element 20 of the arr_2_d array
# matrix_aarr_2_d[3,4]20
# That is to say:
#
# for row: Grab just the forth row,
#          it rescues just one element in the forth row:), and
#
# for column: and just the fifth column.
#             It rescues just one element in fifth column, again:)
2. Using Indexing & Slicing, grab items 2, 7, 12 of the arr_2_d array
# matrix_barr_2_d[:3,1:2]array([[ 2],
[ 7],
[12]])# That is to say:
#
# for row: Grab all from the begining,
# up to the forth row (but not including),
# it rescues 3 rows in a row,
#
# for column: and all from the second
# up to the 3ª Column (bni).
# It rescues just one column, the second one:)3. Using Indexing & Slicing, grab the last row of the arr_2_d array
# n=matrix_carr_2_d[4,:]
array([21, 22, 23, 24, 25])# That is to say:
#
# for row: Grab just the fifth row,
# it rescues just the last row:),
#
# for column: and all from the beginning up to the end of
# the columns(:). It rescues all the columns:)4. Get the sum of all the values in arr_2_d array
# There are 2 solutions (or more...):
# Using NumPy and pass array as parameternp.sum(arr_2_d)325
Or:
# Use the method of the object array itself directlyarr_2_d.sum()325
5. Get the standard deviation of the values in arr_2_d array
np.std(arr_2_d)7.211102550927978Or:
arr_2_d.std()7.2111025509279786. Get the sum of the Columns values in arr_2_d array
# Put Sum In The Lines (axis=0), so sum each column ;)arr_2_d.sum(axis=0)array([55, 60, 65, 70, 75])# axis=0 -> row -> so the result is placed in a row
# (then it is a columns' sum)# axis=1 -> columns -> so the result is placed in a column
# (then it is a row's sum:)7. Get the sum of the Rows values in arr_2_d array
# Put Sum In The Column (axis=1), so sum each rows ;)arr_2_d.sum(axis=1)array([ 15, 40, 65, 90, 115])# axis=0 -> row -> so the result is placed in a row
# (then it is a columns' sum)# axis=1 -> columns -> so the result is placed in a column
# (then it is a row's sum:)CONDITIONAL SELECTION
SUMMARY
- Get an array and perform a comparison operator on it; it will return a boolean array;
- Use that boolean array to index a conditional selection.
# Given that Array to test Conditional Selectionarr = np.arange(1,11)
print(arr)[ 1 2 3 4 5 6 7 8 9 10]1º Step — Comparison:
# Perform the comparison and grab the result (booleans array)bool_arr = arr < 5
print(bool_arr)[ True True True True False False False False False False]2º Step — Select elements conditionally:
# I can now use that boolean array to actually
# index or **conditionally select** elements
result_arr = arr[bool_arr]# from the original array (arr); then only return
# instances where boolean array is true.print(result_arr)[1 2 3 4]In Just One line of code. Just Awesome!
# Returning the same result as aboveresult_arr = arr[arr<5]
print(result_arr)[1 2 3 4]Notes:
Getting an array and using a comparison operator on it will actually return a boolean array (meaning an array of all boolean values).
Then we can use that boolean array to actually index or conditionally select elements from the original array where this happened to true.
So only return instances where that boolean array is true, and more commonly, instead of sorting of splitting this up into 2 steps, we would actually do this all in one step (see code above).
We would say, an array, and in brackets, instead of the array, we would pass in the conditional statement (arr[arr<5]), and that would return the same answer as the 2-step method and this is the sort of syntax notation we’re going to be using all the time as far as conditional selection is an issue.
It’s kind of weird to pass the variable itself as a parameter to the indexer brackets, but that’s how it works!
THIS IS THE SORT OF SYNTAX NOTATION YOU WOULD GET USED SPECIALLY WHEN WE MOVE ON TO PANDAS!Just fine, so far!
print(“that’s it! Thank you for Reading this post! I Hope it helps! Bye o/”)That’s it! Thank you for reading this post! I hope it helps! Bye o/
👉GitHub Repo link
👉Google Colab link
👆More .ipynb
Credits & References:
Jose Portilla — Python for Data Science and Machine Learning Bootcamp — Learn how to use NumPy, Pandas, Seaborn , Matplotlib , Plotly , Scikit-Learn , Machine Learning, Tensorflow , and more!
Universal functions (ufunc) https://numpy.org/doc/stable/reference/ufuncs.html
https://numpy.org/doc/stable/reference/ufuncs.html
Posts Related:
00Episode#PySeries — Python — Jupiter Notebook Quick Start with VSCode — How to Set your Win10 Environment to use Jupiter Notebook
01Episode#PySeries — Python — Python 4 Engineers — Exercises! An overview of the Opportunities Offered by Python in Engineering!
02Episode#PySeries — Python — Geogebra Plus Linear Programming- We’ll Create a Geogebra program to help us with our linear programming
03Episode#PySeries — Python — Python 4 Engineers — More Exercises! — Another Round to Make Sure that Python is Really Amazing!
04Episode#PySeries — Python — Linear Regressions — The Basics — How to Understand Linear Regression Once and For All!
05Episode#PySeries — Python — NumPy Init & Python Review — A Crash Python Review & Initialization at Numpy lib.
06Episode#PySeries — Python — NumPy Arrays & Jupyter Notebook — Arithmetic Operations, Indexing & Selection, and Conditional Selection(this one:)
07Episode#PySeries — Python — Pandas — Intro & Series — What it is? How to use it?
08Episode#PySeries — Python — Pandas DataFrames — The primary Pandas data structure! It is a dict-like container for Series objects
09Episode#PySeries — Python — Python 4 Engineers — Even More Exercises! — More Practicing Coding Questions in Python!
10Episode#PySeries — Python — Pandas — Hierarchical Index & Cross-section — Open your Colab notebook and here are the follow-up exercises!
11Episode#PySeries — Python — Pandas — Missing Data — Let’s Continue the Python Exercises — Filling & Dropping Missing Data
12Episode#PySeries — Python — Pandas — Group By — Grouping large amounts of data and compute operations on these groups
13Episode#PySeries — Python — Pandas — Merging, Joining & Concatenations — Facilities For Easily Combining Together Series or DataFrame
14Episode#PySeries — Python — Pandas — Pandas Dataframe Examples: Column Operations
15Episode#PySeries — Python — Python 4 Engineers — Keeping It In The Short-Term Memory — Test Yourself! Coding in Python, Again!
16Episode#PySeries — NumPy — NumPy Review, Again;) — Python Review Free Exercises
17Episode#PySeries — Generators in Python — Python Review Free Hints
18Episode#PySeries — Pandas Review…Again;) — Python Review Free Exercise
19Episode#PySeries — MatlibPlot & Seaborn Python Libs — Reviewing theses Plotting & Statistics Packs
20Episode#PySeries — Seaborn Python Review — Reviewing theses Plotting & Statistics Packs
Review at Aug/2021 — graph for exercise :)