
Lego Meets Pixy
How to Connect Your Inexpensive Camera Module to Lego — Episode #16
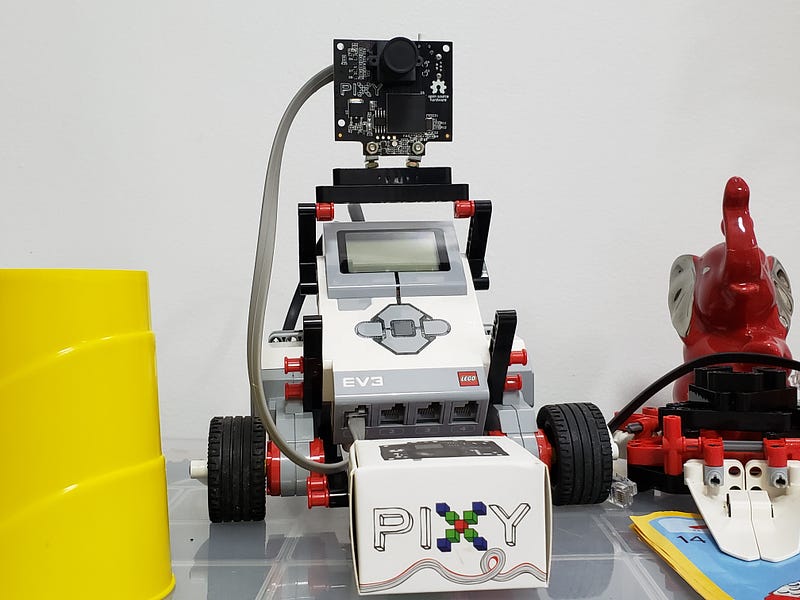
Yes! We are now carrying CMUcam 5, or know as Pixy! It can detect purple dinosaur :) The camera is designed to be added onto robots outfitted. But, the question is: How to get Lego plus Pixy linked together? Welcome to this How-to!

Mindstorms Wires Explained
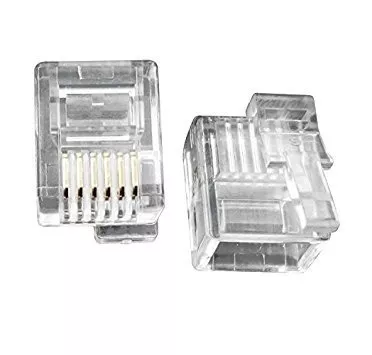
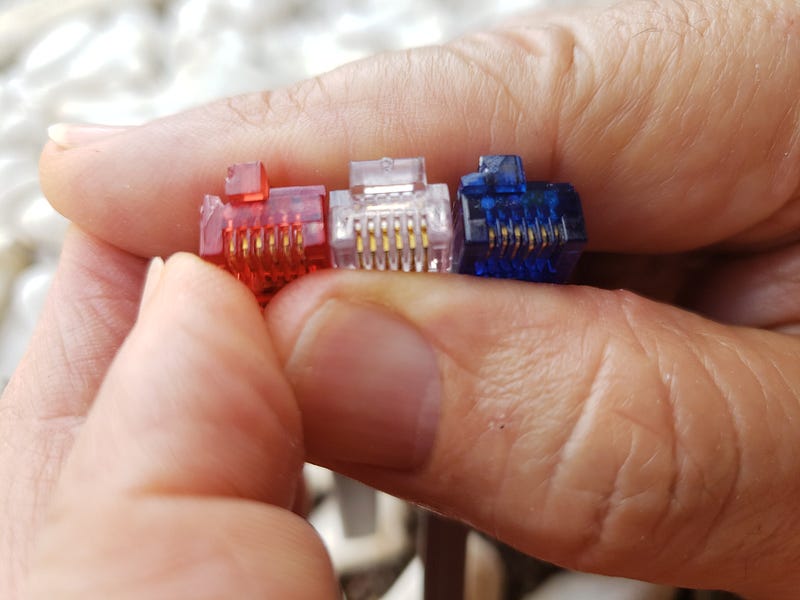
Let's begin by exploring all the nitty-gritty details of the standard Mindstorms wire. Lego uses semi-proprietary wires RJ12 variant in its Mindstorms’ Intelligent Brick access and connections methods.
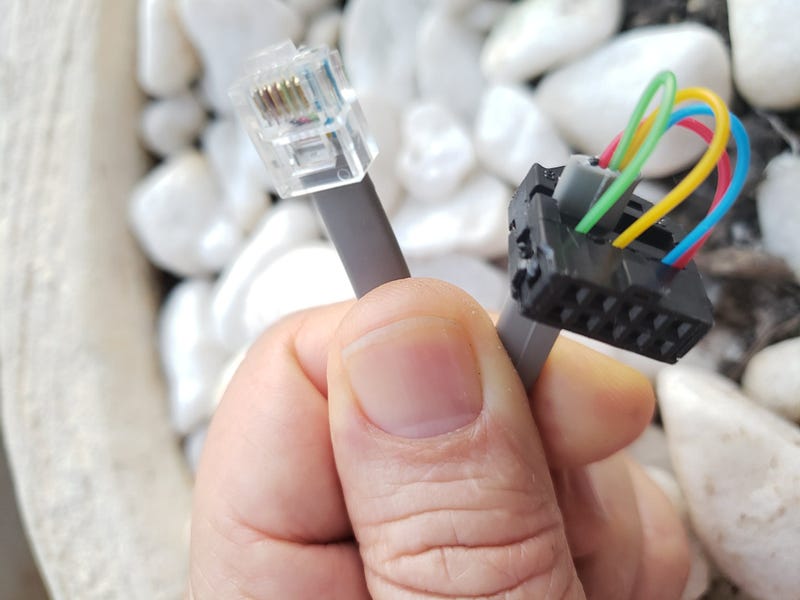
Mindstorms wires are essentially proprietary RJ12 connectors with off-center tabs:
Inside the Mindstorms Wire
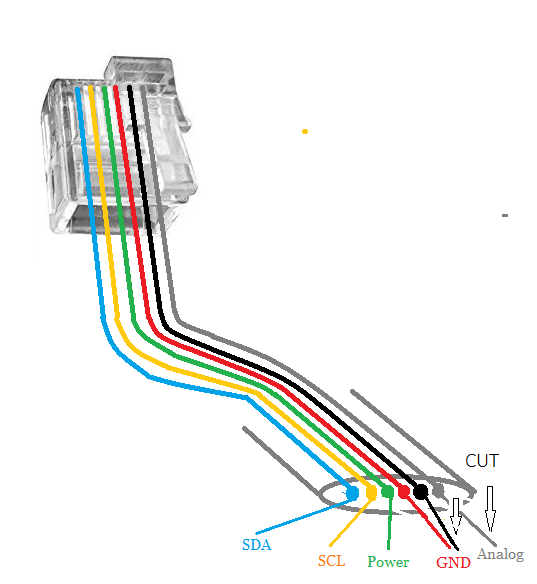
- The blue wire is the SDA (serial data) wire, one-half of a two-wire data transfer protocol called I2C. EV3 can transmit sensor data and commands through the I2C bus;
- Yellow is the SCL (serial clock) wire, the other half of the protocol;
- Green is power, typically delivering either 3.3 or 5V from the EV3' battery pack. You can use this wire to power electronics circuitry and add-on modules;
- Red is ground. Creating a circuit with this ground and the power pin yields 5V;
- Black is also ground. A circuit with this ground and the power pin yields 3.3v;
- White is analog, transmitting analog sensor signal back to the EV3 Intelligent Brick.
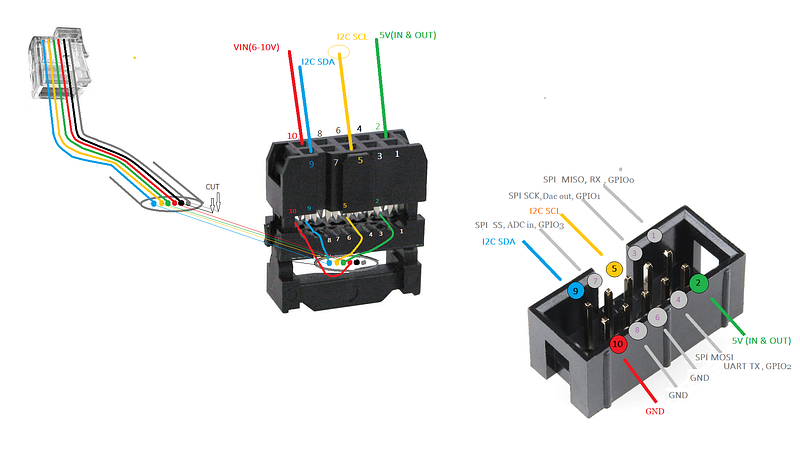
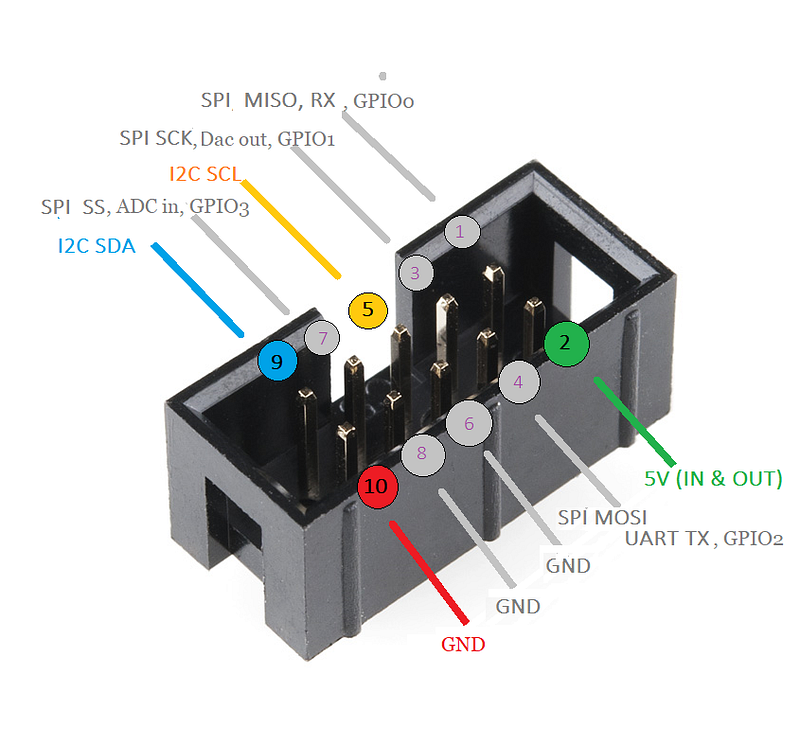
Now we need to understand the Pixy cradle and servos pinout.
Pixy can be interfaced to several protocols — I2C, Serial, and SPI — plus it controls two servos for pan-tilt functionality.
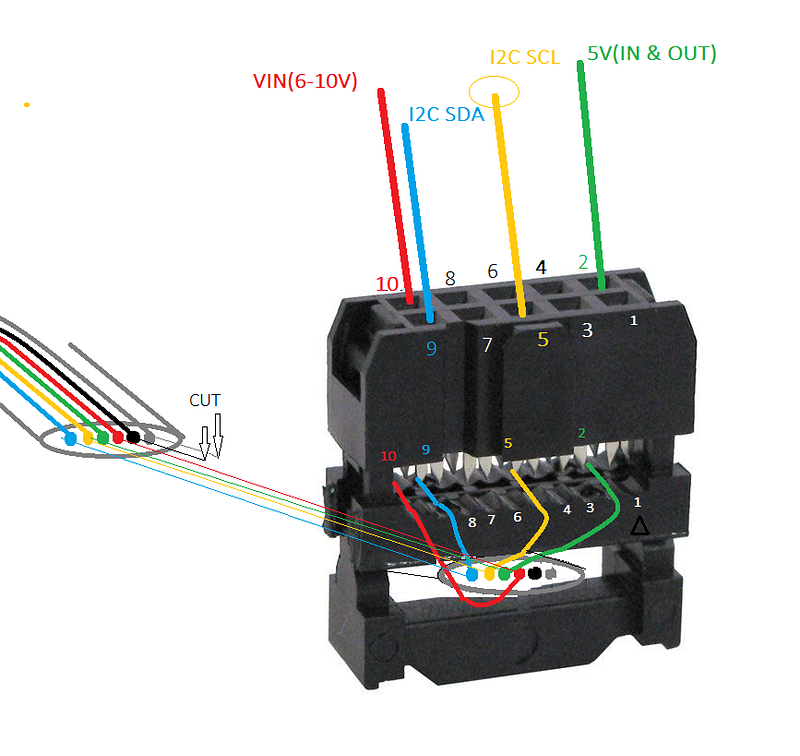
To connect Pixy with Lego we will need it: Ribbon Crimp Connector — 10-pin (2x5, Female)

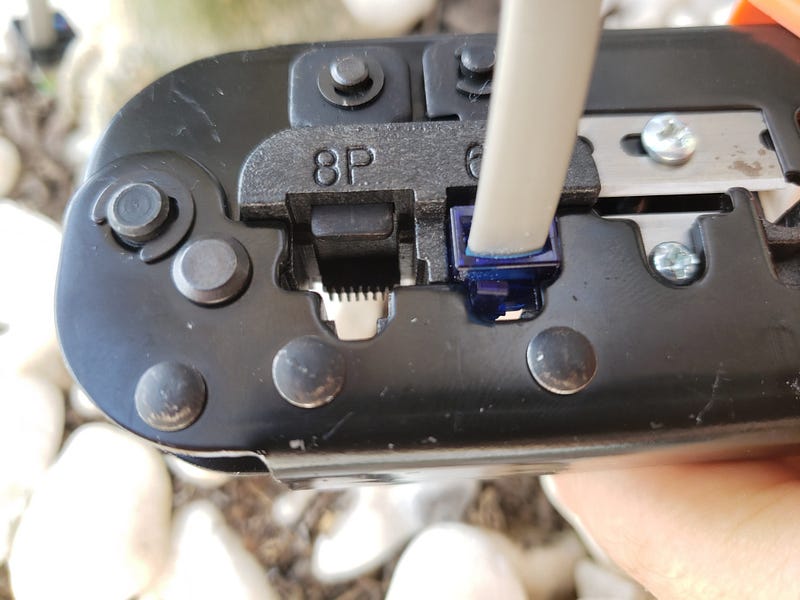
And here is how to connect Pixy and Lego:
The video — Making homebrewed Cable Lego x Pixy

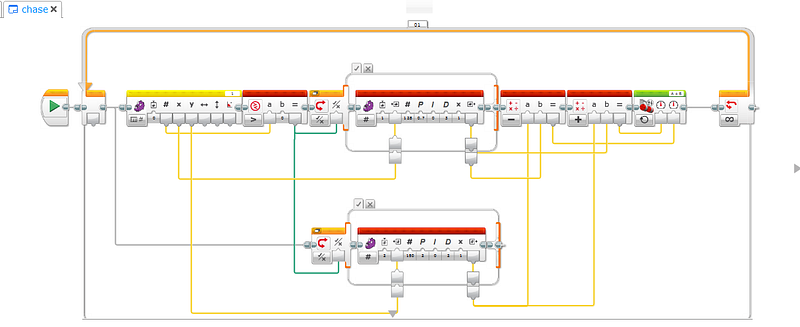
Running Pixy PID code
Here is the working chase code provided by Pixy’s Charmed Lab:
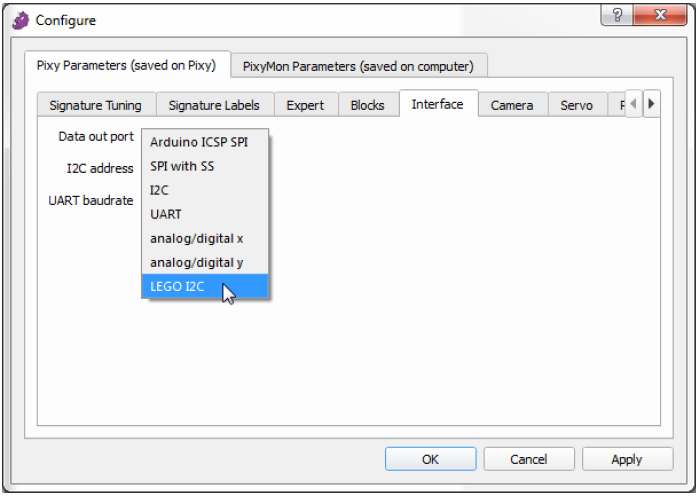
Run PixyMon to Configure Pixy For Lego Capability

Are you Curious about Pixy?
This latest CMUcam version of the embedded camera is an image sensor with a powerful processor that you can program by only send the information you’re looking for so your microcontroller isn’t overwhelmed by data from the image sensor. The Pixy CMUCam also exports its information in a variety of useful ways — UART serial, SPI, I2C, digital out, or analog out — so your microcontroller can communicate easily while still doing other tasks. It’s so unobtrusive that you can even hook up multiple Pixy CMUCams to one microcontroller! Superb!
The Pixy CMUCam5 also uses hue and saturation as its primary means of image detection — rather than the normal RGB. This means that lighting or exposure won’t affect the Pixy CMUCam’s detection of an item — which is a frustrating problem with many image sensors. It’s also a vast improvement over previous versions of the Pixy CMUCam, adding increased flexibility when it comes to lighting and exposure changes.
It can also remember seven different color signatures, find hundreds of objects at the same time, and is super fast — processing at 50 frames a second.
Finally, the Pixy CMUCam is also teachable so you can set it up to only send you images that you’ve specifically told it to look for. It’s easy and fast and has an open source application called PixyMon.
Each Pixy CMUcam5 Sensor comes with a 6-pin-to-10-pin IDC cable and mounting tabs and screws.
Specifications:
. Processor: NXP LPC4330, 204 MHz, dual core;
. Image sensor: Omnivision OV9715, 1/4", 1280x800;
. Lens field-of-view: 75 degrees horizontal, 47 degrees vertical;
. Lens type: standard M12 (several different types available;
. Power consumption: 140 mA typical;
. Power input: USB input (5V) or unregulated input (6V to 10V);
. RAM: 264K bytes;
. Flash: 1M bytes;
. Available data outputs: UART serial, SPI, I2C, USB, digital,    analog;
. Dimensions: 2.1" x 2.0" x 1.4;
. Weight: 27 grams;
Features:
. Small, fast, easy-to-use, low-cost, readily-available vision system;
. Learns to detect objects that you teach it;
. Outputs what it detects 50 times per second;
. Connects to Arduino with the included cable. Also works with Raspberry Pi, BeagleBone and similar controllers;
. All libraries for Arduino, Raspberry Pi, etc. are provided;
. C/C++ and Python are supported;
. Communicates via one of several interfaces: SPI, I2C, UART, USB or analog/digital output;
. Configuration utility runs on Windows, MacOS and Linux;
. All software/firmare is open-source GNU-licensed;
. All hardware documentation including schematics, bill of materials, PCB layout, etc. are provided;
. Pixy can remember and identify 7 colour signatures;
. Pixy can track 100’s of objects simultaneously;
. Pixy interfaces to a PC via USB and the PixyMon Application;.
Credits and References
NXT® plugs crimping tool from philohome.com
An Introduction to Image Processing; Pixy & Its Alternatives from https://electropeak.com

Related Posts
76 Ardu_Serie — Arduino Meets Pixy — How-To Get Up & Running Flying Pixy!
01º Lego Episode — Our Startup’s Journey — Invaders and Invasions?
02º Lego Episode — Timmyton — Lego-Learning-By-Playing — L2BP Series
04º Lego Episode — Lego Motions — Tribot v 1.0 — Seeing Your Creation Move — Move Steering Block
05º Lego Episode — Lego Motions — Move Tribot Around — And Backward…Five Programs Files
06º Lego Episode — Lego Sensors — Touch N Color — Two out of five human senses — Touch N Sight
07º Lego Episode — Lego Sensor — LineFollower — Line Follower Tribot v1.0
08º Lego Episode — Maze Solving Robot v1 — Lego Solution Right-Wall-Follower-Robot
09° Lego Episode — Gettle_&_Sound_Bots — How gentle can a robot be? What is the audible range of the human ear? How deep can we dive?
10° Lego Episode — Data Logging — Data Collection and the EV3
11º Lego Episode — Binning the LineFollower Code — Binning: Arithmetic To Map Sensor Reading
12° Lego Episode — A Proportional LineFollower Robot — Advanced Math To Improve Your Robot’s Steering
8th KidSeries — J3 Follower Line Robot v1.0 — The Simplest Follower Line Robot
13º LEGO Theory — Multitasking — A very Useful Programming Technique
14° LEGO formula — Normalizing Data — Converting Data to Use The Same Range
15º Lego Episode — PID — The Ultimate Line Follower — Algorithm for your EV3 PID Line Follower Robot
16 ° Lego Meets Pixy Episode — How to Connect Your Inexpensive Camera Module to Lego
18° Lego Episode — GEARS & WORMS — Geartrains & Worm & Clutch Gears
23° Lego Episode — Differential Explained — How Differential Works?
24° Lego Episode — PitBot — A Star Is Born — Working at The First Structure in Our Sparring Robot
25° Lego Episode — PitBot Is Agressive? Well, No Worries! — Making PitBot bite!
26° Lego Episode — Dancing Good w/ PitBot — All The Secret for Replicate This Awesome Robot
27 ° LEGO Episode — Sumo Arena is Ready! — Here is the playing arena for Arduino x Lego
28 ° LEGO Episode — Pick Pitbot Up! — Our Robot Are Leaving Body & Paint Shop
28 ° LEGO — B — Episode — Pitbot Battery & Sensor Setup — Preparing The infrastructure for running Arduino code
29 ° LEGO Episode — Bridging All Sensors Together — Pitbot — Collecting All Codes for the Final Act of Giving Behaviors to Robot