Lego GEARS & WORMS
Geartrains & Worm & Clutch Gears — Episode #18
Look at this super nice notebook: Jump to videos? to see my Lego’s youtube playlist — click here;)

A Brain Full of Gears! Superb!
In this post, we will guide you through some new concepts —Geartrains, Worms and Clutch Gears, Speed, Torque— as well as assemble simple contraptions to lay the foundations that will give you some of the main concepts from the machinery: GEARS.
This post is heavily based on the book Building Robots With Lego Mindstorms by Guilio Ferrari and Mario Ferrari
Let’s get it on!
But first…no description or explanation can replace what you learn through hands-on experience so watch our lab videos now!
Let’s gain understanding about gears?
10 Step by step:
1° Counting teeth
Let’s begin by using two very common Lego gears:
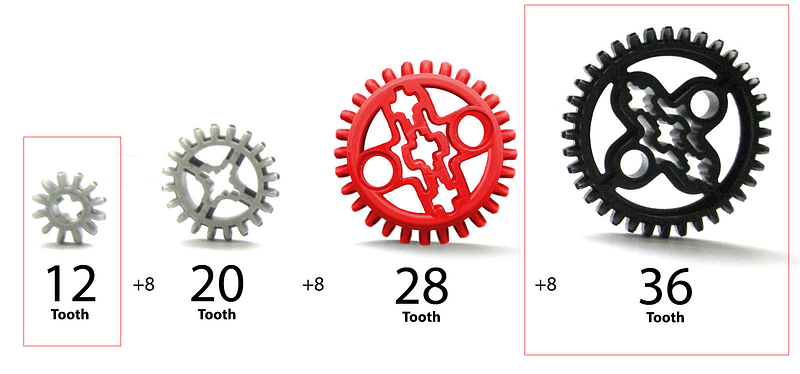
For this tutorial, a gear with 12 teeth becomes 12t and the same for the 36t, right?
2° Fitting Axles
Make this:
Following the notes:
First: The gears are transferring motion from one axle to the other
This is the first thing you should notice is that when you turn one axle, the other turns too. This is their fundamental property, their very nature.
Second: You don't need apply much strength to make them turn This is one of the great characteristics of the LEGO TECHNIC system: Parts are designed to match properly at standard distances. Their teeth match well and there is only a small amount of friction.
Third: The two axles turn in opposite directions
One clockwise and the other counterclockwise.
Fourth: The two axles revolve at different speedsWhen you turn the 12t, the 32t turns more slowly, while turning the 32t makes the 12t turn faster.
3° Gear Ratio
For every turn of the 32t, the 12t makes three turns! We express this relationship with a ratio that contains the number of teeth in both gears: 32 to 12. We can simplify it, dividing the two terms by the smaller of the two (12), so we get 3 to 1.This makes it very clear, in numerical terms, that one turn of the first corresponds to three turns of the second. That gives us 1:3 Gear ratio, right?
You have found a good method to gain speed (technically angular velocity), alright…but … there is always a but …it is impossible to get something for nothing: you have to pay for this gained speed!
System strength decreasesIn other words, the torque falls proportionally to the ratio of the gears relations. But in compensation, you can gain strength by selling speed and that calls for …
4° Symmetrical Conversion of Gears
One of the nice properties of gears is that this conversion is symmetrical: You can convert torque into velocity or vice versa!
5° Gearing it down and gearing it up
We say that we gear up when our system increases velocity and reduces torque and that we gear down when it reduces velocity and increases torque.
6° So what is torque for?
To turning something you want: a wheel, a car, a robot...you’ve got it!Torque is a measure of how much a force acting on an object causes that object to rotate.
Torque is the amount of turning power you have, much in the same way you turn a wrench.
7° The geartrain
Let’s assume you want more speed. What we must do?
Make a Geartrain, also known as a multistage reduction (or multiplication) system:
So, considering our humble geartrain above: at each turn of the worm axis, only one tooth of the 24t advances, so we need 24 turns of the worm axis to give an entire turn of the 24t shaft. the resulting is 1 : 24, while the resulting torque is twenty-four times to one (hence it is easy to turn the lever with load). Therefore, the ratio is 1:24, hurray!
Annotations about Geartrain:
1) It gives you incredible power (see video above);2) You can trade as much velocity as you want for the same amount of torque;3) All this strength must be used with care, however, because if something gets jammed, the strength of a LEGO motor multiplied by 3^5 is enough to deform your beams, wring your axles, or break the teeth of your gears;4) Remember that in adding multiple reduction stages, each additional stage introduces further friction, the bad guy that makes your world less than ideal. For this reason, if aiming for maximum efficiency, you should try and reach your final ratio with as few stages as possible.And talking about few stages…
8° The Worm gear
This is another strange gear, a grey one that resembles a sort of cylinder with a spiral wound around it. Is this thing really a gear? Yes, it is, but it is so peculiar we have to give it a special mention

Here are some Worm Gear features:
1) The worm gear leads to an asymmetrical system;2) The two axles are perpendicular to each other;3) As we turn the worm gear axle slowly by exactly one turn, the 24t gear rotates by exactly one tooth, at the same time; 4) As consequence we get a 1:24 ratio with a single stage;5) The asymmetry makes the worm gear applicable only in reducing speed and increasing torque, because, the friction of this particular device is too high to get it rotated by another gear;6) The same high friction also makes this solution very inefficient, as a lot of torque gets wasted in the process;7) But not always this inneficience is a bad thing. There are common situations where this asymmetry is exactly what we want. For example, when designing a robotic arm to lift a small load (see image below)
In situations where you desire precise and stable positioning under load, the worm gear is the right choice. And it’s also the right choice when you need a high reduction ratio in a small space since allows very compact assembly solutions.
So, it’s friction that makes it possible…otherwise, the load could return and cause a catastrophe in the engine gears or kill someone; it’s like a hardware brake! superb!

9° The clutch gear
Another special device you should get familiar with is the clutch gear: It offers some resistance, but it turns. This is its purpose in life: to offer some resistance, then give in!
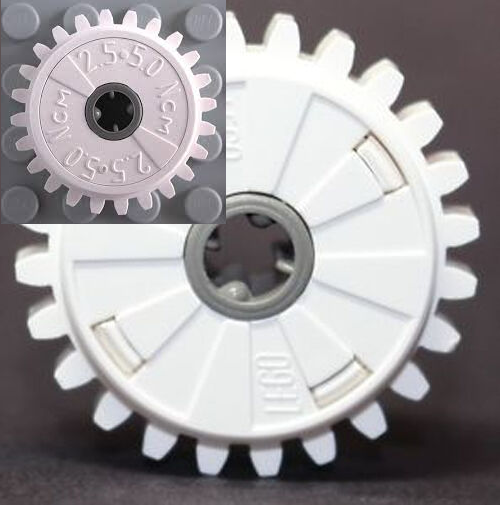
This clutch gear is an invaluable help to limit the strength you can get from a geared system.
The mysterious 2.5·5 Ncm writing stamped on it (Ncm is a newton-centimeter, the unit of measurement for torque) indicates that this gear can transmit a maximum torque of about 2.5 to 5 Ncm. When exceeding this limit its internal clutch mechanism starts to slip.
10º What’s this feature useful for?
This clutch gear helps you limiting the final strength to a reasonable valueYou have seen before that through some reduction stages you can multiply your torque by high factors, thus getting a system strong enough to actually damage itself if something goes wrong.
If you want to know exactly how clutch gear works buy this: I have no 42056 piece, the iconic LEGO Technic Porsche 911 GT3 RS :/
But this is my next online order.
But for now please considered watch these videos:
All right! That’s all Lego’s fun! In the next episode, we’re gonna discuss more Lego’s issue.
Be happy building Lego contraptions and learning by doing this Lego series!
Bye!
Download All Files For This Project
Credits & References
Based on the book Building Robots With Lego Mindstorms by Guilio Ferrari and Mario Ferrari
LEGO Gears for EV3 Robots Part 4: Specialty Gears by Builderdude35
Building Instructions & Program Descriptions
Gear from education.lego.com
Spinning Levers — How A Transmission Works (1936) from US Auto Industry
Related Posts
76Ardu_Serie — Arduino Meets Pixy — How-To Get Up & Running Flying Pixy!
01º Lego Episode — Our Startup’s Journey — Invaders and Invasions?
02º Lego Episode — Timmyton — Lego-Learning-By-Playing — L2BP Series
04º Lego Episode — Lego Motions — Tribot v 1.0 — Seeing Your Creation Move — Move Steering Block
05º Lego Episode — Lego Motions — Move Tribot Around — And Backward…Five Programs Files
06º Lego Episode — Lego Sensors — Touch N Color — Two out of five human senses — Touch N Sight
07º Lego Episode — Lego Sensor — LineFollower — Line Follower Tribot v1.0
08º Lego Episode — Maze Solving Robot v1 — Lego Solution Right-Wall-Follower-Robot
09° Lego Episode — Gettle_&_Sound_Bots — How gentle can a robot be? What is the audible range of the human ear? How deep can we dive?
10° Lego Episode — Data Logging — Data Collection and the EV3
11º Lego Episode — Binning the LineFollower Code — Binning: Arithmetic To Map Sensor Reading
12° Lego Episode — A Proportional LineFollower Robot — Advanced Math To Improve Your Robot’s Steering
8th KidSeries — J3 Follower Line Robot v1.0 — The Simplest Follower Line Robot
13º LEGO Theory — Multitasking — A very Useful Programming Technique
14° LEGO formula — Normalizing Data — Converting Data to Use The Same Range
15º Lego Episode — PID — The Ultimate Line Follower — Algorithm for your EV3 PID Line Follower Robot
16° Lego Meets Pixy Episode — How to Connect Your Inexpensive Camera Module to Lego
18° Lego Episode — GEARS & WORMS — Geartrains & Worm & Clutch Gears
23° Lego Episode — Differential Explained — How Differential Works?
24° Lego Episode — PitBot — A Star Is Born — Working at The First Structure in Our Sparring Robot
25° Lego Episode — PitBot Is Agressive? Well, No Worries! — Making PitBot bite!
26° Lego Episode — Dancing Good w/ PitBot — All The Secret for Replicate This Awesome Robot
27 ° LEGO Episode — Sumo Arena is Ready! — Here is the playing arena for Arduino x Lego
28 ° LEGO Episode — Pick Pitbot Up! — Our Robot Are Leaving Body & Paint Shop
28 ° LEGO — B — Episode — Pitbot Battery & Sensor Setup — Preparing The infrastructure for running Arduino code
29 ° LEGO Episode — Bridging All Sensors Together — Pitbot — Collecting All Codes for the Final Act of Giving Behaviors to Robot
Curiosity