
The Best Medium Article Formatting Guide
A comprehensive guide to formatting Medium stories like a top writer
If you are a new writer on Medium, or an especially curious one like me, you probably have looked at ways to improve the formatting of your Medium articles.
Medium has published a couple articles on article formatting, but many are useless to new writers. These articles are typically outdated, lack proper visuals to demonstrate how to use various features, and even if there is quality information, it is usually distributed across a seemingly random array of articles.
I’ve addressed many of these formatting questions on my publication Blogging Guide, which is geared toward Medium writers looking for help. However, Medium article formatting can be overwhelming and this information should be broken down further with visuals to truly make it understandable to most writers. This was underscored by a response to a Medium-authored formatting guide, from Medium user, Ron Nicholas:

This is just one of many (unanswered) comments made in response to Medium’s formatting guides, which are rich with information, but hard for new writers to decipher.
I tried to make this guide comprehensive enough that it would be useful to both new writers who want to explore all the formatting features Medium offers, and to veteran writers who think they know all the tricks but may have overlooked one or two more obscure ones.
I hope you enjoy the guide, and please be sure to follow the Blogging Guide Publication, subscribe to our newsletter, and join our Facebook group! We are Medium’s leading publication dedicated to publishing useful content for Medium writers.
Medium Text Toolbar Buttons

To format an article on Medium, select the text you want to format and choose the relevant option from the toolbar. Below you’ll find all the formatting options offered by the Medium editor. Animations are listed below each major topic.
Bold
Select the text you want to format to open the text toolbar and click the B button to apply the formatting.
Italics
Select the text you want to format to open the text toolbar and click the i button to apply the formatting.
Links
To create a hyperlink in your post, select the text you want to convert into a link to open the text toolbar, click on the chain icon in the toolbar to hyperlink the selected text, paste or type in a link, and press Enter.

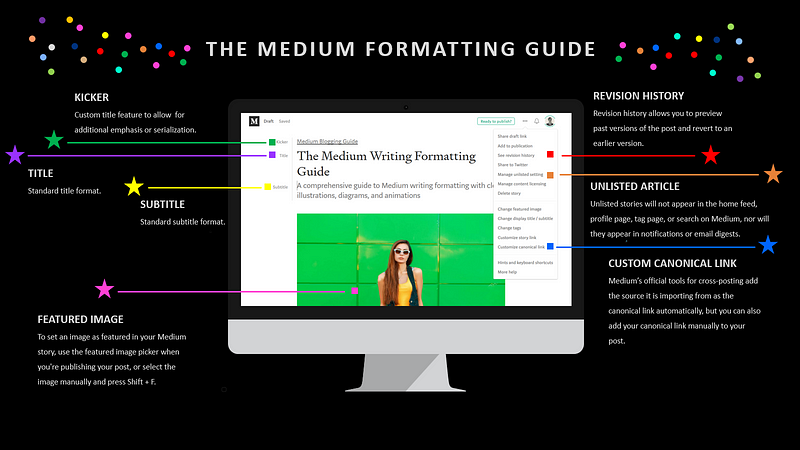
Titles, Subtitles, Headers, and Subheaders
- Title: Only the first line of the story is considered the title. Select the text and click the large “T” icon to format the title. It can be any length, and is bound by hitting “return” on your keyboard.
- Subtitle: Writing directly below the title is considered the subtitle. Select the text and click the small “T” icon to format the subtitle. It can be any length, and is bound by hitting “return” on your keyboard.

For more information on Medium Title and Subtitles, read:
- Headers: To set a header, select any text that isn’t the title or subtitle and click the large “T” icon.
- Subheaders: To set a subheader, select any text that isn’t the title or subtitle and click the small “T” icon.

- Kicker: Creating a “Kicker” is slightly more confusing. My suggestions would be to start with a formatted title and subtitle. Next, using the example seen below, click in front of the the letter “T” in the word “Title” and click enter, creating a new line. Now type the text for your kicker on the top line (which should be blank). Highlight your kicker and click on the lowercase t icon. This is demonstrated below:

For more information on Medium’s Kicker, read:
Quotes
Select any text in the editor and click on the quote icon (“) in the menu to make it a block quote. Click the icon again (second time) to make it a pull quote. Clicking the quote icon a third time will remove the quote formatting.

Tip: Block quotes (pressing the quotation mark button once) are typically used on Medium for longer direct quotes. Pull quotes (pressing the quotation mark button twice)are typically used for short direct quotes. Pull quotes can also be used to emphasize key points in an article.For more information on Medium Quotes, read:
Drop Caps
Select the first letter of a paragraph, and an option to turn it into a drop cap will appear in your formatting menu.

Custom Image Drop Caps
You can also upload a custom image drop cap instead of the Medium default characters.
How to Create a Custom Drop Caps Character
- Follow the steps above to create a standard drop caps character.
- Save the custom image you want to use for your custom drop caps character to your desktop.
- Click on the standard drop caps character (you should see a green rectangle appear around the large letter).
- From your desktop, drag the custom image file you’d like to use in place of your drop cap, directly onto the green box.
- The custom image will replace the default drop caps character.

For more information on Medium Drop Caps, read:
Leaving Private Notes
On a draft or a published post, select the text you want to comment on. Click the lock icon from the pop-up toolbar. Write your note. If you do not see this option in the toolbar, it is because the author has turned off private notes.

Tip: When you leave a note, it will be visible to you, the author of the post, and if the post is in a publication, the editors of the publication will also be able to see the note.Additional Medium Article Formatting Tools

Only some of the more basic formatting tools are in the pop up text toolbar, as described in the sections above. Many of the other formatting tricks either require keyboard shortcuts or use of various custom Medium settings (bulleted lists, custom URLs, custom meta descriptions, and most image formatting, to name a few), as demonstrated below.
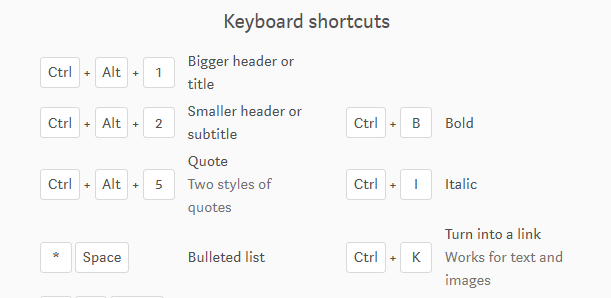
Keyboard Shortcuts in the Editor
If you forget the keyboard shortcuts for Medium’s editor, don’t worry. Press Ctrl+? (Desktop) or ⌘+? (iOS) while editing an article to see the list of keyboard shortcuts.

Creating Lists
Bullet Points — To begin a bulleted list, go to a new line, type in a dash (-) or asterisk (*), and press Space. Next, you start typing your first item. Once you hit Enter on your keyboard, the list will be reformatted for you automatically:

Numbered List — To begin a numbered list, go to a new line, type in 1. (numeral one, period), and press the space bar on your keyboard. The list will automatically add subsequent numbers when you hit Enter on the keyboard.

Tip: Numbered lists cannot be continued if you try to insert an image in the middle of them. Alternatively, you can create numbered lists without using Medium's formatting (so that you can include images, for example)by excluding the space from after the period.Friend Link
One of the most overlooked features available to all Medium writers is the friend link. Medium’s friend link gives anyone free access to your story — even if they’re not a subscribing Medium member or they have already read all their complimentary stories for the month.
To Utilize Medium’s Friend Link:
- Go to the article you want to share
- Click Edit in the top right hand corner of the article
- Click “Share Friend Link”
- Copy the newly generated link, and share with friends or social media

Note: The one exception appears to be using the friend link on Medium itself. For example, if you post the friend link to a related article in another article, this link will revert to the standard pay-walled link.
But outside of Medium (on Facebook, Twitter, LinkedIn, or any other platform) you are able to share your article with anyone, for free!
For more information on Medium’s friend link, read:
Medium Scheduling Posts
To schedule a post to be published at a particular time and date:
- Go to the draft you want to schedule to publish and click Ready to publish?
- Click Schedule for later.
- Enter the date and time when you wish to publish.
- Click Schedule to publish.

For more information on scheduling Medium posts, read:
Mentioning Medium Users
Type “@” and then the name of the person you want to mention. Mentioning someone will link to their profile and send them a notification when you publish.

Tip: If you want to reference a user but not have them receive a specific dashboard notification, you can always hyperlink directly to their profile. However, mentions are a great way to thank those who have helped you or written great articles that inspired you, and it is "the norm" when referencing a Medium user.Custom Meta Description
A meta description (sometimes called a meta description attribute or tag) is an HTML element that describes and summarizes the contents of your page for the benefit of users and search engines.
For example, when you Google the phrase “Tai Lopez” you will see the following results, which include my Medium article:

Medium allows writers to customize the meta description of any article. The text in the red box is from a custom meta description entered into Medium.
How to Customize the Meta Description of Medium Articles:
- Go to the Medium article you want to customize, and click the edit icon in the upper right hand corner.
- Click on the button labeled “change display title/subtitle.”
- Enter your preferred Medium article meta description and click save.

For more information on custom meta descriptions, read:
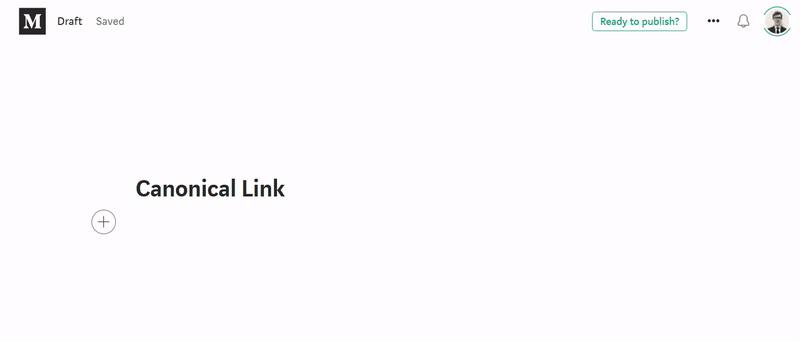
Canonical Link
When posting content to multiple platforms at the same time (such as your website and Medium), it is important to make sure a single source of that content is the ultimate authority. Medium’s tools for cross-posting (such as the Import tool) add the source it is importing from as the canonical link automatically. However, users can also customize their canonical links:
For more information on Medium Canonical Links, read:
Image Alt Text
Also called “alt tags” and “alt descriptions,” alt text is the written copy that appears in place of an image on a webpage if the image fails to load on a user’s screen. This text helps screen-reading tools describe images to visually impaired readers and allows search engines to better crawl and rank your website.
Whether or not you perform SEO for your Medium articles, optimizing your article’s image alt text is your ticket to creating a better user experience for your visitors, no matter how they first found you.
How to Add Alt Text to Your Medium Article Images
- For an existing article, click the “edit story” tab in the upper right hand corner.
- Click on the image you wish to add alt text to. Click on the “Alt-text” button.
- Write a brief description of this image for readers with visual impairments or to optimize SEO.
- Click the “save” button and you are done.
For more information on Medium alt text, read:
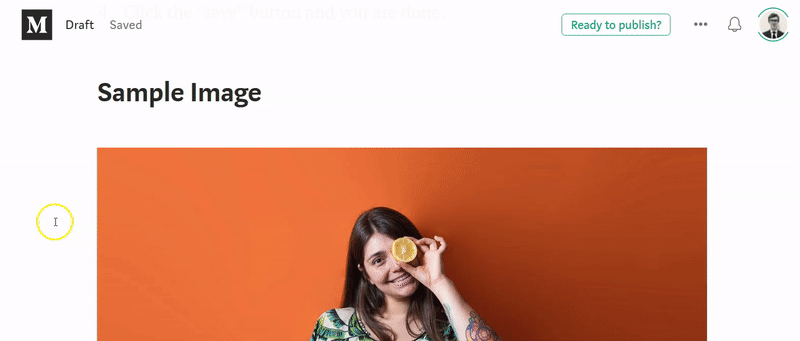
Image Caption
To add a caption to an image, click to select the image. Start typing your caption and it will appear beneath the image.

Standard Image Formatting Options
In the Medium editor, click on any image to bring up the menu that allows you to change its size and position.

While images in Medium articles will appear differently when viewed on desktop devices, mobile devices, iOS and Android apps, below are some guidelines for image dimensions in posts:
- Full column-width images: 1400 px wide
- Out-set images: 2040 px wide
- Screen-width images: 2500 px wide
Note: The editor supports images up to 25MB in the .JPG, .JPEG, .GIF, and .PNG formats.Set Image Focal Point
You can set a focal point on your image to crop your images better for social media thumbnails and preview image on Medium.
How to Set a Focal Point on Your Featured Image
- Hold Alt / Opt.
- Click on the image in the place where you want your focal point to be.
- The resulting green circle will serve as a focal point for automatic image cropping that appears in post listings and previews around the site.

For more information on Medium Image Focal Points, read:
Image Grids
You can create an image grid if you insert two or more images in your Medium story at the same time. Do this by holding Ctrl/⌘ or Shift while selecting image files.
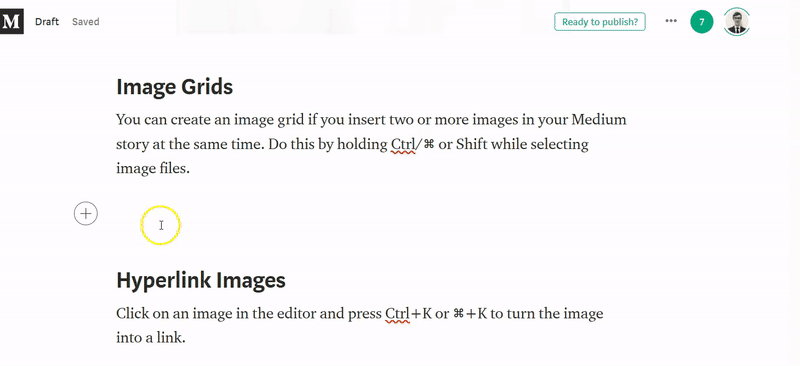
Note: Medium images, when you have many of them, look especially good when you utilize them in groups of three as the grid function is designed to optimally format this configuration.Hyperlink Images
Click on an image in the editor and press Ctrl+K or ⌘+K to turn the image into a link.

For more information on linking Medium images, read:
Featured Image
In the “Publish” drop-down menu, you can select which of the hi-res images from your story is featured in previews. Or select an image and hit “Shift+F.”

Tip: The featured image option allows you to use separate images for external clips of your article and the image you use below your title. This can be useful for images illustrating different points about your articles or when images differ in size or resolution.Embedding Content
To embed a Tweet, Instagram video, or more on Medium, all you need to do is to paste the URL into the Medium editor, and press Enter to convert that link into an embed.
Social media posts — You can embed a tweet or Facebook post in your story by pasting in its link and pressing Enter.
Embed other Medium stories — You can embed another Medium story by pasting in its link and pressing Enter.
Embed videos — You can embed videos from sites like YouTube, Vimeo, and Facebook by pasting in any video link and pressing Enter.
Embed audio — You can embed audio from sites like Soundcloud or Spotify by pasting in any audio link and pressing Enter.

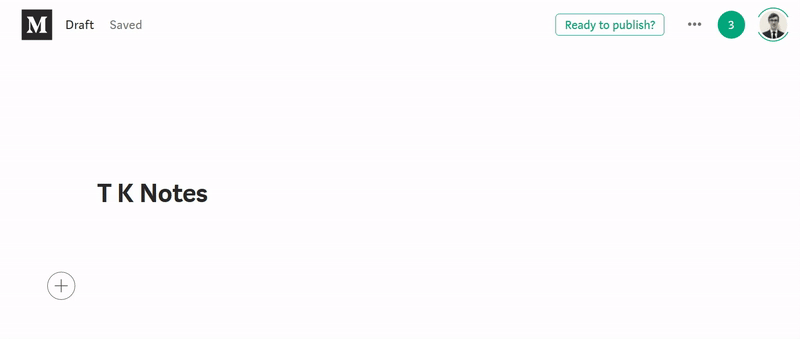
T K Notes
Write “TK” anywhere in your story as a placeholder and reminder to yourself to finish or come back to something later. Typing “TK” will generate a yellow “TK” symbol beside the associated paragraph.
Medium will warn you if you have any TKs left before you hit Publish, so it is especially useful if you are writing long or complex articles.

For more information on Medium TK Notes, read:
Code Blocks
For inline code blocks in a paragraph, type a single backtick ` to begin and end your code. Or highlight some text and press the backtick key.

Where is the backtick on your keyboard?

To include a separate code block or snippet, type three backticks (`) into the editor.

For more information on Medium Code Blocks, read:
Word Count
In the Medium editor, select the entire story Ctrl+A (Desktop) or ⌘+A (iOS) or any passage to see the word count at the top of the page.

Revision History
Click on the […] in the upper right corner of the editor, and then on Revision history to see the version history of your story. You can then view or revert to an earlier version of your story.

Publish as Unlisted
You can publish a story as unlisted on Medium. It will be visible only to those who have its link, and it won’t appear on your profile or on Medium’s public pages. Click on the […] button in the upper right corner of the editor, and then click Manage unlisted setting. Choose an option and click Save.

For more information on Medium unlisted posts, read:
Customize Title and Subtitle of Your Story
After finishing your story, click the […] button and select Title/subtitle. Select Custom title. Choose Custom title, input your custom display title, and then click Save. You must have a title, but a subtitle is optional.

Customize Story Link
Medium allows users to customize the URL link for individual stories.

Tip: The Medium story URL is one of the few aspects of a post that cannot be customized after you hit publish. If you want to create a new URL, you will have to create a new post. If you just want to change the title, subtitle, or description, you can edit those after publishing your post.Import a Story to Medium
The Medium import feature allows you to bring a story you published somewhere else to Medium automatically (for example, a post from your personal blog). You can preview and edit it before publishing.
How to Import a Story on Medium
- Click on your profile picture in the top-right corner of the page and click Stories.
- Click Import a story.
- Paste the URL of the story you’d like to import into the field and click Import.
- Click See your story.
- Edit your post and click Publish to publish it on your profile.

Tip: Imported stories will automatically apply a canonical URL referencing the original source. You can also paste stories into a new Medium draft by click the “write a post” button. However, you will need to customize the canonical URL, as described earlier in this guide.Export and Backup Your Medium Articles
Medium gives you the ability to export your personal data and stories as HTML files in a .zip archive.
How to Export and Backup Medium Articles
- Click on your user icon and click Settings.
- Scroll down to the Accounts section.
- Click Download .zip.
- A link to download your archive will be sent to you by email when it is finished.

For more information on downloading and backing up your Medium posts, read:
Save to Medium
Save to Medium is a feature that will enable you to save stories from any URL, from any device, and view it in the Medium app.
How to Save to Medium
- Navigate to external article you wish to save.
- Tap the share button in your browser or any other app.
- Tap “Save to Medium” to save links directly to your reading list in the Medium app.

I hope you found this Medium guide useful! I will continue to add new formatting tips to it as they are implemented.

Thanks for reading this article! Leave a comment below if you have any questions. Be sure to sign up for the Blogging Guide newsletter, to get the latest tips, tricks, and news about writing on Medium and to join our Facebook group, Medium Writing, to share your latest Medium posts and connect with other writers.
If you liked this article, here are some other articles you may enjoy:

Casey Botticello is an internet entrepreneur and the founder of Blogging Guide, an online community of writers with an award-winning newsletter. He is also the creator of the popular Medium Writing Course and the Substack Newsletter Course.
Casey previously worked at several tech startups, a lobbying & strategic communications firm, and has created several businesses of his own. He is a graduate of The University of Pennsylvania, where he received his B.A. in Urban Studies.
You can connect with him on LinkedIn, Twitter, Facebook, follow his Medium publications, Digital Marketing Lab and Medium Blogging Guide, or reach out to him directly on his personal website.


