
CS50’s Web Programming with Python and JavaScript 2020 — Review APIs, ORM and SQL
Introduction
CS50’s Web Programming with Python and JavaScript is a solid course for IT or software engineers to review the basic knowledge for web programming which provided by HarvardX. Of course, we still have to take time to clarify the concepts after completing the class.
This article includes following topics.
- The basic concept of Flask
- The basic concept of PostgreSQL
- The basic concept of Object-Relational Mapping (Flask-SQLAlchemy)
- The basic concept of APIs
- Some basic operations in Heroku
- Project1: Book-Discovery
About this Series
This series aims to wrap up contents of CS50’s Web Programming with Python and JavaScript.
- Article 1: Review CSS, Sass, and RWD
- Article 2: this article
- Article 3: Review JavaScript, SPA, and CSS animation
- Article 4: Learn Django and Selenium
- Article 5: CI/CD, Containerization, Scalability, Caching, and Security
The basic concept of Flask
Flask is a lightweight WSGI web application framework. It is designed to make getting started quick and easy, with the ability to scale up to complex applications.
It began as a simple wrapper around Werkzeug and Jinja and has become one of the most popular Python web application frameworks. — from Flask
Introduction
There are several items in this section.
- Setup/install Flask
- Example for a Flask app
- Route
- Render template
- Inheritance (Remove duplicate HTML code)
- Submit a form with HTTP Post
- Use session
Setup/install Flask
pip install flaskExample for a Flask app
- Create application.py
from flask import Flaskapp = Flask(__name__)
@app.route("/")
def index():
return "Hello, world"- Execute application.py from the console
export FLASK_APP=application.py
flask run
Route
- route template
@app.route("/<string:name>")
def hello(name):
    return f"Hello, {name}!"
Render template
1.import render_template
from flask import Flask, render_templateapp = Flask(__name__)
@app.route("/")
def index():
headline = "Hello, world"
return render_template("index.html", headline=headline)2.Add index.html in the templates folder
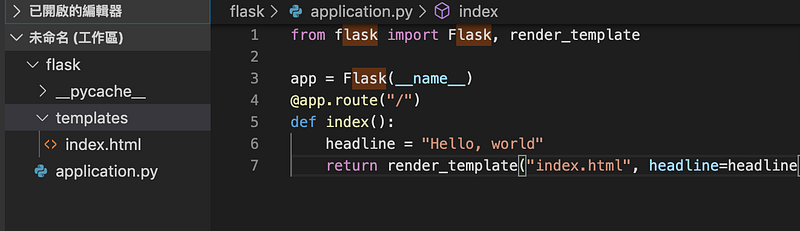
3.Make the index.html with Jinja2 syntax
<!DOCTYPE html>
<html lang="en">
<head>
    <meta charset="UTF-8">
    <meta name="viewport" content="width=device-width, initial-scale=1.0">
    <meta http-equiv="X-UA-Compatible" content="ie=edge"
    <title>Document</title>
</head>
<body>
    <h1>{{headline}}</h1>
</body>
</html>
Inheritance (Remove duplicate HTML code)
- Add layout.html in the templates folder
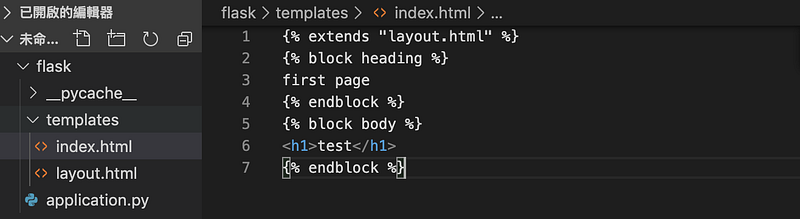
2.Add layout.html in the templates folder
<!DOCTYPE html>
<html lang="en">
<head>
    <title>Document</title>
</head>
<body>
    <h1>{% block heading %}{% endblock %}</h1>
    {% block body %}
    {% endblock %}
</body>
</html>
3.Modify the index.html. Add the extends, block heading, block body
{% extends "layout.html" %}{% block heading %}
first page
{% endblock %}{% block body %}
<h1>test</h1>
{% endblock %}Submit a form with HTTP Post
- Add index2.html in the templates folder
{% extends "layout.html" %}{% block heading %}
first page
{% endblock %}{% block body %}<form action="{{ url_for('hello')}}" method="POST">
<input type="text" name="name" placeholder="enter your name
<button>Submit</button>
</form>{% endblock %}2.Add hello.html in the templates folder
{% extends "layout.html" %}{% block heading %}
Hello
{% endblock %}{% block body %}
Hello, {{name}}
{% endblock %}3.Modify the application.py
from flask import Flask, render_template, requestapp = Flask(__name__)
@app.route("/")
def index():
return render_template("index2.html", headline=headline)@app.route("/hello", methods=["GET, POST"])
def hello():
if request.method = "GET"
return "Please submit the form instead"
else:
name = request.form.get("name")
return render_template("hello.html", name=name)Use session
- Keep variables and values that are specific to a particular user
- Add index.html in the templates folder
{% extends "layout.html" %}{% block heading %}
first page
{% endblock %}{% block body %}
<ul>
{% for note in notes %}
<li>{{note}}</li>
{% endfor %}
</ul><form action="{{ url_for('hello')}}" method="POST">
<input type="text" name="note" placeholder="enter your name
<button>Submit</button>
</form>{% endblock %}2.Modify the application.py
from flask import Flask, render_template, request, session
from flask_session import Session
app = Flask(__name__)
app.config["SESSION_PERMANENT"] = False
app.config["SESSION_TYPE"] = "filesystem"Session(app)@app.route("/")def hello():
if session.get("notes") is None:
session["notes"] = []note = request.form.get("note")
session["notes"].append(note)
return render_template("index.html", notes=session["notes"])Connect to the database: SQLAlchemy
SQLAlchemy is the Python SQL toolkit and Object Relational Mapper that gives application developers the full power and flexibility of SQL.
It provides a full suite of well known enterprise-level persistence patterns, designed for efficient and high-performing database access, adapted into a simple and Pythonic domain language. - from SQLAlchemy
- Setup/installation
pip install psycopg2-binary- Create engine - scoped_session: create sessions for different people
import os
from sqlalchemy import create_engine
from sqlalchemy.orm import scoped_session, sessionmaker
engine = create_engine('postgresql://username:password@localhost:5432/db name', echo=True)
db=scoped_session(sessionmaker(bind=engine))- Select
res = db.execute("select origin, destination from flights").fetchall()
for r in res:
    print(r.origin)
print(r.destination)- Insert: 1. Use placeholder syntax to deal with problems like the escaping the characters that might cause race conditions 2. db.commit: group operations and commit changes
f = open("flights.csv")
reader = csv.reader(f)
for origin, destination, duration inreader:
db.execute("insert into flights(origin, destination, duration) values (:origin, :destination, :duration)", {"origin": origin, "destination": destination, "duration": duration})db.commit()The basic concept of PostgreSQL
PostgreSQL is a powerful, open source object-relational database system with over 30 years of active development that has earned it a strong reputation for reliability, feature robustness, and performance. - from PostgreSQL
Introduction
There are several items in this section.
- Setup/Install PostgreSQL
- CRUD
- Constraints
- Group by
- Foreign Keys
- Join
- Index
- Nest query (subquery)
- SQL injection
- Race conditions
- SQL Transactions
Setup/Install PostgreSQL
- Install it from the official site
CRUD
- Create a new user
create role username superuser;
alter role username with LOGIN;
password username newpassword- Connect to the remote database
psql -U username -h host -p port dbname- Create a new database
create database <name>;- List databases
\l- Create table
create table flights (
    id                serial primary key,
    origin            varchar not null,
    destination       varchar not null,
    duration          integer not null
);- List tables
\d- Show the tables
SELECT * FROM flight;- Switch the database
\c newDatabase- Print the rotated records
\x- Insert
insert into flights(origin, destination, duration) values ('New York', 'London', 415);- Select
select * from flights;- Update
Update flights set duration = 430 where origin = 'New York' and destination = 'London';- Delete
Delete from flights where destination = 'Tokyo';Constraints
There are several kinds of constraints.
- Not null
- Unique
- Primary key
- Default
- Check
You can also refer to:
<Effective SQL> Item 15. Use declarative constraints instead of programming checks
Group by
- group by
select origin, count(*) from flights group by origin;- having
select origin, count(*) from flights group by origin having count(*) > 1;Foreign Keys
Refer to another table’s primary key
create table passengers (
    id                serial primary key,
    name              varchar not null,
    flight_id         integer references flights
);
You can also refer to:
<Effective SQL>: Item 6.Define foreign keys to protect referential integrity
Join
- inner join: it will only get back matched results
select origin, destination, name from flights join passengers on passengers.flight_id = flights.id;2. left join: it will make sure that all of the rows in the flights table are include in the final result, even if they don’t match
select origin, destination, name from flights left join passengers on passengers.flight_id = flights.id;Index
<When do we need to create index for table?>
- It will speed up every time we try to select from that table, base on that particular column.
- Creating index makes it easy to look up a particular value from a column.
<We still have to do the trade off>
- It takes up space.
- It will slow down things like updating data or inserting data
You can also refer to:
<Effective SQL>: Item 11.Carefully consider creation of indexes to minimize index and data scanning
Nest query (subquery)
Subquery means the select query statements in the brackets. We may need subqueries when we require tables, lists, or scalar values.
select * from flights where id in
(select flights.id from passengers group by flights.id having count(*) > 1);
You can also refer to:
<Effective SQL>: Item 40: Know Where You Can Use Subqueries
SQL injection
- Hackers try to hack into the database by doing something malicious. For example, We use the following query for the user login.
select * from users
where (username = username)
and (password = password)- What the hacker puts username = hacker and the password = ‘1’ or ‘1’ = ‘1’? It will always true.
select * from users
where (username = hacker)
and (password = password = ‘1’ or ‘1’ = ‘1’)
Race conditions
- The database was accessed by multiple different people.
- The solution is to use the transaction that it will lock the database before updating the database.
SQL Transactions
- Begin
- Commit
The basic concept of Object-Relational Mapping (Flask-SQLAlchemy)
Introduction
There are several items in this section.
- Steps to made the connect between the database and the Flask APP
- CRUD
- RelationShip
Steps to made the connect between the database and the Flask APP
- Define classes in module.py. These classes are inheriting from the db.model
from flask_sqlalchemy import SQLAlchemydb = SQLAlchemy()class Flight(db.model):
__tablename__="flights"
id = db.Column(db.Integer, primary_key=True)
origin = db.Column(db.String, nullable=False)
destination = db.Column(db.String, nullable=False)
duration = db.Column(db.Integer, nullable=False)
passengers = db.relationship("Passenger", backref = "flight", lazy = True)class Passenger(db.model):
__tablename__="passengers"
id = db.Column(db.Integer, primary_key=True)
name= db.Column(db.String, nullable=False)
flights = db.Column(db.Integer, db.ForeignKey("flights.id"), nullable=False)2. Use SQLAlchemy
import os
from flask import Flask, render_template, request
from models import *
app = Flask(__name__)
app.config["SQLALCHEMY_DATABASE_URI"]=os.getenv("DATABASE_URL")
app.config["SQLALCHEMY_TRACK_MODIFICATIONS"]=False
db.init_app(app)def main():
#Do operationsif __name__ = "__main__":
with app.app_context():
main()CRUD
- Create the table
from flask import Flask, render_template, request
frim models from *
app = Flask(__name__)
app.config["SQLALCHEMY_DATABASE_URI"]='postgresql://username:password@localhost:5432/dbName'
app.config["SQLALCHEMY_TRACK_MODIFICATIONS"]=False
db.init_app(app)def main():
db.create_all()if __name__ = "__main__":
with app.app_context();
main()- Insert
f = open("flights.csv")
reader = csv.reader(f)
for origin, destination, duration inreader:
f = Flight(origin=origin, destination=destination, duration=duration)
db.session.add(f)db.session.commit()- Select
//Select all
select * from flights;
Flight.query.all()//Select where
select * from flights where origin = 'Paris';
Flight.query.filter_by(Flight.origin == 'Paris').all()select * from flights where origin != 'Paris';
Flight.query.filter_by(Flight.origin != 'Paris').all()//Select where limit
select * from flights where origin='Paris' LIMIT 1;
Flight.query.filter_by(Flight.origin='Paris').first()//Select count where
select count(*) from flights where origin='Paris';
Flight.query.filter_by(Flight.origin == 'Paris').count()select count(*) from flights where id=28;
Flight.query.filter_by(id=28).first()
Flight.query.get(28)//sort
select * from flights order by origin;
Flight.query.order_by(Flight.origin).all()//like
select * from flights where origin like %a%;
Flight.query.filter_by(Flight.origin.like("%a%")).all()//in
select * from flights where origin in ('Paris', 'Tokyo');
Flight.query.filter(Flight.origin.in_(['Paris', 'Tokyo'])).all()//and
select * from flights where origin = 'Paris';
Flight.query.filter(_and(Flight.origin == 'Paris', Flight.origin > 500)).all()- Update
update flights set duration=280 where id=28;
flight = Flight.query.get(28)
flight.duration=280- Commit
db.session.commit()- Join
select * from flights join passengers on flights.id = passengers.flight_id;db.session.query(Flights, Passengers).filter(Flight.id == Passenger.flight_id).all()RelationShip
- Get passengers from the flight id
select * from passengers where flight_id=1;
Flight.query.get(28).passengers- join
select * from flights join passengers on flights.id = passengers.flight_id where passengers.name='Alice';Passenger.query.filter_by(name == 'Alice').first().flightThe basic concept of APIs
- The protocols or interfaces between either different applications or different parts of the same application
JSON
- a key value pair
{
    "origin": {
        "city":"Tokyo",
        "code":"HND"
    },
    "destination": {
        "city":"Shanghai",
        "code":"PVG"
    },
    "duration":185,
    "passengers": ["Alice","Bob"]
}
Use Request module
- Make HTTP requests
requests.get(url)
requests.post(url)
requests.put(url)
requests.patch(url)
requests.delete(url)requests.get(url, params={"base": base})res = requests.get(url)
res.status_codeReturn results for APIs in Flask
- jsonify: Creates a Response with the JSON representation of the given arguments with an application/json mimetype.
return jsonify({"error", "Invalid"}), 422Some basic operations in Heroku
Heroku is a platform as a service (PaaS) that enables developers to build, run, and operate applications entirely in the cloud.
Required files for deploying Flask application to Heroku
- Procfile: You can follow the bellow format.
- web mean the execution type in Heroku.
- Heroku uses gunicorn to run the Flask application.
- application means your entry file(application.py).
- app means app()
web: gunicorn application:app2.requirements.txt: the point is that you have to put gunicorn in the content at least
gunicornSet environment variables in Heroku
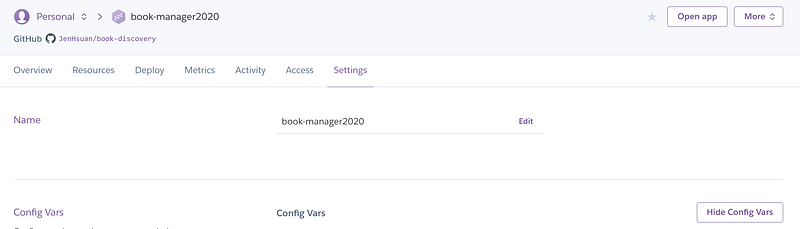
1.Select Reveal Config Vars from Settings
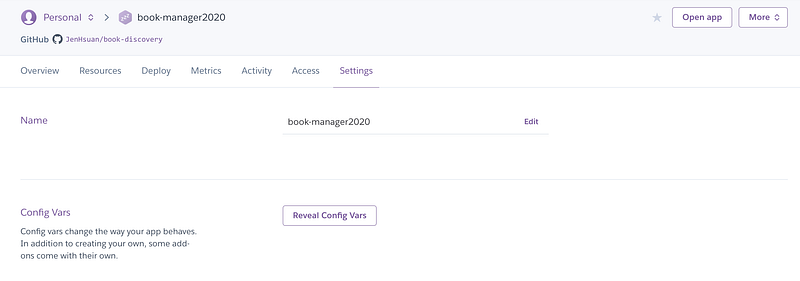
2.Then add key/value pairs in Config Vars
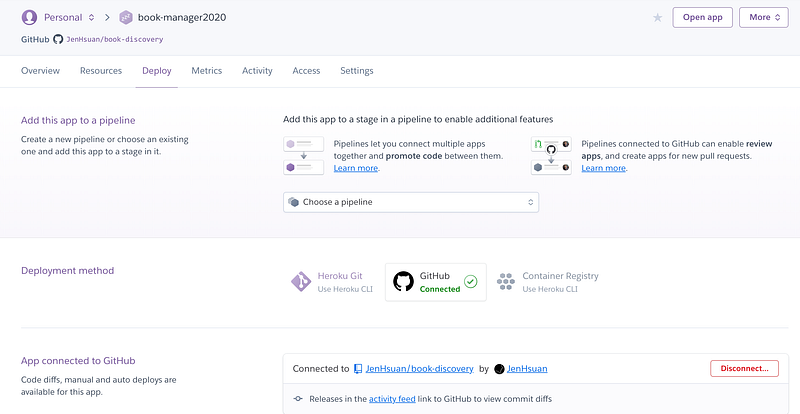
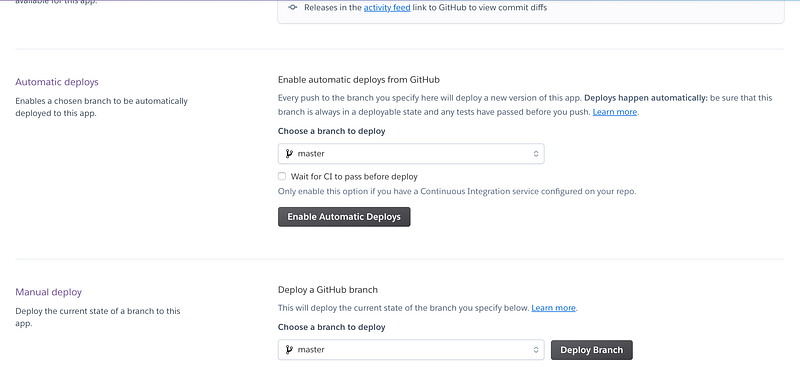
Deploy Flask application from Github to Heroku
1.Select Github from Deployment method
2.Push Deploy Branch from Manual deploy
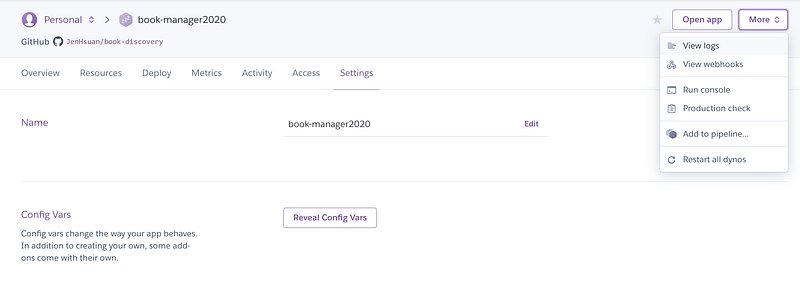
Check logs in the dashboard
- Select View logs from More button
Project1: Book-Discovery
Function requirements
- Sign in, sign up, sign out
- Search books by the ISBN, the author, and title.
- Comment for a book with the grade.
- Review the previous comments and grades for a book
- APIs access:
- [Get] /api/(isbn)
Implementations: Book-Discovery
It’s a service to search favorite books’ information by ISBN, the author, and the title.
References
- Engine Configuration
- 8 best practices to prevent SQL Injection Attacks
- How to find postgresql uri for SQLALCHEMY config
- Error while connecting to postgresql using sqlalchemy
- [Python] “From … Import “和 Import的差別
Summary
Thanks for your patient. I am Sean. I work as a software engineer.
This article is my note. Please feel free to give me advice if any mistakes. I am looking forward to your feedback.
Please feel free to clap if this article can help you. Thank you.
You can also subscribe my page on Facebook.
Related topics
How to use the two-way binding in Knout.js and ReactJS?
Learn how to use SignalR to build a chatroom application
My reflection of
IT & Network:
Database:
Software testing:
Debugging:
DevOps:


