
Secure .NET CORE 6 Web API with JWT from Duende IdentityServer

Introduction
Recently, I upgraded the Visual Studio template OnionAPI to work with Visual Studio version 2022 and .NET 6. Developers can leverage the OnionAPI template to quickly scaffold an advanced C# REST API project with boilerplate code for CRUD, pagination, filter, etc. For Web API security, the scaffolded project contains sample code to work with Duende IdentityServer.
In this story, I will walk thru the steps to test-run secured REST API. The complete source code is available on GitHub. A complimentary screencast of the tutorial is available on Youtube.
The tutorial consists of the following parts:
Part 1: Provide an overview of modern Web API security architecture
Part 2: Run an instance of the .NET Core 6 Duende IdentityServer as a Token Service
Part 3: Run Postman to obtain JWT (JSON Web Token)
Part 4: Input the JWT into Swagger to access secured .NET Core 6 Web API endpoints
Let’s get started!
Prerequisites
- Latest Net Core 6 SDK
- Visual Studio 2022 Community — free code editor for C#Tutorial Content
Part 1: Provide an overview of modern Web API security architecture
Modern applications typically consist of three major components
- Clients — apps such as web, mobile, console
- Api Resources — the REST API resources that provide data to Clients
- Token Service — the security components that issue/validate JWT
As shown in Figure 1, the common security element communicated between all these three components is JWT. The JWT is a signed string that passed through the HTML header. JWT is used within the application for authentication and authorization.

For further reading on the Client, Api Resources, and Token Services (CAT) concept, please read my blog CAT architecture pattern for modern app SPA/Mobile.
Part 2: Run an instance of the Duende IdentityServer as a Token Service server
Duende IdentityServer is middleware that adds spec-compliant OpenID Connect and OAuth 2.0 endpoints to an arbitrary ASP.NET Core host. — https://docs.duendesoftware.com/identityserver/v6/overview/big_picture/
In preparation for this story, I have used the Skoruba Admin UI to create a Github repo of IdentityServer that you can download and run on your local desktop.
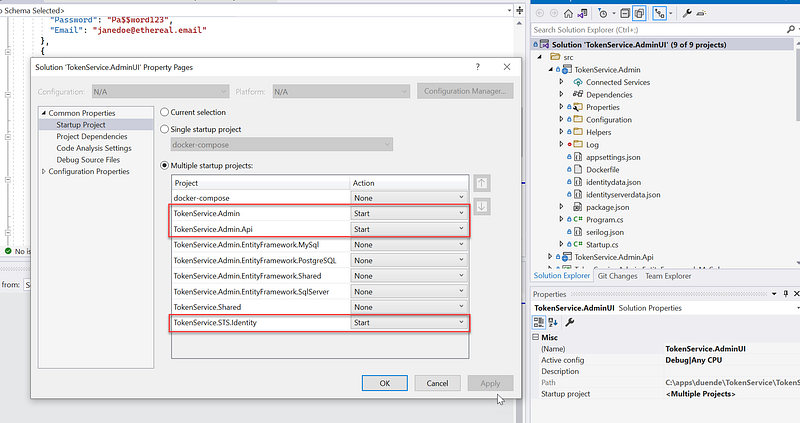
Before running the solution in Visual Studio 2022, be sure to access the Solution > Properties page and set the Multiple startup projects as shown in Figure 2.
After running the solution, locate the login screen as shown in Figure 3. Log in with the account (admin, Pa$$word123)

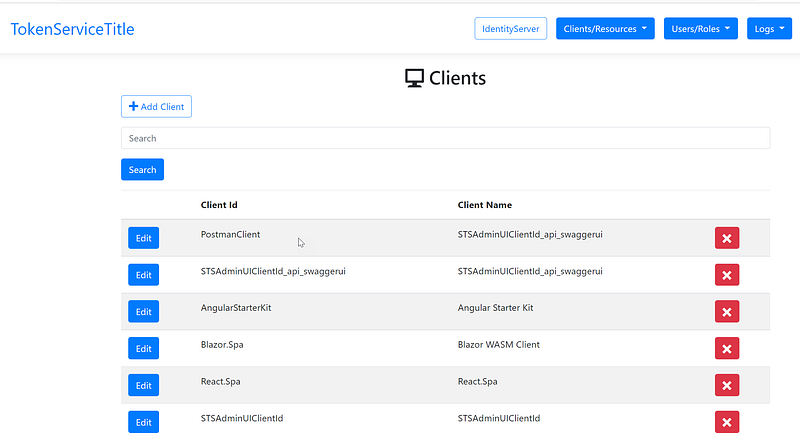
After login, navigate to the Clients screen and verify that you see a PostmanClient setup as shown in Figure 4. Feel free to click on Edit and review the setup of the PostmanClient.
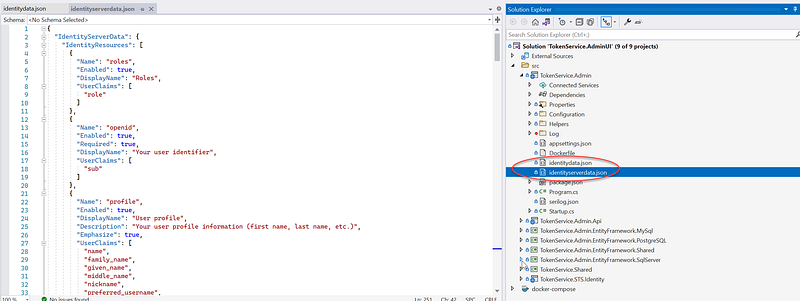
Example clients such as Postman, Angular, React, Blazor, etc. are created when the IdentityServer is initialized the first time. If you want to review client and account settings, check out the two files identitydata.json and identityserverdata.json at the root of the project TokenService.Admin as shown in Figure 5. I have written many blogs on Medium website on how to connect with these types of clients to IdentityServer.
For more information about IdentityServer from Duende, please see https://duendesoftware.com/products/identityserver
Part 3: Run Postman to obtain JWT
Postman is an API platform for building and using APIs. Postman simplifies each step of the API lifecycle and streamlines collaboration so you can create better APIs — faster. — https://www.postman.com/
For this story, we will use Postman app to access the IdentityServer (AKA Token Service Server) to obtain the JWT. Follow the instructions below (see Figure 6 for visual aids)
- Create a HTTP Post and enter URL https://localhost:44310/connect/token
- Complete the Body section with x-www-form-urlencoded data (client_id:PostmanClient; client_secret:PostmanClientSecret; grant_type:client_credentials; scope: app.api.employeeprofile.write app.api.employeeprofile.read)
- Click on Send
You should see the response in the lower right as shown in Figure 6.

To view the content of the JWT, locate the access_token key and cut & paste the value string into jwt.ms website. Review the token data such iss, aud, scope, client_id. See Figure 7 for visual aids.

If you want an explanation of each field (AKA claim) in JWT, click on the Claims tab. See Figure 8 for an example. As a developer, I prefer using jwt.ms over jwt.io because the jwt.ms has a detailed explanation of the claims.

Part 4: Input the JWT into Swagger to access secured Web API endpoints
You can download a sample .NET 6 REST API from https://github.com/workcontrolgit/MyOnionApi. The source code in the repo was scaffolded using the clean architecture template OnionAPI that I produced and published to the Visual Studio Marketplace. The sample project is preconfigured to talk to IdentityServer (set up in Part 2 of this story) running on localhost, port 44310 (https://localhost:44310).
After running the sample Web API project (by hit F5 while the project is open in Visual Studio), you will see the Swagger UI as shown in Figure 9. Click on the Authorize button.

There is a popup window asking for the bearer token. In the Value text box, enter “Bearer”, hit space, and then cut & paste the JWT token in Part 3. See Figure 10 for visual aids.

Locate the AddMock endpoint as shown in Figure 11 and click on the endpoint name to expand. Then click on Try it out button.

In the Request body, change the rowCount to 10 and then click on Execute button. See Figure 12 for visual aids.

To verify that the new 10 rows have been added, run the Get /api/v1/Positions. In the Response body, verify the recordsTotal is incremented by 10 each time you run the AddMock endpoint. See Figure 13 for visual aids.

Screencast
The screencast is a record of the steps described in this story. As a bonus, it has additional instructions to run Web API endpoints such as GET and POST from Postman.
Github Repos
The following repositories are used in this story.
- Web API Example: https://github.com/workcontrolgit/MyOnionApi
- Duende IdentityServer with Admin UI: https://github.com/workcontrolgit/CATTokenService.AdminUI.Duende
References
- An Illustrated Guide to OAuth and OpenID Connect
- Tutorial: Open a project from a GitHub repository from Visual Studio 2022
Related Stories
If you are interested to use IdentityServer to secure client apps, check out my other publications on Medium
- Duende IdentityServer integration with Facebook, Google, Microsoft, GitHub, and Twitter
- New release of Web API template OnionAPI
- Authenticate Asp.Net Web Form with IdentityServer4
- Secure React 17 with JWT and IdentityServer4
- Secure Net 5 Blazor Web Assembly with JWT and IdentityServer4 Admin UI
- Secure Angular 11 with JWT and IdentityServer4 Admin UI
- Angular Guard for Role-Based Access Control (RBAC) Driven by JWT
Summary
This story provides a tutorial on how to obtain JWT using Postman and how to input the JWT into Swagger UI to test run secured REST API endpoints.
Thanks for reading! Hope you found it useful. Want more? Please follow me and become a member on medium for more articles. With your support, I’ll keep creating awesome content for you. Have a great day ahead! — Fuji Nguyen


