
Secure Angular 11 with JWT and IdentityServer4 Admin UI

In JWT we trust.
Update: On May 12, 2021, Google released Angular version 12. The sample Angular app in this tutorial has been upgraded from version 11 to 12. You can find the upgraded source code in the ng-12-upgrade branch. The master branch is still at version 11.
Introduction
Imagine you are working on an Angular app, and you are about implementing the login feature. After successful login, the app needs to obtain JWT (JSON Web Token) and subsequently pass JWT to the backend REST API to retrieve data. It can be a steep learning curve if you are new to OpenID Connect/oAuth2 and try to set up the secure token infrastructure to support development. Are there pre-built tools or libraries that developers can leverage to quickly integrate JWT into your Angular apps? Thanks to Opensource communities, the answer is YES.
Opensource Project Highlights
Credit where credit’s due.
To develop this tutorial, I have reviewed and integrated tools and techniques from the following high-quality opensource projects.
- IdentityServer4 — this project has 7.9K stars on Github. It is the #1 opensource project for securing enterprise ASP.NET WebAPI by Brock Allen.
- IdentityServer4.Admin — this project has 2.7K stars on GitHub. It is the best Admin UI of the IdentityServer4 and Asp.Net Core Identity by Jan Škoruba.
- angular-oauth2-oidc — this project has 1.4K stars on GitHub. It is a NPM package supporting OpenId Connect (OIDC) and OAuth 2 and in Angular.
- sample-angular-oauth2-oidc-with-auth-guards — this project has 145 stars on GitHub. It is a basic Angular app that implements the angular-oauth2-oidc library and Angular AuthGuards.
Tutorial Content
SPA (Single Page Application) requires JWT for access control. Per OIDC specification, the JWT consists of two components: ID token and Access token. The ID token confirms the user identity, while the Access token grants the user’s permission to access API Resources. In practicality, ID and Access tokens are for authentication and authorization respectively.
This tutorial places focus on IdentityServer4 Admin UI configuration and operational readiness to issue JWT to secure the Angular apps. The tutorial content consists of three parts:
Part 1: Git-Clone Angular app and IdentityServer4 Admin UI Clone an Angular app and IdentityServer4 Admin UI from Github. Verify both apps are running on localhost.
Part 2: Configuring JWT Identity Token for Authentication Login Admin UI and set up a client app. Configure the client with URI redirect, CORS. Specify claims such as email, openid, roles, and profile.
Part 3: Configuring JWT Access Token for Authorization Add an API scope and configure role claim for inclusion in the Access Token. Configure the client to use the new API scope.
At the end of each tutorial part, I include a complementary screencast, so you can see how it was done on my desktop. Grab a drink and relax while watching the video!
The complete source code for this tutorial is available on GitHub. You can download and run it on your workstation. An online demo is also available (see link and account to login at botom).
Prerequisites
The following tools/skills are recommended.
- Visual Code — free code editor for Angular
- Visual Studio 2019 Community — free code editor for C#
- Knowledge of Git such as cloning Github repository to local
- Familiar with OIDC and oAuth2 terminologies
GitHub Repos used in this tutorial
The source code for this tutorial is available on GitHub. You can clone/run these projects out of the box and then follow the instructions in this tutorial to configure the security.
- workcontrolgit/TokenProject.AdminUI — this is a repository of IdentityServer4 Admin UI written in C#. The Visual Studio solution consists of three web projects Admin UI, Admin API, and IdentityServer4.
- workcontrolgit/sample-angular-oauth2-oidc-with-auth-guards — this repo contains a sample angular application pre-configured with OIDC client library to login IdentityServer4. The app provides login/logout features and displays the JWT on the screen.
Tutorial Overview
Imagine that you work on an Angular app to manage company Employee Profiles. There are three roles in the app
- employee — users in this role can view and update their own profile
- manager — users in this role can view the profile of their subordinators and approve profile changes
- HR admin — users in this role can enroll new employees and make administrative edit
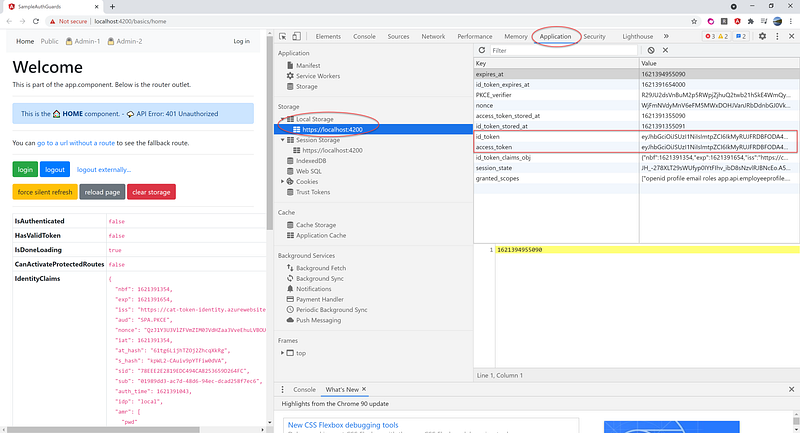
In the Angular SPA application, when the users successfully log in using their credentials, a JWT will be saved locally in the browser, typically in local or session storage. In Chrome developer tools, developers can see the JWT from the Application tab. Figure 1 depicts an example of JWT in Local Storage.
When the users want to access a protected WebAPI resource, the Angular app will retrieve the JWT access_token from local storage and sends the access_token in the Authorization header using the Bearer schema. The user’s roles must be included in the access_token so the backend API can verify access based on roles.
Let’s get started!
Part 1: Git-Clone Angular app and IdentityServer4 Admin UI
In this part of the tutorial, we will git-clone the sample OIDC Angular app and IdentityServer4 Admin UI Visual Studio solution from GitHub and then run them on localhost.
Task 1.1 — Git clone sample Angular app
In this task, we are going to clone the Angular project from Github via Command Pallet in Visual Code. Prior to making the clone, be sure to create a folder C:\apps\devkit\Clients on your desktop for storing Angular source code.
- Start Visual Code
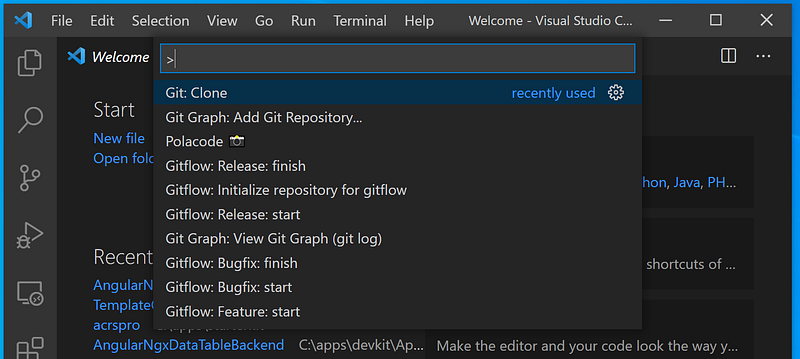
- Go to menu View>Command Pallet (or Ctrl-Shift-P). See Figure 2 for visual aids.
- Type in “Clone” and select Git: Clone. See Figure 3 for visual aids
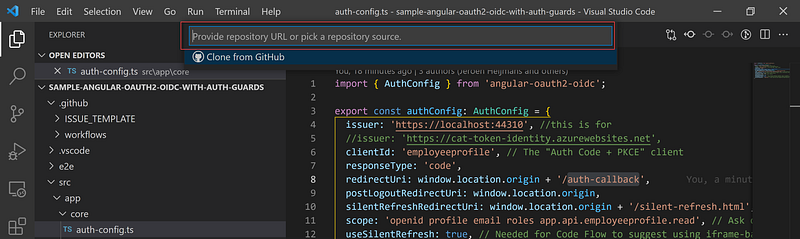
- Enter https://github.com/workcontrolgit/sample-angular-oauth2-oidc-with-auth-guards when prompt for Provide repository URL or pick a repository source. See Figure 4 for visual aids.
- Select folder C:\apps\devkit\Clients to save the source code.
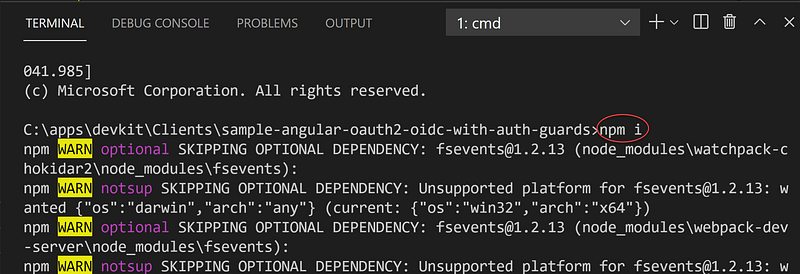
- Go to menu View > Terminal (or Ctrl + ‘), and at the command line, type in npm i, and hit Enter. It may take a few minutes to restore the NPM packages depending on your network bandwidth. See Figure 5 for visual aids.

Task 1.2- Git clone the IdentityServer4 Admin UI
Using Visual Studio, we are going to clone the IdentityServer4 Admin UI C# source code project from Github.
Follow the steps below to download the source code:
- Start Visual Studio 2019 and select the option ‘Clone a Repository’
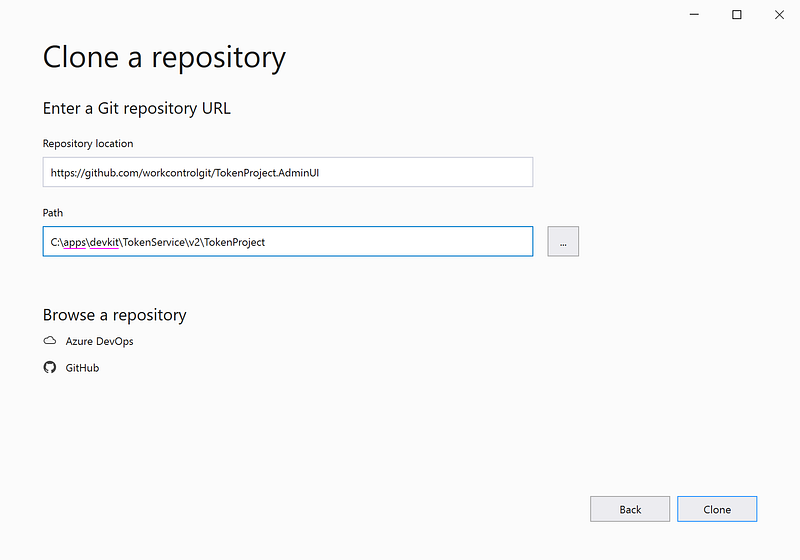
- Clone the repo https://github.com/workcontrolgit/TokenProject.AdminUI to C:\apps\devkit\TokenService\v2\TokenProject (see Figure 6)
In the Solution Explorer, right mouse click on the solution name, select Properties, and set Multiple startup projects to three projects
- TokenProject.Admin
- TokenProject.Admin.Api
- TokenProject.STS.Identity
See Figure 7 for a screenshot of enabling Multiple startup projects in Visual Studio.

Task 1.3 — Run sample Angular and IdentityServer4 Admin UI on localhost
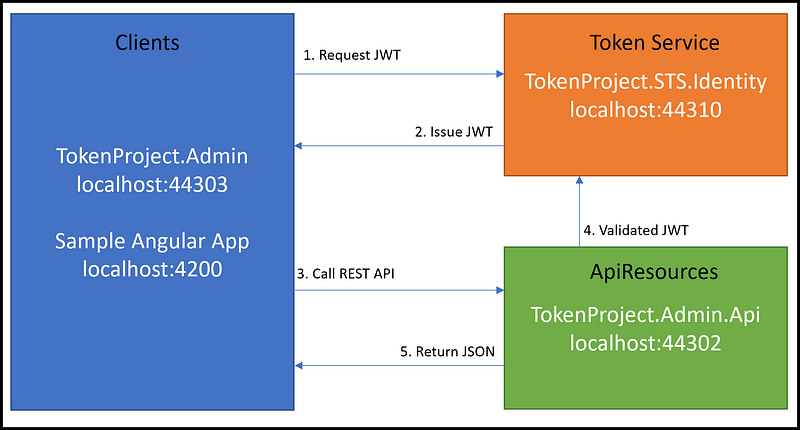
To run the application, start the IdentityServer4 Admin UI solution first and then the Angular app. See Figure 8 for the projects and their corresponding ports when running on localhost. The application architecture consists of Clients, ApiResources, and Token Service (CAT). For more information about CAT, see CAT architecture pattern for modern app SPA/Mobile.
1.3.1 Run IdentityServer4 Admin UI
In Visual Studio, run the solution by hitting F5. You should see three instances of the Chromes running. Refer to Figure 8 for the localhost and port numbers of the three projects.
1.3.2 Run the Angular app
To run the Angular frontend, from Visual Code > Terminal screen, run ng serve -o to automatically open the Angular app in the browser pointing to URL https://localhost:4200.
Screencast of Part 1
The complementary Youtube video is a record of the steps in this part of the tutorial.
Part 2: Configuring JWT Identity Token for Authentication
This part of the tutorial will walk through the steps to
- Register the Angular app as a Client in IdentityServer4 Admin UI
- Configure the client with URI redirect, CORS, and claims (such as email, openid, roles, and profile)
- Login to the Angular and inspect JWT
Task 2.1 Register a client app
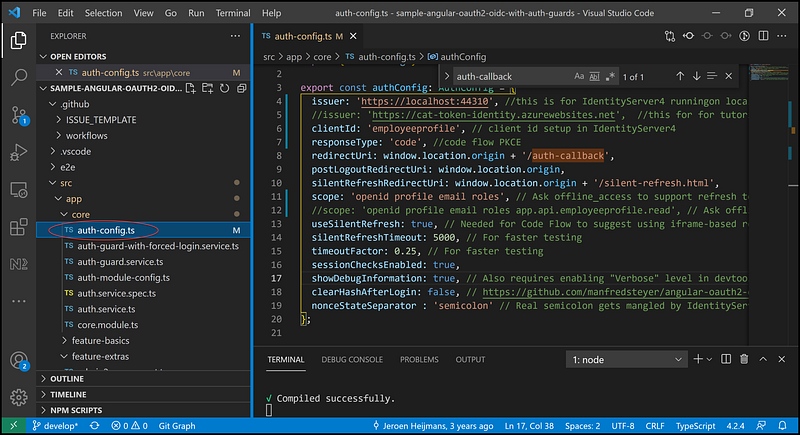
In prior task 1.1, we cloned the sample Angular app to local. The settings for the Angular app to work with IdentityServer4 are in the file auth-config.ts under src/app/core folder. See Figure 9 for detail settings and values of clientID, responsType, redirectUri, etc. These settings must match the settings we are going to set up via Admin UI.
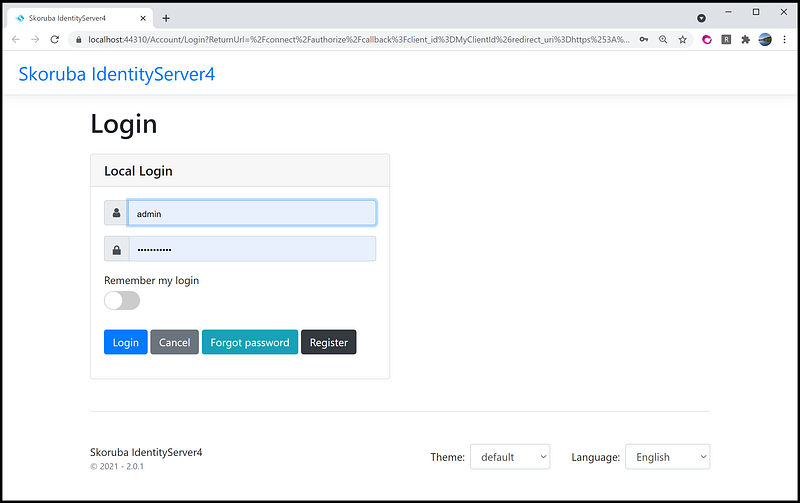
In prior task 1.3, we have run the IdentifyServer4 Admin UI from Visual Studio. Locate the browser instance with the login screen as shown in Figure 10, and log in with the account (admin, Pa$$word123).
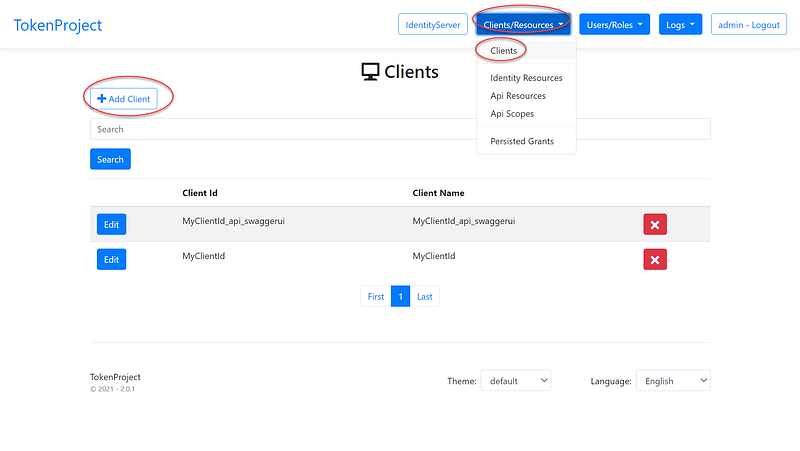
After login, register the Angular app as a client using the steps below (see Figure 11 for navigation aids)
- Click on Clients/Resources main menu
- Select Clients sub menu
- Click on Add Client
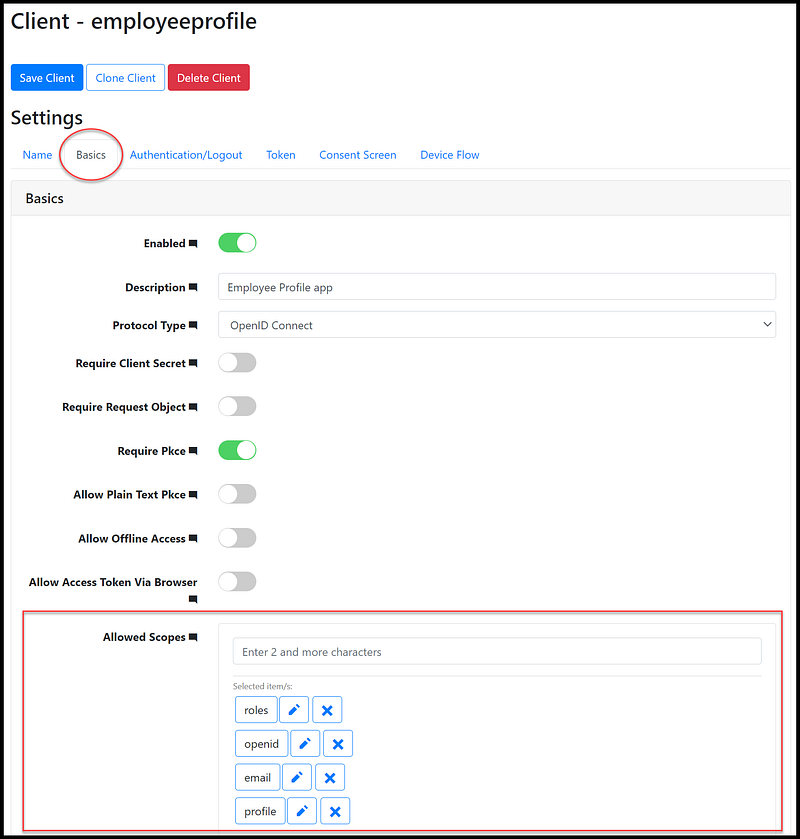
On the client form (see Figure 12)
- Enter employeeprofile in the ClientId
- Enter employeeprofile in the Client Name
- Click on Single Page Application — Javascript Authorization Code Flow with PKCE tile
- Click on Save Client

Task 2.2 Configure the client Angular app
In this task, we will configure settings for the client Angular app via the Admin UI.
Task 2.2.1 Configure Allowed Scopes
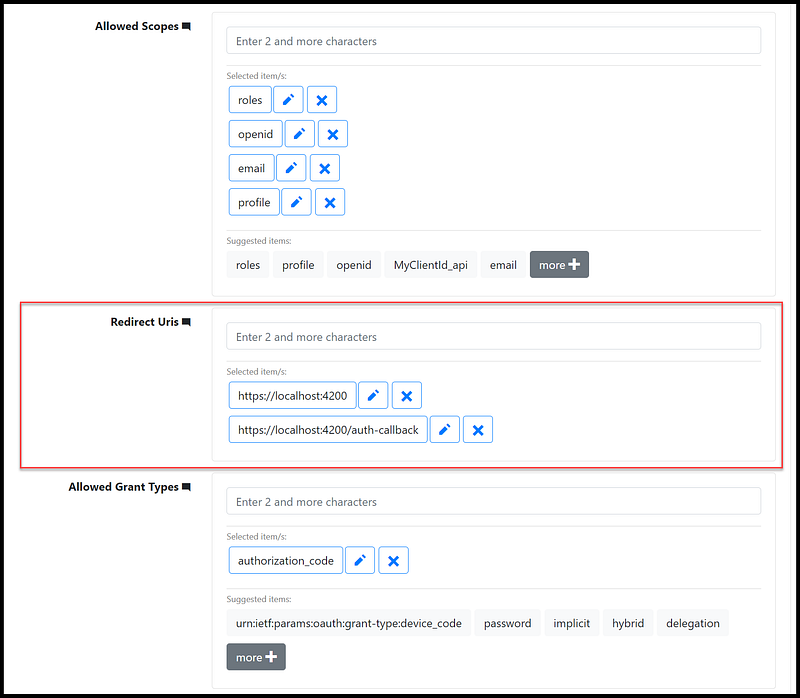
On the client Basic tab, specify the claims in the Allowed Scopes field as shown in Figure 11.
Task 2.2.2 Configure Redirect Uris
The redirect Uris values are authorized URLs that the IdentityServer4 can redirect to after login. Since the Angular app will run on localhost port 4200, set up URLs as shown in Figure 12.
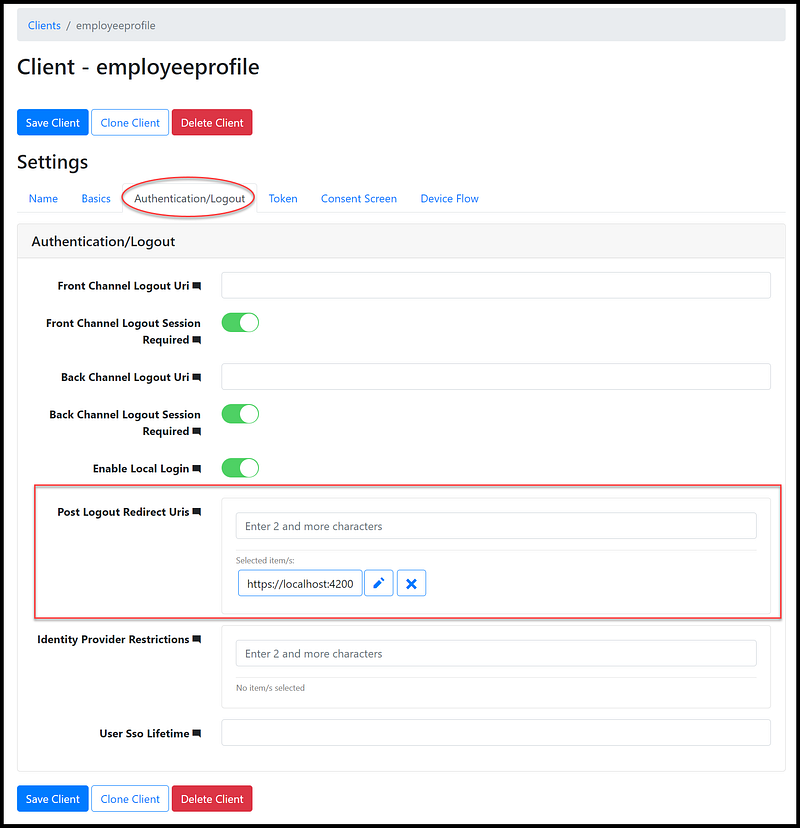
Task 2.2.3 Configure Post Logout Redirect Uris
On the Authentication/Logout tab, set up the Post Logout Redirect Uris as shown in Figure 13.
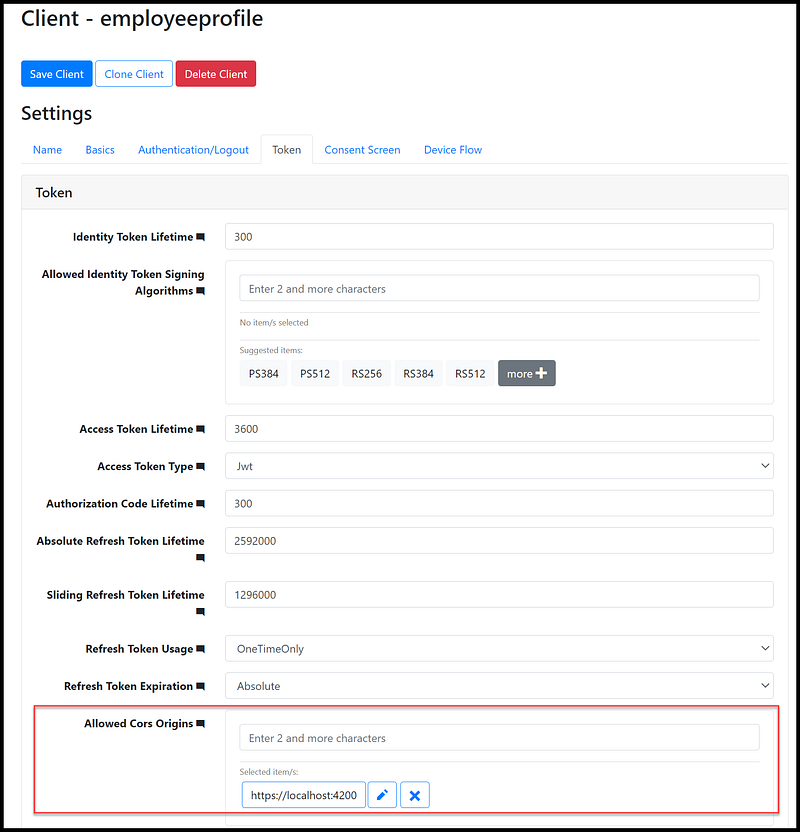
Task 2.2.4 Configure CORS
Cross-Origin Resource Sharing (CORS) is an HTTP-header based mechanism that allows a server to indicate any other origins (domain, scheme, or port) than its own from which a browser should permit loading of resources.
On the Token tab, set up the CORS as shown in Figure 14.
Task 2.3 Login to Angular app and Verify JWT
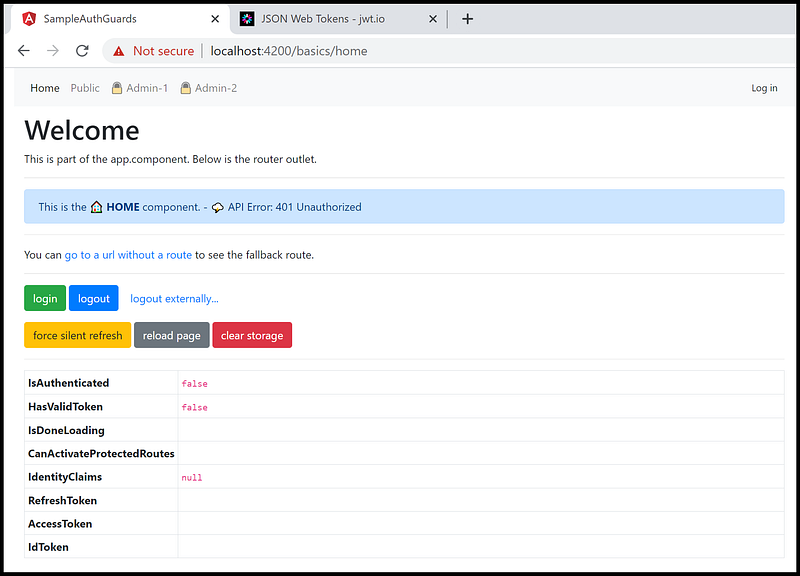
The sample Angular app is pre-wired with the OIDC library to log in to the instance of IdentityServer4 running on localhost (as part of the IdentityServer4 Admin UI). Click on the login button (see Figure 15 for visual aids).
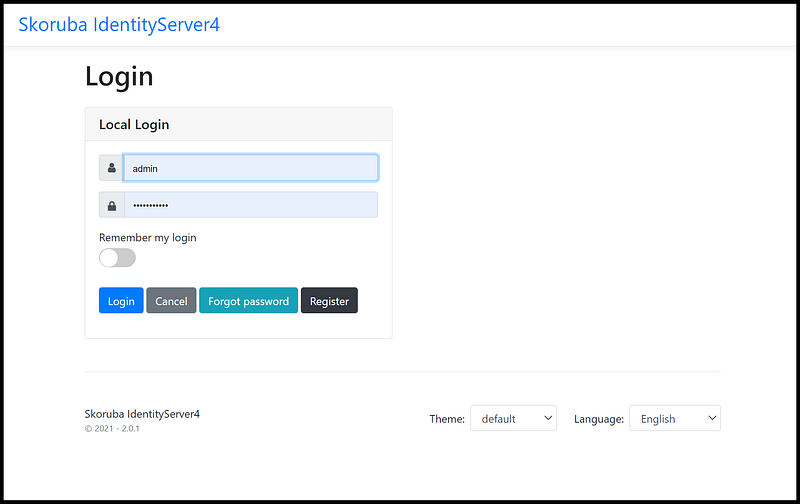
After clicking on the login button, it redirects to IdentityServer4. Log in with the account (admin, Pa$$word123). See Figure 16 for visual aids.
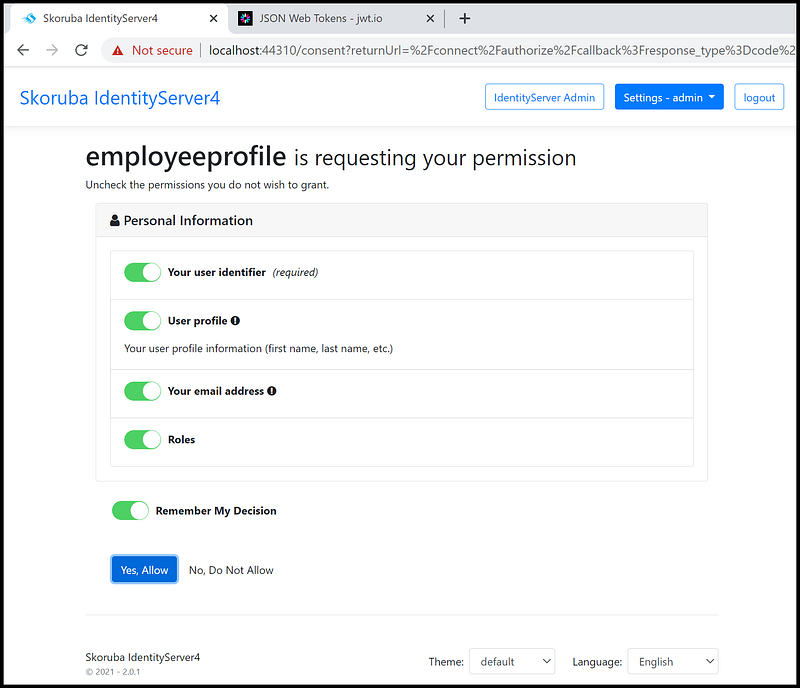
If you log in the first time, it will prompt for a consent screen. Click on Yes, Allow button. See Figure 17 for visual aids.
After login, it will redirect back to the Angular app and display AccessToken and IdToken as shown in Figure 18.
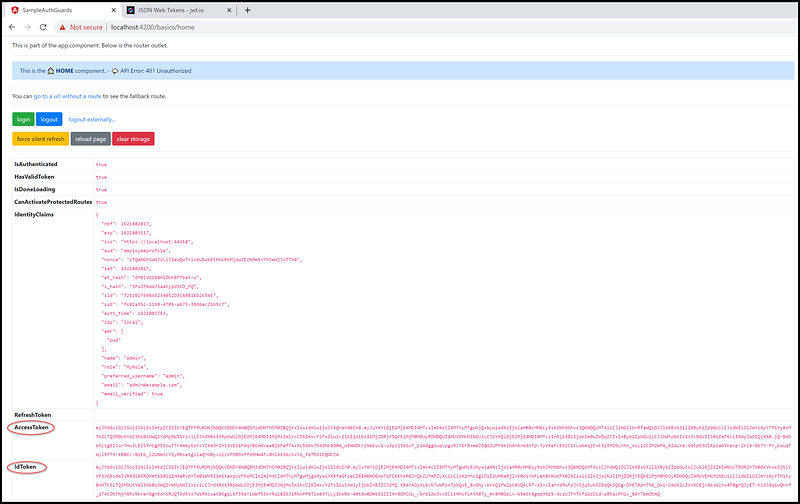
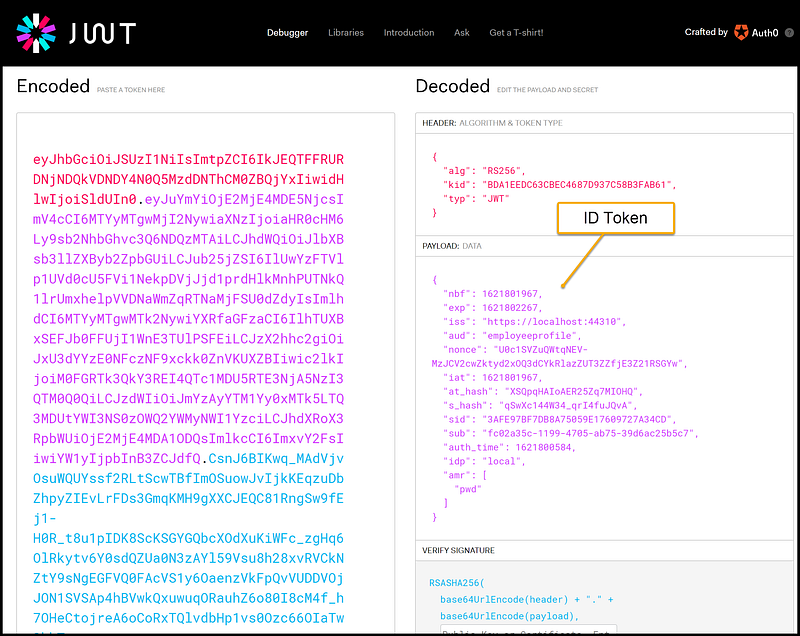
You can cut and paste the IdToken into the jwt.io website and review the decoded Id Token as shown in Figure 19.
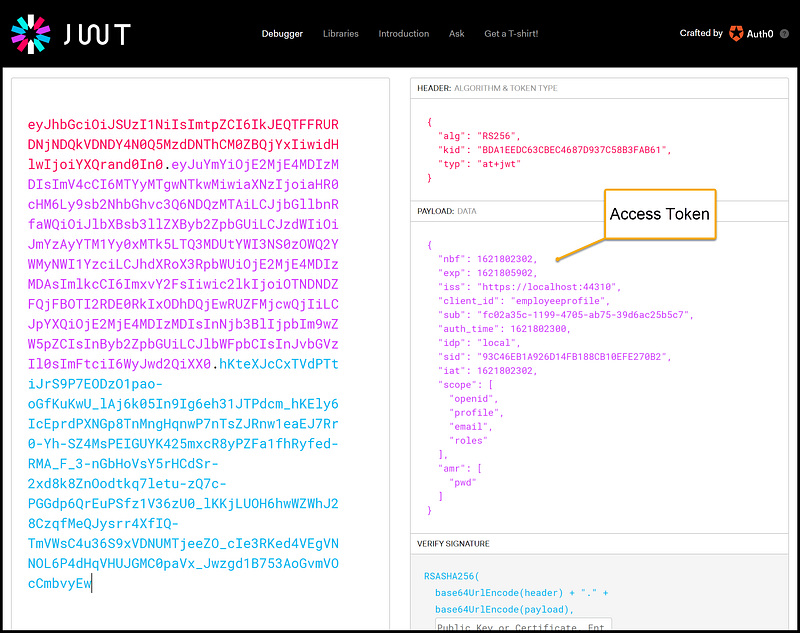
You can cut and paste the access_token into the jwt.io website and review the decoded Access Token as shown in Figure 20.
Screencast of Part 2
The complementary Youtube video is a record of the steps in this part of the tutorial.
Part 3: Configuring JWT Access Token for Authorization
This part of the tutorial will go over the steps to
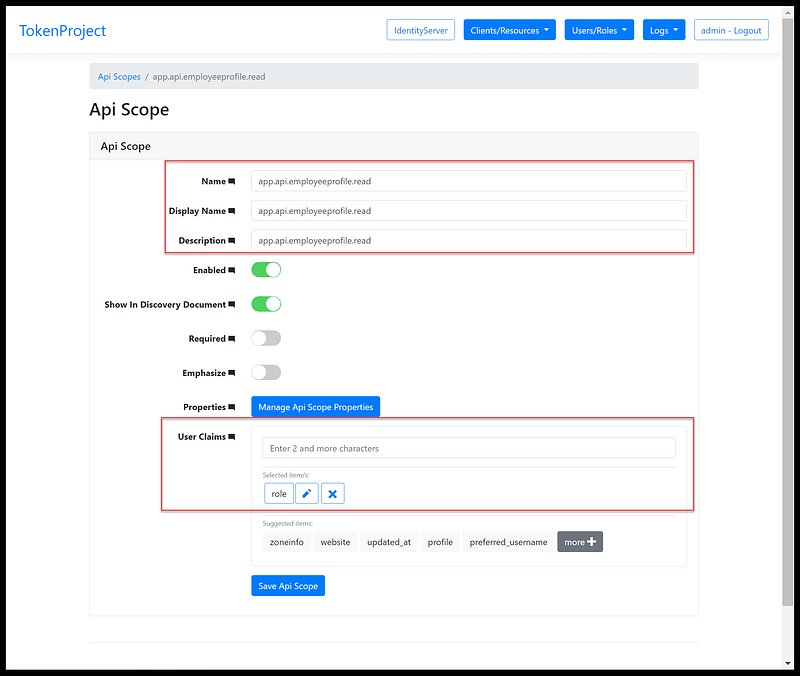
- Add an API Scope app.api.employeeprofile.read and configure role in the Users Claims field
- Update the sample Angular to include app.api.employeeprofile.read in the request scope setting and verify the user’s role in the AccessToken
Task 3.1 Set up API Scopes
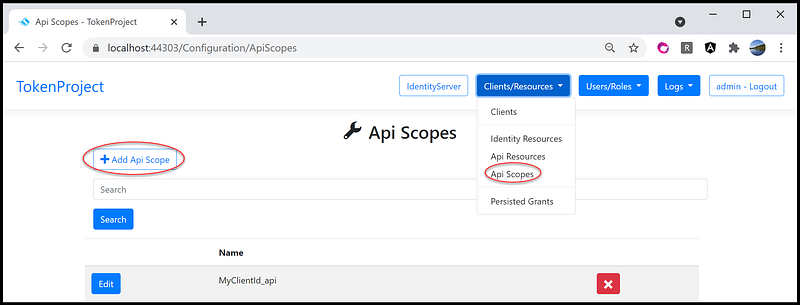
To get to the screen to add an API scope (see Figure 21 for navigation aids), follow the steps below:
- Click on Clients/Resources menu and select Api Scopes sub menu
- Click on Add Api Scope
Complete the API Scope form with data as shown in Figure 22. Be sure to specify role in the User Claims field as this will include user’s roles in the Access Token. Then click on the Save Api Scope button.
Task 3.2 Update sample Angular app to include Api Scope and verify user’s roles in the access_token
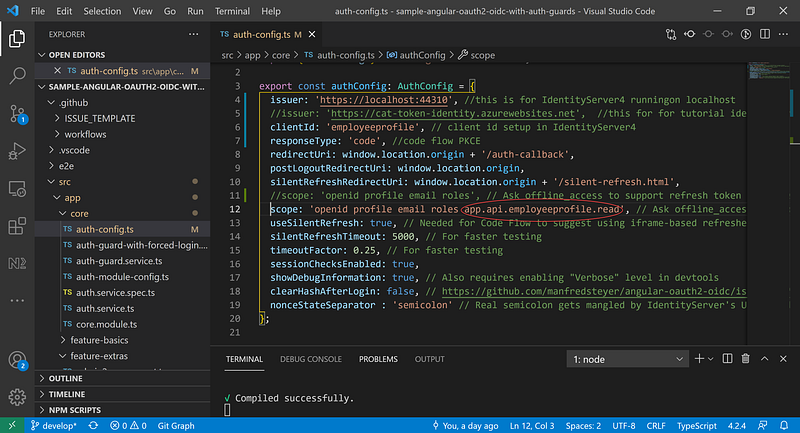
In Visual Code, navigate to auth-config.ts under app > core folder. Add scope app.api.employeeprofile.read to scope as shown in Figure 23.
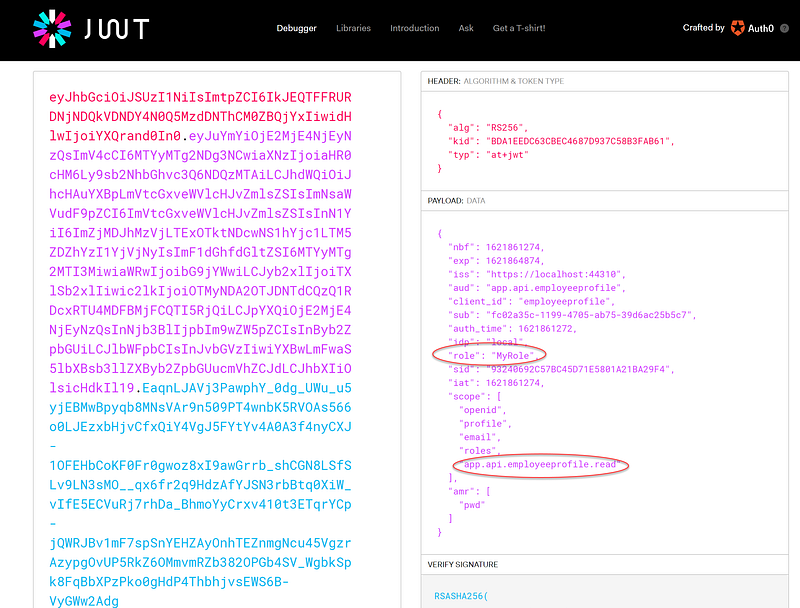
Log out and log back into the sample Angular app with the admin account. After successful login, cut & paste the AccessToken into jwt.io site. Notice that the role MyRole and scope app.api.employeeprofile.read are shown in the payload data section. See Figure 24 for visual aids.
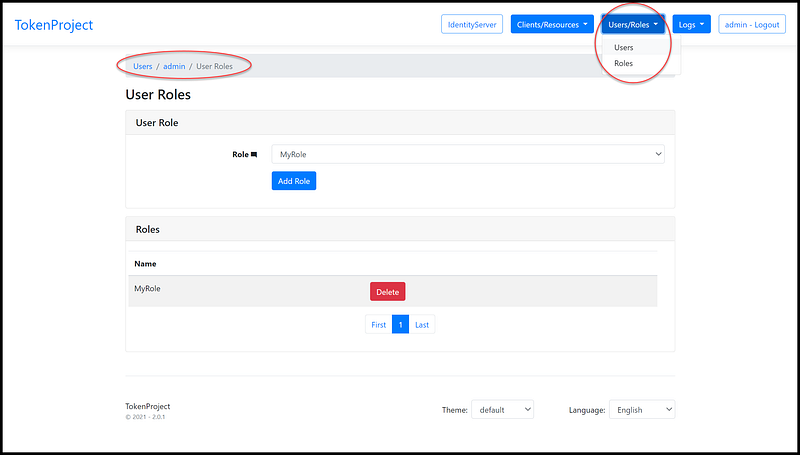
The Admin UI provides screens to manage users and roles via the Users/Roles menu. See Figure 25 for navigation aids. You can add additional roles such as employee, manager, or HR Admin and assign those roles to the admin account. You can then verify that these roles are included in the AccessToken. Give that a try!
Screencast of Part 3
The complementary Youtube video is a record of the steps in this part of the tutorial.
Tutorial Demo
Developers love to see working source code. We all like to experiment with how something works, and then decide whether we want to spend our valuable time learning it. Check out the live demo. Log in with the account (janedoe, Pa$$word123).
Related Tutorials
- CAT architecture pattern for modern app SPA/Mobile
- Secure Angular 11 App with Code Flow PKCE and IdentityServer4
- IdentityServer4 Admin UI Setup in Azure
- IdentityServer4 Admin UI from Skoruba.IdentityServer4.Admin Template
Summary
In this tutorial, we learned
- How to use the Admin UI to configure a sample Angular 11 app to log in and obtain JWT from IdentityServer4
- The basics of client app registration and OIDC and oAuth2 configuration to support authentication and authorization
In real-world applications, there are many other integrations such as UI/UX, REST API/CRUD, Single-SignOn (SSO), and RBAC (role-based access control). If you are looking for an end-to-end solution, check out the Angular Starter Kit for Rapid Prototype.
Thank you for reading!


