
IdentityServer4 Admin UI from Skoruba.IdentityServer4.Admin Template

A user interface is like a joke. If you have to explain it, it’s not that good (:
Update
On April 26, 2021, developer Jan Škoruba released IdentityServer4 Admin UI version 2.0.1 which supports ASP.NET CORE v5. I have published an updated tutorial Run IdentityServer4 Admin UI local and Azure.
The IdentifyServer4 is a free, open-source OpenID Connect and OAuth 2.0 framework for ASP.NET Core. If you are in the market for a robust admin user interface (UI) to manage the IdentityServer4, you come to the right place. In this story, I will provide
- Instructions to set up the beautiful Admin UI using the open-source Skoruba.IdentityServer4.Admin template
- Walk-thru of the generated source code and run it on localhost
Open Source Project Highlights
To develop this story, I have reviewed and integrated tools and techniques from the following high-quality opensource projects
- IdentityServer4 — this project has 7.7K stars on Github. It is the #1 opensource project for securing enterprise ASP.NET WebAPI by Brock Allen
- IdentityServer4.Admin — this project has 2.5K stars on GitHub. It is the best Admin UI of the IdentityServer4 and Asp.Net Core Identity by Jan Škoruba
One way you can show your appreciation to open-source project developers is by giving them a “star” on Github.
For this story, I reached out Jan Škoruba, the creator of IdentityServer4.Admin for his comments. See below for Jan’s response. Bless his heart!
I have been working on this open source Admin UI for more than 4 years. I really like the IdentityServer4 and I am happy that I am able to share this Admin UI to others. 😊
Currently, I am working on version 2.0.0 — which contains upgrade IdentityServer4 to version 4 and convert UI part into Razor Class Library.
After IS4 Admin version 2.0.0 I will continue on porting this Admin UI to Duende Identity Server.
— Jan Škoruba
What is Skoruba.IdentityServer4.Admin template?
.NET Core developers can use the Skoruba.IdentityServer4.Admin template to generate a Visual Studio solution that provides Admin UI to the IdentityServer4. Via the Admin UI, you can register client apps and WebAPI resources.
A variety of client application connection types are supported by IdentityServer4
- PKCE flow — for Mobile, SPA application connection
- Hybrid flow — for Server-Side Web application connection
- Resource Owner Password flow— for Machine/Robot application connection
- Client Credentials flow — for Server to Server application connection
- Device flow —for Limited-Input Device Application connection
Part I — Download and Run the Template
The dotnet command is used to download and run the template.
Task 1 — Download the template
The template can be downloaded and installed via the dotnet new command with parameter -i (for install). For example, open the command prompt and enter the command below to download the Skoruba template version 1.0.0
dotnet new -i Skoruba.IdentityServer4.Admin.Templates::1.0.0Task 2 — Run the template
To generate the Visual Studio solution, run the dotnet new, specify the template name and template parameters. Suppose you want to generate the source code for a project named “MyProject” and place the project source code in the folder C:\apps\skoruba, follow the instruction below
- Open a command prompt and navigate to folder C:\apps\skoruba
- Run the script donet new script below to generate the project
dotnet new skoruba.is4admin --name MyProject --title MyProject --adminemail "[email protected]" --adminpassword "Pa$$word123" --adminrole MyRole --adminclientid MyClientId --adminclientsecret MyClientSecret --dockersupport trueSee below for the explanation of template parameters (from https://github.com/skoruba/IdentityServer4.Admin)
--name: [string value] for project name
--adminpassword: [string value] admin password
--adminemail: [string value] admin email
--title: [string value] for title and footer of the administration in UI
--adminrole: [string value] for name of admin role, that is used to authorize the administration
--adminclientid: [string value] for client name, that is used in the IdentityServer4 configuration for admin client
--adminclientsecret: [string value] for client secret, that is used in the IdentityServer4 configuration for admin client
--dockersupport: [boolean value] include docker support
Once the script is completed, you will find the source code in C:\apps\skoruba as shown in Figure 1.
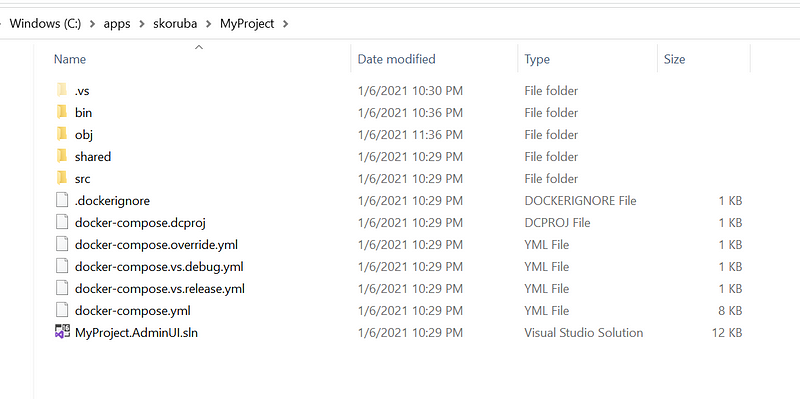
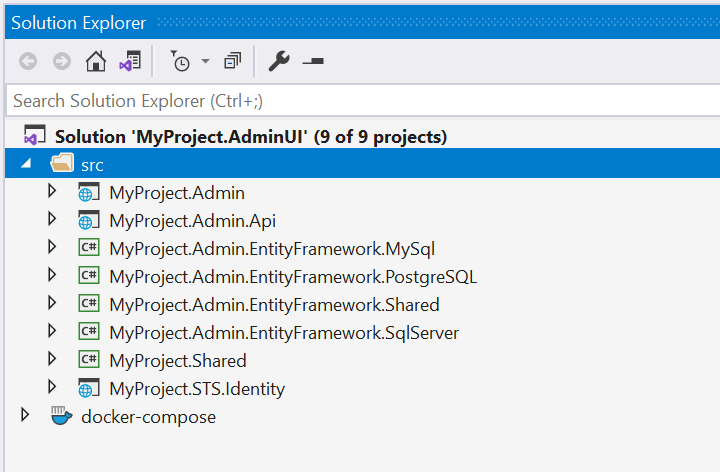
Launch Visual Studio and open the solution file MyProject.AdminUI.sln. You should see the solution projects as shown in Figure 2
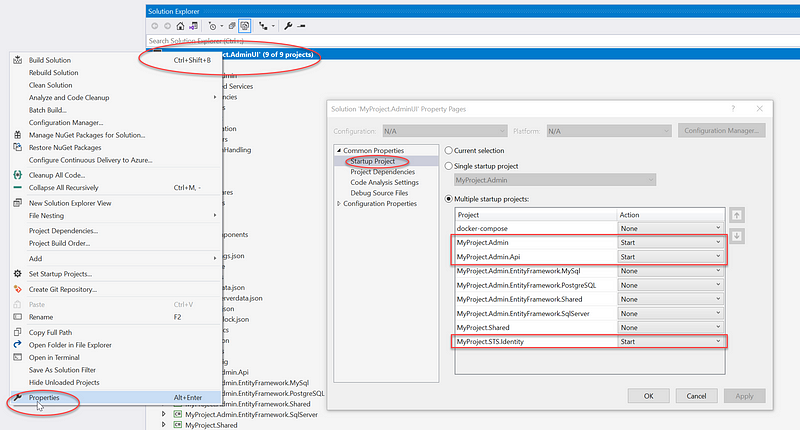
In the Solution Explorer, right mouse click on the solution name, select Properties, and set “Multiple startup projects” to three projects
- MyProject.Admin
- MyProject.Admin.Api
- MyProject.STS.Identity
See Figure 3 for a screenshot of enabling “Multiple startup projects” in Visual Studio.
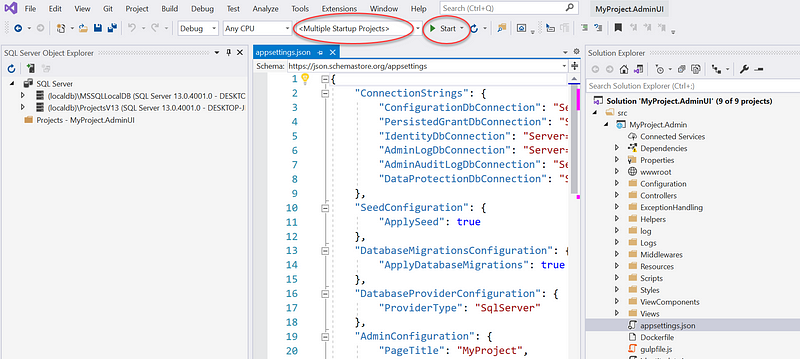
To run the solution, make sure the setting is Multiple Startup Projects, and then click on Start as shown in Figure 4.
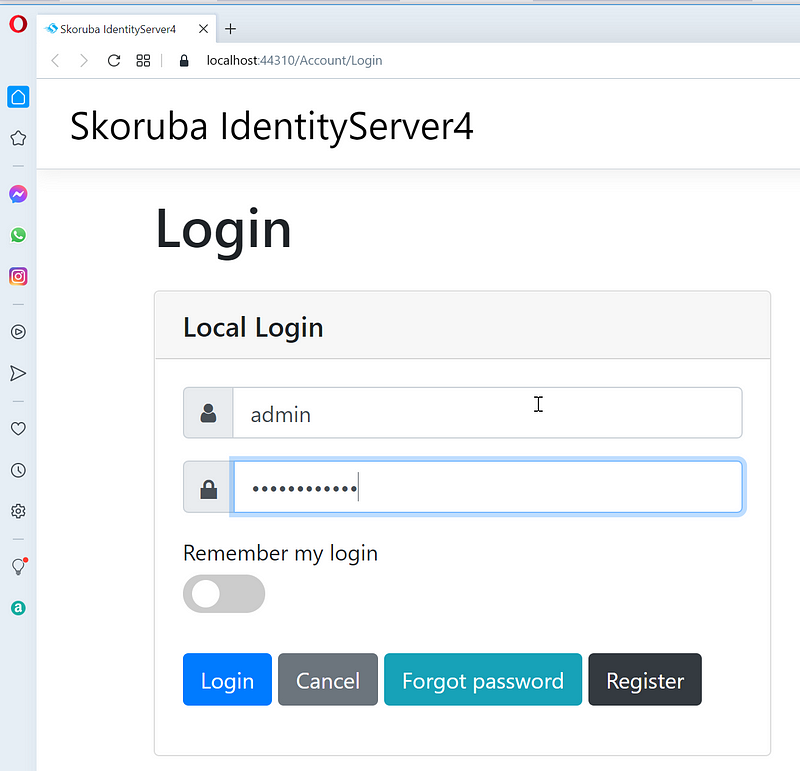
Your development workstation will launch three instances of the web browsers. Locate the one with the login screen as shown in Figure 5, and log in with the account (admin, Pa$$word123). The password is set in the parameter “adminpassword” when you ran the template earlier.
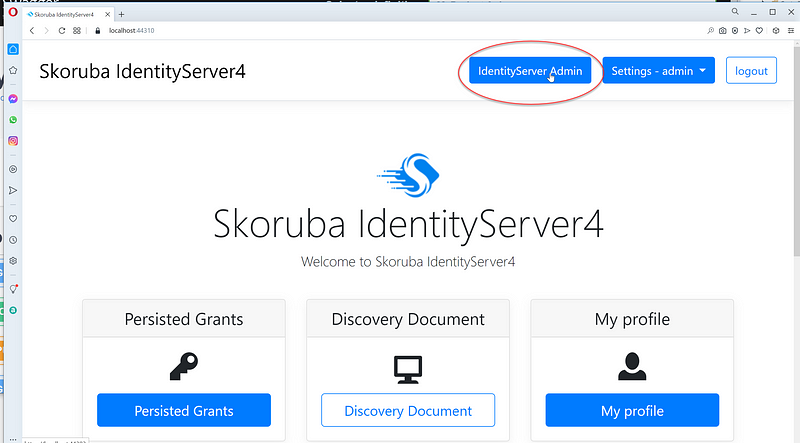
After login, click on IdentifyServer Admin menu as shown in Figure 6
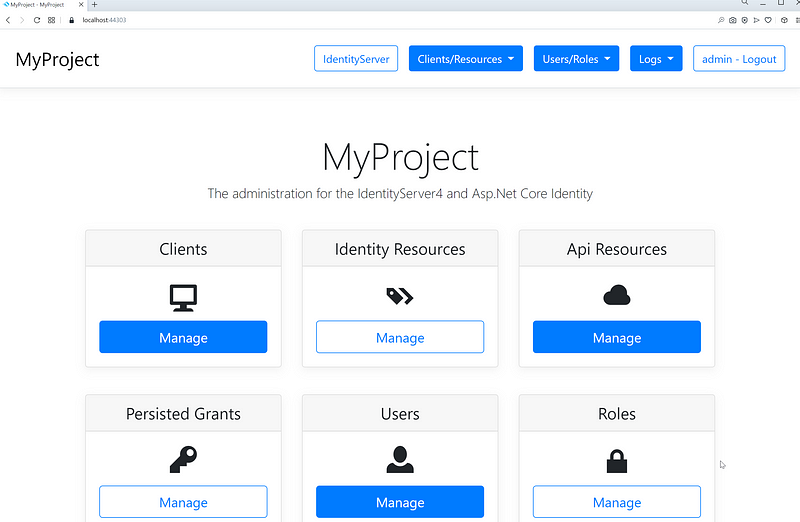
You should see the Admin UI running on port 44303 as shown in Figure 7.
Part II — Walk-thru of generated source code
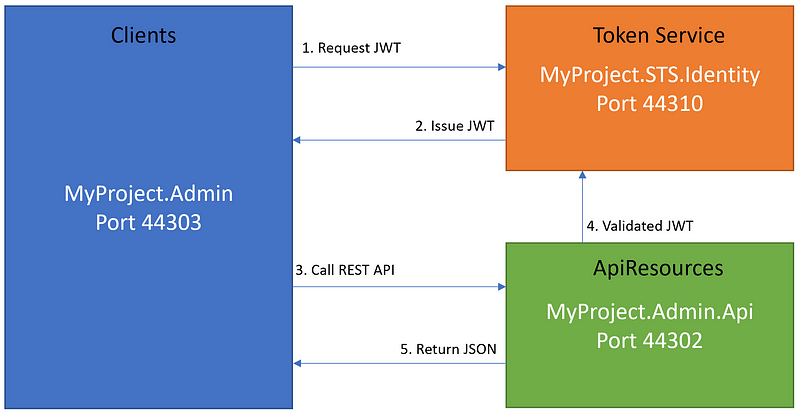
Before doing a deep dive into the solution source code, let’s get familiar with the Admin UI logical design. The Visual Studio solution source code provides three major functions in support of OpenID Connect and OAuth 2.0 framework.
1. Client — an ASP.NET Core web application making protected resource requests with its authorization in the form of the JSON Web Token (JWT)
2. Token Service — an ASP.NET Core web application, issuing JWT to clients and validating access tokens upon request access to ApiResources
3. ApiResources — the ASP.NET Core WebAPI capable of accepting and responding to protected resource requests using access tokens
Figure 8 depicts the relationship between three startup projects and their running ports.
- MyProject.Admin — port 44303
- MyProject.STS.Identity — port 44310
- MyProject.Admin.API — port 44302
Each project has its own port which allows Multiple Projects Startup in Visual Studio. If you want to change the port number, update the port in the launchSettings.json in the project > Properties folder. Figure 9 shows the launchSettings.json in the MyProject.Admin project

Solution Structure
As shown in Figure 2, the solution contains 9 projects. Below is a high-level description of each project.
- MyProject.Admin — ASP.NET Core MVC application that displays Admin UI
- MyProject.Admin.Api — ASP.NET WebAPI that exposes REST API for MyProject.Admin to consume
- MyProject.Admin.EntityFramework.MySql — DB provider for MySql
- MyProject.Admin.EntityFramework.SqlServer — DB provider for SqlServer
- MyProject.Admin.EntityFramework.PostgreSQL — DB provider for PostgreSQL
- MyProject.Admin.EntityFramework.Shared — DB context and entity models used in EntityFramework
- MyProject.Shared — shared Dtos, Helpers, Services, and Configurations
- MyProject.STS.Identity — an instance of IdentityServer4 code to support Admin UI authentication and authorization for incoming requests
- docker-compose — contains docker-compose scripts
Database Configuration
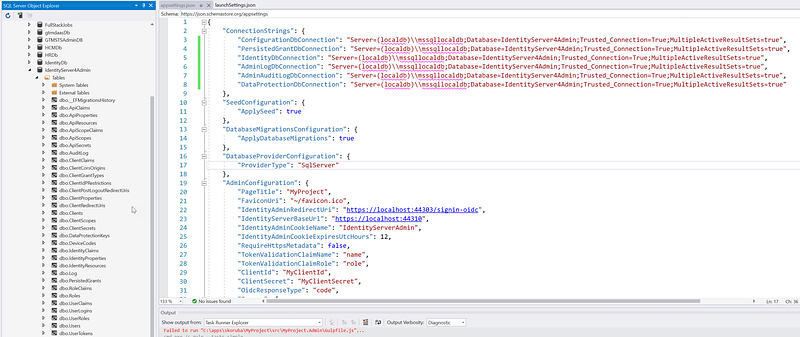
The connection string is specified in the appsettings. json file. The default database name is “IdentityServer4Admin”. If you want to update the connection string, be sure to update the appsettings. json in all three projects MyProject.Admin, MyProject.Admin.Api and MyProject.STS.Identity. See Figure 10 for a screenshot of the appsettings. json file. Notice that line 17 indicates the default database type SqlServer. You can change the setting to another type such as MySQL or PostgreSQL.
Also from Figure 10, the left side of the screenshot shows a set of tables behind Admin UI. These tables are setup automatically by EntityFramework when you first run the project. You can get to the SQL Server Object Explorer from the Visual Studio > View menu.
Seed Data
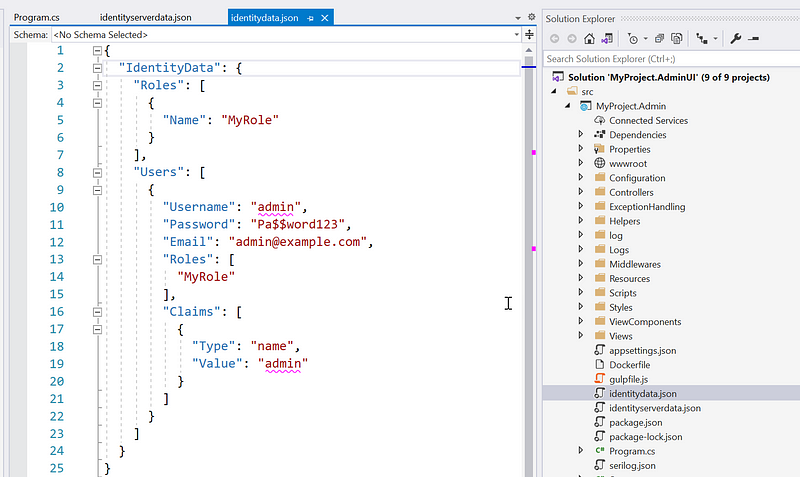
Two json files are the source to seed the data and you can find them in the MyProject.Admin project. You can customize or add new seed data in these two files before starting the project the first time.
- identitydata.json — seeding default users and roles (Figure 11)
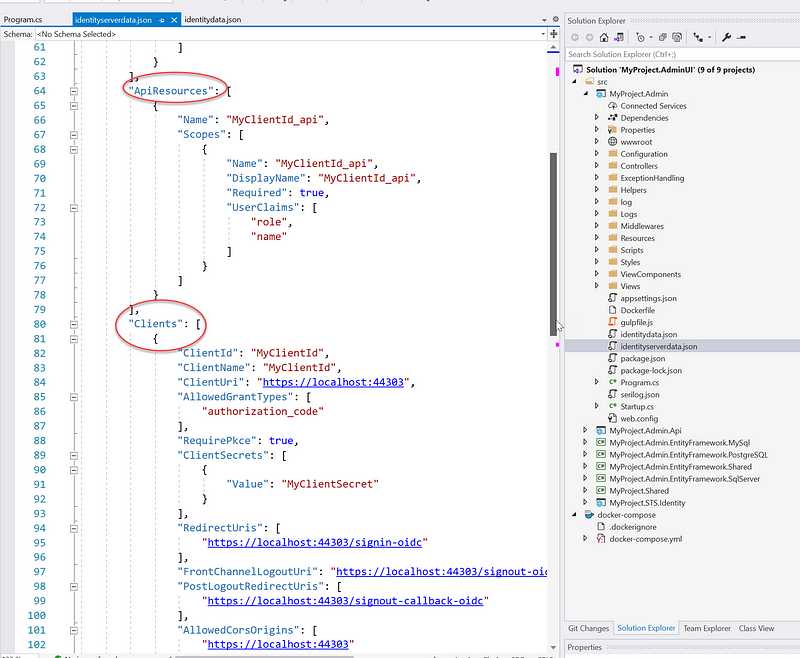
- identityserverdata.json — seeding clients and api resources (Figure12)
Source Code
You can get the generated source code in GitHub https://github.com/workcontrolgit/MyProject.AdminUI
Screencast
Watch the Youtube screencast (no voice yet) to see how to
- Install Skoruba.IdentityServer4.Admin template
- Generate Admin UI solution from template
- Run the Visual Studio solution
- Log in to the Admin UI
Related Stories
- IdentityServer4 with Admin UI, ASP.NET WebAPI, and Angular Tutorial
- Register Clients and ApiResources in IdentityServer4 | Tutorial 2
- ASP.NET WebAPI JWT validation against IdentityServer4 | Tutorial 4
- Angular SPA authentication against IdentityServer4 | Tutorial 5
Summary
One of the most prevailing features of IdentityServer4 is its ability to provide a single, centralized Identity and Access Management (IAM) solution across multiple applications. The Skoruba.IdentityServer4.Admin template provides Admin UI to streamline the configuration of oAuth2 client applications and API resources. Developers can focus on writing code for new software features and less on cross-cutting code for authentication and authorization. It saves time and money and alleviates the developer's stress. Give it a try!


