
Run IdentityServer4 Admin UI local and Azure

Beam me up, Scotty!
Introduction
On April 26, 2021, developer Jan Škoruba released IdentityServer4 Admin UI version 2.0.1 which supports ASP.NET CORE v5. In this tutorial, I will share the steps to deploy the Admin UI to Azure Cloud from Visual Studio 2019.
One of the most prevailing features of IdentityServer4 is it’s ability to provide a single, centralized Identity and Access Management (IAM) solution across multiple applications. The Skoruba.IdentityServer4.Admin template provides Admin UI to streamline the configuration of oAuth2 client applications and API resources. Developers can focus on writing code for new software features and less on cross-cutting code for authentication and authorization.
As a developer of Angular and ASP.NET CORE REST API, I need a Secure Token Service server to protect SPA applications. What would it take to deploy Secure Token Service to the cloud? It’s easy. In this tutorial, I will provide a step-by-step on how to do it.
This write-up is an extension to my previous publication on Medium in which I did a deep dive into the Skoruba.IdentityServer4.Admin opensource project. To learn more about Admin UI to secure ASP.NET CORE REST APIs and clients (ex. SPA, MVC, mobile), please visit IdentityServer4 Admin UI from Skoruba.IdentityServer4.Admin Template.
Open Source Project Highlights
To develop this story, I have reviewed and integrated tools and techniques from the following high-quality opensource projects.
- IdentityServer4 — this project has 7.9K stars on Github. It is the #1 opensource project for securing enterprise ASP.NET WebAPI by Brock Allen.
- IdentityServer4.Admin — this project has 2.7K stars on GitHub. It is the best Admin UI of the IdentityServer4 and Asp.Net Core Identity by Jan Škoruba.
One way you can show your appreciation to open-source project developers is by giving them a “star” on Github.
Tutorial Content
The tutorial has three parts:
Part 1: Scaffolding an Admin UI solution Use Net Core CLI to generate IdentityServer4 Admin UI project based on Skoruba.IdentityServer4.Admin template v2.0.1.
Part 2: Infrastructure setup in Azure to run Admin UI Set up App Service websites and SqlAzure database. Customize the IdentifyServer4 seed data file to work with websites in the cloud.
Part 3: Publishing Admin UI solution to Azure Deploy three web projects to Azure App Service from Visual Studio 2019 using Azure App Service Publishing Profile.
At the end of the tutorial part, I include a complementary screencast, so you can see how it was done on my desktop. Grab a drink and relax while watching the video!
Prerequisites
The following tools/skills are recommended.
- Visual Studio 2019 Community — free editor for ASP.NET Core WebAPI C#.
- Knowledge of Azure App Service and SQLAzure
Let’s get started!
Part I — Scaffolding an Admin UI solution
The dotnet command is used to download and run the Skoruba.IdentityServer4.Admin template.
Task 1.1 — Download the template
The template can be downloaded and installed via the dotnet new command with parameter -i (for install). For example, open the command prompt and enter the command below to download the Skoruba template version 2.0.1
dotnet new -i Skoruba.IdentityServer4.Admin.Templates::2.0.1Task 1.2 — Run the template to generate the Visual Studio solution
To generate the Visual Studio solution, run the dotnet new, specify the template name and template parameters. Suppose you want to generate the source code for a project named TokenProject and place the project source code in the folder C:\apps\devkit\TokenService\v2, follow the instruction below
- Create folder C:\apps\devkit\TokenService\v2
- Open a command prompt and navigate to folder C:\apps\devkit\TokenService\v2
- Run the script donet new script below to generate the project
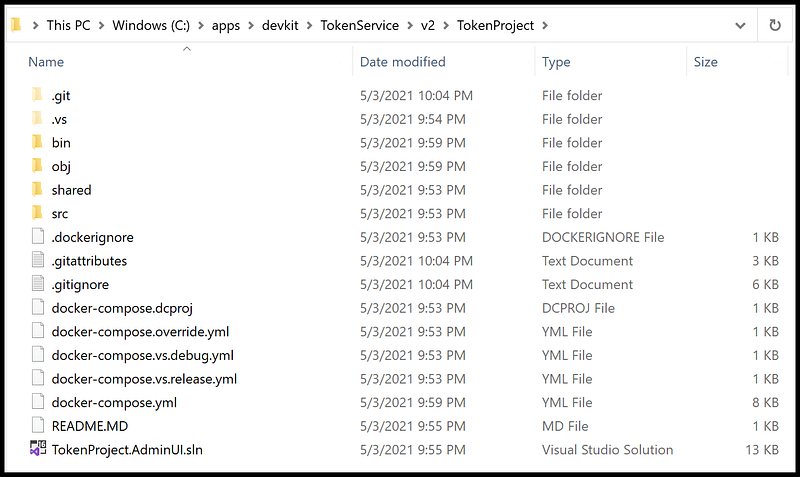
dotnet new skoruba.is4admin --name TokenProject --title TokenProject --adminemail "[email protected]" --adminpassword "Pa$$word123" --adminrole MyRole --adminclientid MyClientId --adminclientsecret MyClientSecret --dockersupport trueOnce the script is completed, you will find the source code in C:\apps\devkit\TokenService\v2\TokenProject as shown in Figure 1.
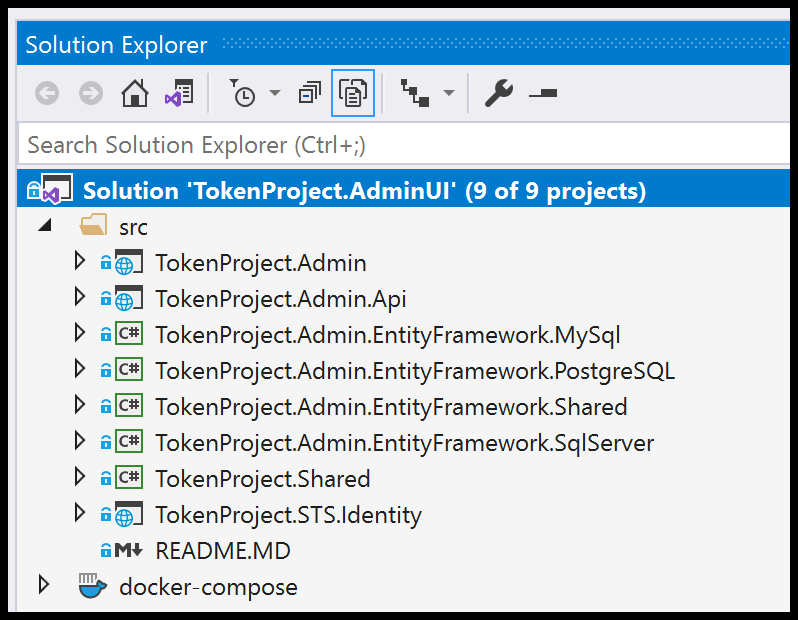
Launch Visual Studio and open the solution file TokenProject.AdminUI.sln. You should see the solution projects as shown in Figure 2.
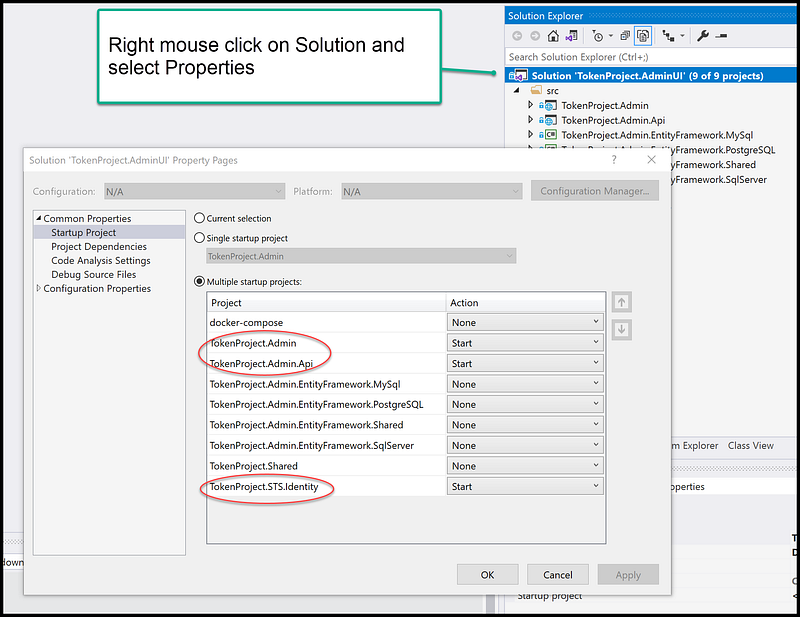
In the Solution Explorer, right mouse click on the solution name, select Properties, and set “Multiple startup projects” to three projects
- TokenProject.Admin
- TokenProject.Admin.Api
- TokenProject.STS.Identity
See Figure 3 for a screenshot of enabling Multiple startup projects in Visual Studio.
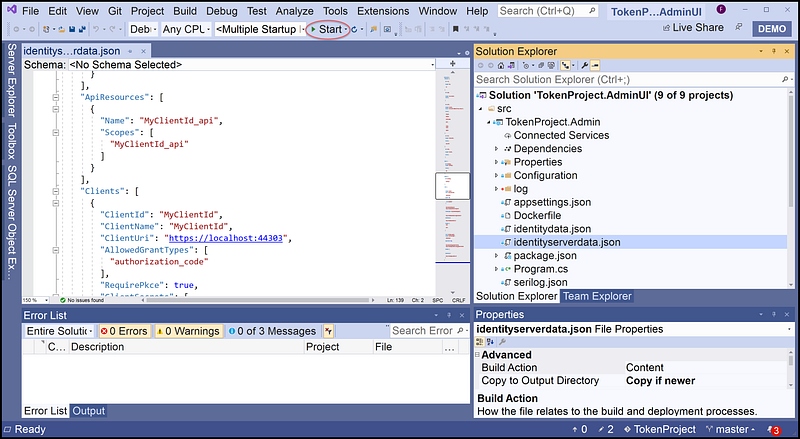
To run the solution, hit F5 or click on Start (as shown in Figure 4).
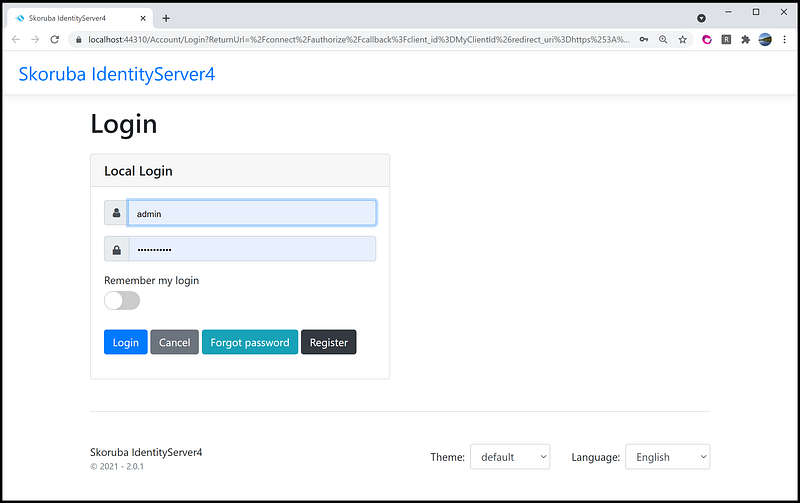
Your development workstation will launch three instances of the web browsers. Locate the one with the login screen as shown in Figure 5, and log in with the account (admin, Pa$$word123). The password is set in the parameter “adminpassword” when ran the template earlier to generate VS Solution. Notice that the localhost port number is 44303 for the login server.
After login, the Admin UI dashboard is shown in Figure 6. Notice that the localhost port number is 44303.

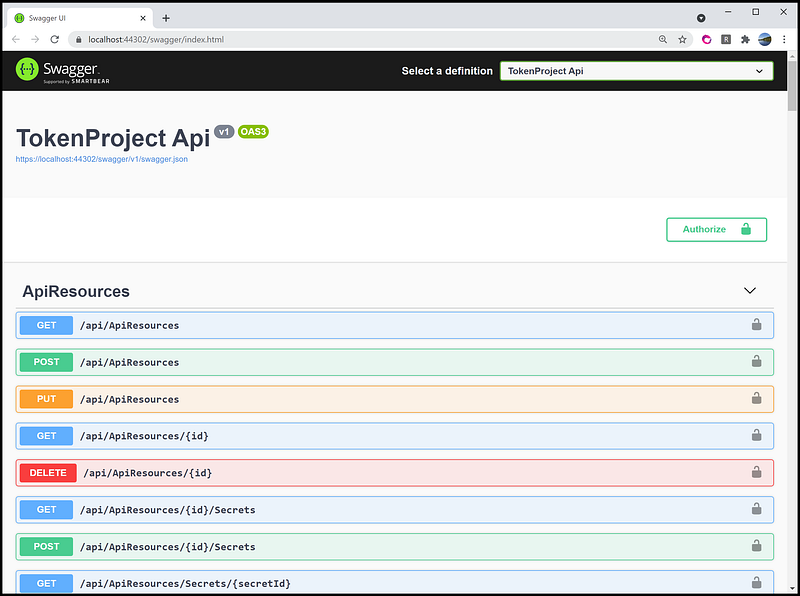
You should also see an instance of the browser displaying in the Admin UI REST API in swagger as shown in Figure 7. Notice that the localhost port number of the REST API is 44302.
Screencast of Part 1
The complementary Youtube video is a record of the steps in this part of the tutorial.
Part II — Infrastructure setup in Azure to run Admin UI
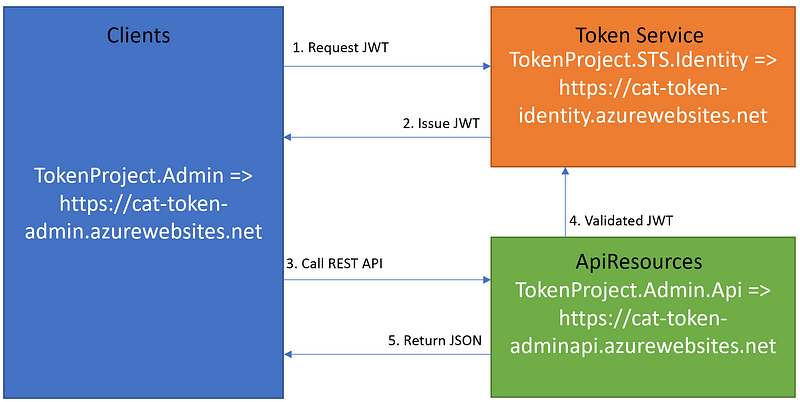
Before deploying Admin UI to Azure, let’s get familiar with the Admin UI architecture. The scaffolded Visual Studio solution provides a loosely couple of application components in support of OpenID Connect and OAuth 2.0 framework.
1. Client — an ASP.NET Core web application making protected resource requests with its authorization in the form of the JSON Web Token (JWT)
2. Token Service — an ASP.NET Core web application, issuing JWT to clients and validating access tokens upon request access to ApiResources
3. ApiResources — the ASP.NET Core WebAPI capable of accepting and responding to protected resource requests using access tokens
Figure 8 depicts the relationship between three web projects and their running ports on localhost. The Admin UI in a MVC (Client) accessing the backend REST API (ApiResource) that is secured by JWT (Token Service).
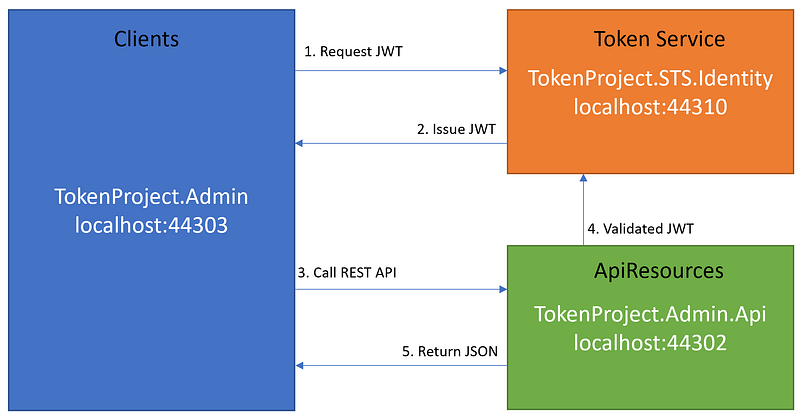
For more information about Clients-ApiResources-TokenService architecture for building scalable and maintainable modern applications, see CAT architecture pattern for modern app SPA/Mobile.
Database Configuration
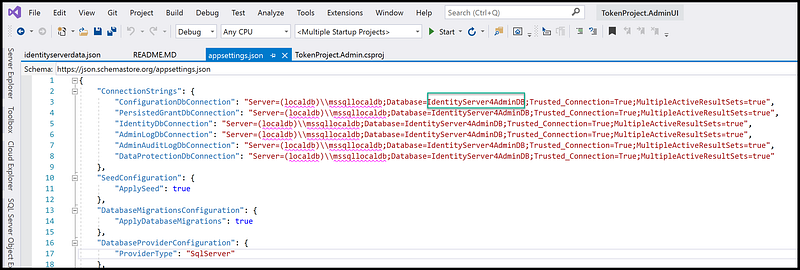
The connection string is specified in the appsettings.json file. The default database name is “IdentityServer4Admin”. For this tutorial, I changed it to IdentityServer4AdminDB to make it easy to identify in Azure.
If you want to update the connection string, be sure to update the appsettings.json in all three projects TokenProject.Admin, TokenProject.Admin.Api and TokenProject.STS.Identity. See Figure 9 for a screenshot of the connection string section in the appsettings.json file in project TokenProject.Admin.
Seed Data
Two json files are the source to seed the data, and you can find them in the root of TokenProject.Admin project. You can customize the seed data in these two files before deployment.
- identitydata.json — seeding default users and roles
- identityserverdata.json — seeding clients and api resources
Task 2.1 Set up SQLAzure database
It is assumed that you know how to create SQLAzure database. For instructions, see Create an Azure SQL Database.
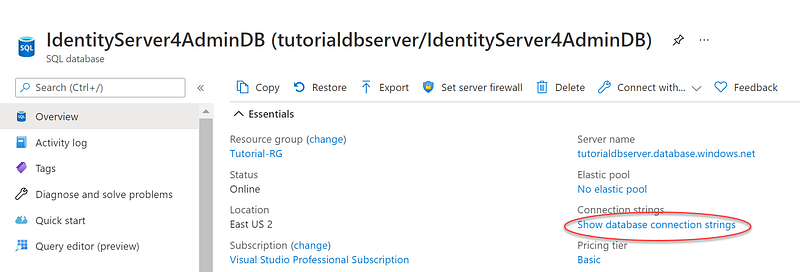
The IdentityServer4 Admin UI needs a database to store configuration and operational data. Create a SQLAzure database name IdentityServer4AdminDB. See Figure 10 for a screenshot of the database in Azure. Notice that you can get the database connection string by clicking on the Show database connection strings link.
Task 2.2 Setup Azure App Service
It is assumed that you know how to create Azure App Service. For instruction, see Creating the Azure App Service.
Set up three Azure App Service websites
- cat-token-admin — to run Visual Studio project TokenProject.Admin
- cat-token-identity — to run Visual Studio project TokenProject.STS.Identity
- cat-token-adminapi — to run Visual Studio project TokenProject.Admin.Api
Figure 11 shows the Visual Studio projects and their target publish-to-websites. Notice that I came up with the App Service names for use in this tutorial. You must come up with different App Service names in your project and adapt the names to the instructions in this tutorial accordingly. For example, if your app service name is my-token-admin which is equivalent to cat-token-admin, then everywhere in the tutorial replace cat-token-service with my-token-service. This is a limitation in Azure where App Service name must be unique.
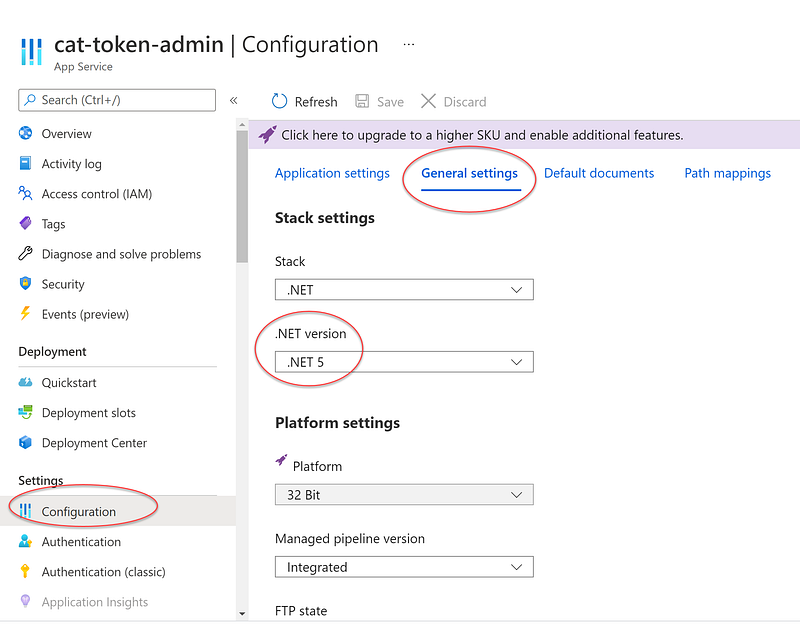
Since the Admin UI is running on ASP.NET CORE 5, be sure to set all the App Service apps to run .NET 5. See Figure 12 for the screenshot of the stack settings section in the cat-token-admin.
Task 2.3 Configure Azure App Service > App Settings
It is assumed that you know how to configure app settings. For instructions, see Configure an App Service app in the Azure portal.
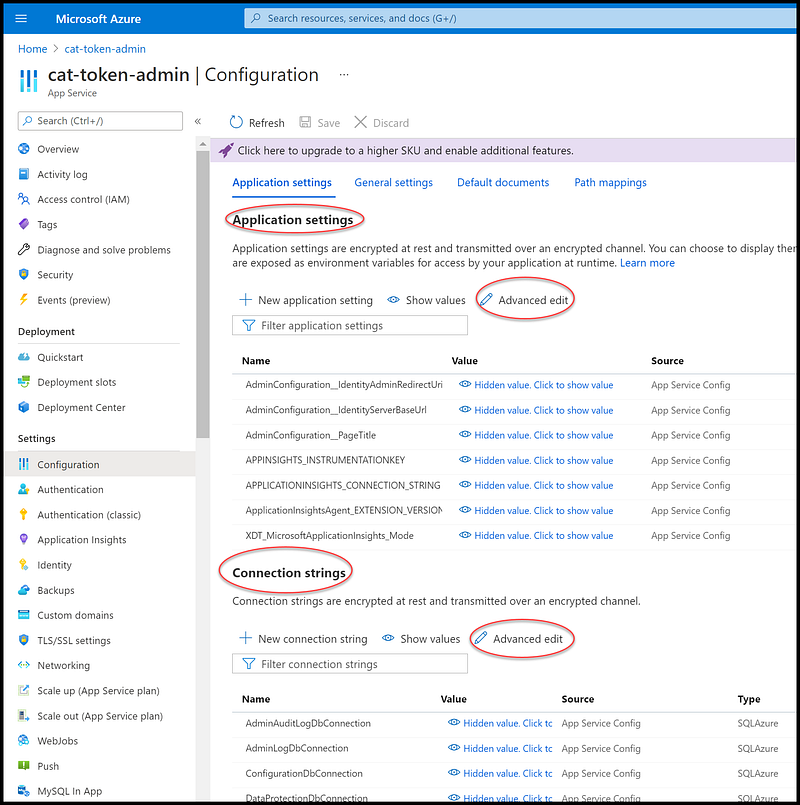
In App Service, app settings are variables passed as environment variables to the application code. This allows overriding the settings in the appsettings.json at runtime. Figure 13 shows the Application settings and Connecting strings section of the App Service cat-token-admin. You can click on Advanced edit to mass update all the settings via JSON format.
Figures 14 and 15 are values for Application settings and Connecting strings for App Service cat-token-admin. Be sure to update the values to match your project.
Figures 16 and 17 are values for Application settings and Connecting strings for App Service cat-token-adminapi. Be sure to update the values to match your project.
Figures 18 and 19 are values for Application settings and Connecting strings for App Service cat-token-identity. Be sure to update the values to match your project.
Task 2.4 Update IdentifyServer4 Admin UI Seed JSON file
The file identityserverdata.json in Visual Studio project TokenProject.Admin is used for seeding the database with the initial configuration. By default, this file contains the localhost URLs to support local development. We need to expand the seed json file with the Azure App Service website URLs in order for the Admin UI to work in Azure. See Figure 17 for a screenshot of the additional URLs in file identityserverdata.json.
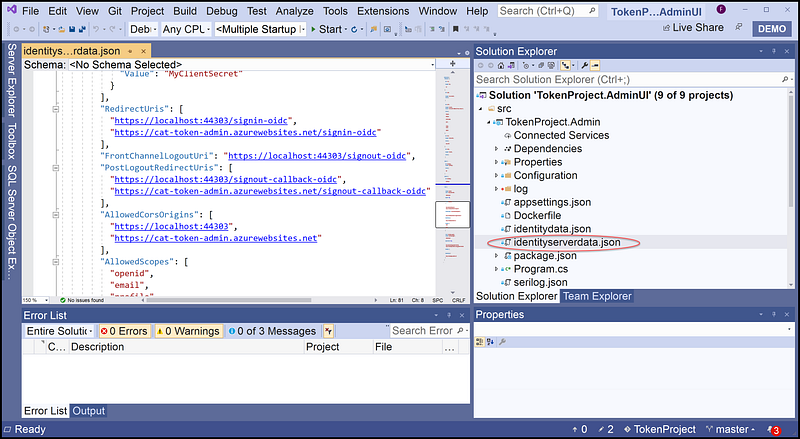
Figure 18 has a listing of the updated identityserverdata.json. Notice that the Azure website URLs are added in lines 99, 104, 108, 127, and 134. Be sure to update the URL values to match your project.
Screencast of Part 2
The complementary Youtube video is a record of the steps in this part of the tutorial.
Part III— Publishing Admin UI solution to Azure
Deploy three projects TokenProject.Admin, TokenProject.Admin.Api, and TokenProject.STS.Identity to Azure App Service
Task 3.1 — Download Azure App Services publishing profile from Azure
It is assumed that you know how to download the publishing profile from Azure. For instructions, see Publish an application to Azure App Service by importing publish settings in Visual Studio.
To download publishing profiles
- From Azure Portal, go to App Service menu
- Select the app service cat-token-admin
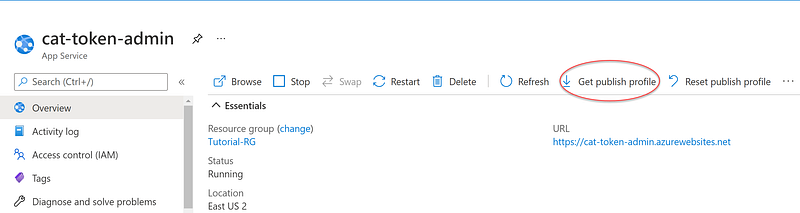
- From the Overview blade, click on Get publish profile (remember the location where the file is saved)
- Repeat step 1 to 3 above for two other App Service cat-token-identity and cat-token-adminapi
Figure 19 is an example screenshot showing where to download the publishing in App Service cat-token-admin.
Task 3.2 — Publish project to Azure App Services
To publish Visual Studio project TokenProject.Admin to Azure
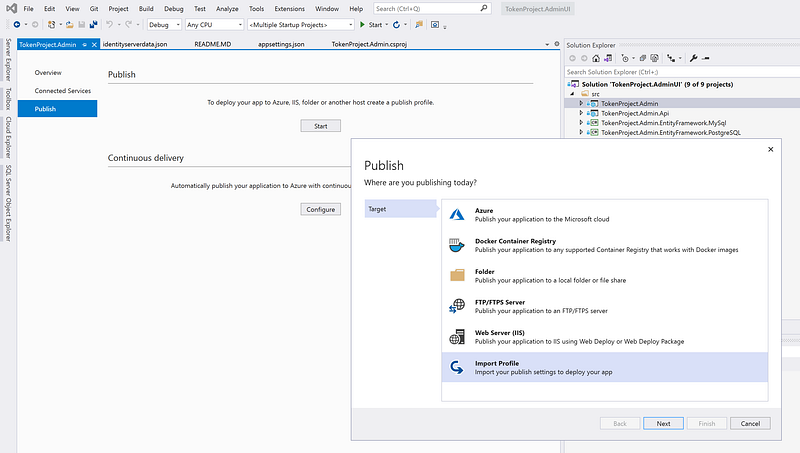
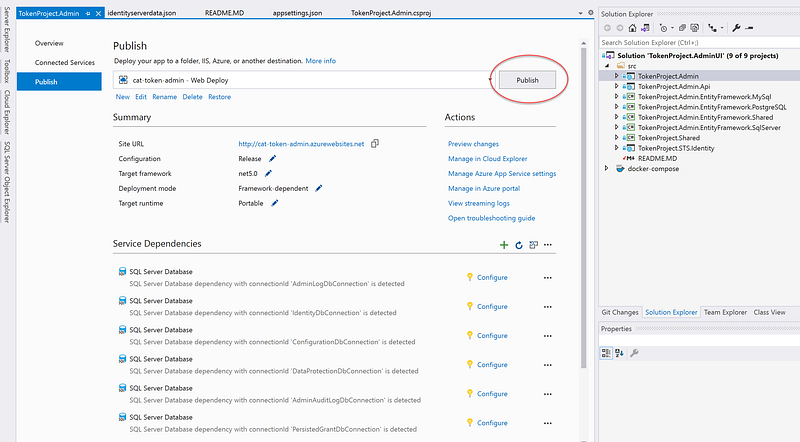
- Right mouse click on TokenProject.Admin and Select Publish
- Select Import Profile (see Figure 20)
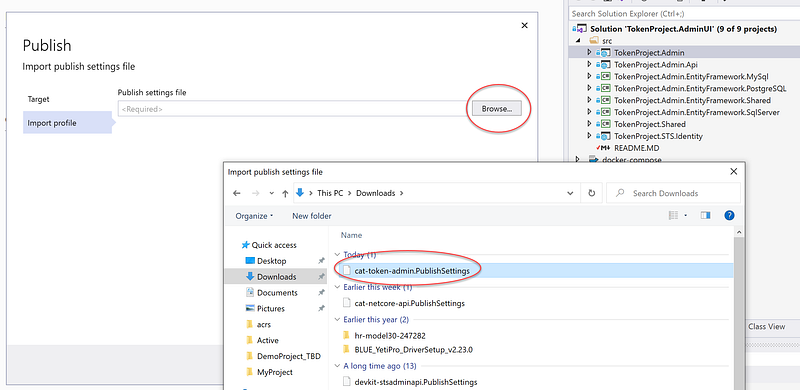
- Select Publish Settings file that was downloaded prior (see Figure 21)
- Click on Publish (see Figure 22)
Repeat steps 1–4 for two other Visual Studio projects TokenProject.Admin.Api and TokenProject.STS.Identity.
Screencast of Part 3
The complementary Youtube video is a record of the steps in this part of the tutorial.
Github Repositories
The source code for this tutorial is here. You can clone and run on localhost using Visual Studio 2019 without any code modification. Once the solution is up and running, log in with (admin, Pa$$word123), review the source code discussed in this publication, and try out the Admin UI from your local desktop.
Live Demo
Developers love to see a working product demo. We all like to be shown how something works, so we can decide whether we want to spend our valuable time learning it. Below are demo URLs running in Azure. It is running on low-tier cost in Azure so the performance is slow to start up. Please be patient.
- Admin UI — front end Razor MVC
- Admin UI Rest API Swagger — backend web api
- Admin UI Identity —an instance of IdentifyServer4 to support login
References
- ASP.NET Core 6 and Authentication Servers
- Skoruba IdentityServer4 Admin Documentation
- IdentityServer4 Documentation
- CAT architecture pattern for modern app SPA/Mobile
Summary
In this tutorial, you learned how easy it is to seed the database and leverage Azure App Service configuration to run an instance of IdentityServer4 Admin UI in Azure. It is a good solution for team development where the individual developer does not have to set up local instance IdentityServer4. Developers can use the Admin UI in Azure to register new apps while doing development on the local desktops. It saves time and money and alleviates the developer’s stress.
IMHO, IdentityServer4.Admin is one of the best ASP.NET Core Open Source projects in terms of high-quality C# coding. Cloning the repository to a local workstation and analyzing the architecture, design, and implementation details can expand the developer’s practical knowledge. Let’s learn from the best!