
Secure React 17 with JWT and IdentityServer4

What does JWT stand for? Just Wasting Time? John Wayne Trail? Job Without Title?
Introduction
React is a JavaScript library for building user interfaces. Developers can use the Create React App for building a new single-page application (SPA). Create React App doesn’t handle backend logic or security. It just creates a frontend user interface in Javascript/HTML and leaves it up to developers to pick a backend technology such as ASP.NET, Node, Python, or Java.
If you work with Microsoft ASP.NET Core, there is a good chance that you have heard of a popular middleware product called IdentityServer4 and its frontend Admin UI. Developers can take advantage of highly configurable IdentityServer4 to secure client apps and Web API using JSON Web Token (JWT). This tutorial will get you familiar with the setup and configuration of IdentityServer4 to secure React app.
Opensource Project Highlights
Credit where credit is due
To develop this tutorial, I have reviewed and integrated tools and techniques from the following high-quality opensource projects
- IdentityServer4 — this project has 7.9K stars on Github. It is the #1 opensource project for securing enterprise ASP.NET WebAPI by Brock Allen.
- IdentityModel/oidc-client-js — this project has 2.1K stars on Github. It is a library to provide OpenID Connect (OIDC) and OAuth2 protocol support for client-side, browser-based JavaScript client applications by Brock Allen.
- IdentityServer4.Admin — this project has 2.7K stars on GitHub. It is the best Admin UI of the IdentityServer4 and Asp.Net Core Identity by Jan Škoruba.
- react-oidc-client-js — this project has 130 stars on GitHub. It is a sample React app wired in oidc-client-js library to login IdentityServer4 by Jan Škoruba.
Prerequisites
The following tools/skills are recommended.
- Visual Code — free code editor for Typescript
- Visual Studio 2019 Community — free code editor for C#
- Knowledge of Git such as cloning Github repository to local
- Familiar with OIDC and oAuth2 terminologies
Tutorial Content
The tutorial will focus on features in IdentityServer4 Admin UI to secure React app. Thanks to the advanced Admin UI, you can register the React app as a Client and then configure security settings via the user-friendly interface (vs. writing a lot of code which you may have seen in many online tutorials).
The story content consists of:
Part 1: A walk-thru of an online demo to get you familiar with JSON Web Token (JWT).
Part 2: Download the source code of React app and IdentityServer4 Admin UI from GitHub, and run them on localhost.
Part 3: Review application architecture and configuration in IdentityServer4 to secure React app.
Github Source Code
The source code for the sample React app secured by IdentityServer4 is available on GitHub. You can clone and run these projects out of the box. Below are links to repositories and their description
- workcontrolgit/react-oidc-client-js — this repo contains a React app pre-configured with OIDC client library to login IdentityServer4. The app provides login/logout features. The repo is a fork of react-oidc-client-js and then upgraded to React 17 and added custom code/configuration to work on localhost and in Azure
- workcontrolgit/TokenProject.AdminUI — this is a repository of IdentityServer4 Admin UI written in C#/NetCore5. The Visual Studio solution consists of three web projects Admin UI, Admin API, and IdentityServer4.
- workcontrolgit/catnetcoreapi — this repo contains a sample REST API generated using OnionAPI template. The REST API is written in C#/NetCore 5.
Part 1: A walk-thru of an online demo to get you familiar with JSON Web Token (JWT)
Developers love to see working source code. We all like to experiment with how something works, and then decide whether we want to spend our valuable time learning it. Check out the live demo. Log in with the account (janedoe, Pa$$word123) or your GitHub.
First, let’s get familiar with the demo React app. Figure 1 depicts the application architecture reference in this tutorial. It shows the JWT interface and communication ports between application components running in Azure. The architecture consists of Clients, ApiResources, and Token Service (CAT).
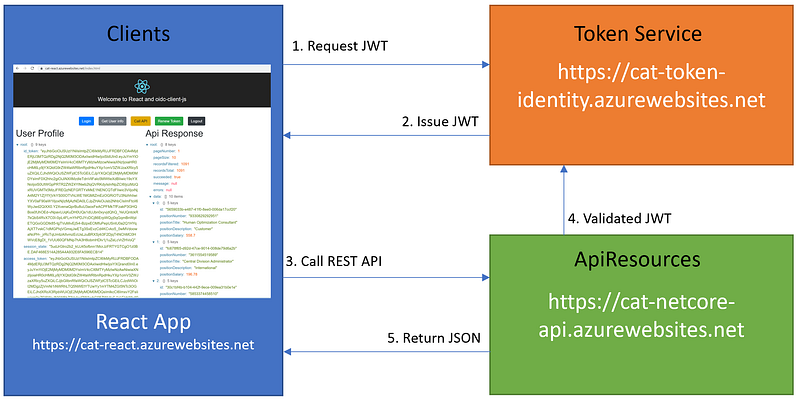
The client React app requests JWT from the Token Service, which runs an instance of IdentityServer4. The Token Service is responsible for issuing and validating JWT. When the React app needs to access the API Resources, it will send the JWT via the browser header to the API Resources. The API Resources will valid the JWT prior to response with data.
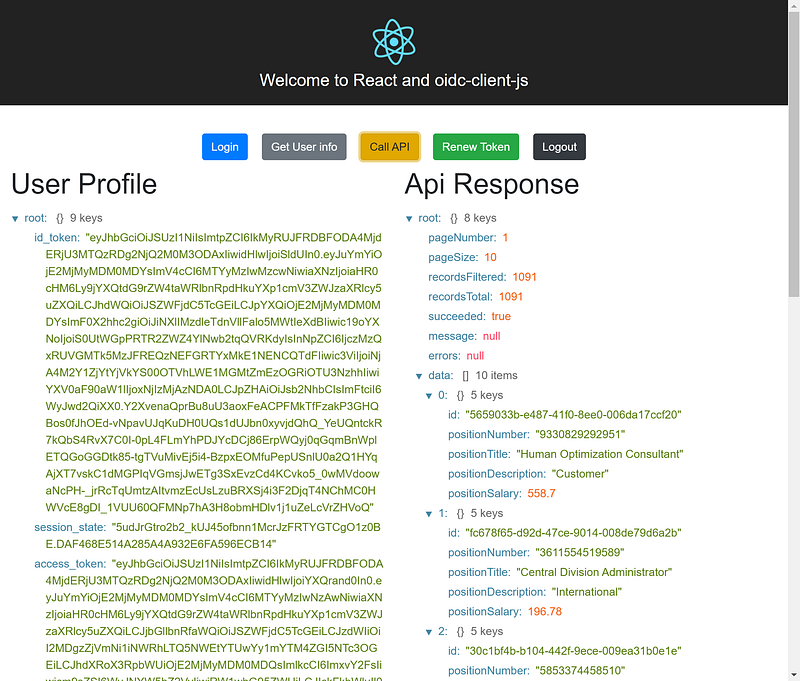
Figure 2 depicts the homepage of the React app with a series of buttons to demonstrate authentication and authorization.
- Login — redirect to IdentityServer4 https://cat-token-identity.azurewebsites.net for login. Upon successful login, the IdentityServer4 will redirect back to React App and the app will display the JWT
- Get User info — load user info from browser storage (hint: to see user info in the storage, in Chrome, go to Developer Tools > Application tab > Session Storage)
- Call API — call an example REST API at https://cat-netcore-api.azurewebsites.net/api/v1/Positions and pass the access token via the header to get the data back and display
- Renew Token — call IdentityServer4 to get a new token
- Logout — redirect to IdentityServer4 for logout
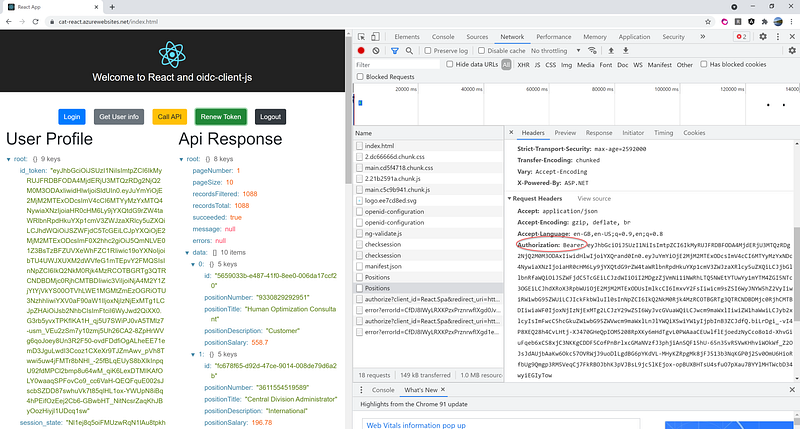
In Javascript applications such as React, to learn the traffic under the hood, I recommend using Chrome to run the app. While in Chrome, go to Developer Tools (by hit F12) and click on the Network tab to see communication between React app and the backend. Figure 3 is an example of the network traffic when clicking on Call API. Notice that the JWT is passed in the header using the Bearer schema.
Part 2: Download the source code of React app and IdentityServer4 Admin UI from GitHub
During development, developers often need an instance of IdentityServer4 Admin UI running on localhost, so we can create a new app and use the IdentityServer4 as security infrastructure to prototype authentication and authorization.
Task 2.1 — Git clone React app with Visual Code
To clone React app to localhost, follow the steps below
- In Visual Code, press F1 to display the command palette.
- At the command palette prompt, enter gitcl, select the Git: Clone command, and press Enter.
- When prompted for the Repository URL, enter a GitHub repository url https://github.com/workcontrolgit/react-oidc-client-js, then press Enter.
- Select (or create) the local directory (recommend C:\apps\devkit\Clients\react-oidc-client-js) into which you want to clone the project.
To run React app, follow the steps below
- Click on menu View > Terminal (or hit CTRL + `)
- Type in npm start at the command prompt
- Hit Enter key
Task 2.2 — Git clone IdentityServer4 Admin UI with Visual Studio.
It is assumed that you know how to Git Clone in Visual Studio. If you need instruction, visit Tutorial: Open a project from a repo.
To git clone IdentityServer4 Admin UI
- Start Visual Studio 2019.
- On the start window, select Clone a repository.
- Enter the repository location https://github.com/workcontrolgit/TokenProject.AdminUI
- Enter the path C:\apps\devkit\TokenService\v2\TokenProject
- Click on Clone
In the Solution Explorer, right mouse click on the solution name, select Properties, and set Multiple startup projects to three projects
- TokenProject.Admin
- TokenProject.Admin.Api
- TokenProject.STS.Identity
To run the solution, hit F5
Task 2.3 — Git clone sample REST API with Visual Studio
To git clone sample REST API
- Start Visual Studio 2019 (hint: you can have multiple instances of Visual Studio running the same time on the desktop, one for IdentifyServer4 Admin UI and second for sample REST API)
- On the start window, select Clone a repository
- Enter the repository location https://github.com/workcontrolgit/catnetcoreapi
- Enter the path C:\apps\devkit\ApiResources
- Click on Clone
To run the project, hit F5
Part 3: Review application architecture/code and configure IdentityServer4 to secure React app
Task 3.1 — Review application architecture
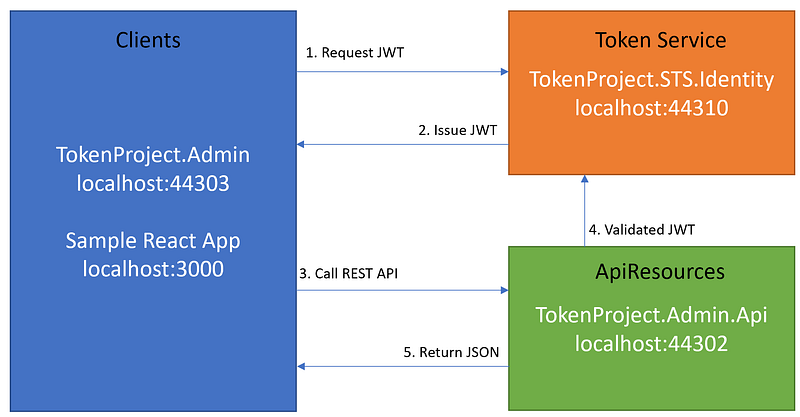
See Figure 4 for the projects and their corresponding ports when running on localhost. The application architecture consists of Clients, ApiResources, and Token Service (CAT). For more information about CAT, see CAT architecture pattern for modern app SPA/Mobile.
Task 3.2 Code walk-thru of React App pertain to OIDC integration
In the React app, the settings to connect to IdentiServer4 can be found in Figure 5, which contains a listing of the source code in AuthService.ts
Line 1 : Import objects from oidc-client library
Line 6–14: Setup input parameters to oidc-client. These parameters must be configured in the IdentityServer4
Line16: initialize an instance of userManager object
Line 22: get user info by calling getUser() method from object userManager
Line 26: redirect to IdentityServer4 to log in
Line 30: method to renew the token
Line 34–36 — method to log out
The values of the settings are in the files .env, .env.development and .env.production. If you want to know how to use these environment files during development and production build, see Adding Custom Environment Variables
The source code in file Buttons.tsx displays a series of the buttons and the source code in file AppContent.tsx handles the click events and then calls the methods in the AuthService.ts (see Figure 5).
Task 3.3 Register and Configure React app in IdentityServer4
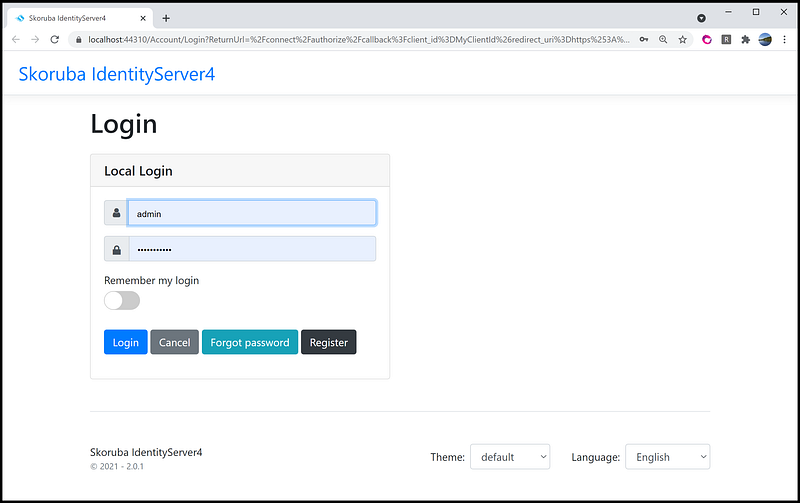
In prior Task 2.2, we ran the IdentifyServer4 Admin UI from Visual Studio. Locate the browser instance with the login screen as shown in Figure 6, and log in with the account (admin, Pa$$word123).
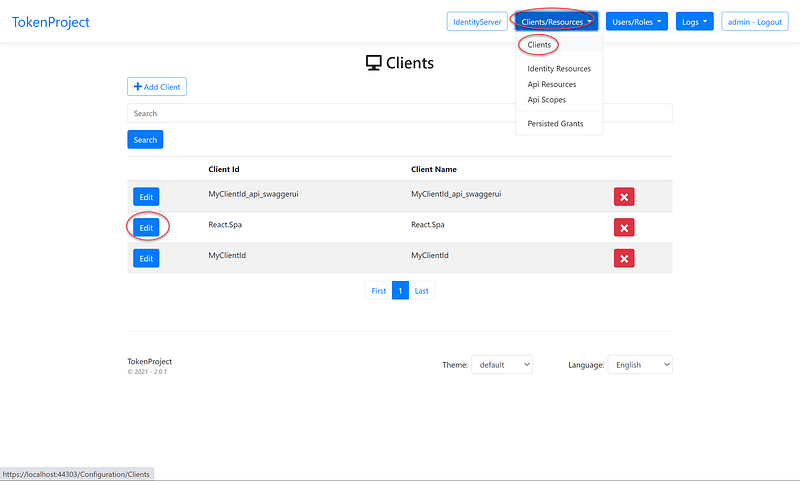
After login, review the React app as a client using the steps below (see Figure 7 for navigation aids)
- Click on Clients/Resources main menu
- Select Clients sub menu
- Locate React.Spa and click on Edit
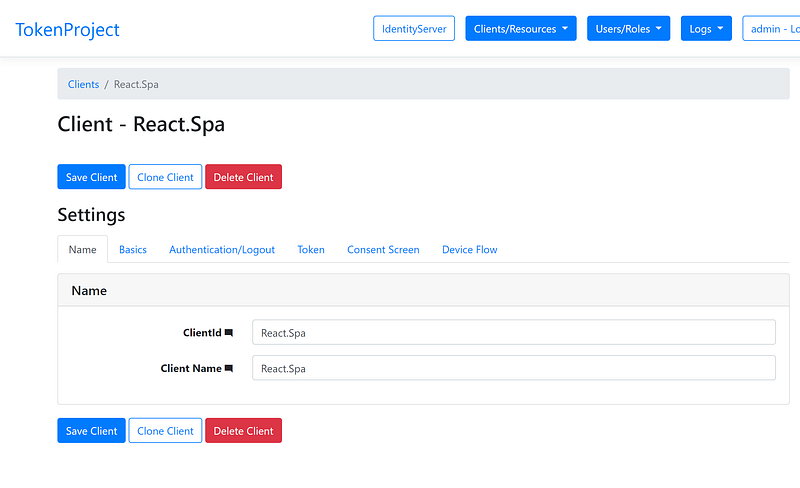
On the client Name tab(see Figure 8)
- Review the ClientId field
- Review the Client Name field
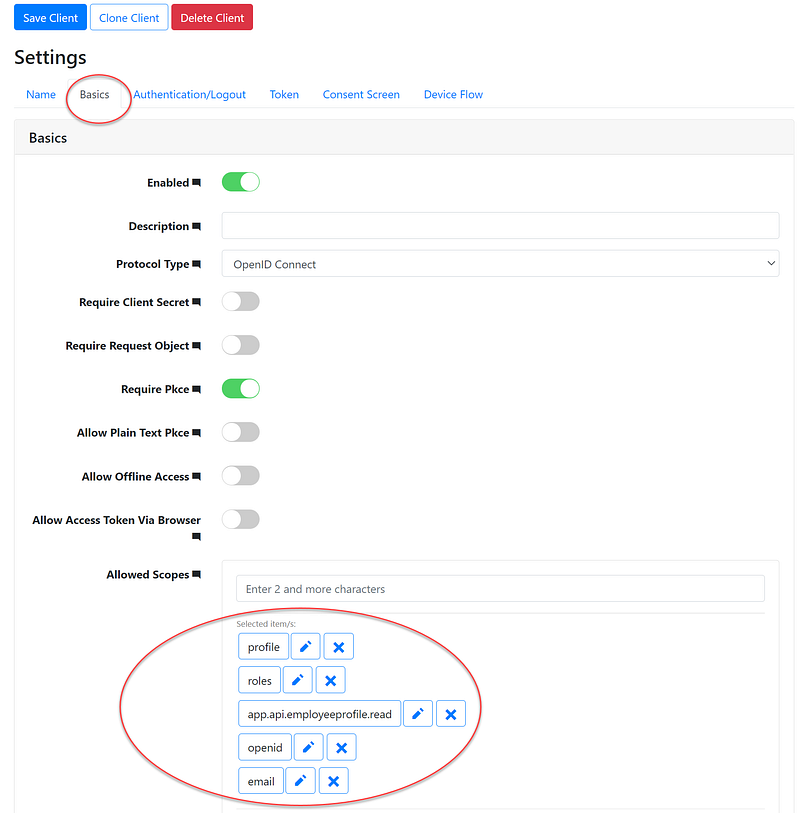
On the client Basic tab, review the settings for the Allowed Scopes field as shown in Figure 9.
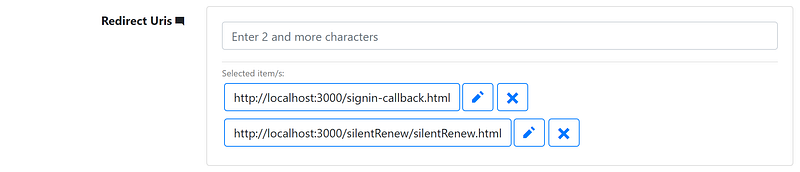
The redirect Uris values are authorized URLs that the IdentityServer4 can redirect to after login. Since the React app will run on localhost port 3000, on the client Basics tab, set up URLs as shown in Figure 10.
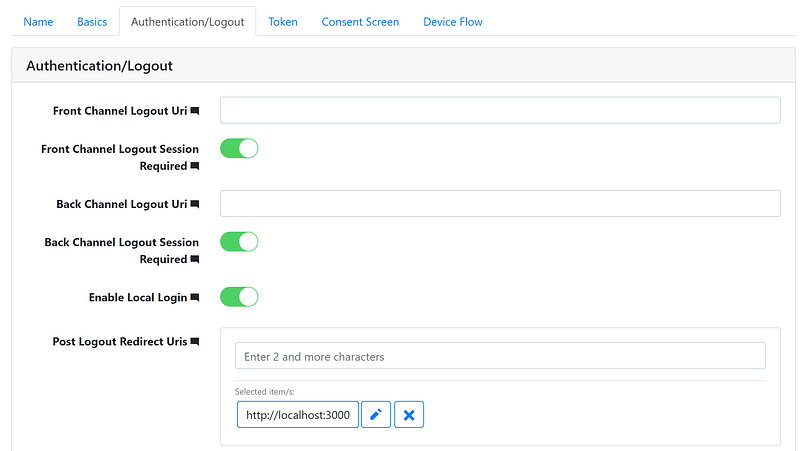
On the Authentication/Logout tab, set up the Post Logout Redirect Uris as shown in Figure 11.
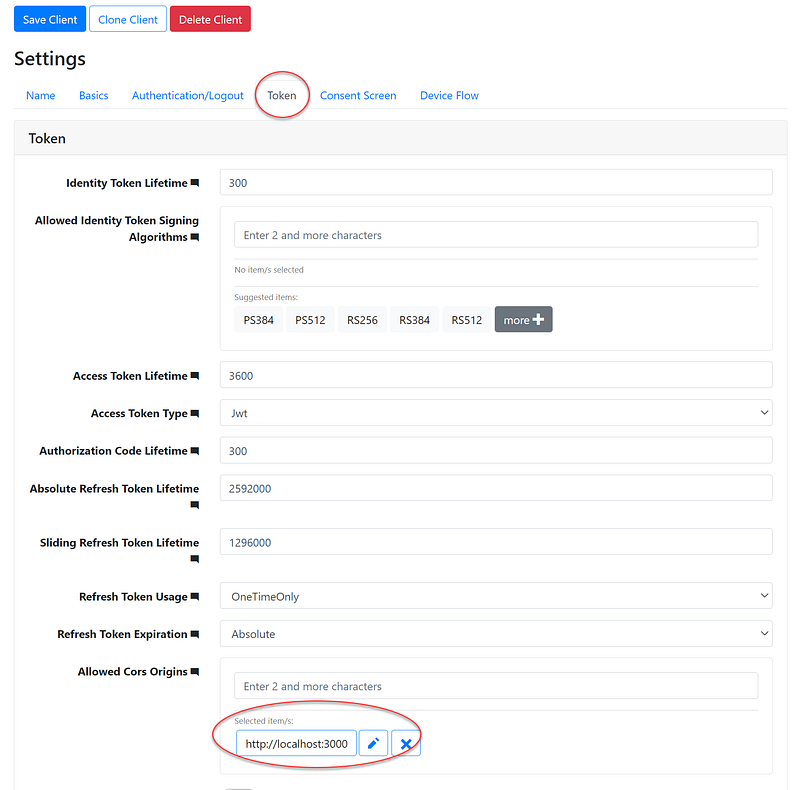
Cross-Origin Resource Sharing (CORS) is an HTTP-header based mechanism that allows a server to indicate any other origins (domain, scheme, or port) than its own from which a browser should permit loading of resources.
On the Token tab, set up the CORS as shown in Figure 12.
Summary
This tutorial gets developers familiar with configuring IdentityServer4 to secure React App. If your tech stack is React and ASP.NET Core WebAPI, you can leverage popular opensource projects IdentityServer4 Admin UI and OIDC client to quickly implement authentication and authorization. Don’t sweat over JWT!


