
Authenticate Asp.Net Web Form with IdentityServer4

Introduction
The story is for developers who have been around the block. If you are stuck with legacy Asp.Net Framework Web Form applications and want to upgrade the login to modern OIDC/oAuth2 for SSO, this story is for you.
ASP.NET Web Forms is a web application framework and one of several programming models supported by the Microsoft ASP.NET technology. Web Forms applications can be written in any programming language which supports the Common Language Runtime, such as C# or Visual Basic. — https://en.wikipedia.org/wiki/ASP.NET_Web_Forms
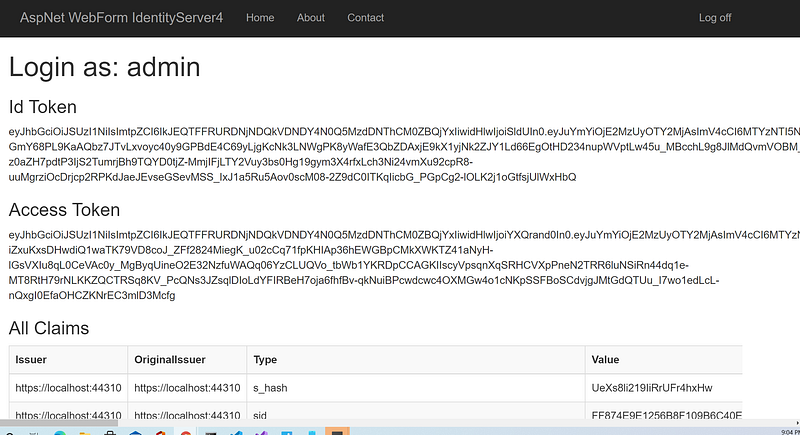
In this tutorial, I will go over the application architecture and programming technique to retrieve JSON Web Token (JWT) from a sample Asp.Net Web Form client. Figure 1 is an example screenshot displaying the Id Token and Access Token after login to IdentityServer4.
Application Architecture Overview
Asp.Net Web Forms was included in the original .NET Framework 1.0 release back in 2002. The main building blocks of Web Forms pages are server controls, which are reusable components responsible for rendering HTML markup and responding to events.
Microsoft provides a set of OWIN NuGet packages to enable legacy Asp.Net Web Form to connect and retrieve JSON Web Token (JWT) from Secure Token Service (STS) using Implicit flow. The JWT is saved in Cookies for subsequence usage.
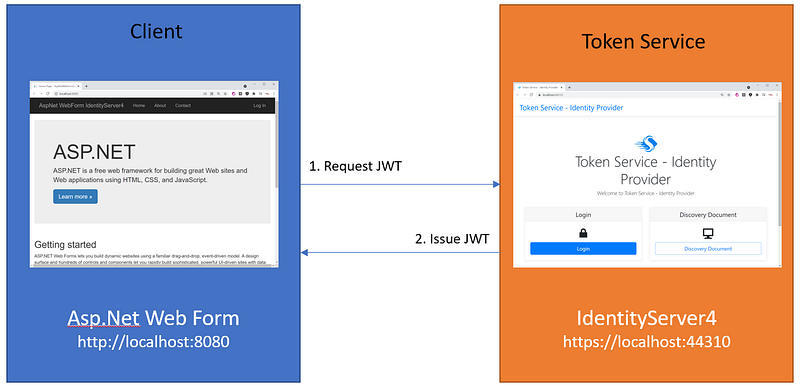
Figure 2 depicts the connectivity and data flow between the client app and the STS IdentityServer4.
Why Implicit and not PKCE (Proof Key for Code Exchange)? I have tried PKCE but it did not work. I came across an online blog from Scott Brady showing how to connect with PKCE flow for legacy Asp.Net MVC but not Web Form. If anyone has successfully set up a Web Form app to login IdentityServer4 with the PKCE flow, please leave a note in the Comments section.
Opensource Project Highlights
Credit where credit’s due.
To develop this tutorial, I have reviewed and integrated tools and techniques from the following high-quality opensource projects and online references.
- WebFormsClient — is a sample of the Asp.Net Web Form client for IdentityServer3. I used the code in this project as a reference to connect to the IdentityServer4.
- IdentityServer4.Admin — this project has 2.7K stars on GitHub. It is the best Admin UI of the IdentityServer4 and Asp.Net Core Identity by Jan Škoruba. I used the Admin UI to add a web client and configure it with Implicit flow support.
GitHub Repos
The source code for this tutorial is available on GitHub. You can clone/run these projects out of the box. Then, follow the instructions in this tutorial to configure the security.
- workcontrolgit/cat-toolkit-tokenservice-starter— this is a repository of IdentityServer4 Admin UI written in C#. The Visual Studio solution consists of three web projects: Admin UI, Admin API, and IdentityServer4.
- workcontrolgit/AspNetWebFormId4— this repo contains a legacy Asp.Net Web Form client application pre-configured with OWIN library for login into IdentityServer4. The app provides login/logout features.
Prerequisites
The following tools/skills are recommended.
- Visual Studio 2019 Community — free code editor for C#.
- ASP.NET Core Token Service Starter Kit — IdentityServer4 and Admin UI tool
- Familiar with OIDC and oAuth2 terminologies
Tutorial Content
This tutorial will go over the steps to set up a sample Asp.Net Web Form client to log in and request a JWT from the Secure Token Service (STS) IdentityServer4.
The content consists of three parts:
Part 1: Setup Asp.Net Web Form to connect to IdentityServer4 Configure Microsoft OWIN OpenIdConnect library to work with Secure Token Service (STS) such as IdentityServer4
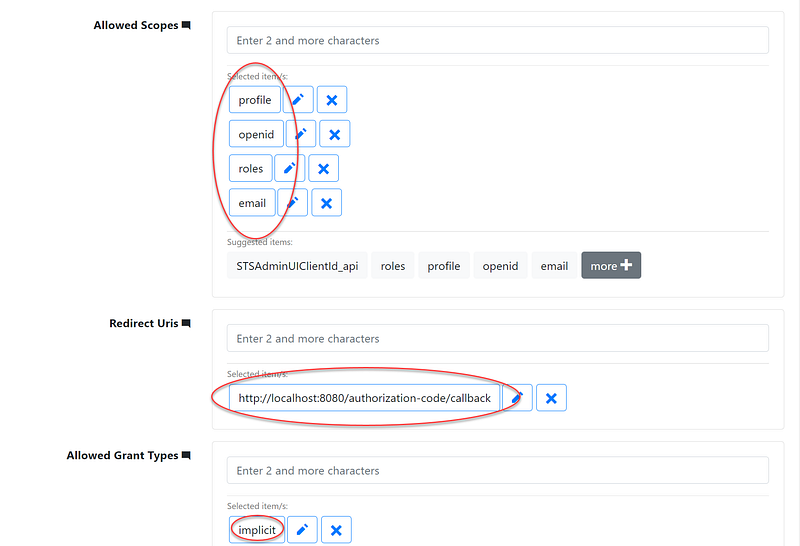
Part 2: Setup web form application as a client in IdentityServer4 Configure Implicit flow, URI redirect, and CORS. Specify scopes such as email, openid, roles, and profile.
Part 3: Log in to the Asp.Net Web Form app and inspect the JWT View Id token and Access token from JWT.
Part 1: Setup Asp.Net Web Form to connect to IdentityServer4
In this part of the tutorial, I will take you through the steps to connect Asp.Net Web Form client to the IdentityServer4. Be sure to clone the workcontrolgit/AspNetWebFormId4 project from GitHub first.
Task 1.1 — Reference OWIN packages
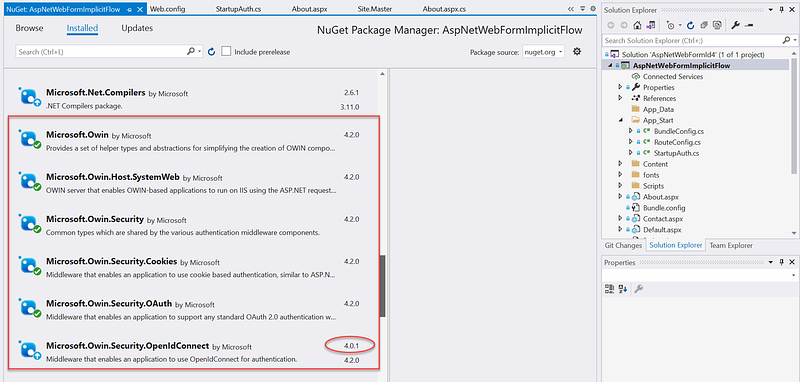
Reference the six (6) Microsoft OWIN packages as shown in Figure 3. Notice that for package Microsoft.Owin.Security.OpenIdConnect, use version 4.0.1. I found that upgrading to version 4.2.0 does not work.
Task 1.2 — Wire up OWIN libraries
In OWIN enabled application, you find the Startup.cs file in the root of the project folder, and it is used to register middleware services. The Startup.cs file contains the Startup class, which triggers at first when the application launches. In the sample Web Form client, the code to integrate with IdentityServer4 is in the StartupAuth.cs file inside the App_Start folder. The StartupAuth is implemented as a partial class that is activated from the Startup.cs file.
Code walk-thru: Line 18: Set up the partial class Startup Line 21–26: read in the IdentityServer4 setting from web.config Line 33–38: set authentication type “Cookies” and timeout Line 49–116: configure UseOpenIdConnectAuthentication method
Task 1.3 — Update web.config with IdentityServer4 parameters
Add settings to connect to the IdentityServer4 in the web.config. See Figure 5 for source code listing.
Code walk-thru: Line 8: Client Id when registering the web form as a client in IdentityServer4 Line 9: URL of the IdentityServer4 login server Line 10: the relative path of the endpoint to retrieve user profile Line 11: the relative path of the endpoint to retrieve the JWT Line 12: the URL that the IdentityServer4 will redirect back post login Line 13: the URL that the IdentityServer4 will redirect back post logout
Part 2: Setup web form application as a client in IdentityServer4
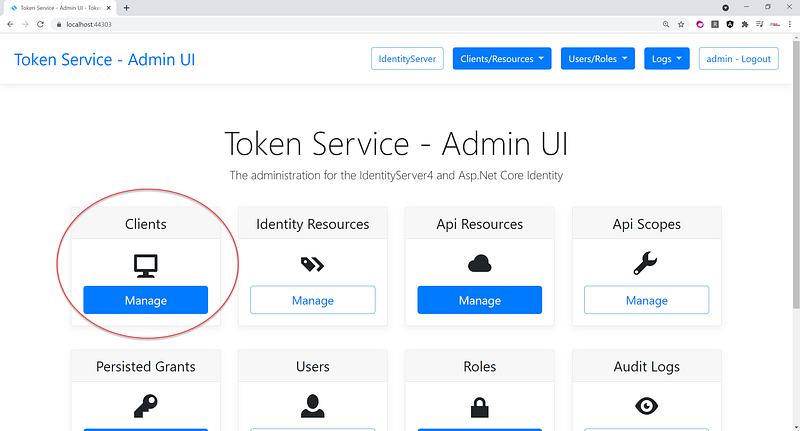
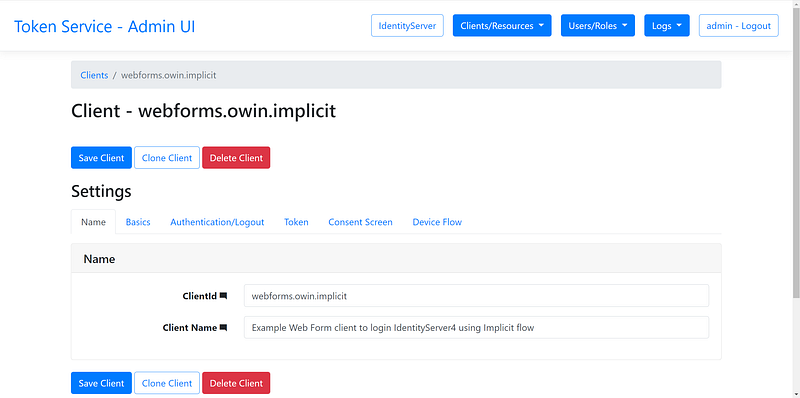
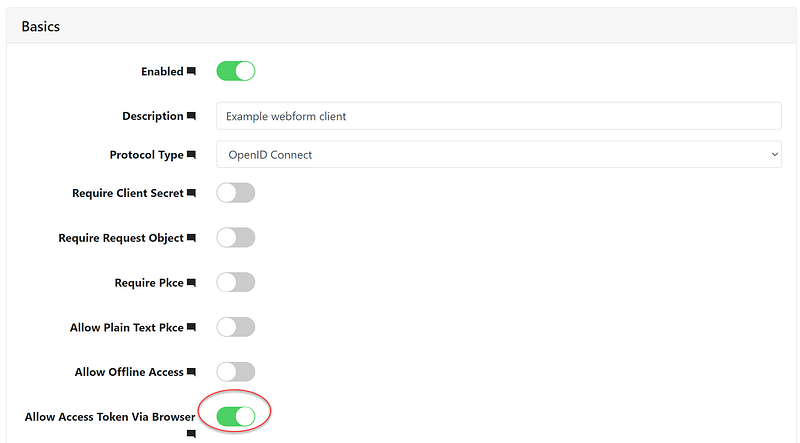
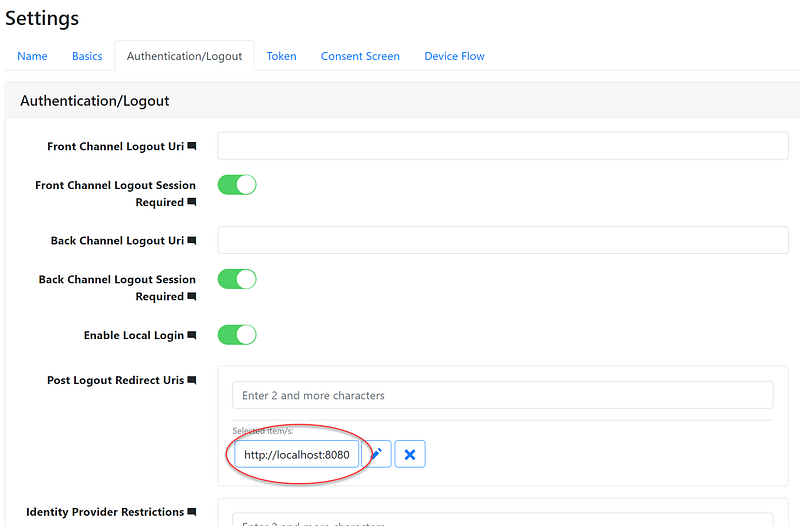
In Part 2, we will register the Web Form client in IdentityServer4 using the Admin UI. Be sure to follow the instructions in the story ASP.NET Core Token Service Starter Kit to set up the IdentityServer4 with Admin UI to run on localhost. You should see the option to create Clients as shown in Figure 6.
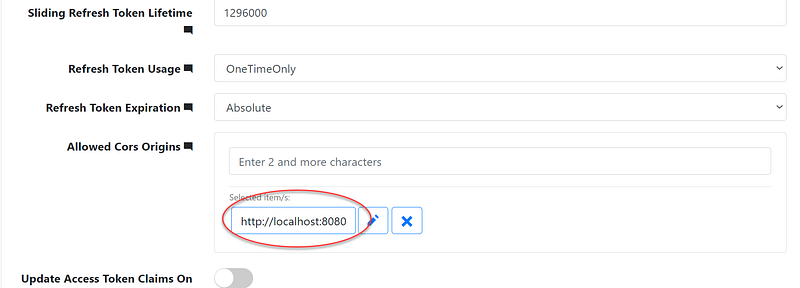
Register a new client using the information in Figures 7 to 11. Please pay attention to the settings in the red circle.
Part 3: Log in to the Asp.Net Web Form app and inspect the JWT
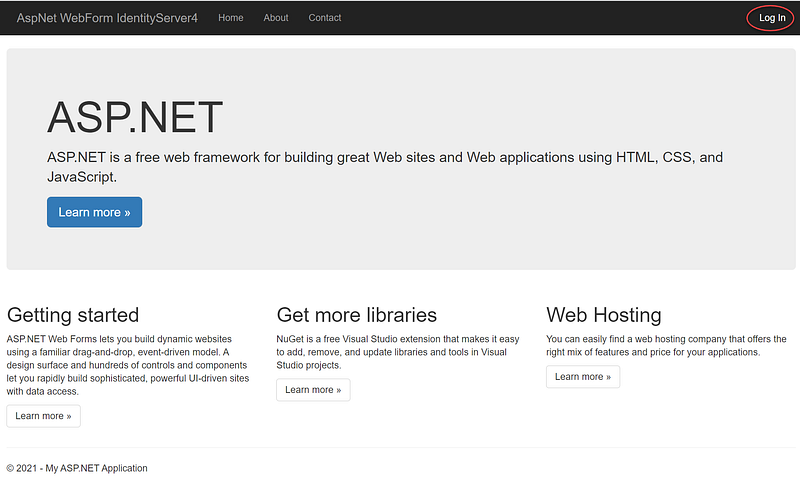
Hit F5 to run the Asp.Net Web Form project AspNetWebFormId4 that was setup in Part 1 of this tutorial. Click on Log In link in the upper right corner. See Figure 12 for visual aids.
The STS IdentityServer4 (setup in Part 2 of this tutorial) comes with several test accounts. See below. Use any of these accounts to test login.
{“Username”: “antoinette16”, “Password”: “Pa$$word123”, “Email”: “[email protected]”, “Roles”: [ “Employee” ]}
{“Username”: “rosamond33”, “Password”: “Pa$$word123”, “Email”: “[email protected]”, “Roles”: [ “Employee”, “Manager” ] },
{ “Username”: “ashtyn1”, “Password”: “Pa$$word123”, “Email”: “[email protected]”, “Roles”: [ “Employee”, “Manager”, “HRAdmin”
After login, click on the About menu to see the JWT. See Figure 13 for visual aids.

To see the example code to retrieve the JWT and read the Id and Access token using LinQ, open the source code file About.aspx.cs and put a breakpoint inside the Page_Load event. See Figure 14 for visual aids.

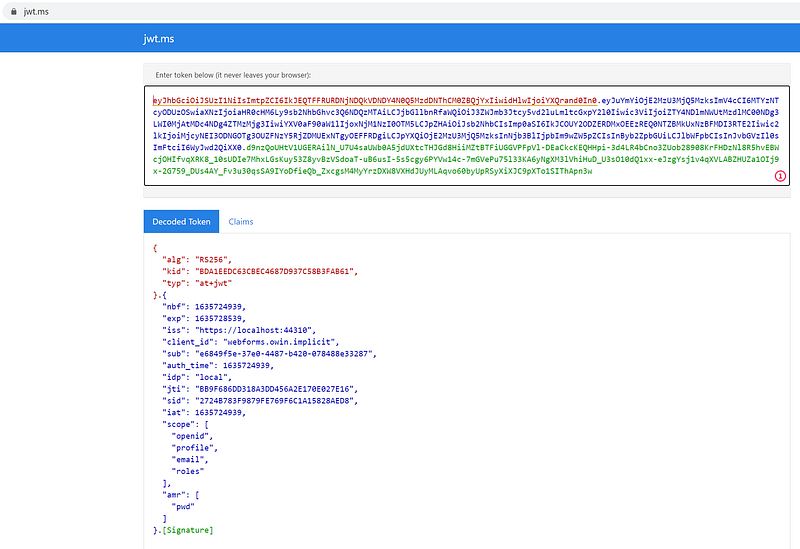
The Id and Access tokens are signed but not encrypted. To see the plain text in the these token, cut and paste the string into jwt.ms. See Figure 15 for example decoded of the Access Token.
To log off, click on the Log off menu. The Web Form application will redirect to the IdentityServer4 to log off and then IdentityServer4 will redirect back to the Web Form application.
References
- Calling Web API Using HttpClient — HttpClient class provides a base class for sending/receiving the HTTP requests/responses from a URL. It is a supported async feature of .NET framework. HttpClient is able to process multiple concurrent requests. It is a layer over HttpWebRequest and HttpWebResponse. All methods with HttpClient are asynchronous.
- RestSharp — the most popular REST API client library for .NET. The main purpose of RestSharp is to make synchronous and asynchronous calls to remote resources over HTTP. As the name suggests, the main audience of RestSharp are developers who use REST APIs. However, RestSharp can call any API over HTTP (but not HTTP/2), as long as you have the resource URI and request parameters that you want to send comply with W3C HTTP standards.
Summary
In this tutorial, we learned how to connect legacy Asp.Net Web Form to modern OIDC/oAuth2 servers such as IdentityServer4. The power behind the IdentityServer4 is its integration with Identity Providers such as Azure AD/o365, Google, Facebook etc. You are one step closer to SSO.
Long live Asp.Net Web Form!


