
ASP.NET Core Token Service Starter Kit

Ready-to-serve middleware ASP.NET CORE Token Service Starter Kit to secure SPA applications written in Angular, React, or Blazor Web Assembly.
Introduction
On Medium, I have published several tutorials on how to secure Single Page Application (SPA) in frameworks such as Angular, React, and Blazor WASM using OpenID Connect (OIDC) and oAuth2. Developers have inquired about the middleware Token Service server in those tutorials and how to configure the server to secure the client apps with JWT. In this tutorial, I will introduce you to the APS.NET Core 5 C# Token Service Starter Kit (TSSK). To help developers get started with implementing OIDC, oAuth2, and JSON Web Token (JWT), the starter kit is preconfigured with
- a sample client registration and configurations for each framework Angular, React, and Blazor WASM
- sample user accounts and roles to support Identity and Access Management (IAM)
Open Source Project Highlights
To develop this tutorial, I have reviewed and integrated tools and techniques from the following high-quality opensource projects. I chose these open-source projects because they are mature and provide a modern OIDC/oAuth2 method to secure SPA with Proof Key for Code Exchange (PKCE). They have been around and there are numerous open-source OIDC JS libraries that you can choose to connect to the Token Server.
- IdentityServer4 — this project has 7.9K stars on Github. It is the #1 opensource project for securing enterprise ASP.NET WebAPI by Brock Allen.
- IdentityServer4.Admin — this project has 2.7K stars on GitHub. It is the best Admin UI of the IdentityServer4 and Asp.Net Core Identity by Jan Škoruba.
One way you can show your appreciation to open-source project developers is by giving them a “star” on Github.
Prerequisites
The following tools/skills are recommended.
- Visual Studio 2019 Community — free code editor for C#
- Knowledge of Git such as cloning Github repository to local
- Familiar with OIDC and oAuth2 terminologies
GitHub Repos used in this tutorial
The source code for this tutorial is available on GitHub cat-toolkit-tokenservice-starter repo. You can clone/run the project out of the box and then follow the instructions in this tutorial to get familiar with the starter kit.
Tutorial Content
Scenario: Imagine that you are working on a SPA app to manage company Employee Profiles. There are three roles in the app:
- Employee — users in this role can view and update their own profile
- Manager — users in this role can view the profile of their subordinators and approve profile changes
- HR Admin — users in this role can enroll new employees and make administrative edits
The tutorial will explain how to initialize and run the Starter Kit with the above scenario. The initialized settings are in the JSON files, so you can customize them to meet your need.
The tutorial consists of the following parts:
Part 1: Starter kit introduction Discuss features, benefits, and clean architecture.
Part 2: Running starter kit on localhost Git-clone Visual Studio solution source code from GitHub and run the stater kit on localhost.
Part 3: Walk-thru sample ODIC client configurations Set up client registration, redirect URL, CORS, claims, scope to support Angular, React, and Blazor Web Assembly.
Part 4: Walk-thru sample accounts and roles Leverage identity management in IdentityServer4 to set up sample login accounts with preconfigured roles to support SPA development and testing
Part 1: Starter Kit Introduction
The tech stack of the starter kit consists of Asp.Net Core 5 MVC and EntityFrameworkCore with the default backend database SqlServer. The Starter Kit clean architecture consists of three loosely coupled but tightly integrated modular services to provide a scalable solution.
1. Clients — an ASP.NET Core MVC application making protected resource requests with its authorization in the form of the JSON Web Token (JWT)
2. Token Service — an ASP.NET Core web application, issuing JWT to clients and validating access tokens upon request access to ApiResources
3. ApiResources — the ASP.NET Core WebAPI capable of accepting and responding to protected resource requests using access tokens
Figure 1 depicts the relationship between modular web projects in the Visual Studio solution starter kit and their running ports on localhost.

For more information about Clients-ApiResources-TokenService architecture for building scalable and maintainable modern applications, see CAT architecture pattern for modern app SPA/Mobile (you will have a good laugh when reading this one).
Part 2: Running starter kit on localhost
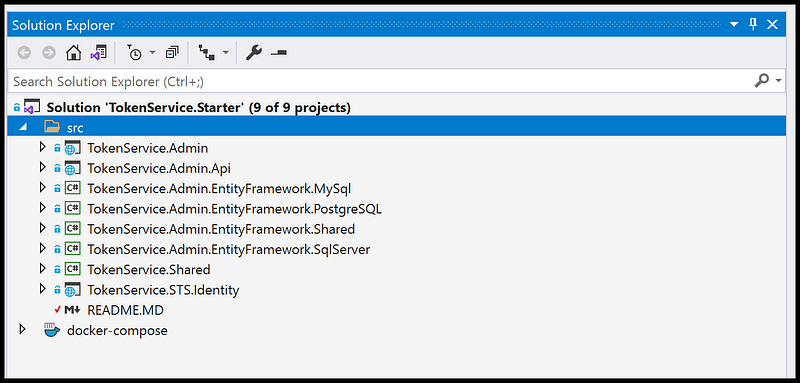
The source code of the starter kit is available on GitHub. After git-clone, open the source code with Visual Studio 2019. You should see the layout of projects as shown in figure 2.
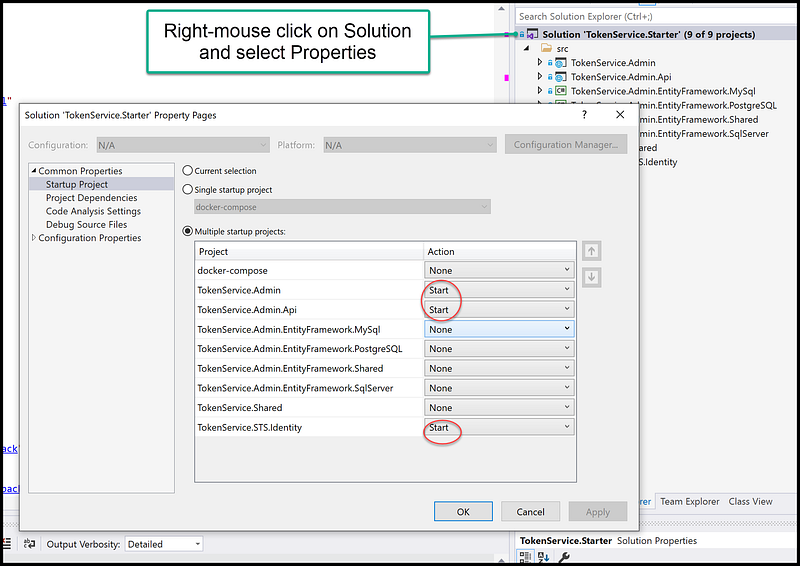
In the Solution Explorer, right mouse click on the solution name, select Properties, and set “Multiple startup projects” to three projects
- TokenProject.Admin
- TokenProject.Admin.Api
- TokenProject.STS.Identity
See Figure 3 for a screenshot of enabling Multiple startup projects in Visual Studio.
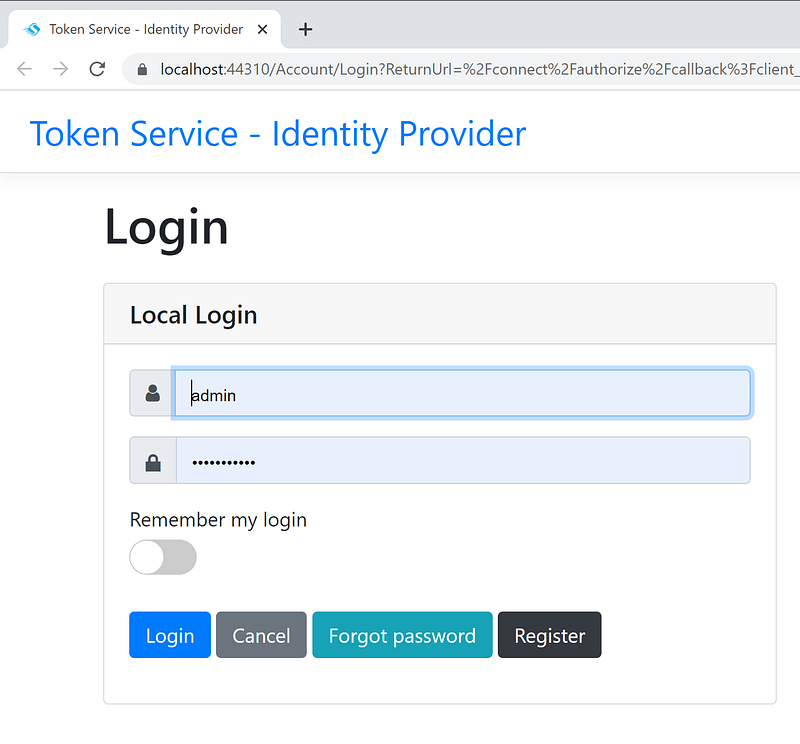
To run the solution, hit F5 or click on the Start button in the Visual Studio toolbar. Your development workstation will launch three instances of the web browsers. Locate the one with the login screen as shown in Figure 4, and log in with the account (admin, Pa$$word123).
The starter kit default database is Microsoft SqlServer. When running the starter kit for the first time, EntityFrameworkCore will automatically create the database and its tables and indexes. The database will be initialized with data coming from two files
- identityserverdata.json — this file contains the initial operational configuration settings of the Token Service
- identitydata.json — this file contains the initial identity data for user accounts and roles
We will do the code walk-thru of the file identityserverdata.json in Part 3 and file identitydata.json in Part 4 of this tutorial.
Part 3: Walk-thru of sample ODIC client configurations
Code walk-thru of the file identityserverdata.json (see Figure 5 for detail).
Line 75–90: set up two sample scopes app.api.employeeprofile.write and app.api.employeeprofile.read. Both scopes include UserClaim role, which allows the user’s role to be automatically included in the Access Token.
Line 100–105: set up a sample API Resource app.api.employeeprofile. This API Resource includes scope app.api.employeeprofile.read as a required scope. Real-world systems may have multiple API Resources. The API Resource server will be getting requests from applications with the access token in the header. The API Resource server will compare the scopes in the access token and validate against the required scope in the API Resource. It can deny the request if the access token does not have the required scope.
Line 142–143: setup sample React.Spa client id and name Line 145: set grant type to authorization_code (support PKCE) Line 148: set to require PKCE Line 150–153: set the authorized redirectUri Line 154: set URL to redirect back to after log out Line 158: set allow CORS URL Line 160–165: set allows scope that will be included in the JWT
Line 168–193: setup sample Blazor.Spa client. Similar to React.Spa, there are similar settings to support client app registration and security.
Line 194–221: set up sample AngularStarterKit client. Similar to React.Spa, there are similar settings to support client app registration and security. Notice that the attribute AllowOfflineAccess is set to true to support silence refresh of the JWT.
Part 4: Walk-thru Identity and Access Management
Code walk-thru of the file identitydata.json (see Figure 6 for detail).
Line 3–16: setup 4 samples roles Line 18–31: set up admin user, assign to STSAdminRole and assign claim name admin Line 33–35: set up janedoe account with no role Line 37–43: set up antoinette16 account and assign role Employee Line 45–53: set up rosamond33 account and assign role Employee and Manager Line 54–63: set up ashtyn1 account and assign role Employee, Manager, and HRAdmin
Frequently Asked Questions
- Where is the setting for the database? It is in the appsettings.json files in three projects TokenService.Admin, TokenService.Admin.Api, and TokenService.STS.Identity. The default database name is CATToolkitTokenServiceDB.
- What are the support databases? The default database is SqlServer and it is set in the appsetings.json file in three projects TokenService.Admin, TokenService.Admin.Api, and TokenService.STS.Identity. To change the database, search for “ProviderType”: “SqlServer” and update the type accordingly. The valid database types are SqlServer, MySql, and PostgreSQL.
There are many other configurable options documented in the readme.md file in the open-source project IdentitServer4 Admin. I recommend you take a look at them.
Screencast
The complementary Youtube video is a record of the user interface navigation inside the Starter kit. Background music is coming (:
Summary
This tutorial provides instructions to download and set up the Token Service server, which includes samples of client registration for Angular, React, and Blazor Web Assembly. The tutorial does not cover OIDC JS libraries to connect client apps to the Token Service Starter Kit to obtain JWT. To learn how to connect popular SPA frameworks to Token Service server, please see my tutorials below
- Secure React 17 with JWT and IdentityServer4
- Secure Net 5 Blazor Web Assembly with JWT and IdentityServer4 Admin UI
- Secure Angular 11/12 with JWT and IdentityServer4 Admin UI
It can be a learning curve for developers who are new to OIDC, oAuth2, and JWT. The starter kit is meant to minimize the learning curve while providing a working Token Service tool for developers to prototype and testing application security. If you have questions or comments on the starter kit, feel free to post in the Response section of this tutorial.
Stay safe!!!


