
Sentiment Analysis: Hugging Face Zero-shot Model vs Flair Pre-trained Model
Which pre-trained Natual Language Processing (NLP) model has better prediction accuracy for the sentiment analysis, Hugging Face or Flair?

There are different methods for sentiment analysis. Some examples are lexicon-based methods, building customized models, using cloud services for sentiment predictions, or using pre-trained language models.
In this tutorial, we will compare two state-of-art deep-learning pre-trained models for sentiment analysis, one from Hugging Face, and the other from Flair. We will talk about:
- What are the benefits of a pre-trained model for sentiment analysis?
- How to use Hugging Face zero-shot classification model for sentiment analysis?
- How to use Flair pre-trained sentiment model for sentiment analysis?
- Which one of the two models has higher accuracy for sentiment prediction?
Resources for this post:
- Video tutorial for this post on YouTube
- Click here for the Colab notebook
- More video tutorials on NLP
- More blog posts on NLP
Let’s get started!
Step 1: Benefits of Pre-trained Model for Sentiment Analysis
Firstly, let’s talk about the benefits of using a pre-trained classification language model.
- Compared with the lexicon-based sentiment analysis such as VADER or TextBlob, the pre-trained zero-shot deep-learning language models are usually more accurate. To learn more about lexicon-based sentiment analysis, please check out my previous tutorial TextBlob vs. VADER for Sentiment Analysis Using Python.
- Compared with the customized sentiment analysis models, the pre-trained zero-shot deep-learning language models usually utilize a much larger training dataset. Large modeling dataset typically produces better model results. One exception is that if the documents for the sentiment analysis are from a highly specialized domain, a customized sentiment model may work better.
- A customized classification model needs labeled data, while a zero-shot sentiment analysis model does not need the data to be labeled. This saves the cost of labeling, which is usually pretty high for large datasets.
- Compared with the cloud services for sentiment analysis such as Amazon Comprehend, Azure Cognitive Service for Language, Google Natural Language API, and IBM Watson Natual Language Understanding API, the open-source pre-trained zero-shot models have much lower cost because they are free to use.
Step 2: Sentiment Analysis Algorithms
In step 2, let’s talk about the algorithms behind the Hugging Face zero-shot sentiment analysis and the Flair pretrained sentiment model.
Hugging Face zero-shot sentiment analysis uses zero-shot learning (ZSL), which refers to building a model and using it to make predictions on tasks the model was not trained to do. It can be used on any text classification task, including but not limited to sentiment analysis and topic modeling.
Zero-shot sentiment analysis from Hugging Face is a use case of the Hugging Face zero-shot text classification model. It is a Natural Language Inference (NLI) model where two sequences are compared to see if they contradict each other, entail each other, or are neutral (neither contradict nor entail).
When using the Hugging Face zero-shot sentiment analysis, we will have the text as the premise and the sentiment labels such as positive and negative as hypotheses. If the model predicts that a text document entails positive, then the document is predicted to have a positive sentiment. Otherwise, the document is predicted to have a negative sentiment.
The Flair pre-trained sentiment model is a text classification model explicitly built for predicting sentiments. The modeling dataset set is the IMDB, so it may work better for documents that are similar to the IMDB data than the documents that are quite different from IMDB data.
Step 3: Install And Import Python Libraries
In step 3, we will install and import python libraries.
Firstly, let’s import transformers and flair.
# Install libraries
!pip install transformers flair
After installing the python packages, we will import the python libraries.
pandasis imported for data processing.- Hugging Face
pipelineis imported fromtransformersfor the zero-shot classification model. - The English sentiment model is loaded from the
FlairTextClassifier. Sentenceis imported from Flair to process input text.- The
accuracy_scoreis imported for model performance.
# Data processing
import pandas as pd

# Hugging Face model
from transformers import pipeline

# Import flair pre-trained sentiment model
from flair.models import TextClassifier
classifier = TextClassifier.load('en-sentiment')

# Import flair Sentence to process input text
from flair.data import Sentence

# Import accuracy_score to check performance
from sklearn.metrics import accuracy_score
Step 4: Download And Read Data
The fourth step is to download and read the dataset.
The UCI Machine Learning Repository has the review data from three websites: imdb.com, amazon.com, and yelp.com. We will use the review data from amazon.com for this tutorial. Please follow these steps to download the data.
- Go to: https://archive.ics.uci.edu/ml/datasets/Sentiment+Labelled+Sentences
- Click “Data Folder”
- Download “sentiment labeled sentences.zip”
- Unzip “sentiment labeled sentences.zip”
- Copy the file “amazon_cells_labelled.txt” to your project folder
Those who are using Google Colab for this analysis need to mount Google Drive to read the dataset. You can ignore the code below if you are not using Google Colab.
drive.mountis used to mount to the Google drive so the colab notebook can access the data on the Google drive.os.chdiris used to change the default directory on Google drive. I set the default directory to the folder where the review dataset is saved.!pwdis used to print the current working directory.
Please check out Google Colab Tutorial for Beginners for details about using Google Colab for data science projects.
# Mount Google Drive
from google.colab import drive
drive.mount('/content/drive')

# Change directory
import os
os.chdir("drive/My Drive/contents/nlp")

# Print out the current directory
!pwd
Now let’s read the data into a pandas dataframe and see what the dataset looks like.
The dataset has two columns. One column contains the reviews and the other column contains the sentiment label for the review.
# Read in data
amz_review = pd.read_csv('sentiment labelled sentences/amazon_cells_labelled.txt', sep='\t', names=['review', 'label'])

# Take a look at the data
amz_review.head()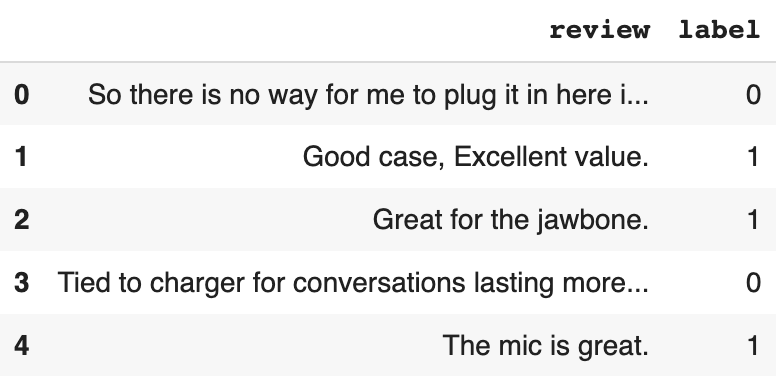
.info helps us to get information about the dataset.
# Get the dataset information
amz_review.info()
From the output, we can see that this data set has 1000 records and no missing data. The review column is the object type and the label column is the int64 type.
<class 'pandas.core.frame.DataFrame'>
RangeIndex: 1000 entries, 0 to 999
Data columns (total 2 columns):
 #   Column  Non-Null Count  Dtype
---  ------  --------------  -----
 0   review  1000 non-null   object
 1   label   1000 non-null   int64
dtypes: int64(1), object(1)
memory usage: 15.8+ KB
The label value of 0 represents negative reviews and the label value of 1 represents positive reviews. The dataset has 500 positive reviews and 500 negative reviews. It is well-balanced, so we can use accuracy as the metric to evaluate the model performance.
# Check the label distribution
amz_review['label'].value_counts()
Output:
0    500
1    500
Name: label, dtype: int64
Step 5: Hugging Face Zero-shot Sentiment Prediction
In step 5, we will use the Hugging Face zero-shot text classification model to predict sentiment for each review.
Firstly, the pipeline is defined:
taskdescribes the task for the pipeline. The task name we use iszero-shot-classification.modelis the model name for the prediction used in the pipeline. You can find the full list of available models for zero-shot classification on the Hugging Face website. At the time this tutorial was created in January 2023, thebart-large-mnliby Facebook(Meta) is the model with the highest number of downloads and likes, so we will use it for the pipeline.devicedefines the device type.device=0means that we are using GPU for the pipeline.
# Define pipeline
classifier = pipeline(task="zero-shot-classification",
                      model="facebook/bart-large-mnli",
                      device=0)
After defining the pipeline, the data is processed and the sentiments are predicted by the pipeline.
- Firstly, the reviews are put into a list for the pipeline.
- Then, the candidate labels are defined. We set two candidate labels,
positiveandnegative. - After that, the hypothesis template is defined. The default template is used by the Hugging Face pipeline is
This example is {}.We use a hypothesis template that is more specific to the sentiment analysisThe sentiment of this review is {}.and it helps to improve the results. - Finally, the text, the candidate labels, and the hypothesis template are passed into the zero-shot classification pipeline called
classifier.
The output is in a list format and we converted it into a Pandas dataframe.
# Put reviews in a list
sequences = amz_review['review'].to_list()

# Define the candidate labels
candidate_labels = ["positive", "negative"]

# Set the hyppothesis template
hypothesis_template = "The sentiment of this review is {}."

# Prediction results
hf_prediction = classifier(sequences, candidate_labels, hypothesis_template=hypothesis_template)

# Save the output as a dataframe
hf_prediction = pd.DataFrame(hf_prediction)

# Take a look at the data
hf_prediction.head()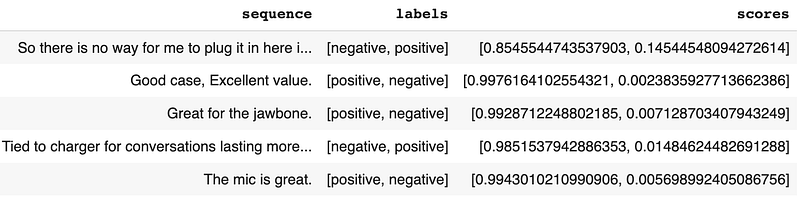
The sum of positive and negative scores for each review is 1, indicating the relative score of a review belonging to a sentiment.
The first label in the labels list is the predicted sentiment for each review, and the first score in the scores list is the corresponding score prediction. For example, the review Great for the jawbone. has the predicted sentiment of positive and the predicted score of 0.99, indicating that positive is a much more likely sentiment than negative. Note that the score values are not the absolute predicted probability of the sentiment, and it represents only the relative probability among the given candidate labels.
To make the prediction results easy to read and process, two new columns are created, one for the predicted sentiment and the other for the score of the predicted sentiment. We also appended the true sentiment labels for the reviews.
# The column for the predicted topic
hf_prediction['hf_prediction'] = hf_prediction['labels'].apply(lambda x: x[0])

# Map sentiment values
hf_prediction['hf_prediction'] = hf_prediction['hf_prediction'].map({'positive': 1, 'negative': 0})

# The column for the score of predicted topic
hf_prediction['hf_predicted_score'] = hf_prediction['scores'].apply(lambda x: x[0])

# The actual labels
hf_prediction['true_label'] = amz_review['label']

# Drop the columns that we do not need
hf_prediction = hf_prediction.drop(['labels', 'scores'], axis=1)

# Take a look at the data
hf_prediction.head()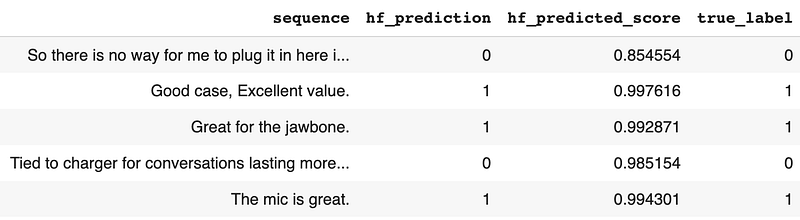
The comparison between the actual and predicted sentiment shows an accuracy score of 96.9%, which is very accurate, especially considering that this is a general pretrained zero-shot text classification model not specific for sentiment analysis.
# Compare Actual and Predicted
accuracy_score(hf_prediction['hf_prediction'], hf_prediction['true_label'])
Output:
0.969Step 6: Flair Pretrained Sentiment Model
In step 6, we will use the Flair pretrained sentiment model to predict sentiments for the reviews.
Let’s define a function that takes a review as input and the score and the predicted label as outputs.
- Firstly, the review text is passed into the
Sentencefunction to get tokenized. - Then, we use the
.predict()to make sentiment predictions. - After the prediction, we can extract
scoreandvaluefrom thesentence.valueis the predicted sentiment label, andscoreis how confident the model is about the prediction. - Finally, the function output the
scoreand thevaluefor the input review.
# Define a function to get Flair sentiment prediction score
def score_flair(text):
  # Flair tokenization
  sentence = Sentence(text)
  # Predict sentiment
  classifier.predict(sentence)
  # Extract the score
  score = sentence.labels[0].score
  # Extract the predicted label
  value = sentence.labels[0].value
  # Return the score and the predicted label
  return score, value
After the function is defined, we can apply the function to each review in the dataset and create the predicted sentiments.
# Get sentiment score for each review
amz_review['scores_flair'] = amz_review['review'].apply(lambda s: score_flair(s)[0])

# Predict sentiment label for each review
amz_review['pred_flair'] = amz_review['review'].apply(lambda s: score_flair(s)[1])

# Check the distribution of the score
amz_review['scores_flair'].describe()
From the score distribution, we can see that the minimum score is 0.53 and the average score is 0.99, indicating that the model is very confident about the sentiment predictions.
count    1000.000000
mean        0.988019
std         0.046841
min         0.533639
25%         0.996153
50%         0.999167
75%         0.999887
max         0.999999
Name: scores_flair, dtype: float64
Flair by default outputs text NEGATIVE and POSITIVE as labels. Before checking the prediction accuracy, we need to map the NEGATIVE value to 0 and the POSITIVE value to 1 because the Amazon review dataset has true labels of 0 and 1.
# Change the label of flair prediction to 0 if negative and 1 if positive
mapping = {'NEGATIVE': 0, 'POSITIVE': 1}
amz_review['pred_flair'] = amz_review['pred_flair'].map(mapping)

# Take a look at the data
amz_review.head()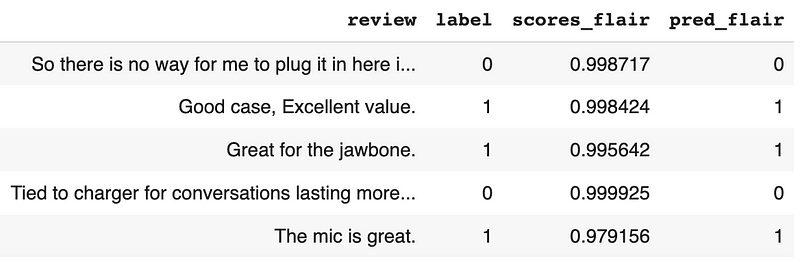
The comparison between the actual and predicted sentiment shows an accuracy score of 94.8%, which is less accurate than the Hugging Face prediction accuracy of 96.9%, but is still very accurate.
# Compare Actual and Predicted
accuracy_score(amz_review['label'],amz_review['pred_flair'])
Output:
0.948More tutorials are available on GrabNGoInfo YouTube Channel, GrabNGoInfo.com, and LinkedIn.
Recommended Tutorials
- GrabNGoInfo Machine Learning Tutorials Inventory
- Zero-shot Topic Modeling with Deep Learning Using Python
- Topic Modeling with Deep Learning Using Python BERTopic
- Google Colab Tutorial for Beginners
- TextBlob vs. VADER for Sentiment Analysis Using Python
- Five Ways To Create Tables In Databricks
- Time Series Anomaly Detection Using Prophet in Python
- Multivariate Time Series Forecasting with Seasonality and Holiday Effect Using Prophet in Python
- Time Series Causal Impact Analysis in Python
- 3 Ways for Multiple Time Series Forecasting Using Prophet in Python
- Hierarchical Topic Model for Airbnb Reviews
- Hyperparameter Tuning For XGBoost
- Four Oversampling And Under-Sampling Methods For Imbalanced Classification Using Python
- Explainable S-Learner Uplift Model Using Python Package CausalML
- One-Class SVM For Anomaly Detection
- Recommendation System: Item-Based Collaborative Filtering
- Hyperparameter Tuning for Time Series Causal Impact Analysis in Python
- Hyperparameter Tuning and Regularization for Time Series Model Using Prophet in Python
- LASSO (L1) Vs Ridge (L2) Vs Elastic Net Regularization For Classification Model
- S Learner Uplift Model for Individual Treatment Effect and Customer Segmentation in Python
- How to Use R with Google Colab Notebook
References
- Hugging Face New pipeline for zero-shot text classification
- Zero-shot Learning in Modern NLP
- Zero-shot Pipeline Notebook
- Using Huggingface zero-shot text classification with large data set
- Zero-shot classification NLI models
- Hugging Face bart-large-mnli model documentation
- Task-Aware Representation of Sentences for Generic Text Classification Paper
- Flair Few-Shot and Zero-Shot Classification (TARS)


