Okta SAML Integration with AWS IAM Step 3: Creating SAML Roles
ACM.174 Determining permissions for an AWS Billing Administrator Role
~~~~~~~~~~~~~~~~~~~~~~~~~~~~~~~~~~~~~~~~~~~~~~~~~~~~~~~~~~~
⚙️ Check out my series on Automating Cybersecurity Metrics. The Code.
🔒 Related Stories: Cloud Governance | IAM | AWS Security | Okta
💻 Free Content on Jobs in Cybersecurity | ✉️ Sign up for the Email List
~~~~~~~~~~~~~~~~~~~~~~~~~~~~~~~~~~~~~~~~~~~~~~~~~~~~~~~~~~~
In the last post, we set up an Identity Provider in AWS for Okta federation.
In this post we are going to add a role for federation with Okta.
Create a Billing Administrator Role
The first role we are going to test is our Billing Administrator role. The Billing administrator role will be able to add new accounts, but only add them to the DenyAll SCP to implement the segregation of duties described in this post:
We’ll follow Step 2 of these instructions in the Okta documentation:
Obtain the ARN for the AWS IAM Identity Provider
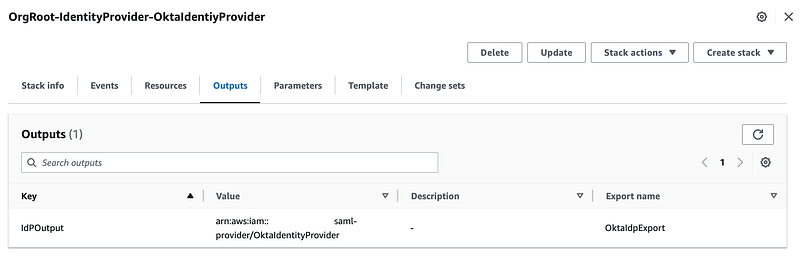
The first thing we need is the ARN for the AWS IAM Identity Provider (IdP) created in the last post. You can get this from the AWS IAM console or you can find it in the Outputs of the IdP CloudFormation stack we deployed.
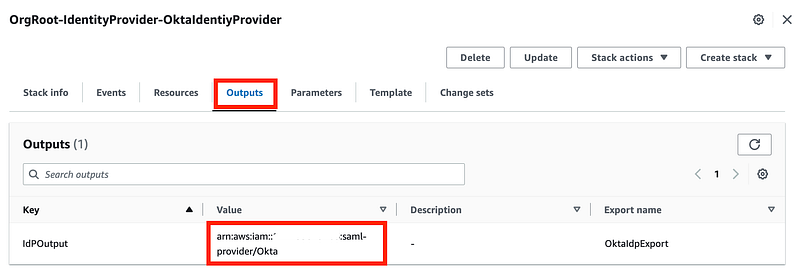
We’re going to use that ARN below where it says to copy and paste the ARN into the example trust policy.
{
  "Version": "2012-10-17",
  "Statement": [
    {
      "Effect": "Allow",
      "Principal": {
        "Federated": "<COPY & PASTE SAML ARN VALUE HERE>"
      },
      "Action": "sts:AssumeRoleWithSAML",
      "Condition": {
        "StringEquals": {
          "SAML:aud": "https://signin.aws.amazon.com/saml"
        }
      }
    }
  ]
}
We’re not going to copy and paste, however. We’re going to use the approach we’ve used throughout this series and reference the CloudFormation output above to populate the ARN in the CloudFormation template we use to deploy our new role. If you’re not familiar with that concept you might want to read this series from the start.
I wrote about the possibility of using MFA with Okta in a prior post, but for starters we’re going to start with the above. We’ll revisit adding MFA to the above trust policy later.
Create the Billing Administrator Role
What permissions do we need to give our Billing Administrator? That depends on exactly what actions you need this person to do in your company.
One action we know we want to give our billing administrator is the ability to create accounts, but only in the DenyAll Organizational unit we created here:
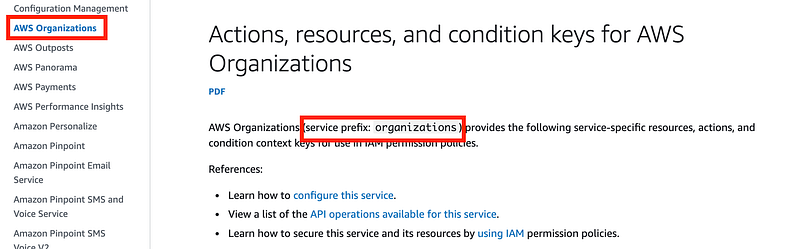
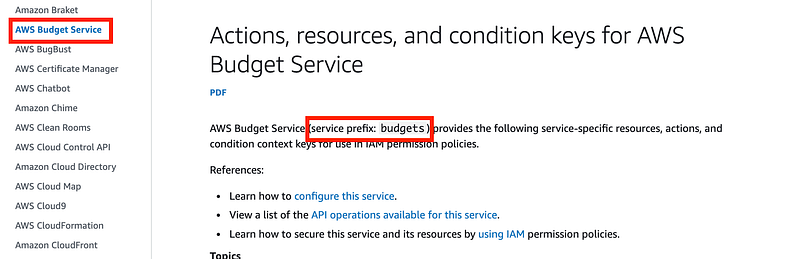
To determine the service and action we need to add to the IAM policy, navigate to the list of AWS IAM actions.
Click on AWS Organizations. We can see that the service prefix we need to use is “organizations” at the top of the page. I feel like this could visually more obvious, but just know that the service prefix is at the top of each service. page.
Scroll down to see the list of actions and take a look at CreateAccount. The last column shown below are Condition Keys. Those conditions are based on tags and a new account won’t have a tag nor do we want to require one so this doesn’t seem like what we want. We need to be able to only allow creation of the account in a specific OU.

How can we ensure that the account is only created with the DenyAll OU?
Well, fist of all we’ve denied permissions via an SCP to add accounts to the root OU so that should be blocked. We can test that when we add a new account — in theory that should be OK. But we need to test it.
To ensure that the billing administrator cannot add an account to any OU except the DenyAll OU, we can add a statement that denies all actions except on the DenyALL OU.
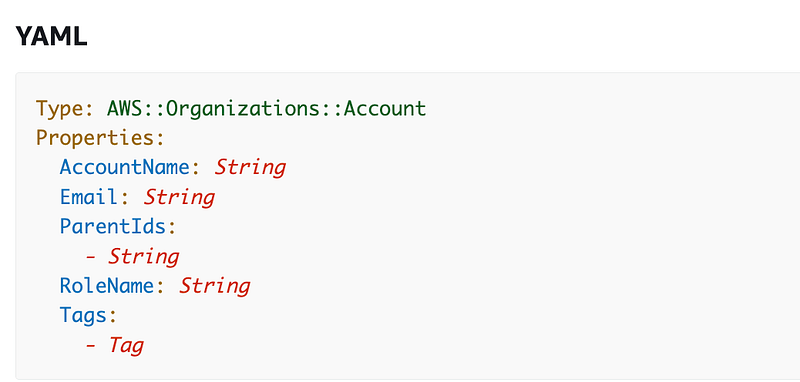
But here’s where things get tricky. When I look at AWS CloudFormation I see that I can assign a parent ID for a new account. That parent ID can be the OU where you want the account to end up.
When I look at the AWS CLI I see no such option:
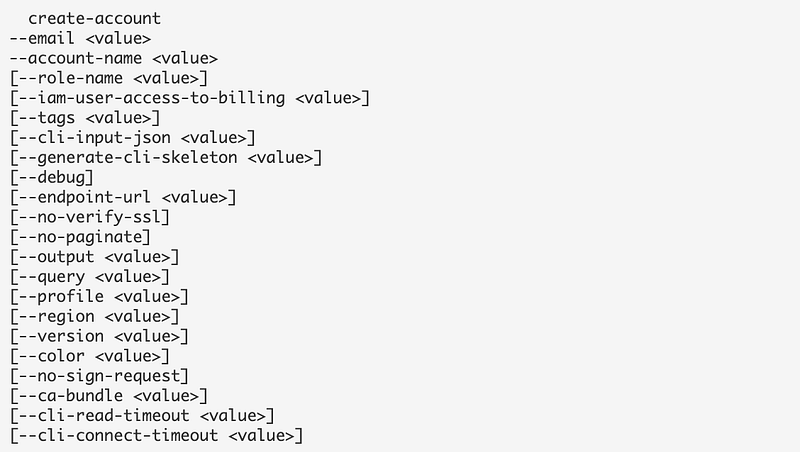
When I look at the AWS Organizations permissions, I don’t see a permission specific to assigning an OU to a new AWS account. I only see the option to move an account to an OU.
My concern is that when creating an account via CloudFormation the account is created in the Root OU and then moved to the DenyAll OU. If that is the case, and all accounts must first be created in the Root OU, we’re going to need to change our SCP that denies adding accounts to the Root OU. Instead, we can enforce that any accounts in the DenyOU are assigned the DenyAll policy directly except the management account.
In that case, we can deny all actions on all OUs except Root and DenyALL.
We are adding this policy in the AWS Organizations management account so this is the only place where the billing administrator can perform these actions — and some actions can only be performed in the management account.
I wish AWS would provide a simple and concrete list of all the actions that can only be performed in the management account. Also it would be nice to indicate that in the AWS IAM documentation:
The list needs to include other related actions that cannot be delegated and can only be performed in the management account for other services like the billing functions I’ll write about next.
Other functions to grant a Billing Administrator
There are may other billing-related functions you may want to assign to your billing administrator. I’m listing some of them below and what I am going to assign to this policy. What you assign for your organization may vary. Also note that I do not see a way to delegate billing administration to a separate account at the time of this writing so it appears these actions must be taken in the management account for an organization.
In this midst of writing this, AWS is about to make changes to the IAM billing options. Instead of having a separate prefix for the console and programmatic actions, some actions are being combined under a single prefix. In addition, some prefixes will be divided up into more granular sets of permissions to be able to create more granular billing controls.
Essentially, we want to not assign the aws-portal permissions or the two purchase-order permission listed in the following blurb. We will want to take a look at the new service prefixes below, which unfortunately do not all have “cost” or “billing” in the name.

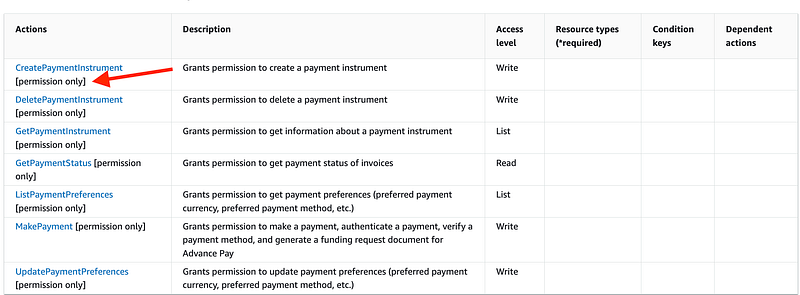
When you look up some of these new and altered services, AWS has added [permission only] under the name of the action. I have no idea what that means.
Although granular controls are nice, I find this change to be a bit complicated. There are way so many service prefixes for billing now. It may have been better to have less prefixes and more actions within each prefix. Competent IAM administrators would know how to create roles with only a subset of actions for a prefix in a policy, such as I have been doing throughout this series. AWS could provide appropriate management roles for those who want someone to create the policies for them. At a minimum, it would have been nice if all the prefixes had “billing” in the name so they all show up in the same place in the list. #awswishlist
Action: Budgets:*
Effect: Allow
I always set up a budget immediately in a new account. We can do that in a later post but it’s pretty simple if you take a look at the directions.
Account Management (account) — allow
All of the AWS Account Management services. Note that this includes enabling and disabling regions for an account. The Service Control Policy we created should override this. I feel like that is an access control that should belong to the governance team but we’ll leave it here for now.
Application Cost Profiler Service (application-cost-profiler) — deny
I will enable this service if and when needed.
Actions, resources, and condition keys for AWS Application Cost Profiler Service
undefined
undefined
Billing Conductor (billingconductor) — deny
I don’t have a use for this service at this time.
Cost Management Console (aws-portal) — N/A
The announcent was a bit confusing in terms of what was actually happening with the aws-portal prefix. However, AWS added an error message in my account recently while trying to use some of these actions:

So they definitely are being deprecated. The problem is, it’s not entirely clear which new actions replace which old actions. See future blog posts for more information.
Cost and Usage Report (cur) — allow
The billing administrator can manage cost and usage reports.
Cost Explorer Service (ce) — allow
The billing administrator can query costs.
Free tier (freetier)— allow
The billing administrator can manage the free tier alert preference.
Invoicing (invoicing) — deny
My billing administrator will not change the billing invoice delivery preferences.
Payments (payments)— deny
Root or OrgRoot will manage payment methods. (Note, I changed this in an upcoming post for accounts we are trying to close.)
Price List Service (pricing) — allow
The billing administrators can query the cost of AWS service programmatically.
Purchase Orders (purchase-orders)— deny
I don’t pay with purchase orders. You can enable this service if you do.
AWS tax (tax)— deny
The billing administrator cannot change the organization’s tax settings.
Code to deploy our Billing Administrator role
I’m going to add a new folder called OktaRole under my IAM folder in my code. I’m going to copy my existing code over to the OktaRole folder so I can reuse as much as possible, but alter it to work with Okta.

I may be breaking the DRY Principle a bit as we go but I want to be able to support either IAM roles or Okta roles and I don’t want to break what I already created for IAM roles.
Once again I need:
- A functions script to deploy Okta roles.
- CloudFormation templates for my new okta roles.
- A deploy script.
- Test scripts.
Functions Code
IAM/OktaRole/role_functions.sh
I modified deploy_group_role in role_functions.sh to replace every instance of group with okta. I updated the parameters to pass in a role name instead of a group name. I removed what is not extraneous group code since we’re not using AWS groups for this.
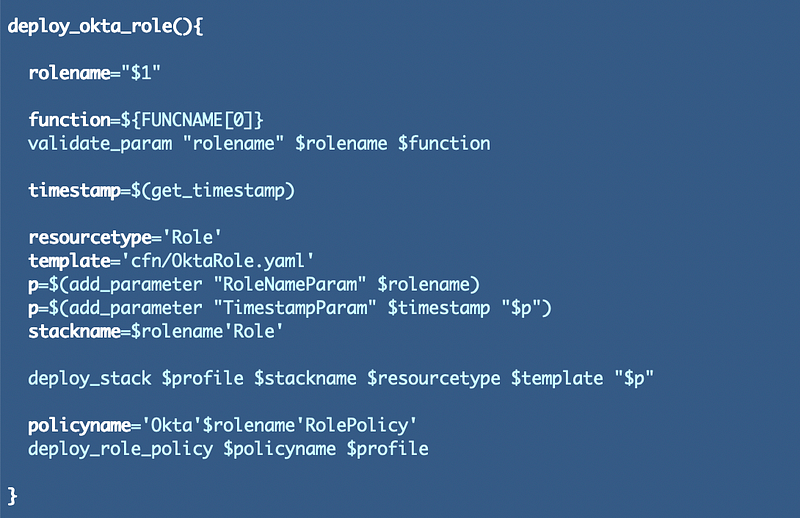
I also added a function to deploy Okta roles using the OrgRoot profile. I’ve been using simplified approach rather than passing in a profile override lately.

I removed these functions:
- deploy_aws_service_role()
- deploy_lambda_role()
- deploy_batch_job_role()
- deploy_ec2_instance_profile()
The deploy_role_policy function can work as is.
Role and Policy CloudFormation templates
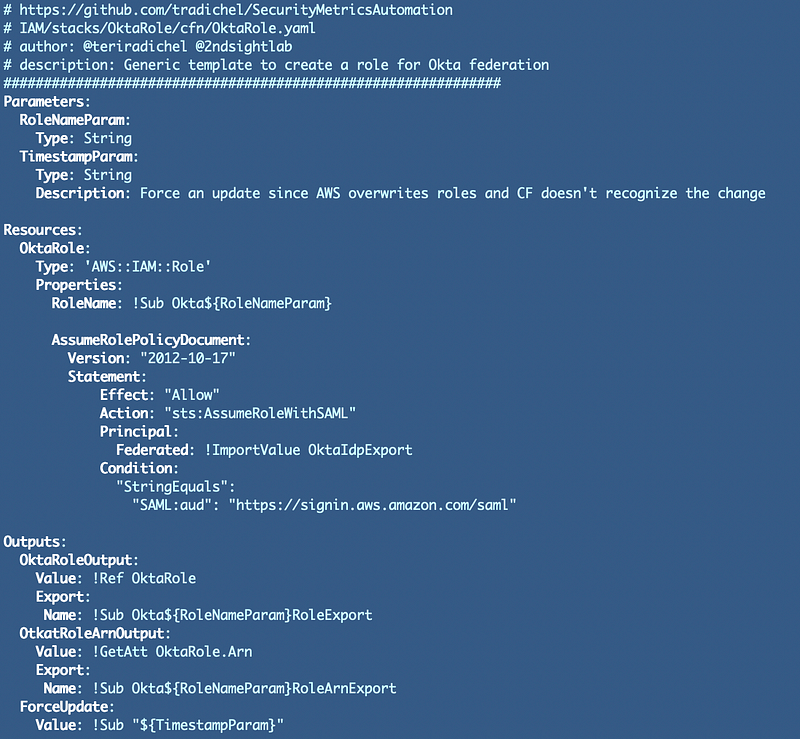
Over in my /cfn directory I am going modify GroupRole.yaml to become OktaRole.yaml.
I need to change the parameters to send in the RoleName instead of the Group parameters.

I need to modify the AssumeRolePolicyDocument (called a Trust Policy in the AWS Console). I changed the Action from sts:AssumeRole to sts:AssumeRoleWithSAML.

As mentioned above I’m going to get the IdP value from my IdentityProvider CloudFormation stack:

I removed the MFA condition (for now) and added the SAML condition.

In the outputs, I replaced Group everywhere with Okta:
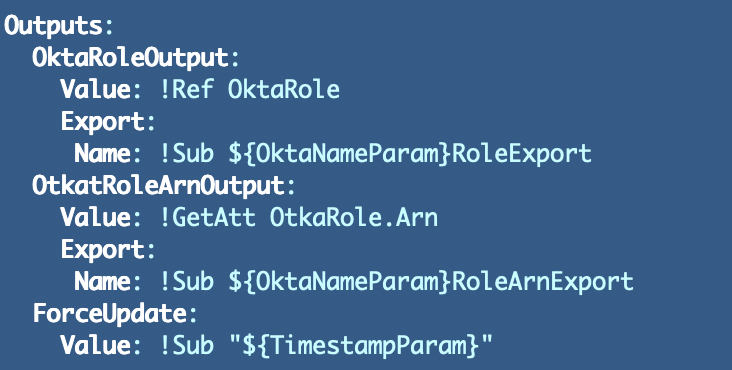
The full role CloudFormation template:
I removed the other roles from the cfn directory.
Role Policy
Next, I removed all the policies from the cfn/policy directory except the governance policy.
I changed every place it says “Group” to “Okta”. I change every place it says “Governance” to “Billing”.
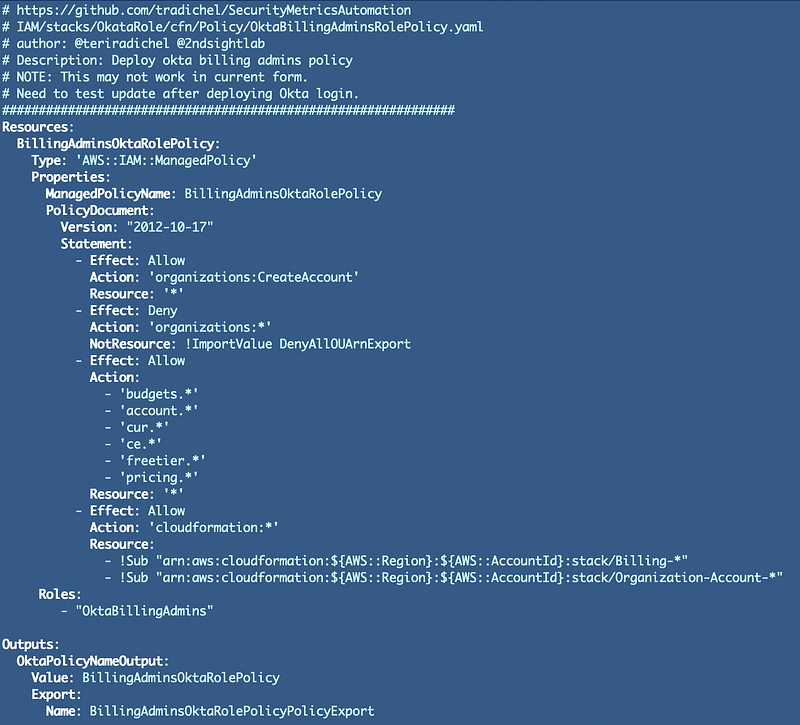
I modified the actions and as noted above there may be some issues with the CreateAccount actions. This is what we have right now:
- The policy below allows the billing administrator role to create an account.
- The root SCP denies creating accounts at the root.
- The policy below prevents the billing administrator from doing anything with the any OU except the DenyAll OU.
Once I can login with Okta using this role, we’ll verify this works as desired and troubleshoot as needed.

I’m also allowing the services mentioned above:

As per usual we are going to allow Billing Administrators to modify their own stacks:

This may pose another problem when we want to allow the governance user to move an account into a different OU. The stack takes a ParentID to create:
Then the stack needs to be updated to move the account into a new OU.
That means both the Governance team and the Billing team need access to update this CloudFormation stack per our design:
Let’s give our Organizational Account stacks a different prefix — Organization. The resource is going to be Account. So the naming convention for our stacks will be: Organization-Account-[AccountName]
So we’ll also let our billing administrators modify stacks that start with “Organization-Account”. We could further restrict the billing administrators to only create or delete stacks but not update them but our other permissions should limit the actions appropriately.
Here’s the whole policy:
Deployment Script
Next, I created the deploy_root_roles.sh script. It’s pretty simple:
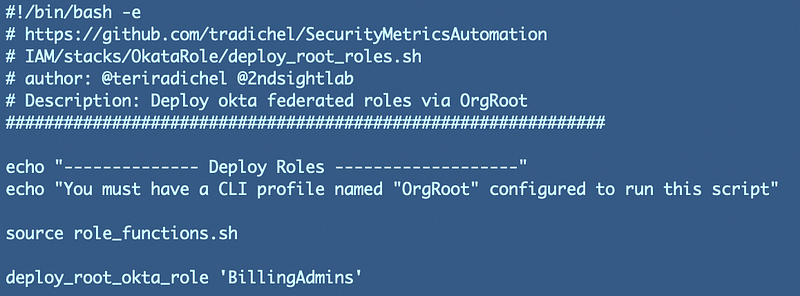
Note that the role template will add the “Okta” prefix to all Okta roles so we don’t need to add that in the name above.
Shared Functions Update
I also had to add the OrgRoot user to my list of profiles that can use IAM capabilities in my deploy_stack function in the shared functions file: Functions/shared_functions.sh:

Test the deployment
Deploy the role and policy by running the following script from the OktaRole folder.
./deploy_root_policies.sh
Make sure you have created the OrgRoot profile discussed in prior posts starting here:
Confirm they are added to the AWS management account. Take note of the role ARN as that will be referenced in the next post, where we grant Okta users permission to assume the role.
Follow for updates.
Teri Radichel | © 2nd Sight Lab 2023
About Teri Radichel:
~~~~~~~~~~~~~~~~~~~~
⭐️ Author: Cybersecurity Books
⭐️ Presentations: Presentations by Teri Radichel
⭐️ Recognition: SANS Award, AWS Security Hero, IANS Faculty
⭐️ Certifications: SANS ~ GSE 240
⭐️ Education: BA Business, Master of Software Engineering, Master of Infosec
⭐️ Company: Penetration Tests, Assessments, Phone Consulting ~ 2nd Sight Lab
Need Help With Cybersecurity, Cloud, or Application Security?
~~~~~~~~~~~~~~~~~~~~~~~~~~~~~~~~~~~~~~~~~~~~~~~~~~~~~~~~~~~~~
🔒 Request a penetration test or security assessment
🔒 Schedule a consulting call
🔒 Cybersecurity Speaker for PresentationFollow for more stories like this:
~~~~~~~~~~~~~~~~~~~~~~~~~~~~~~~~~~~~~~~~~~~~~~~~~~~~~~~~~~~~~
❤️ Sign Up my Medium Email List
❤️ Twitter: @teriradichel
❤️ LinkedIn: https://www.linkedin.com/in/teriradichel
❤️ Mastodon: @teriradichel@infosec.exchange
❤️ Facebook: 2nd Sight Lab
❤️ YouTube: @2ndsightlab