
How to Use Medium: A Complete Beginners Guide to the Writing Platform
The ultimate guide to writing, publishing, and promoting on Medium.com

Medium.com is one of the only places on the internet right now where writers and bloggers can come to post their content — and get paid straight away!
It has a simplistic design, it’s easy to set up an account, and has a crazy high domain authority on Google (96 as of the time of this writing).
Medium.com also gets over 400 million views a month! If you’re looking to write and earn some cash, this is a great place to start.
If you’re looking to make a huge amount — that’s also possible — some people make over $20,000 a month on the platform!
Here is a short but sweet guide to navigating Medium and the most common tips and tricks you’ll need to ensure your own success.
Enjoy!
Just in case you haven’t become a Medium member yet, I’d love you eternally if you signed up using my referral link! I’ll get a small commission at no cost to you and you’ll get eternal love — win-win!
What is the Medium.com blogging platform?
Medium is a fantastic source of articles from a huge variety of writers, poets, and comic artists from around the World. It’s the Youtube of writing.
You can come here to read — as over 200 million people do a month — or to share your articles and stories with a huge audience.
It’s free to write on and join the Medium Partner Program to earn money from your work. If you’re just here to read, you’re able to view 3 articles per month for free or pay $4.99 for a monthly subscription (Or $50 per year).
Is Medium.com reliable?
Yes! Medium.com has an interesting history starting with the co-founder of Twitter — Evan Williams. It first launched back in 2012 to great fanfare as a way to combine humans and technology to improve the quality of what we read on the internet.
“There’s a huge buffet. If you eat whatever’s put in front of you, you’re not necessarily going to be making the best choices.”
The company itself has gone through a lot of changes over the years, but they are still going strong. With likely over 300,000 writers on the platform producing content every day, there is a neverending source of interesting content.
Medium also runs several professional in-house publications, whereby they are fully staffed with fact-checkers and full-time editors.
They’ve even stepped up during this world pandemic and created a publication for constant updates on the virus.
It’s become quite popular and is a great source for people searching for medical news on Medium.com.
Some people do feel that these in-house publications take on a certain bias. But as the platform is wide-open, you don’t have to read (or post) to their publications if you don’t want to. Y
ou are also able to block publications from your newsfeed if you don’t like seeing any topics/writers.
Now that we briefly covered Medium.com, let’s dive into all the various aspects of the platform and what you’ll need to write an article.
Enjoy!
Table of contents
- Before we begin
- Titles, subtitles, and headers, oh my!
- Formatting and style
- Drop caps
- Authors and usernames
- Keyboard shortcuts
- Links and embeds like Tweets, videos, and stories
- Images and pictures
- Uploading images
- Finding free images without copyright
- Crediting your images
- Quotations!
- Paywall and membership on Medium.com
- How to set up membership or join the Medium Partner Program (to get paid)
- How do I earn money?
- Statistics and views
- Writing
- What is ‘Top Writer’ on Medium?
- Publications
- Sharing drafts and submitting as a writer
- Hitting the publish button
- Getting ranked on google and search engines
- Wrap Up
Before we begin — Curation and getting distributed
Before you hit that juicy looking green ‘Publish’ button on Medium for the first time.
Pause.
That’s because there’s a working theory that most new users on Medium have their first few articles manually reviewed by staff at Medium.
Why do they review it? To see if they want to curate it.
Curation on Medium is when the platform selects a story** of yours to be promoted within the website.
**FYI — they call all articles and comments here stories.
And you want to have your articles get curated.
It doesn’t guarantee success. But it does massively increase the chances of it going viral in the future. And if they really like your story, they might even email it to their hundreds of thousands of subscribers.
So before you publish your first piece, go read the official curation guidelines at the very minimum.
To learn even more about the subject, check this story out:
How do titles, subtitles, and subheadings work on Medium?
The vast majority of stories and articles on Medium.com follow the same pattern for titles.
For the main title, use title case. If you’re not 100% sure if your title is in that format, there are several online tools to quickly use.
Once you’ve finished writing the title, highlight it, and press the green ‘T’ icon:

For the subtitle, use sentence case. Make the first letter of the sentence is capitalized and don’t use a period on the end.
Once you’ve written it, highlight the subtitle and press the smaller green ‘T’:

For the headers in the body of the text, you have some freedom of choice with it. But the more professional publications recommend using sentence case as well.
Many bloggers will advise using H2 for sub-headers within the body of a blog.
As for SEO (Search Engine Optimization), it seems that Google doesn’t use them for ranking anymore. As long as the headers help Google’s algorithms understand your content and quality, you’re good to go.
So feel free to experiment and go with what looks better and makes more sense. As for myself, I often use H1 to break up my sections. But some publications only use H2 or none at all.
In the Medium.com platform, H1 is the big green ‘T’, and H2 is the smaller green ‘T’. (The same fonts as the title and subtitle.)

For some great tips on how to write killer titles on Medium, check out Kris Gage’s article:
How do you format and style Medium articles?
In simple word editors like Medium, it’s very easy to see how many of the articles can look similar in terms of style. That’s because Medium.com went the Apple route of design.
Easy to use and beautifully simple.
That does limit us with some of the formatting we might like to try. But on the other hand, it’s very easy to use. (Especially after reading this guide! 😉)
The following sections are some of my favorite formatting tips, but by no means all of them.
How to use drop caps on Medium?
For the first word of an article, I often use a drop cap or initial to start it off. I don’t use it every time, but it does help a story stand out a little and add a tinge of professionalism to it.
What’s a drop cap?

That big ‘M’ up there. I usually only put them at the beginning of my stories. But some people do sprinkle them throughout or use them at the beginning of every new section.
Just highlight the first word of a paragraph you want to use a drop cap in, and select the ‘T with lines’ icon like below:

How do author names and usernames work on Medium.com?
Sometimes you want to link other people in your stories. Other times you might want to highlight your own username — as I do for a signature. Either way, Medium allows you to link directly to other authors on Medium as a built-in function.
^That’s me! If you click it, it goes straight to my profile (which is full of other amazing work — trust me, I’m not biased.)
This is an easy-to-use function. You just need to type ‘@’ and then the person’s username.
Note, there is a bit of trickiness with this. Many authors will have a different display name from their username.
Let’s say you want to link to Robert Turner and one of his informative articles. I’d naturally type in ‘@robertturner’, but it wouldn’t find his name for me.
That’s because in this case (and for many people on here), his searchable name is his username.
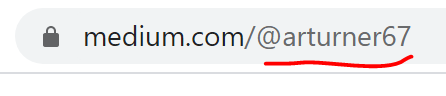
In this case, his searchable username is: ‘@arturner67’.
You can see people’s searchable names in the web address on their profile, as below”:
One word of caution including usernames in your stories though — Medium can get a bit testy if you do it too often, and with many people. They consider this spam, and not like the delicious meat variety.
Just kidding, everyone hates spam of all forms.
What keyboard shortcuts are on Medium?
You can find a bunch of articles online showing the various keyboard shortcuts you can use on Medium.
Here is the most important one:
CTRL + ?If you use that above, it brings up a list of all the keyboard shortcuts you can use on the platform!
Here are the other ones I use regularly (but take a look at the list if you want to see more):
To use a code block like this, type ```If you want to set a reminder to change something before you publish:
Type TK together to block your article from publishing until you remove the reminder.When reading blogs, people like to have more space generally. It makes things smoother and more organized.
The function on Medium.com for that is:
CTRL + ENTERAnd it makes a page break that looks like this:

If you want to add bullet points for listing stuff, it's easy:
Type * + SPACE to start a bullet listFor the number equivalent:
Type 1 + . + SPACEIf you want to bold or italicize words you can highlight them and select the B or i like this:

Alternatively, you can select the words or letters and just type:
CTRL + b or CTRL + iOften we might want to know how many words we’ve written so far. Some publications will have a minimum or maximum word requirement.
In addition, Medium uses your word count to try to figure out (and display) the estimated ‘reading time’ for users.
CTRL + aIf you’re in the word editor on Medium and type CTRL + A it selects everything and tells you the number at the top left of the screen:

How do links and embeds for Tweets, videos, and articles work on Medium?
Adding links in Medium is also pretty easy, and there are 3 ways to do it. For a link of text that looks like this — Wikipedia — you should type the word you want to appear.
Then go copy the website link you want to paste.
Then you highlight the word in Medium and you can either use the pop-up link button:

Or you can press these keys to paste the link on top of it:
CTRL + vThe third way is what’s referred to as an embed. Which is kind of groovy.
Let’s say I want to prominently display something like a Tweet, a GIF, a youtube video, or another one of your amazing articles on Medium.
Like this:
See? Fun, right?
Medium uses an applet called Embed.ly which claims to allow over 300 different kinds of links/embeds. That link goes to the FAQ section of Medium on the subject.
Basically, if you find a link you like, you just need to copy then paste it in the Medium editor and press enter. Usually, you want to do this on a ‘fresh’ line with no words around it.
How can you add images and pictures on Medium.com articles?
Every decently performing article on Medium has a beautiful picture at it’s beginning. There is the odd exception, but just trust me on this — put an image.
On this platform, they call that main image at the beginning of most stories the ‘featured image’.
Medium.com even has a built-in applet from Unsplash for you to find copyright-free images to use with your titles and throughout your articles.
When you’re typing a new line, you see that little ‘+’ sign that pops up? That’s the easiest way to add in images to our stories.
If you click that ‘+’, it shows you this pop-up:

Don’t get scared, remember we all passed Shapes Class in grade 2.
- The ‘X’ merely cancels the popup
- The ‘camera’ lets you explore your computer for an image to upload
- The ‘magnifying glass’ lets you search for an image using Unsplash
- The ‘right-pointing triangle’ lets you add in a video link (but you don’t need to use this function to do that, see above section)
- The ‘< >’ is the same but for other embeds (again, you can just paste the link normally and press ‘enter’ without this function)
- The ‘- -’ is a page break, which you can also do by typing CTRL + ENTER
I mainly use this ‘+’ for uploading images and finding them on Unsplash.
Here are some more tips on navigating images on Medium — written by Medium itself.
How do you upload images on Medium?
Using that above function to find and upload images from your hard drive is pretty easy.
Medium claims to support images up to 25 Megabytes, so be wary of your really large photos. They also accept JPG, JPEG, GIF, and PNG formats.
Here are the guidelines they state in their FAQ for preferred image sizes:
- Full column-width images: 1400 pixels wide
- Out-set images: 2040 pixels wide
- Screen-width images: 2500 pixels wide
Why does size matter? (Outside of my personal life that is.)
Because people view your stories on a wide variety of laptops, PC’s, Macs, tablets, and phones. There is also a popular Medium app for viewing stories (and some people write in it too, but that can be a bit clunky).
Google’s ranking algorithm also heavily relies on your website’s loading speed. And images can play a big role in that. Medium does a good job at resizing the images though, so if you stick roughly to their guidelines (or just use Unsplash etc), you’ll be fine.
In the end, you can use any image you want. Just know that if the resolution isn’t high enough, or the pixels wide enough (hint: they’re directly related), then the image might not look the best on some user’s screens.
You can also play around with the imaging positioning. Once you have a picture uploaded into the editor, just click on it and you’ll see this:

Each of those represents a different style for the image to appear around your text. Feel free to have fun with it!
How do you find free images without copyright for Medium.com articles?
Medium.com has its partner applet with Unsplash, which is a great place to start looking for beautiful free images to use. But it’s not the only place.
There are countless websites out there that have free stock images, but my preferred ones are:
- Native applet of Unsplash
- Pexels
- Pixabay
- WikiMedia Commons
Here’s an article talking about a bunch more, if you’re interested.
How should you credit your images in Medium stories?
Medium puts a lot of importance on having legally owned copyrighted images in your stories — and showing proof.
If you don’t have it displayed in the image caption, they won’t curate the story.
I have seen some examples of viral stories without credited images, but they are usually in the publications that Medium actually owns/runs, so it can be assumed they bought the pictures I suppose.
So if you created an image or found a copyright-free one to use, it’s easy to add the caption.
If you’re using the Unsplash applet, it does this automatically for you. Nice.
If you’re uploading an image or copying one over from Pexels/etc, then you have to find where they put the credit line, and copy-paste that.
Here’s an example from Pexels:
First, I went to the website and found an image. Next, I right-clicked and copied the image. Then I’ll paste it here by pressing CTRL + V:

After that, back to the Pexels website and find the source section:

Clicking that button shows me who made the image and that it’s free to use. You’ll see this there:

You can then copy that line by using the button or highlighting the text and right-clicking copy. Now go to the original image and click on it anywhere (or at the bottom just below the picture):

Press ‘ENTER’ and you have a credited image that’s free to use.
Some notes on crediting images:
- You can use any photo that you made or drew
- For your own work, you can write something like ‘Image by Author’
- For other people’s work that you know you are allowed to use, you can type something along the lines of ‘Credit: Person from Website Name’
- There are many exceptions to copyright rules if you research into them, especially when it comes to parodies and politicians
- Different countries do have different copyright laws, just know this is a US-based website, so those rules apply at the very least
How can you add quotations in Medium articles?
Quotes are important when blogging because they help add authority, relevance, and some pizazz to your stories. They’re also easy to add inside Medium.
Just write or copy/paste the quote you’re using, then choose from one of the 2 types of quotations.

If you click the quotes button highlighted there just 1 time, you’ll get a block quote:
Please read my work, I’m a starving blogger! — JJ Pryor
If you click it again, you’ll turn it into a pull quote:
Please read my work, I’m a starving blogger! — JJ Pryor
If you want to follow the strict guidelines of writers, block quotes are used only for quoting other people. Pull quotes are used to highlight important/fun text from further down in your story.
This well-written article by K M Brown explains the concept more.
But remember, you are the creator — do what you want! (Unless an editor says don’t do it.)
How does the Medium paywall and membership program work?
Medium is a pretty simple platform but its membership architecture isn’t often displayed very well.
It works like this:
- Anyone can view up to 3 articles a month
- If you want to view more than 3 articles a month, you need to subscribe to Medium.com — $5 USD per month or $50 per year
- If you want to publish articles that can get you money for them, you don’t actually have to be a paid subscriber — but it can help
I do recommend becoming a paying subscriber if you want to write and earn money on the platform for a few reasons.
Firstly, there’s some amazing content here! I read probably 50 articles a week and love most of them. For everything I write, I spend at least the same amount of time reading on here.
Secondly, other readers can see on your profile if you are a paying member (AKA helping to support the community).
That little green circle around my profile picture? That indicates that I’m a paying member of the platform.
I suspect people do care if you are and that it may affect (even if slightly) the number of claps and views you get in the long run.
How to set up membership or join the Medium Partner Program (to get paid)
This is Medium’s official article on joining the program and is worth a read.
Important things to note:
- You need to have and use a Stripe account (easy enough to setup)
- There’s a tax declaration for the US IRS because it’s a US-based company
- If you’re in a country that doesn’t have a tax treaty with the US, there might be a 30% royalty withholding tax taken out of your earnings
- Some countries don’t have access to Stripe (yet) and aren’t eligible
- If you’re from India, Brazil, or other Stripe Beta countries, here are separate instructions
- Payments usually come within the 1st two weeks of the following month
- If you aren’t a member of the Medium Partner Program (MPP), your articles won’t be eligible for curation (nor to make money)
How do I earn money on Medium.com articles?
Firstly, the story you publish has to be behind the ‘metered paywall’. For those that have signed up to the MPP already, this is the default option. The checkbox is auto-ticked.

Assuming that’s all set up and your stories are eligible to earn money, there are now 2 ways for each story to make some of that sweet cash we all crave.
1. Member reading time
The main way your stories will earn cash is based on the number of minutes paying Medium members read your stories. It’s not a straight forward 1 minute = $1 type of thing though.
If a member reads 100 minutes a month of Medium articles, and they only read 1 minute of your stories in the entire month, you would get 1% (1/100) of the payout.
The payout is a certain chunk of that member’s Medium fees. The exact number hasn’t been stated but I assume its around $4 of a member’$5 monthly fee.
Another way to put it would be if I only read your stories this month, then you would get my entire $4.
2. Medium also pays you a small commission if a non-paying member reads one of your articles and subscribes within 30 days.
It’s not mentioned how much the payment is, but I suspect it uses the same formula as it does for #1, or something close to that.
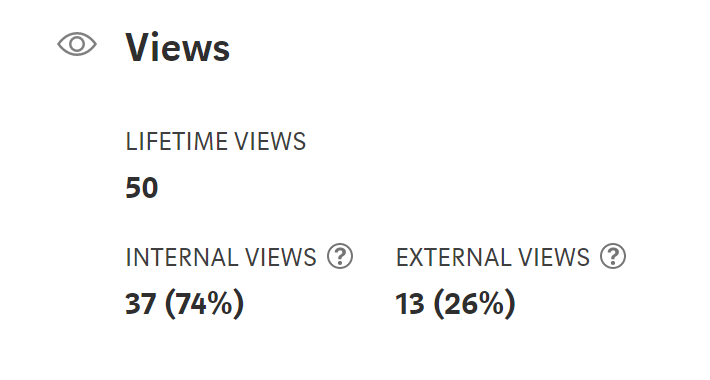
When you look at your stats (covered in another section), you’ll see that you have internal and external views.
The easy way to think about these in terms of payment is an internal view will count towards #1 types of payments. While external views have a possibility of counting towards #2 payments.
Sometimes it is a bit of a crapshoot on what pays more — but the general feeling is that #1 is the usual money maker.
I’ve seen proof of some articles getting 100,000 external views and only making $18. Whereas I have some of my own articles with 3,000 internal views that have made $150.
Just like with normal blogging, knowing your target audience can pay off. And there are pros and cons to getting internal vs external traffic.
For myself, I’m just happy if anyone reads one of my articles. I try to put the thought of monetization secondary (even if I obsess over my stats from time to time).
How do you see statistics and views for your Medium articles?
One of the cool things about Medium is the statistics that it lets you see. Although they aren’t the most in-depth, they do provide up-to-the-minute stats for us to see.
If you want to see your stats, go to your profile in the top right corner:

Then go down to the ‘Stats’ section and click it.

Now you’ll be on the ‘Stats’ page where you can see total views of stories for 30 days. As well as all of your individual stories and comments below.
Here’s an example of my stats from December (in browser mode):
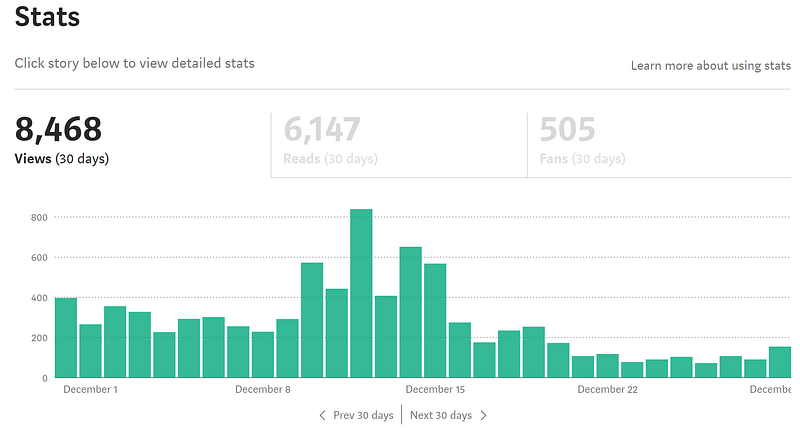
Important to note here that Medium includes both your articles AND your comments as ‘stories.’
So those spikes of 800 views in a day might have been mostly comments. It’s hard to tell without looking at individual stories and earnings. Comments aren’t eligible to earn money.
But there is a handy way around the articles vs comments vs stories problem with a free browser plugin!
For individual stories, you can click on them to see different kinds of stats.
Just click on the ‘Details’ section, like this:

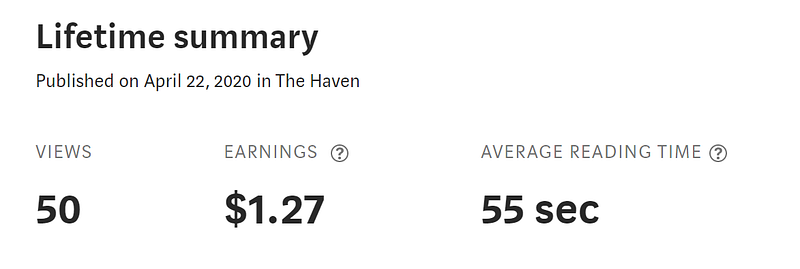
That then brings you to a page that shows internal and external stats, as well as how much money you’ve earned on that story so far.
Here’s a recent short humor article I wrote:
It also shows you internal vs external:
Member reading time (which is how we get paid for method #1):

It also shows you the sources of your traffic. Some are clickable — like Twitter and Facebook — to see the exact post that directed the viewer to your article.
There are also charts for each section which just graphically display the same information.


What should you write about on Medium?
Whether you’re a long time blogger or brand new to the art of writing online, Medium has a place for everyone. There are many places to start here but I’d advise having a look around at the different publications to see what’s popular.
You can write about almost anything on the platform, as long as it doesn’t violate the usual rules you find online. Their list of violations are pretty standard for the course. Here are the usual suspects (with many more):
- Hate speech
- Harassment
- Spam
- Duplicated content
- Plagiarized
I also highly recommend downloading the free browser plugin called Grammarly. Some people also use one called Hemingway Editor.
These plugins will help improve your spelling, catch typos, and can even rate your story based on its algorithms. The paid versions have more features and can help you with things such as titles and keywords.
Which leads me to a great point, if you’re looking to maximize your potential audience, have a look through this quick article for some interesting strategies on increasing your views:
Attention spans aren’t huge when reading blogs, so try to remember to keep your work to the point, informative, fun to read, and written with lots of white space.
What is ‘Top Writer’ on Medium?
Before long, you’ll probably see something called Top Writer on Medium. This is kind of like a badge of honor for writing about a specific subject and getting enough views that you’re considered in the top 50 most read authors for that subject.
Here’s my list of the 73 current categories eligible for Top Writer:
You can find a lot of articles on the subject on the platform, here’s one of the better ones out there by Jun Wu:
I’ve had 10 at the most at any given time, and right now I have these on my profile:

The basics you should know:
- Top writers are featured in a separate section on Medium for each of the 73 categories
- It can help drive traffic to your stories (but likely not too much)
- The most I’ve seen other people have is 19, but that’s extreme
- The list is updated frequently, so you can gain and lose a Top Writer status depending on your level of activity/views
What are publications on Medium.com?
Getting your work published in publications on Medium is vital to growing a following and getting more eyeballs. There are even a few publications out there with over 500,000 subscribers!
There’s a lot to cover with publications, the pros and cons, etc. I’ll try to keep it simple here for the sake of this guide.
- There are over 11,000 publications on Medium (you can see Smedian for full list)
- Many of the huge publications with the most followers are 3–7 years old
- Some people advise starting your own publication to keep some of your work
- Having a publication is the only way to directly email your followers (of that pub)
- Self-publishing something (if it's curated) gives it a chance to be read by editors of the Medium owned publications
As for myself, most of the work I publish is in publications. It almost always gets me the most views.
But I do make an effort to self-publish the odd one here and there to see if it will be curated or not.
There’s also a chance that a self-published article can get picked up by one of the Medium owned publications. (They don’t like to poach articles from other publications to be nice.)
The nice part about having my own publication is that I can move the self-published stories into it after I’ve seen if it’s curated or not. You can organize your own publication’s stories on what order the stories appear.
If you’re interested in more about the subject (it’s a great place to start on this platform), here are two of my most read articles on the topic:
Start here:
Then go here:
Good luck!
What is “boosting” on Medium and how can it help your articles get more views?
A ‘boost’ on Medium is a highly sought-after boost in visibility and engagement for your content. It’s akin to winning the writer’s lottery, resulting in your article being recommended across various channels including Medium’s homepage, apps, and the popular Daily Digest email.
The objective of this feature is for your boosted story to receive a minimum of 500 views within the first week. However, results can be far more substantial, with some ‘boosted’ stories reported to have amassed up to 100,000 views.
The great news is that all writers on Medium have the chance to get their story boosted. The process involves around 30 publication editors (a number that’s expected to increase) who can recommend around 5 articles a week to a team of human curators at Medium HQ. These curators have been trained to select stories based on a specific set of qualities.
The effectiveness of a Medium ‘boost’ can vary. While every boosted story is expected to get at least 500 extra views, some lucky ones have gone on to receive as many as 100,000 views. With such potential, it’s an incentive that keeps many writers engaged.
Getting your story boosted, though, can feel like a challenge given the volume of content on Medium. The curators look for 5 main criteria in a story: it should be constructive, original, the author should have relevant experience, the story should be well-crafted, and it should be memorable. Here’s a simplified interpretation:
- Make It Useful: Your content should provide valuable information or insights that your readers can use.
- Break New Ground: Try to explore overlooked, misunderstood, or uncharted topics. Or, if the topic is familiar, provide a fresh perspective.
- Draw from Your Experience: Authenticity is important. Drawing from your experiences, passions, or expertise can make your writing more relatable and credible.
- Craft Your Content Carefully: Pay attention to grammar, clarity, and style. Also, make sure the packaging — title, subtitle, images — is attractive.
- Create a Lasting Impression: Aim to create content that lingers in your reader’s mind and compels them to share it.
While the odds of getting your content boosted might seem low considering the number of articles published daily on Medium, remember you’re mainly competing against the 10% of published pieces that are of high quality. So, make sure your content ticks all the criteria.
Consistency, time, and practice can help improve your odds. Even if your chances seem slim, remember that without following these steps, the odds of being boosted are practically zero. Good luck with your next boosted article on Medium!
How do you share drafts and submit to publications as a writer on Medium.com?
When trying to get into publications on Medium, you first have to be added as a writer.
Not all publications accept writers though. Usually, you can see a tab on their publication called ‘Submissions’ or ‘Submit’ and you can see instructions. If you go to that guide I posted above, you can see submission guidelines for all the pubs in it.
Once you are accepted as a writer, you can then submit your drafts to the editors directly through the Medium platform.
If you haven’t been accepted as a writer yet, a lot of publications ask for an ‘unpublished draft link’ to be sent through email first.
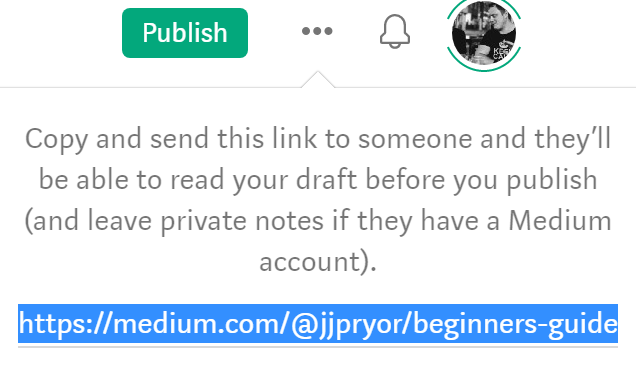
If you want to share a draft with an editor (or even a friend on Medium to review) go to the ‘…’ in the top right of the screen:

Then go to the ‘Share draft link’ part:

That brings up a simple link for you to copy and send to whoever you want to:
To submit your piece through Medium directly to a publication (after you’ve been added as a writer), go again to the ‘…’ in the top right of the screen:
There, you’ll see ‘Add to publication’:

If you click that, you’ll see the list of all the publications you’ve been added as a writer on. Then just select the publication you want:

And click ‘Add draft’. That will then select that publication as your target for that article.
How to add tags before you hit the publish button on Medium
Assuming you’re completely done with the article now, you can then hit the green ‘Publish’ button in the top right or your screen.
It takes you to the publishing page, the last step!

Here is where you can schedule your post by using the ‘Schedule for later’ function at the bottom — or you can simply publish straight away with ‘Publish now’.
Make sure you keep that green checkmark clicked (it’s clicked by default) as that allows you to get curated and to make money from the article.
The most important part of this page is the ‘tags’ section. You can add up to 5 tags, use them all!
Tags on Medium can be thought of as hashtags on Instagram or Twitter. They help the algorithm and people searching to identify what content your article contains.
If you put in wrong tags, your article won’t be rewarded in the search function.
People might find your article, read a little bit, and then jump away. The algorithm punishes your work if this happens a lot.
So explore the tags, there are thousands of them! The best part is you can start writing a word you think might match — and if you pause — it will show suggestions for tags to use (with numbers of popularity beside it!).
How can Medium articles get get ranked on Google and search engines?
I am by no means an SEO expert or guru (nor would I ever want to call myself one). But I do have a few articles ranked #1 on Google now. All I did was use a few basic tricks on my more developed articles.
To use the Meta Descriptions (the ones that appear on Google), go to the ‘…’ in the top right of the screen:
On there you’ll see a ‘More settings’ tab, click that.

On this page, you can change your Meta Title, Meta Description and create a custom-ish URL for your story.

Please note, you don’t have to change these or do this step at all. Medium will autofill them just fine if you don’t want to take this extra step.
I only do it for articles that I feel are very helpful, long-form, and have a chance at answering a question or covering a topic really well.
If you do take this extra step, it can go a long way to helping Google know what your story is about — and if it wants that story, this step will help it rank up faster.
The basic idea is that you have a title in your story with certain keywords. You can then write an alternate title in the Meta Title area above with other similar (but different) keywords.
Lastly, you can create the Meta Description (that little blurb on Google you see under article headlines). Again, you’ll probably want to put some key descriptions of what your article is there.
Some people also go to the extent of creating a custom URL.
The default will use something based on your story’s title, but you can modify it. (While still having to leave the ‘Medium.com’ part of course.)
These above steps take just a few extra minutes if you know what you’re doing. If you don’t, there’s a lot of information on the web about SEO (but it’s tiring to wade through the muck of opinions on it.)
Here’s a good guide from Casey Botticello about SEO and Medium for those more interested in the subject:
Wrap Up
I hope you’ve found this guide pretty useful for the Medium writing noobie. It took me a while to write (and months of use to learn!).
Medium is a fun place to hang out, write, and read to your heart’s content. Whether you’re going to write on here full time or just be a casual observer, I hope you enjoy your journey.
I’d be really grateful if you were to follow my publication on here that has more advice like this (often much shorter!).
You can also check out my own profile for other stuff I write about (humor, essays, advice): J.J. Pryor
Note Again: Just in case you haven’t become a Medium member yet, I’d love you eternally if you signed up using my referral link! I’ll get a small commission at no cost to you and you’ll get eternal love — win-win!
Or feel free to follow my free newsletter for more guides, deep dives, and interesting articles!
Thanks and good luck!


