
Docker — Container Management With Examples
Exploring how to run and manage containers with different options.
A container is the specific unit of software which packages code and all the necessary dependencies to work in a standardized way. It can run in any environment quickly and reliably and it’s a runnable instance of the image.
Docker images become containers at runtime when they run in the Docker engine. Docker Containers are standard, Lightweight and secure.
In this article, Let’s explore the different ways of creating, running, removing containers and best practices as well. Here are the topics we want to cover in this article.
- Container Architecture
- Understanding Docker Engine
- Building Images
- Understanding Dockerfile
- Starting Containers
- Understanding the docker run command
- Listing containers
- Interacting with Containers
- Inspecting Containers
- Removing containers
- Container logs
- Usage of volumes with containers
- Best Practices
Container Architecture
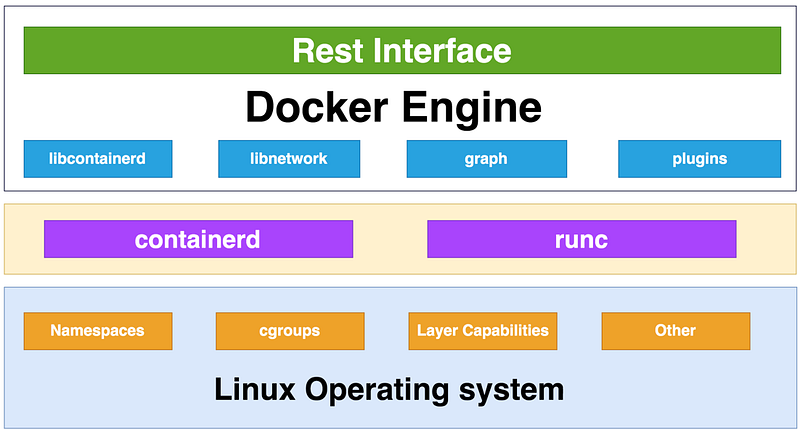
Let’s look at the following diagram, we have three sections 1) Docker Engine provides rest API for the docker client and also has other functionality such as image builds and management, security, core networking, etc. 2) container runtime has two modules containerd and runc which are responsible for the container execution 3) Linux Operating System
Understanding Docker Engine
Let’s understand the Docker Engine architecture before we dive into container management.
When Docker was first released, it has one monolithic binary which includes Docker client, Docker API, container runtime, images builds, etc. But, it was later modularized into separate components according to OCI(open container Initiative). OCI created two container-related specifications
- Image Spec
- Container runtime spec
As shown in the following figure, all the image specific and container-specific binaries were moved out of docker daemon and implemented as separate modules.
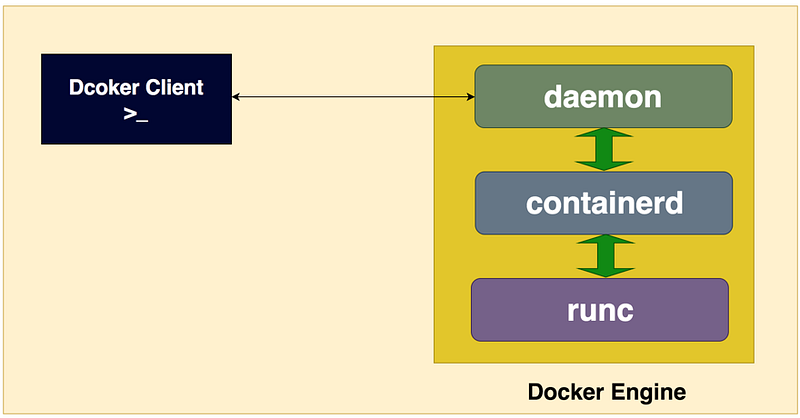
Docker client takes the commands and sends these commands to daemon through API. Docker daemon is responsible for implementing those commands with the help of containerd and runc libs.
Here is another diagram which demonstrates each module purpose.
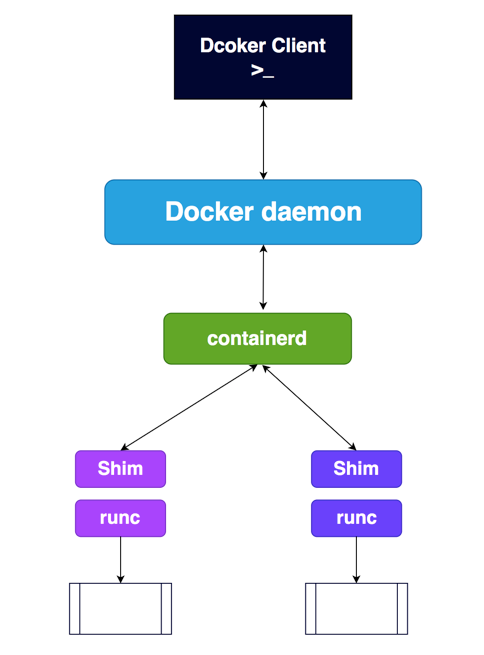
Docker Client: This is mostly CLI where you send docker commands to docker daemon. If you install Docker on any OS like windows(cmd), mac(terminal) or Linux, This is where you actually interact with docker.
Docker daemon: This is the server which exposes Restful API to accept the docker commands from Docker client. This is responsible for executing those commands, image builds, authentication, security, networking, etc.
containerd: This sits between daemon and runc at the OCI layer and this is responsible for the container lifecycle operations. It started as a lightweight container management But, it has more functionality other than container execution.
runc: It creates containers. containerd uses a new instance of runc every time we create a container. runc process exits as soon as it creates a container so that we don’t have to create as many runc instances as containers.
Shim: Shim is nothing but a library which enables daemonless containers. The reason why it is daemonless is runc process exits as soon as it creates a container. Shim is responsible for the container from there. It reports the container’s exit status back to the daemon.
Building Images
Check out these articles about building images.
Understanding Dockerfile
Check out this article if you want to know Dockerfile in detail.
Starting Containers
A running instance of an image is called a container. We can start the container with any image we built or pulled from docker hub with the following command docker container run
For instance, Let’s start a container from the node image. If the image is cached locally it will it from the local, if not it will pull it from the official docker repo.
docker container run -it --name my-node node:latest /bin/bashwe don’t have local node image so, it is pulled from the docker hub and process we are running /bin/bash as soon as the container starts. We can interact with the bash shell immediately to check the versions of node like below. we can exit out with the exit command.
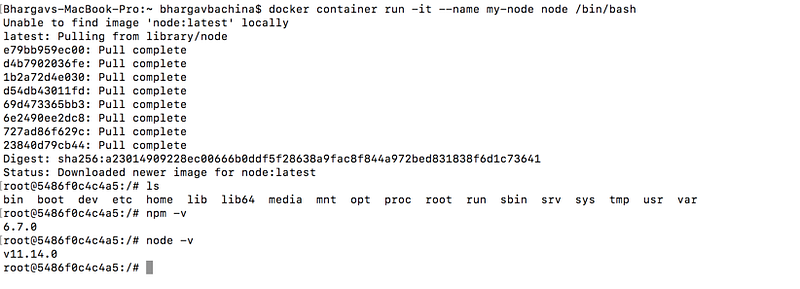
We can start the container in a detached mode as well with -d flag. When we start the container like this, it just returns the id.

We can also omit the container in the command like below

Understanding the docker run command
Let’s understand the following command in detail.
docker container run -it --name my-node node:latest /bin/bash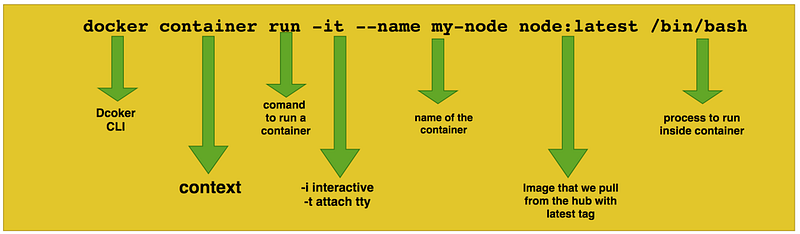
Listing containers
We can list the container in two ways docker container ls and docker ps. Both will result in the same output. Let’s see those in action

By default, it lists only running containers. What if we want to list all the containers such as exited, and running. we need to use flag -a

We can actually select particular fields to list with --format flag and Go like templates. add table for table-like format and \t for space.
docker container ls -a --format '{{.ID}} {{.Image}} {{.Statue}}'docker container ls -a --format 'table {{.ID}} {{.Image}} {{.Statue}}'docker container ls -a --format 'table {{.ID}}\t{{.Image}}\t{{.Statue}}'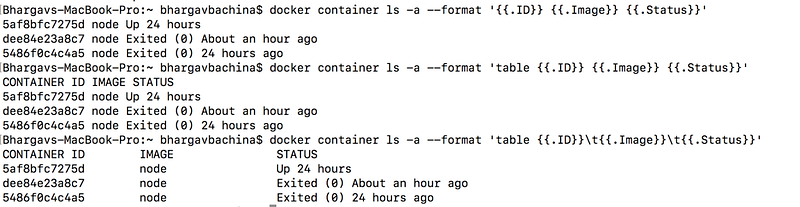
If we don’t want to type every time in the command line. There is a way to predefine this format so that every time we run container ls , it will result in a specific format. we need to edit the file under /Users/<username>/.docker folder.

after we edit the fileconfig.json and restart the docker, we can see the container ls command prints in that specific format

we can print in a json format with the following command
docker container ls --format '{{json .}}'
Interacting with Containers
We can interact with the running containers in two ways exec and attach, there is a slight difference between these two. Let’s see what that is.
we can directly interact with the container when we start a container by providing the process we want to run at the end.
for instance, if we are running node, we can provide bash at the end to interact with it
docker container run -it --name my-node node:latest /bin/bashHow to do you interact with already running container? Here are the options
attach: this is used to interact with the container with the same process that container is running. Let’s run the following commands.
// run the container in detached mode
docker container run -dit --name mynode1 node bash
// make sure container is up
docker container ls// attach the running container
docker attach mynode// exit out of the running process
exit// check whether conatiner is running or not
docker psattach in action. if we exit with the attach command, it exits the present running process of the container. so, the container stops.
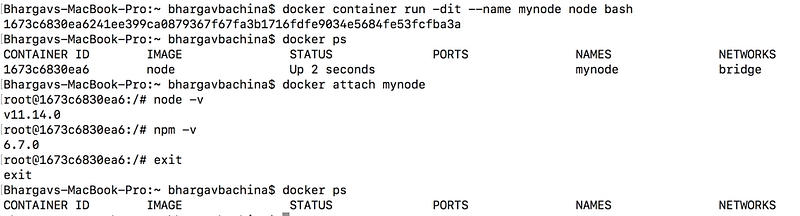
exec: This command is used to interact with the container with a separate process. So that if we exit out of the process, the container is still running in another process.
// run the container in detached mode
docker container run -dit --name mynode1 node bash
// make sure container is up
docker container ls// using exec, takes two arguments
docker exec -it mynode bash// exit out of the running process
exit// check whether conatiner is running or not
docker ps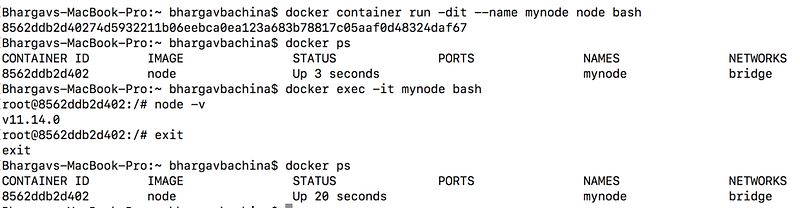
More about these commands, exec vs attach
Inspecting Containers
we can inspect containers with the following command. it doesn’t matter which state it is in as long as it is not removed.
docker container inspect <container name>This command prints a lot of information in a json format such as networking details, storage, Name, etc.
If we want to know specific info, we can pipe this to grep like below
docker container inspect mynode | grep IPAddress
Removing containers
We can remove containers with this command docker container rm But, it’s always best practice to stop containers with docker container stop before removing.
// stop running containers
docker container stop <container id/name>
// remove containers
docker container rm <container id/name>
The difference is that docker container stop sends SIGTERM to container process and docker container rm sends SIGKILL to container process. SIGKILL wait for 10 sec before it ends container’s life.
Container logs
We can access logs of the running container with the following command
// container logs
docker container logs mynode
// last 10 lines
docker container logs tail -10 mynode// follow the logs
docker container logs --tail 10--follow mynode
There are so many logging drivers for the logs such as json-file, journald, none,gelf, fluentd, etc. docker container logs supports only json-file and journald.
we can specify the logging driver in the docker run command as below
docker container run -it --name mynode --log-driver none node bashUsage of volumes with containers
Why use volumes?
we need to understand how containers work and save data before we dive into volumes.
All layers in the images are immutable and readonly. If we look at the following diagram, whenever we create a container from the image, it creates a writable layer on top of immutable image layers. whatever we create or save data inside the container, it will be saved into this writable layer.
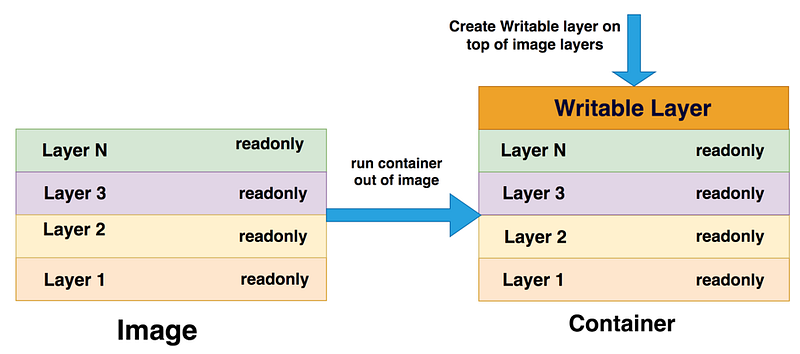
The downside of it is that if we remove the container, all the data will be lost with the container. One way to solve this problem is to use volumes. Volumes go beyond container lifecycle and persist data.
Run container With a volume
We can create volumes with this command docker volume create mydata
//create volumes
docker volume create mydata
//list volumes
docker volume ls//inspect volumes
docker volume inspect mydataWe can actually see where exactly data in the volume is saved as a Mountpoint.
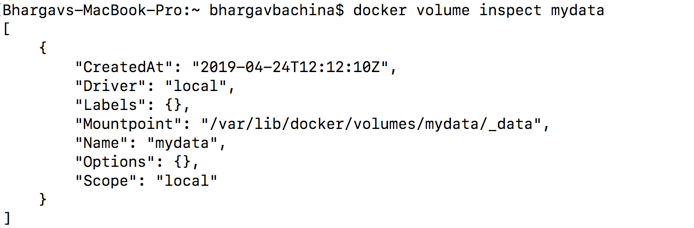
docker VM is hidden on macos, we have to use the following command to get into VM
// get into shell
screen ~/Library/Containers/com.docker.docker/Data/vms/0/tty
// cd into Mountpoint location
cd /var/lib/docker/volumes//list the volumes
ls -a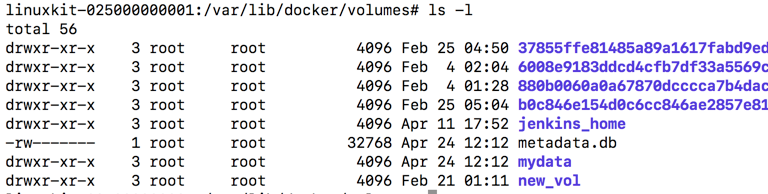
Let’s run the container with the volume
// run container with volume
docker container run --name volumetest -it -v mydata:/data alpine sh
//cd into data
cd data//create one file there
echo "This is some data" > somedata.txtSince it is mounted to volume location, we can actually see the file in the volume location.

Now we can remove the container, we still have this data in place and we can start another container with the same volume and access the file form volume like below.

If you want more about volumes, check out this article
Best Practices
- Always stop containers before removing. Graceful shutdown is always the best practice
- Use volumes for persistent data. Make sure removing volumes if not necessary
- use one application per container. For instance, don't use nodejs app and MongoDB in one container.
- Use docker cache to our advantage while building images using dockerfiles
- always build the smallest image possible so that container starts quickly and will be fewer disk usages.
- make use of docker multi-stage dockerfile to build small and secure images.
- when it comes to usage of public image, should be chosen carefully as we don’t have complete control over it.
- tags are mutable so we should use these tags properly. Use digest since it is immutable.
- Always build the image only with the necessary tools. Always reduce the usage of tools, it will have less surface for attacks.
- whenever we are sharing data between containers with volumes, make sure only one container is writing into the volume to avoid concurrency.
Container management is very important to run efficient docker applications.


