
Presents-AVR-Freaks w/ Atmel Studio 7 & UNO (Episode#02)
Showing mountain to climb —Tech Docs to be situated!
In this post: Introducing AVR LibC we gonna toggle the led on pin 13 (same as PINB5). trivial? But relevant matter! Keep it going!
AVR Freaks:
(https://www.avrfreaks.net/) Since 2001! The preeminent AVR community for discussing everything related to Atmel’s popular 8- and 32-bit AVR microcontrollers.
Community:
https://community.atmel.com/communities
Let’s code!
Step#00→ Go through this Serie’s Episode 0 & 1 :)
Step#01→ Go to Understanding Arduino UNO Hardware Design from https://www.allaboutcircuits.com/technical-articles/understanding-arduino-uno-hardware-design/
or
https://drive.google.com/drive/u/0/folders/0B6uNNXJ2z4Cxc3VwZHNaUkM3eGs
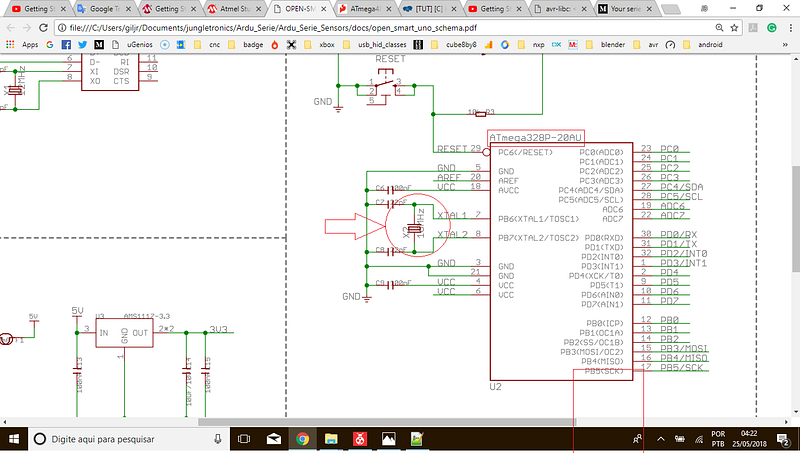
Arduino UNO uses 16MHz Xtal, cool!
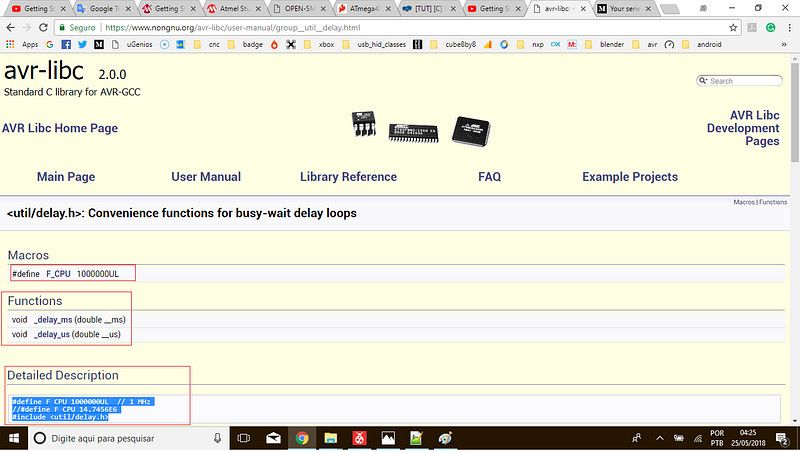
Step#02→ Get acquainted with some functions from AVR Libc Home Page; We’re gonna use _delay_ms() first (avr-libc 2.0.0 Standard C library for AVR-GCC):
Step#03→ Go to Datasheet page 75 and see how to toggle a pin in Arduino:
As we are interesting in PinB5 here is how:
PINB |= (1<<PINB5);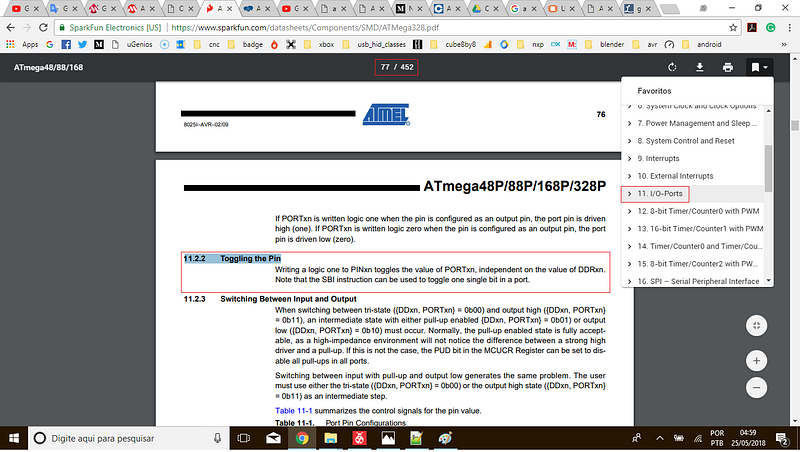
Step#04→ Last we need to call delay, say for 500 milliseconds.
Here’s the complete code for today:
https://gist.github.com/giljr/dce3a88de7c94ec020a467a762e9e86f
Step#05→ As usual, F7 , then Tools > Send to Arduino UNO, and there you have it!
We now have sites, documents, and examples to follow. We are evolving slowly but consistently.
Knowledge comes in series!
in the next video we will manipulate buttons and turn on the led manually.
See you later!
References & Credits
Follow along with the entire ‘Getting Started with AVR’ series: http://bit.ly/GettingStartedwithAVR
→Goto Episode#03
Complete Serie:
#00 HowTo-Load-Into-Arduino-AS7
#01_Hello-World
#08
#09
#10