
Learning how to use git version control
Learning a source control system is necessary for teamwork nowadays. However, it was difficult for me to remember these commands when I was a beginner.
The way I learn Git is to record the commands I have ever used to solve problems.
I am still working on making this note better.
The article includes the following topics.
1. Best practices
- Write good commit messages
- Tags and the release branch
- Don’t push a new commit to fix the previous error
2. Set up SSH key on Github/Gitlab
3. Basic settings
4. Common operations for the local repository
- Status
- Working tree
- Staged snapshot
- .git repository
- Stash
- Staged snapshot
- Patch
5. Interact with the repository which is stored on the internet
- Push our code from our local computer to the repository that is stored somewhere on the internet
- Download the latest version of the repository
6. Debugging
- Git blame
7. Customized settings
- Line ending setting
8. Thing about Merge
- Merge types
- Revert the merge operation
- Solve the merge conflicts
- Merge squash
9. Thing about Rebase
- Revert for the rebase commits
- Rebase squash
10. Error message
- SSL certificate error
11. Check commits’ status and summaries
12. Tags
1. Best practices
Write good commit messages
- Write subject and body. They are separated by a new line
- Restrict the length of the subject to 50
- Capitalize the subject
- Don’t add the period on the subject
- Restrict the length of each sentence of the body under 72
- Explain what you did in the commit on the body
Tags and the release branch
- Tag release versions
- Fix bugs in release branches with root causes and merge back to the master branch
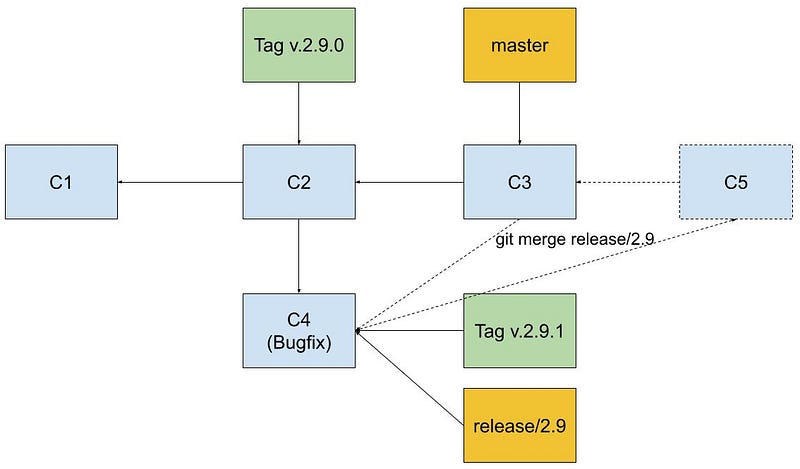
- The semantic versioning
Don’t push a new commit for fixing the previous error
- Combine the previous commit (the hash will be modified)
git commit --amend //update the last commit- Combine the past N commits (the hash will be modified)
git reset {hash} default: mixed2. Set up SSH key on Github/Gitlab
- Install OpenSSH (Windows 10)
- Open PowerShell and use the following commands
2. Generate SSH key
- Use command line instead of PowerShell on Windows 10
ssh-keygen -t rsa -b 4096 //Github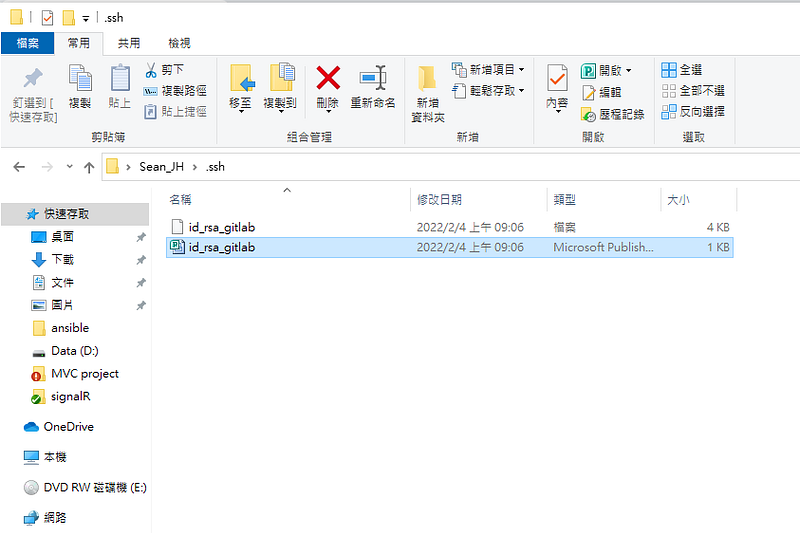
ssh-keygen -t ecdsa //Gitlab- Enter the new file name, for example
mac:
/Users/seanhsieh/.ssh/id_rsa
Windows 10:
C:\Users\Sean_JH\.ssh\id_rsa2. Check the public key
- mac/CentOS
cat ~/.ssh/id_rsa.pub- Windows 10
3. Paste the public key on the remote machine or Github/Gitlab
- Remote machine
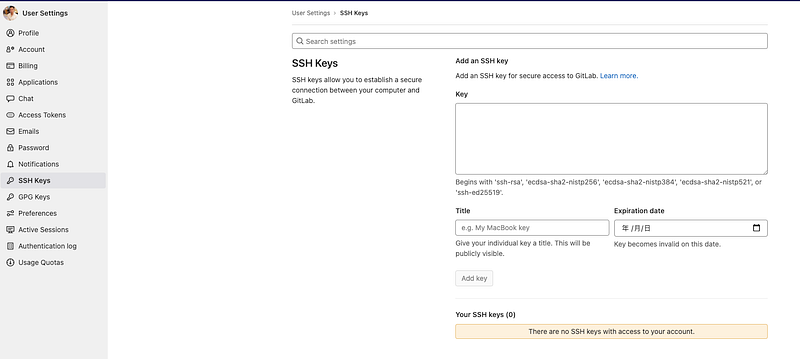
paste on /.ssh/authorized_keysorssh-copy-id -i id_ras.pub {userName}@{host}- Github: Settings ->SSH and GPG keys -> New SSH key
- Gitlab: Edit profile -> SSH keys -> Add key
4. Add the generated private key (local)
- mac/CentOS
ssh-add ~/.ssh/id_rsa- Windows 10: use PowerShell
get-service ssh*
Set-Service -Name ssh-agent -StartupType Manual
Start-Service ssh-agent
cd C:\Users\Sean_JH\.ssh\
ssh-add .\id_rsa- Ubuntu (or WSL)
Use the following scripts if it throws “Could Not Open A Connection To Your Authentication Agent.“
ssh-agent bash
ssh-add ~/.ssh/id_rsa
5. Create config file under .ssh

6. Test the SSH connection
ssh -vT git@github.com //github
ssh -vT git@gitlab.com //gitlab
Update the remote URL from HTTP to SSH
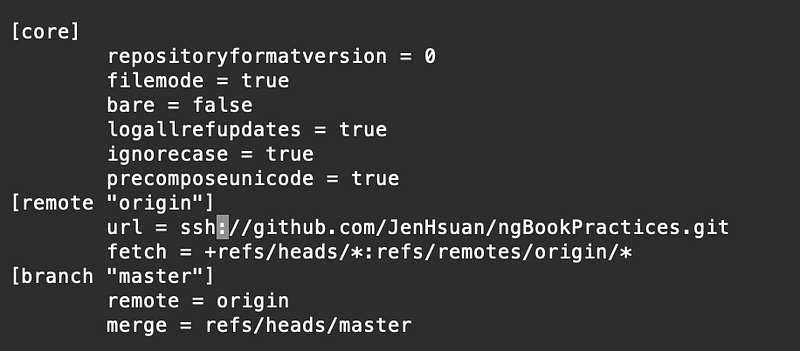
- Modify the URL of remote on .git/config to SSH
3. Basic settings
Init .gitconfig
- Use the following command to init .gitconfig
git config --global user.name "Sean"
git config --global user.email "[email protected]"
git config -l //Check the setting2. Visit the user folder to check if the .gitconfig existed or not
- Mac
cd- Windows: C:\Users\
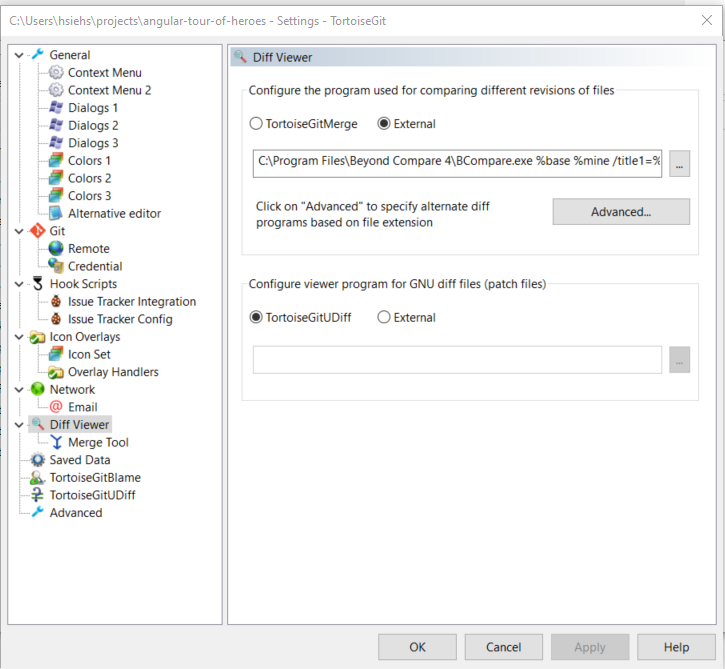
Integrate Beyond compare with TortoiseGit (Windows)
- Install Beyond compare
- Install TortoiseGit
- Visit a folder which is a git repository
- Right click and select TortoiseGit -> Settings from the menu
- Diff Viewer:
C:\Program Files\Beyond Compare 4\BComp.exe %base %mine /title1=%bname /title2=%yname /leftreadonly - Merge Tool:
C:\Program Files\Beyond Compare 4\BComp.exe” %mine %theirs %base %merged /title1=%yname /title2=%tname /title3=%bname /title4=%mname
4. Common operations for the local repository
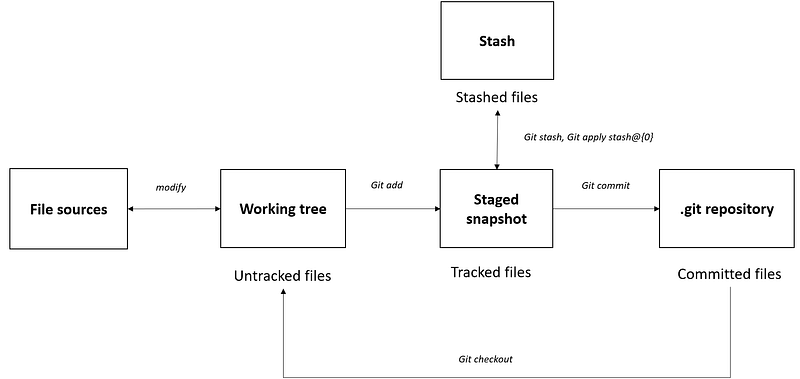
The operations for the local repository matter working tree (working directory), staged snapshot (staging area), stash, and repository.
Status
- Check the status of the working tree (e.g., changes added to commit.)
git status- List the untracked files
git ls-files -m- Check the difference between the untracked files
git diff
git diff <filename>
Working tree
git worktree commands allow us to create a new worktree in another physical folder.
The benefit is that we don’t have to save the changes in the stash temporarily and switch to other branch when facing prompt issues.
- List all work trees of the git repository
git worktree list
2. Add a new work tree in another physical folder
git worktree add -b <new branch name> <physical folder> <based branch name>

e.g., git worktree add -b customized ../Angular15Project_customized main
3. Open the created work tree with the editor
4. Commit the changes
5. Delete the physical folder
rm -r ../Angular15Project_customized6. Clean the linked working tree
git worktree prune
Revert untracked files
- Revert the specific file in the working tree
> git checkout -- <filename>
> git checkout -- <filename*>
> git checkout origin/HEAD <filename>
> git checkout origin/HEAD <filename*>- Revert changes
> git restore {file name}Add untracked files to the staged snapshot
- Add files: it will create new files under .git/objects and update the .git/index
> git add -A //Track all files
> git add <filename>
> git add -u //Only track committed files to the index- Check the .git/objects
> git cat-file -t <SHA1 under .git/objects> //check the type
> blob
> git cat-file -p <SHA1 under .git/objects> //check the content
> {content}> git cat-file -s <SHA1 under .git/objects> //check the length
> {length of content}> git ls-file -s // list all files in the index of staging area
> {permission} {blob} {version} {file path}- SHA1 under .git/objects
sha1 of "blob {length of the conetent}\0{content}"Revert tracked files to working tree (Unstage)
- Remove entire file from the staging area
> git rm --cached {file name}- Revert the last change of the file
> git restore --staged {file name}Add staged files to .git repository
- Submit files to the local repository
> git commit -a //submit all files to a new commit
> git commit -m {comment}- Check the .git/objects
> git cat-file -t <SHA1 under .git/objects> //check the type
> commit
> git cat-file -p <SHA1 under .git/objects> //check the content
> tree {sha1 of tree}
> author {name} {email} {timestamp} {time zone}
> committer {name} {email} {timestamp} {time zone}> git cat-file -t <SHA1 of tree under .git/objects> //check the type
> tree> git cat-file -p <SHA1 of tree under .git/objects> //check the content
> {permission} blob {sha1 of blob} {file name}Stash
- Store the files in the staging to the stash
git stash save- List all stashes
git stash list- Apply the specific stash to the working tree
git stash apply stash@{0}Patch
- Apply patch
git apply –reject patch5. Interact with the repository which is stored on the internet
Push our code from our local computer to the repository that is stored somewhere on the internet
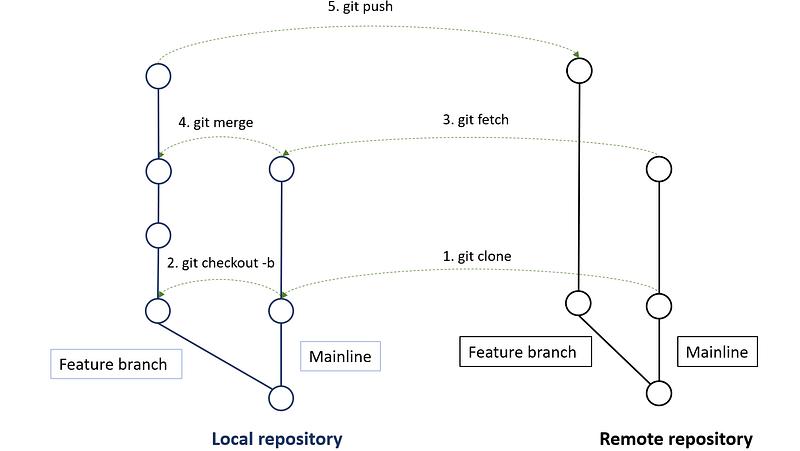
- Clone git repository from the remote server
git clone --recursive <URL>2. List local branches
git branch3. Checkout the specific branch
git checkout <branch>git checkout -f <branch> //Force to checkout branch
e.g., git checkout -f remotes/origin/master --git checkout -b <branch> <remote branch>4.Modify code from the local repository
5.Add untracked files to the staging area
git add -A //Track all files
git add <filename>
git add -u  //Only track committed files to the index
6.Submit files to the local repository
git commit -a //submit all files to a new commit
git commit -amend //update the last commit
7.Push the local branch to the remote server. (if the remote branch’s name doesn’t equal the local branch’s name)
git push -u origin <local branch>:<remote branch>
e.g., git push --progress "origin" feature/WEB-373:feature/WEB-373
Download the latest version of the repository
- Fetch updates from the remote server
git fetch -v --progress "origin"2. Merge origin/master to the local branch(dev)
git checkout dev
git merge remotes/origin/master
3. Solve the merge conflicts
4. Update sub-modules ( https://blog.chh.tw/posts/git-submodule/)
git submodule update --init -- <sub-module name>
git submodule update --init --recursive
6. Debugging
- Check the past changes for the specific file
git blame -L <start line>,<end line> <file name>
e.g, git blame -L 222,225 example.js
7. Customized settings
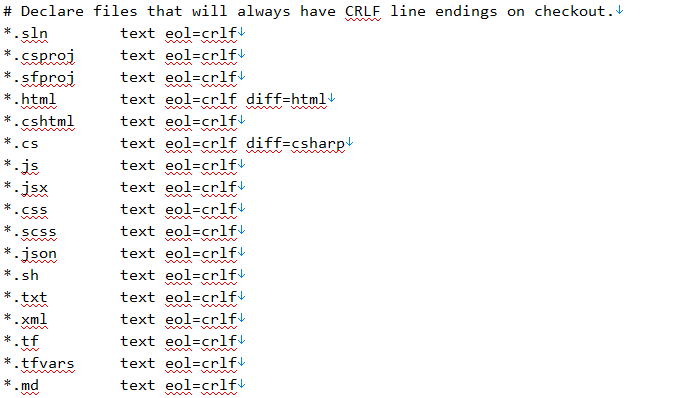
Line ending setting
In Windows, system uses CRLF as the line ending. In Linux and Mac, system uses LF as the line ending. We have two ways to convert line ending.
1.Set the core.autocrlf in the .git\config file
git config core.autocrlf false
git config core.autocrlf true
2.Modify text attribute in the .gitattributes file
I referred the following explanations from there.
- text=auto Git will handle the files in whatever way it thinks is best. This is a good default option.
- text eol=crlf Git will always convert line endings to `CRLF` on checkout. You should use this for files that must keep `CRLF` endings, even on OSX or Linux.
- text eol=lf Git will always convert line endings to `LF` on checkout. You should use this for files that must keep LF endings, even on Windows.
- binary Git will understand that the files specified are not text, and it should not try to change them. The `binary` setting is also an alias for `-text -diff`.
Refreshing a repository after changing line endings
I referred the following commands from there.
1.Save your current files in Git, so that none of your work is lost.
git add . -u
git commit -m "Saving files before refreshing line endings"
2.Add all your changed files back and normalize the line endings.
git add --renormalize3.Show the rewritten, normalized files.
git status4.Commit the changes to your repository.
git commit -m "Normalize all the line endings"8. Things about Merge
Merge types
- Fast forward: only when the new commit is based on the head of the master which means that we have to squash commits if we need the fast-forward.
- 3-way merge: a new commit will be created with 2 parents
Revert the merge operation
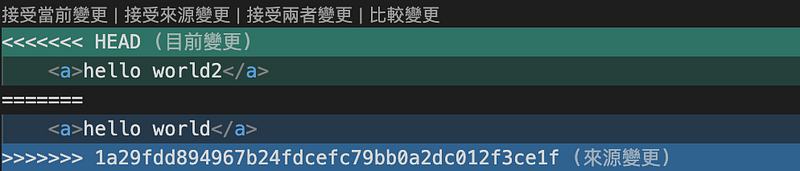
git reset ORIG_HEADSolve the merge conflicts
- Anything between HEAD and equal sign is your changes
- Anything between the equal sign and the greater than sign are the remote changes
- 1a29fd is the commit hash of the one caused the conflict
- Do the following steps
1.Modify code. Just leave the code you want.

2. Add untracked files to the staging area
git add -A //Track all files3.Submit files to the local repository
git commit -a //submit all files to a new commit4.Push the local branch to the remote server. (if the remote branch’s name doesn’t equal the local branch’s name)
git push -u origin <local branch>:<remote branch>Merge squash
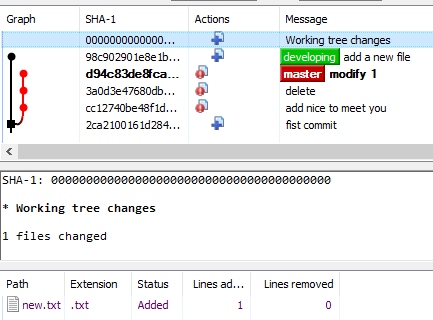
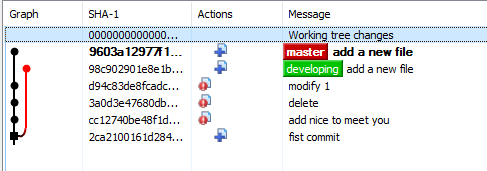
- We can use Git merge squash to merge the developing branch to the master branch without a new commit.
- For example, we have two branches. The developing branch has a new file. The working space is empty currently.
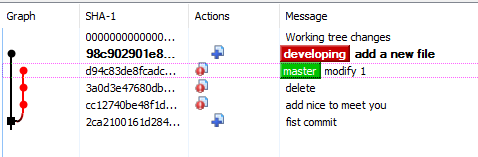
1.Type the following commands.
git checkout master
git merge -squash developing - Then the working space will have a new file from the developing branch
2.Commit
git commit -m "add a new file"- Then we complete a the diff to the master branch.
You can also read the following articles: - Git: 比較 Merge Squash 與 Rebase Squash
9. Things about Rebase
Revert for the rebase commits
- Check the history of the commits. Press ‘q’ to exit.
git reflog- Then it will show the history of the commits.
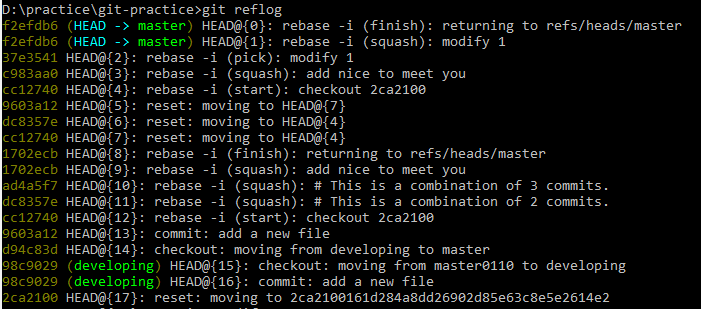
2.Reset:
- Soft: leave working tree and index (staging area) untouched
- Mixed: leave working tree untouched, reset index (the default action)
- Hard: Reset working tree and index (discard all local changes)
git reset --hard HEAD@{13}3.Type the following command to check the branch’s commits.
git log --oneline- Then it will shows the commits on the current branch.
Rebase squash
- We can use Git rebase squash to combine commits together.
- For example, we have a branch.
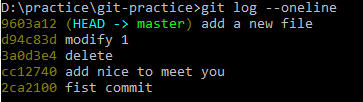
1.Type the following command to check the branch’s commits.
git log --oneline- Then it will shows the commits on the current branch.
2. Choose the base commit.
git rebase -i 2ca2100- Then it will prompt a window. The squash commits will be combined to the pick commits
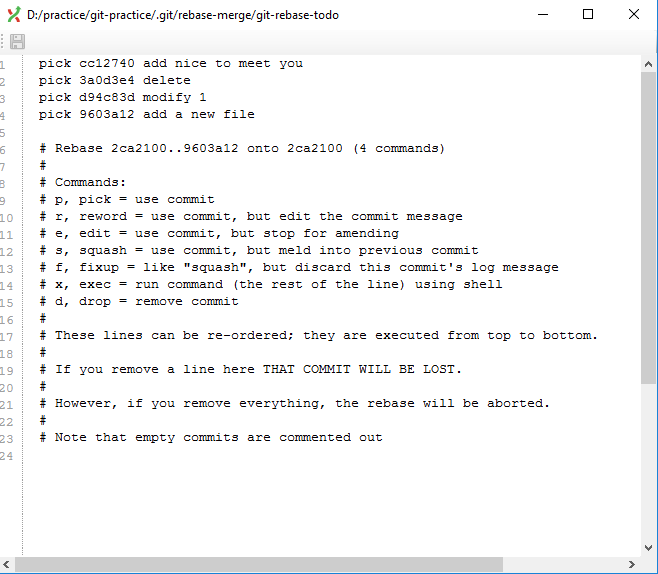
3.Edit the combined order. Save it then close it.
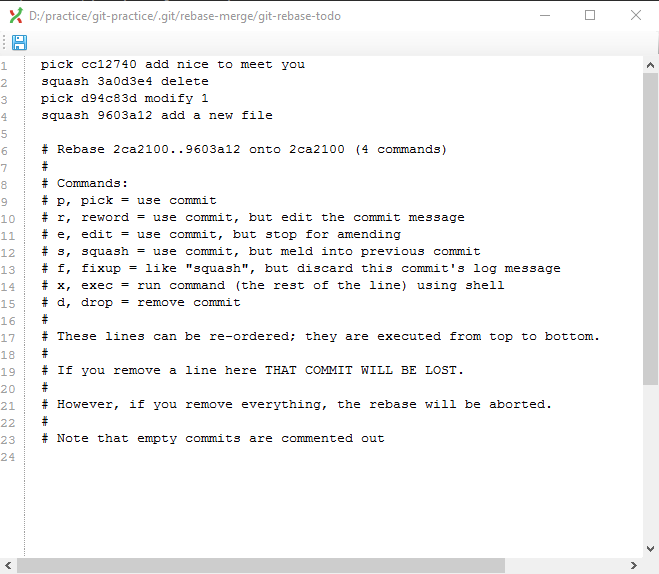
4. Check the Git logs after it completes.

10. Error message
SSL certificate error
“ fatal: unable to access ‘…': SSL certificate problem: unable to get local issuer certificate”
workaround solution
git config --global http.sslVerify false11. Check commits’ status and summaries
- Copy the commit SHA-1
2. Use git show to check the summary
git show <SHA-1> --stat --summary12. Tags
Create
- Type 1.lightweight tag
git tag <tag name> - Type 2. Annotated tag
git tag -a <tag name> -m <tag message>
git tag -a <tag name> <commit SHA1 value>
Delete
- Delete tag (local)
git tag -d <tag name>- Delete tag (remote)
git push -delete origin <tag name>Push
- Single tag
git push origin <tag name>- Multiple tags
git push --tagsReferences
- How to list all the files in a commit?
- Git: See my last commit
- git: See changes to a specific file by a commit
- How to undo all the changes to a specific file in your working directory using Visual Studio — 070
- Git 的 core.autocrlf 參數
- Git 在 Windows 平台的換行字元
- Configuring Git to handle line endings
- .1 Git 客製化 — Git 設定
- [Git] unable to get local issuer certificate
- SSH keys on Windows 10
- Windows 10 启用 SSH server 配置 SSH 证书 密钥 免密 登录 Windows 及 错误 1607 Permission denied 要求输入密码 记录
- How to Generate SSH Key in Windows 10
- Windows下使用ssh-add报错 Error connecting to agent: No such file or directory
- 適用于 Windows 10 1809 和 Windows Server 2019 的 OpenSSH 伺服器設定
- 安裝 OpenSSH
- HOME更改情况下Git for Windows报错[email protected]: Permission denied (publickey)的原因及解决方法
- 解決,Ssh Add 出現 Could Not Open A Connection To Your Authentication Agent.
- Git worktree: 同時開多個工作目錄
- git worktree 簡單介紹與使用
Summary
Thanks for your patient. I am Sean. I work as a software engineer.
This article is my note. Please feel free to give me advice if any mistakes. I am looking forward to your feedback.
Please feel free to clap if this article can help you. Thank you.
Other topics
You can also subscribe my page on Facebook.
Related topics
How to use the two-way binding in Knout.js and ReactJS?
Learn how to use SignalR to build a chatroom application
My reflection of
APM & Logging Services:
IT & Network:
Database:
Software testing:
Debugging:
DevOps:


