avatarTeri Radichel

Free AI web copilot to create summaries, insights and extended knowledge, download it at here

6910

Abstract

ython_coreml_stable_diffusion.coreml_model:Loading a CoreML model through coremltools triggers compilation every time. The Swift package we provide uses precompiled Core ML models (.mlmodelc) to avoid compile-on-load. INFO:python_coreml_stable_diffusion.coreml_model:Loading vae_decoder mlpackage INFO:python_coreml_stable_diffusion.coreml_model:Loading ./models/Stable_Diffusion_version_CompVis_stable-diffusion-v1-4_vae_decoder.mlpackage INFO:python_coreml_stable_diffusion.coreml_model:Done. Took 5.5 seconds. INFO:python_coreml_stable_diffusion.coreml_model:Loading safety_checker mlpackage INFO:python_coreml_stable_diffusion.coreml_model:Loading ./models/Stable_Diffusion_version_CompVis_stable-diffusion-v1-4_safety_checker.mlpackage INFO:python_coreml_stable_diffusion.coreml_model:Done. Took 2.2 seconds. INFO:main:Done. INFO:main:Initializing Core ML pipe <span class="hljs-keyword">for</span> image generation INFO:main:Stable Diffusion configured to generate 512x512 images INFO:main:Done. INFO:main:Beginning image generation. 100%|████████████████████████████████████████████████████████████████████████████████████████████████████████████████████████| 51/51 [01:50<00:00, 2.17s/it] INFO:main:Generated image has nsfw concept=False</pre></div><p id="77e7">After the program finishes, we could find the file under <code>./output</code></p><figure id="c8ab"><img src="https://cdn-images-1.readmedium.com/v2/resize:fit:800/1*4Ntawlgr5C5fwo-Ca-2shg.jpeg"><figcaption></figcaption></figure><p id="cd05">However, it takes 3–4 minutes to see result images, rather slow. To generate more variations via adjusting random “seeding” or change the “descriptive text”, all in commands. It could be inconvenient when the text is long。</p><h1 id="a3ea">Step 4. How to make it image generation easier with ML Stable Diffusion?</h1><h2 id="cda1">Let’s build a Web UI</h2><p id="0bb8"><code>gradio</code> is an interesting python library to quickly create simple stunning web UI.</p><figure id="8f88"><img src="https://cdn-images-1.readmedium.com/v2/resize:fit:800/1*s5nh1On2QyHCr8pWPOL6Wg.jpeg"><figcaption></figcaption></figure><p id="6ab7">Let’s create a <code>web.py</code> with follow content</p><div id="8584"><pre><span class="hljs-keyword">import</span> python_coreml_stable_diffusion.pipeline <span class="hljs-keyword">as</span> pipeline</pre></div><div id="c3c9"><pre><span class="hljs-keyword">import</span> gradio <span class="hljs-keyword">as</span> gr <span class="hljs-title">from</span> diffusers <span class="hljs-keyword">import</span> StableDiffusionPipeline</pre></div><div id="da50"><pre>def init(args): pipeline.logger.<span class="hljs-built_in">info</span>(<span class="hljs-string">"Initializing PyTorch pipe for reference configuration"</span>) pytorch_pipe = StableDiffusionPipeline.from_pretrained(args.model_version, <span class="hljs-attribute">use_auth_token</span>=<span class="hljs-literal">True</span>)</pre></div><div id="3c0d"><pre> user_specified_scheduler = None <span class="hljs-keyword">if</span> <span class="hljs-built_in">args</span>.scheduler <span class="hljs-built_in">is</span> <span class="hljs-keyword">not</span> None: user_specified_scheduler = pipeline.SCHEDULER_MAP[ <span class="hljs-built_in">args</span>.scheduler].from_config(pytorch_pipe.scheduler.config)</pre></div><div id="cb88"><pre> <span class="hljs-attr">coreml_pipe</span> = pipeline.get_coreml_pipe(pytorch_pipe=pytorch_pipe, <span class="hljs-attr">mlpackages_dir</span>=args.i, <span class="hljs-attr">model_version</span>=args.model_version, <span class="hljs-attr">compute_unit</span>=args.compute_unit, <span class="hljs-attr">scheduler_override</span>=user_specified_scheduler) </pre></div><div id="880f"><pre> def infer(<span class="hljs-built_in">prompt</span>, steps): pipeline.logger.info(<span class="hljs-string">"Beginning image generation."</span>) <span class="hljs-built_in">image</span> = coreml_pipe( <span class="hljs-built_in">prompt</span>=<span class="hljs-built_in">prompt</span>, <span class="hljs-built_in">height</span>=coreml_pipe.<span class="hljs-built_in">height</span>, <span class="hljs-built_in">width</span>=coreml_pipe.<span class="hljs-built_in">width</span>, num_inference_steps=steps, ) images = [] images.<span class="hljs-built_in">append</span>(<span class="hljs-built_in">image</span>[<span class="hljs-string">"images"</span>][<span class="hljs-number">0</span>]) <span class="hljs-built_in">return</span> images </pre></div><div id="d83e"><pre> <span class="hljs-attr">demo</span> = gr.Blocks()</pre></div><div id="0310"><pre> with demo: gr.Markdown( <span class="hljs-string">"<center><h1>Core ML Stable Diffusion</h1>Run Stable Diffusion on Apple Silicon with Core ML</center>"</span>) with gr.Group(): with gr.Box(): with gr.Row(): with gr.Column(): with gr.Row(): text = gr.Textbox( <span class="hljs-attribute">label</span>=<span class="hljs-string">"Prompt"</span>, <span class="hljs-attribute">lines</span>=11, <span class="hljs-attribute">placeholder</span>=<span class="hljs-string">"Enter your prompt"</span>, ) with gr.Row(): btn = gr.Button(<span class="hljs-string">"Generate image"</span>) with gr.Row(): steps = gr.Slider(<span class="hljs-attribute">label</span>=<span class="hljs-string">"Steps"</span>, <span class="hljs-attribute">minimum</span>=1, <span class="hljs-attribute">maximum</span>=50, <span class="hljs-attribute">value</span>=10, <span class="hljs-attribute">step</span>=1) with gr.Column(): gallery = gr.Gallery( <span class="hljs-attribute">label</span>=<span class="hljs-string">"Generated image"</span>, <span class="hljs-attribute">elem_id</span>=<span class="hljs-string">"gallery"</span> )</pre></div><div id="6605"><pre> text.submit<span class="hljs-params">(infer, <span class="hljs-attr">inputs</span>=[text, steps], <span class="hljs-attr">outputs</span>=gallery)</span> btn.click<span class="hljs-params">(infer, <span class="hljs-attr">inputs</span>=[text, steps], <span class="hljs-attr">outputs<

Options

/span>=gallery)</span></pre></div><div id="603f"><pre> demo.launch(<span class="hljs-attribute">debug</span>=<span class="hljs-literal">True</span>, <span class="hljs-attribute">server_name</span>=<span class="hljs-string">"0.0.0.0"</span>) </pre></div><div id="b5d7"><pre><span class="hljs-keyword">if</span> name == <span class="hljs-string">"main"</span>: parser = pipeline<span class="hljs-selector-class">.argparse</span><span class="hljs-selector-class">.ArgumentParser</span>()</pre></div><div id="3ee6"><pre> parser.add_argument( <span class="hljs-string">"-i"</span>, <span class="hljs-attribute">required</span>=<span class="hljs-literal">True</span>, help=(<span class="hljs-string">"Path to input directory with the .mlpackage files generated by "</span> <span class="hljs-string">"python_coreml_stable_diffusion.torch2coreml"</span>)) parser.add_argument( <span class="hljs-string">"--model-version"</span>, <span class="hljs-attribute">default</span>=<span class="hljs-string">"CompVis/stable-diffusion-v1-4"</span>, help= (<span class="hljs-string">"The pre-trained model checkpoint and configuration to restore. "</span> <span class="hljs-string">"For available versions: https://huggingface.co/models?search=stable-diffusion"</span> )) parser.add_argument( <span class="hljs-string">"--compute-unit"</span>, <span class="hljs-attribute">choices</span>=pipeline.get_available_compute_units(), <span class="hljs-attribute">default</span>=<span class="hljs-string">"ALL"</span>, help=(<span class="hljs-string">"The compute units to be used when executing Core ML models. "</span> f<span class="hljs-string">"Options: {pipeline.get_available_compute_units()}"</span>)) parser.add_argument( <span class="hljs-string">"--scheduler"</span>, <span class="hljs-attribute">choices</span>=tuple(pipeline.SCHEDULER_MAP.keys()), <span class="hljs-attribute">default</span>=None, help=(<span class="hljs-string">"The scheduler to use for running the reverse diffusion process. "</span> <span class="hljs-string">"If not specified, the default scheduler from the diffusers pipeline is utilized"</span>))</pre></div><div id="522f"><pre> <span class="hljs-variable">args</span> = <span class="hljs-variable">parser.parse_args</span>() <span class="hljs-function"><span class="hljs-title">init</span>(<span class="hljs-variable">args</span>)</span></pre></div><p id="46e2">Save above <code>web.py</code>into <code>python_coreml_stable_diffusion</code> directory and then run</p><div id="717c"><pre>python -m python_coreml_stable_diffusion.web -i ./models --compute-unit ALL</pre></div><p id="7e7d">Here is the logs after that command</p><div id="1f63"><pre>WARNING:coremltools:Torch version 1.13.0 has not been tested with coremltools. You may run into unexpected errors. Torch 1.12.1 is the most recent version that has been tested. INFO:python_coreml_stable_diffusion.pipeline:Initializing PyTorch pipe <span class="hljs-keyword">for</span> reference configuration Fetching 16 files: 100%|██████████████████████████████████████████████████████████████████████████████████████████████████| 16/16 [00:00<00:00, 16396.01it/s] INFO:python_coreml_stable_diffusion.pipeline:Removed PyTorch pipe to reduce peak memory consumption INFO:python_coreml_stable_diffusion.pipeline:Loading Core ML models <span class="hljs-keyword">in</span> memory from ./models INFO:python_coreml_stable_diffusion.coreml_model:Loading text_encoder mlpackage INFO:python_coreml_stable_diffusion.coreml_model:Loading ./models/Stable_Diffusion_version_CompVis_stable-diffusion-v1-4_text_encoder.mlpackage INFO:python_coreml_stable_diffusion.coreml_model:Done. Took 4.4 seconds. INFO:python_coreml_stable_diffusion.coreml_model:Loading unet mlpackage INFO:python_coreml_stable_diffusion.coreml_model:Loading ./models/Stable_Diffusion_version_CompVis_stable-diffusion-v1-4_unet.mlpackage INFO:python_coreml_stable_diffusion.coreml_model:Done. Took 73.5 seconds. INFO:python_coreml_stable_diffusion.coreml_model:Loading a CoreML model through coremltools triggers compilation every time. The Swift package we provide uses precompiled Core ML models (.mlmodelc) to avoid compile-on-load. INFO:python_coreml_stable_diffusion.coreml_model:Loading vae_decoder mlpackage INFO:python_coreml_stable_diffusion.coreml_model:Loading ./models/Stable_Diffusion_version_CompVis_stable-diffusion-v1-4_vae_decoder.mlpackage INFO:python_coreml_stable_diffusion.coreml_model:Done. Took 6.0 seconds. INFO:python_coreml_stable_diffusion.coreml_model:Loading safety_checker mlpackage INFO:python_coreml_stable_diffusion.coreml_model:Loading ./models/Stable_Diffusion_version_CompVis_stable-diffusion-v1-4_safety_checker.mlpackage INFO:python_coreml_stable_diffusion.coreml_model:Done. Took 1.9 seconds. INFO:python_coreml_stable_diffusion.pipeline:Done. INFO:python_coreml_stable_diffusion.pipeline:Initializing Core ML pipe <span class="hljs-keyword">for</span> image generation INFO:python_coreml_stable_diffusion.pipeline:Stable Diffusion configured to generate 512x512 images INFO:python_coreml_stable_diffusion.pipeline:Done. Running on <span class="hljs-built_in">local</span> URL: http://0.0.0.0:7860</pre></div><div id="a7f4"><pre><span class="hljs-keyword">To</span> create a <span class="hljs-keyword">public</span> <span class="hljs-keyword">link</span>, <span class="hljs-built_in">set</span> <span class="hljs-string">share=True</span> <span class="hljs-keyword">in</span> <span class="hljs-string">launch()</span>.</pre></div><p id="b1df">We could see that the Web service is starting on port 7860. Let’s open our favourite browser on the address.</p><figure id="db3e"><img src="https://cdn-images-1.readmedium.com/v2/resize:fit:800/1*_HwT7zViq5n86sFosWNt2Q.jpeg"><figcaption></figcaption></figure><p id="4c1a">Let’s test it with “colourful startrails”, then click “Generate image” then wait for the generation to complete and the image will appear on the right side.</p><figure id="fb07"><img src="https://cdn-images-1.readmedium.com/v2/resize:fit:800/1*wuRf6OR_HPTEpKwshZinHw.jpeg"><figcaption></figcaption></figure><p id="470f">Now, it is much easier. We only need to adjust the text in the “prompt” and a single click would generate image, saving us from command param adjusting or digging file through the directory. In addition, the model is loaded only once unlike previously each invoke will require loading model separately, saving a lot of time too.</p><p id="9f82">If you find the guide helpful, feel free to clap and follow me. Join medium via <a href="https://medium.com/@caodanju/membership">this link</a> to access all premium articles from me and all other awesome writers here on medium.</p></article></body>

Job Execution Framework Environments

ACM.437 Initializing a 2nd Sight Lab job execution environment with the minimum resources required to run jobs

~~~~~~~~~~~~~~~~~~~~~~~~~~~~~~~~~~~~~~~~~~~~~~~~~~~~~~~~~~~

⚙️ Part of my series on Automating Cybersecurity Metrics. The Code.

🔒 Related Stories: Governance | Application Security | Batch Jobs

💻 Free Content on Jobs in Cybersecurity | ✉️ Sign up for the Email List

~~~~~~~~~~~~~~~~~~~~~~~~~~~~~~~~~~~~~~~~~~~~~~~~~~~~~~~~~~~

In the last post I initialized my AWS Organization by deploying it using a container in CloudShell.

Next I want to deploy my AWS environments. I’ve written about environments before. You can find some of those posts in my list of topics on Cloud Governance:

Essentially an “environment” for the purposes of this framework is a scope in which individuals can deploy resources from a particular set of repositories in a particular set of AWS accounts. I’ll reiterate the concept here and my latest iteration after recent changes to the job execution framework and why I’m making them.

What are environments?

For the purposes of my job execution environment the key points are that all the resources deployed in the environment come from the environment repositories. The accounts in the environment don’t have access to any other repositories or resources outside their specified environment.

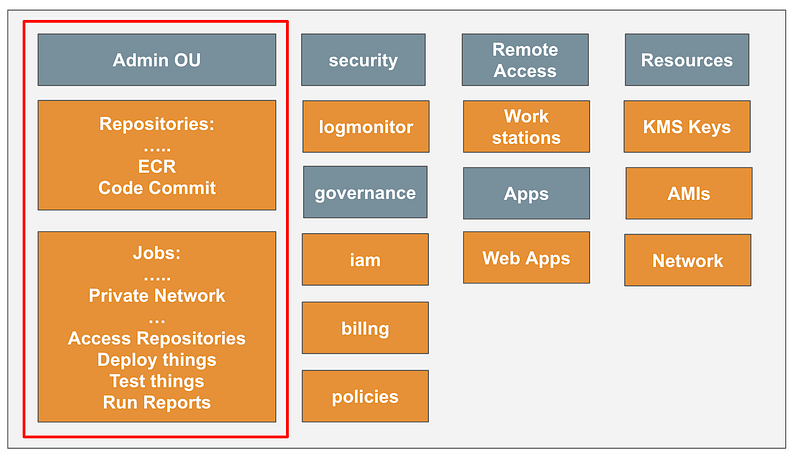
Recall that the top level job execution framework repository is here and you can read the README.md file to understand how it works.

Revisiting environment architecture — limiting the blast radius

Now the thing that’s making me think here is initially I had one governance OU that controlled everything for the entire organization, but that comes with some obvious risk. Access to that one environment provides access to the entire organization.

So here’s a thought. What if each environment had its own IAM account and related governance accounts?

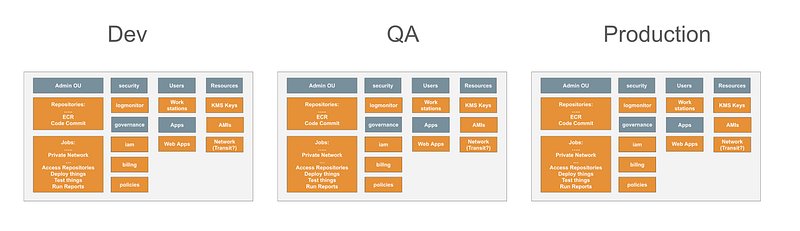
What are the implications?

You might have a developer IAM user account with credentials that you create in a non-production environment but never has access to production due to the inherent trust boundary created by containment in a separate AWS account. You can limit cross account access to accounts in the same environment (all prefixed with the same name like dev- or prod- or under a particular AWS OU).

On the flip side, you may have users like the security team that need access to all environments. They may need to log in three separate times. But if you minimize your environments it’s a lot easier to log into three IAM accounts and assume the associated roles in each environment than logging into thirty-six different accounts as shown in the above diagram.

Also, if they create jobs with my automated job framework they would basically need to enter three MFA tokens instead of one. The job could handle the role-switching as I’ve shown in prior posts to access different accounts in a single environment.

The other thing I was thinking about was that I was testing out Okta and the cool thing is that Okta gives you a production and non-production environment. So you could set up different environments to be associated with your Okta production and non-production environments if you are using that. If you have multiple non-production environments they may need to share the non-production instance but at least you can segregate prod and non-prod.

Resources that don’t allow separate instance for each environment

You might find that some things only allow you to deploy one resource across an organization. What can we do in that case?

Let’s say you want to create a delegated administrator for your organization. Can you specify more than one and have each delegated administrator create policies for different accounts? I don’t think so but I haven’t tried it. So perhaps there is only one policy account in the production environment.

So there may be certain things which you only have in the production environment, but as much as possible we can try to segregate the resources so there’s a separate management account for different policies, logging, backups, and so on in each environment.

All IAM users and secrets in one account per environment

The other thing that is bugging me is that I want to have all my users in an IAM account. If I deploy this org-admin account and put my org-admin user in it then that user is separate from all my other users in my IAM account. So really I need to create my IAM account first, add the org-admin to it, and then build out the rest.

I also have been rethinking my EC2 job role for the job framework. I really want that role to access the IAM account for all secrets and the jobs account for all parameters. That means I have to set up the IAM account before the ec2jobrole in the jobs account.

All roads lead back to the requirement to deploy the IAM account first.

Encrypting the secrets

There’s one other thing we need which pretty much precedes anything else. If we want to encrypt resources with a KMS key, we need the KMS key. So I’m going to go ahead and deploy that as well. After I initially wrote this post I realized I need to also install the KMS admin because I need to assign an administrator for the key and I want that to be the KMS admin in the KMS account.

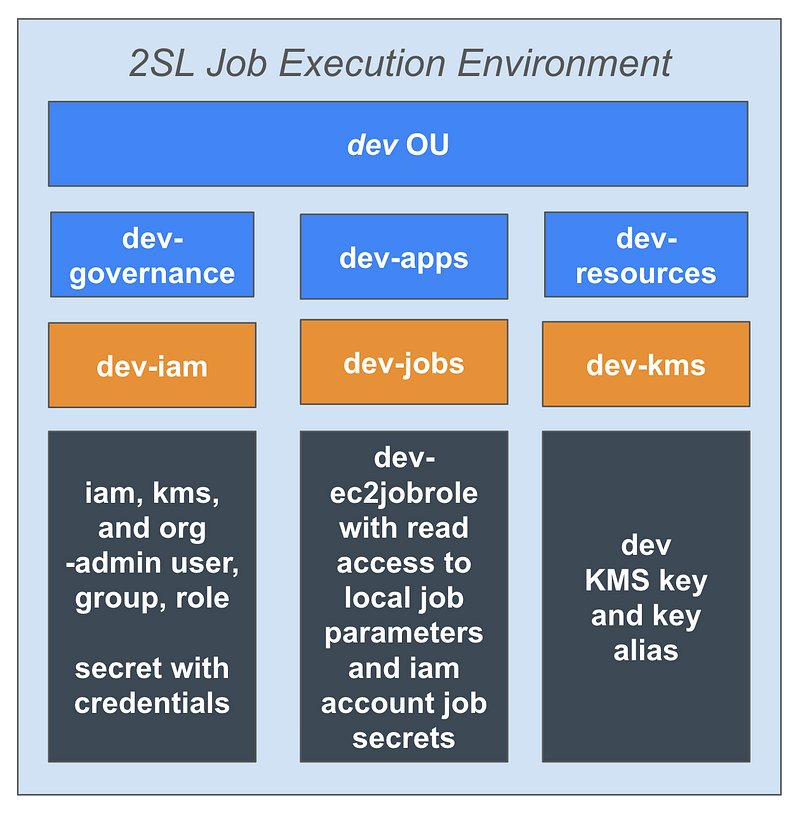
Dev, Test, and Production Initial Resources

  • dev OU
  • dev-governance OU
  • dev-iam account in dev-governance OU
  • dev-iam-admin user, group, role, and user secret to deploy IAM resources
  • dev-resources OU
  • dev-kms account in the dev-resources OU
  • dev-kms-admin user, group, role, and user secret to execute jobs.
  • dev kms key and alias with dev-kms-admin as the administrator
  • dev-iam account
  • dev-org-admin user, group, role, and user secret to execute jobs.
  • dev-apps OU
  • dev-jobs account in the dev-apps OU for executing 2SL Job Execution Framework jobs
  • dev-ec2jobrole with read only access to job secrets in the IAM account and job parameters in the job account

I can repeat the above for three environments: dev, test, and prod (or whatever environments you want to create).

Using 2SL Job Execution Framework (2sl-jobexecframework)

The reason I started to revamp my code to eliminate a bunch of repetitive code. I realized I need to revamp a few things in conjunction with that.

I’ve made the framework more flexible so it’s easier to add new jobs (containers) and job configurations (parameters).

Now you can deploy a new type of job by deploying a new repository with a new container image via a Dockerfile and execution.sh file (and whatever else the job needs). I demonstated use of those two components in the last post.

When I’m done you can configure a new resource deployment by adding an SSM parameter with a job configuration and executing the awsdeploy job.

I hit some complications due to the location of the credential secrets and parameters. Deploying the IAM account first allows me to put all my IAM resources in that account. Then the ec2jobrole can reference credential secrets for all users in one account.

Executing all the jobs in a job-execution account ensures that all the job configurations are in one place for a particular environment and that all jobs are running in a segregated, private network. If we have jobs that need network access we can also set up that network accordingly and separate from our private jobs.

As far as this initialization process, I am deploying the minimal resources needed so the org admin can execute jobs with the framework to deploy all other resources.

We can add EC2 instances at a later time to more fully automate and secure job executions but that will require additional resources. We have to start somewhere.

As a reminder I am not using Lambda because I couldn’t get it to work when I tried to assume a role using MFA. I haven’t gone back to see if that is fixed.

But besides that, it seems that we have more control over the network and compute configuration with an EC2 instance and we can segregate the role that retrieves the credentials and job configuration from the role that obtains the resource the job needs to complete the job task.

Now that I’ve thought that through a bit more, hopefully I can cruise through deploying it. Dare to dream!

Next post:

Follow for updates.

Teri Radichel | © 2nd Sight Lab 2024

About Teri Radichel:
~~~~~~~~~~~~~~~~~~~~
⭐️ Author: Cybersecurity Books
⭐️ Presentations: Presentations by Teri Radichel
⭐️ Recognition: SANS Award, AWS Security Hero, IANS Faculty
⭐️ Certifications: SANS ~ GSE 240
⭐️ Education: BA Business, Master of Software Engineering, Master of Infosec
⭐️ Company: Penetration Tests, Assessments, Phone Consulting ~ 2nd Sight Lab
Need Help With Cybersecurity, Cloud, or Application Security?
~~~~~~~~~~~~~~~~~~~~~~~~~~~~~~~~~~~~~~~~~~~~~~~~~~~~~~~~~~~~~
🔒 Request a penetration test or security assessment
🔒 Schedule a consulting call
🔒 Cybersecurity Speaker for Presentation
Follow for more stories like this:
~~~~~~~~~~~~~~~~~~~~~~~~~~~~~~~~~~~~~~~~~~~~~~~~~~~~~~~~~~~~~ 
❤️ Sign Up my Medium Email List
❤️ Twitter: @teriradichel
❤️ LinkedIn: https://www.linkedin.com/in/teriradichel
❤️ Mastodon: @teriradichel@infosec.exchange
❤️ Facebook: 2nd Sight Lab
❤️ YouTube: @2ndsightlab
Job Execution
Framework
AWS
Environment
Iam
Recommended from ReadMedium