
How does the browser work when rendering a web page? For server-side rendering

Introduction
The browser has to do many things before rendering a web page to the user. It’s important to understand how the browser works when rendering a page.
This topic is the note for learning the phases of CRP(Critical render path).
The differences between CSR, SSR, Pre-rendering, and Static SSR
You can also read: - SSR VS CSR ,一次讲个通透
Steps to render a page from an HTML file
<!DOCTYPE html>
    <html lang="en">
        <head>
            <link rel="stylesheet" href="css/style.css" type="text/css"></link>
            <script src="js/app.js"></script>
        </head>
        <body>
            ...
        </body>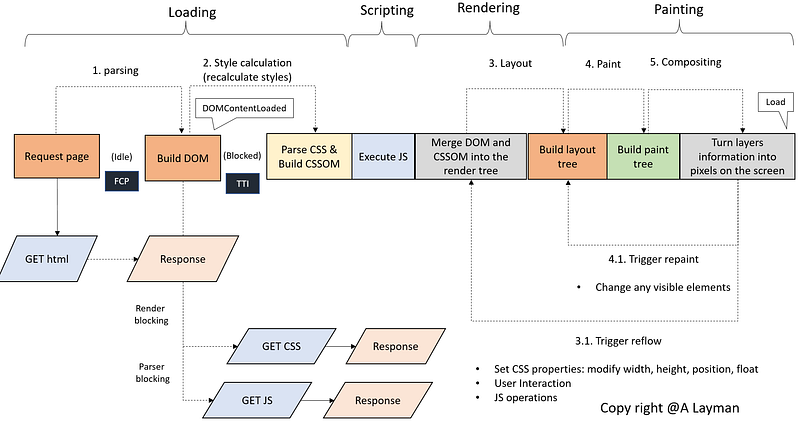
</html>- Begin constructing the DOM by parsing HTML (1. parsing)
- Request CSS and JS resources (The rendering will be blocked)
- Parse CSS and build the CSSOM tree (2. style calculation)
- Execute JS
- Merge DOM and CSSOM into the Render tree
- Build the layout tree (3. layout)
- Build the paint tree (4. paint)
- Turn layers information into pixels on the screen (5. compositing)
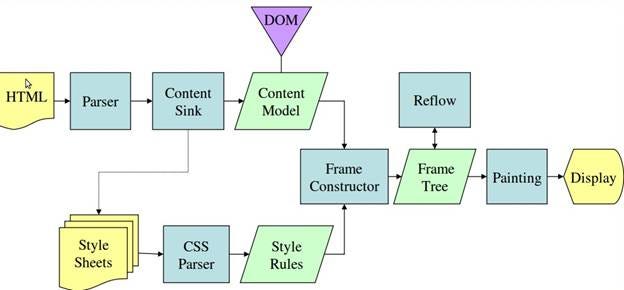
1. Parsing
- The HTML parser parses HTML and constructs the structure called DOM (Document Object Model) tree.
- The main thread will request for sub-resources if when parsing <link>, <img>, <script>.
- We should fetch CSS files (in the <head>) before fetching JS files. Sometimes JS files will manipulate the CSSOM tree.
(1) Fetch resources (CSS, JS files)
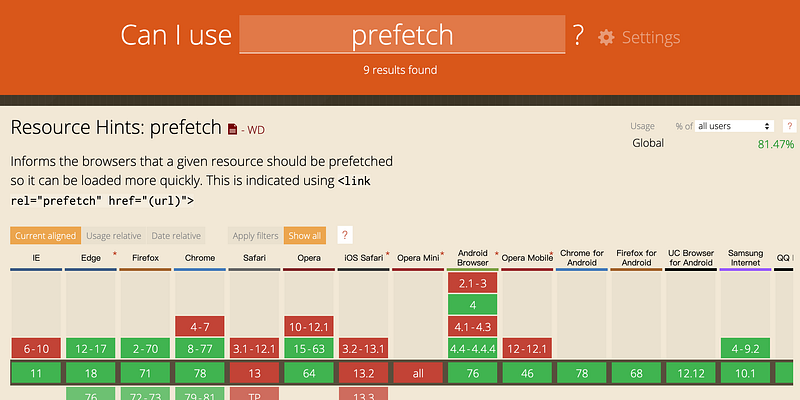
The browser will download CSS files and executes them when parsing <link>. There are some solutions to optimize performance like prefetch, preload, and dns-prefetch.
[prefetch]
- The browser will increase the priority for the resource fetching.
- The browser fetch the resources for the future navigation. The critical resource and navigation requests can be completed in parallel.
- The browser will save it in the HTTP cache if the resource is cacheable. The browser will save the resource in the memory cache if it’s not cacheable.
- The browser won’t cancel the request for the resource when the page was closed or redirected.
<link href="test.js" rel="prefetch">5. Supported browsers
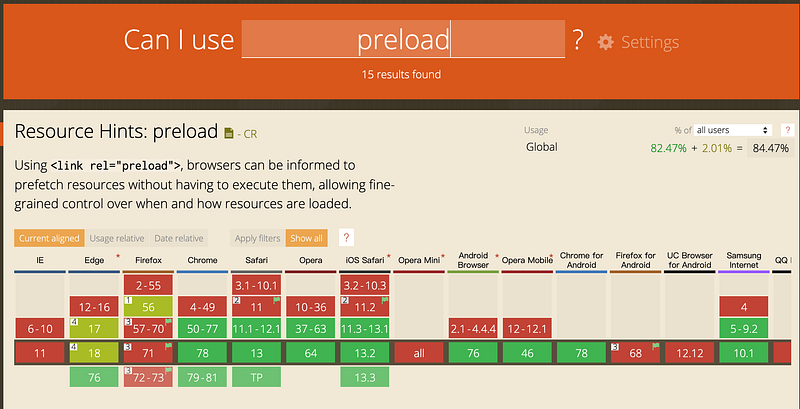
[preload]
- The browser will increase the priority for the resource fetching.
- The browser fetches the resources for the current needed. The critical resource and navigation requests will be canceled for the current page’s unload.
- The browser will download the resource when the browser is available.
- The browser saves it in the HTTP cache if the resource is cacheable. The resource will be saved in the memory cache if it’s not cacheable.
<link rel="preload" href="/test.js" as="script">5. Supported browsers
You can also read: - Preload vs Prefetch - Preload, Prefetch And Priorities in Chrome - 带你玩转prefetch, preload
[dns-prefetch]
- Add the following code in the head, the browser will enable tags in the page.
<link rel="dns-prefetch" href="//example.com">- The browser will fetch the CDN’s IP address before the browser downloads the resources or loads the page.
- It will reduce the required time of the DNS-lookup.
[browser’s cache]
There are four types in Chrome.
1.HTTP cache
2.Memory cache
3.Service worker cache
4.Push cache
You can also read: - DNS Prefetching — 預先做DNS解析,幫助網頁載入速度更快 - 循序漸進理解 HTTP Cache 機制 - HTTP Caching
(2) Fetch and execute re-sources (JS files)
There are two ways to download and execute JS files.
- Create
<script async src="test.js"></script>2. Create
var script = document.createElement('script');
script.src = "test.js";
document.getElementsByTagName('head')[0].appendChild(script);
The properties of the
- The browser will download JS files and executes them at the same time immediately when parsing
(3) Fetch JS files asynchronously
We can use async, defer, module to avoid blocking.
You can also read: - dns-prefetch,defer和async
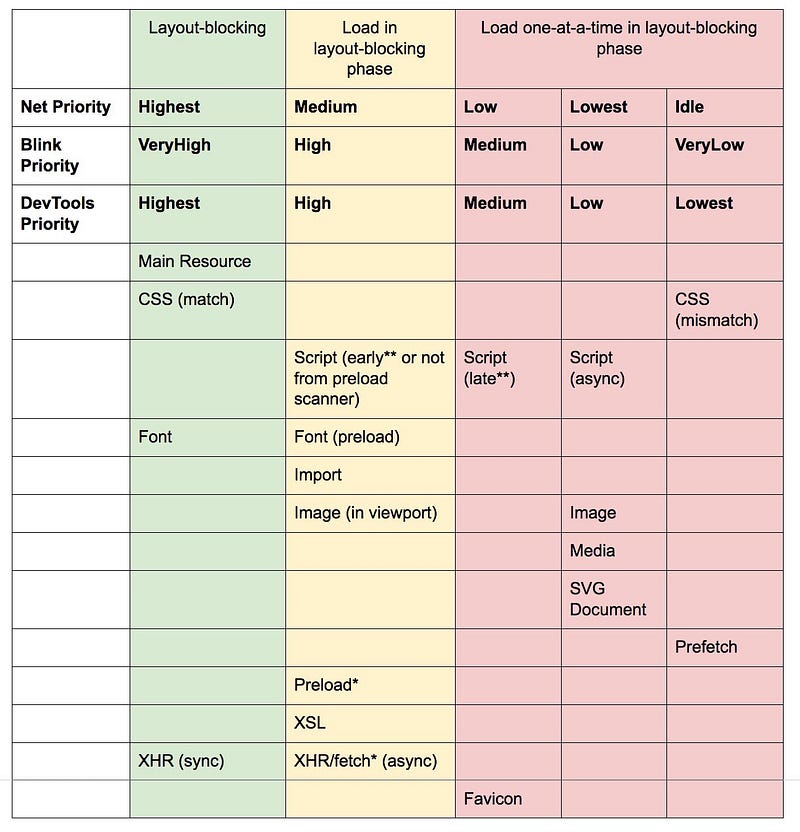
(4) Summary: The order of fetching resources
- The order should be CSS files/font, script (preload), font/import/image(in viewport)/XHR/script(block), script(async, defer)/image/SVG, prefetch
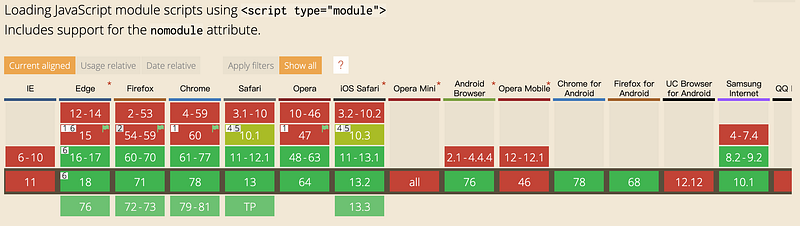
(5) Using JS modules in the browser (module)
On the web, you tell the browser to treat a <script> element as a module by setting “type” attribute as “module”. We can use import in this section.
- HTML
//For local JS files
<script type = "module" src = "test.js">
//For inline script
<script type="module">
import {saySomething} from './test.js';
saySomething("hello");
</script>//For unsupported ES6 module's browser
<script nomodule src="test_fallback.js"></script>- JavaScript (test.js)
function saySomething(name) {
    console.log(name);
}
export {saySomething};You can also refer to: - JavaScript modules, - 寫一個require.js, - How do I migrate require.js modules from ScriptBundle to Webpack on ASP .NET?. - script 標籤與模組
[The properties of the module]
- For ES6 module, the strict mode is turned on by default
2. defer works on external and inline module (The normal inline script will ignore defer)
3. async works on external and inline modules
4. Only execute once regardless how many times you import the same module
5. Always CORS (Cross-Origin Resource Sharing)
- CORS
You can also refer to: - ECMAScript modules in browsers, - 跨來源資源共用(CORS), - 和 CORS 跟 cookie 打交道 - Same Origin Policy 同源政策 ! 一切安全的基礎
2. Style calculation (and recalculate styles)
The main purpose of this stage
- The main thread parses HTML and CSS files then computes style and generates the render tree.
The process of generating CSSOM(CSS Object Model)
- characters->tokens->nodes->CSSOM
- The CSS is render-blocking
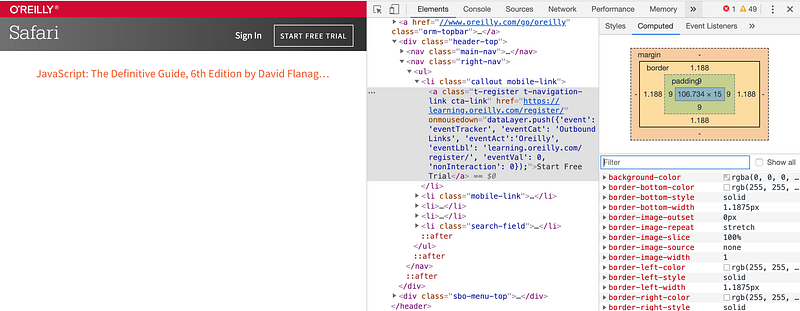
The recalculation
- The inline styles will override CSSOM’s style
- The information stores in the computed tab
The specificity of CSS (Cascading Style Sheets)
Animation > !important > inline style > ID > class / property selector >tag > *{} > inheritance
Use Media query to improve the performance
The browser will check Media query before apply CSS styles.
[Use Media query in HTML]
- The browser will fetch the resource when printing
<link rel="stylesheet" media="print" href="printer.css" />[Use Media query in CSS]
@media print {
    ...
}
[Media types]
- all, print, screen, speech
You can also read: - Create print styles using CSS3 @media queries - CSS Media Queries 詳細介紹 - 在瀏覽器第一次渲染之前
3. Layout
The main purpose of this stage
- The main thread calculates positions and dimensions to generate the layout tree.
- The layout tree has information like the size, shape, and location of all visible HTML nodes without
- In the phase, elements are only represented as vector boxes.
- Reflows is a costly process. The bowser has to check a lot of extra stuff to see what else has to be rendered as well as the element that you changed. It’s also followed by layout, paint, and compositing.
Reflows
The browser will re-run the layout for the following things that we should avoid as possible as we can.
- Changes for CSS properties
- Recalculate size (e.g., width, height), display (e.g., float), or position
- Animating the element’s size or position
2. JavaScript operations
- Appending an element to the document (e.g., operate to DOM)
- Get the CSS properties of elements (e.g., scrollTop)
3. Users interactions
- Adjust the window’s size
- Responsive web design: The layout depends on the size of the browser
<meta name="viewpoint" content="width=device-width">You can also refer to: - Eliminate content repaints with the new Layers panel in Chrome - 03. [CSS] Reflow 及 Repaint 是什麼?
4. Paint
The main purpose of this stage
- The main thread walks through the layout tree to create paint records.
- Paint record is a note of the painting process like background first, then text, then rectangle.
- In the phase, the main thread determines the order (z-index) and put vector boxes on layers.
Repaint
The browser will re-run the paint for the following things.
- Change CSS properties like background-color, cursor, visibility, etc
- Repaints are also a costly process. It will trigger paint and compositing you can check CSS triggers from there.
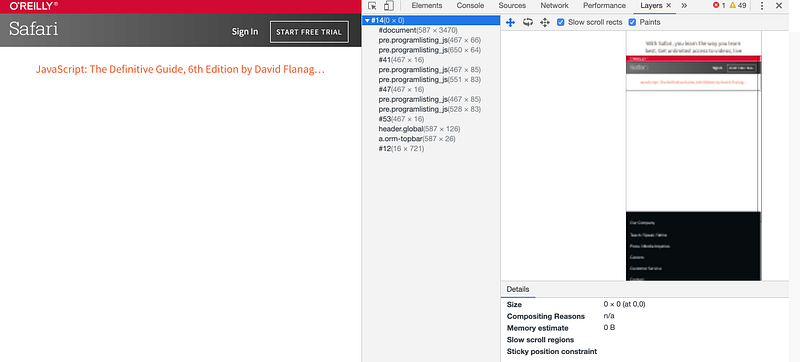
5. Compositing
- The main thread turn layers information into pixels on the screen (rasterizing). If the user scrolls the page, the main thread will composite a new frame.
- The browser stored information in the layer panel.
How to avoid repaints and Reflows?
- Avoid using attributes which will trigger Reflows or Repaints
opacity and transform are added at the composting stage when all layers are prepared. Therefore, they will not cause Reflows or Repaints.
- Use translate instead of top
//bad idea: DOM operations
document.getElementById("b1").style.top = "100px";
//better idea: translate
document.getElementById("b1").style.transform = "translateY(100px)";- Use opacity instead of visibility
//bad idea: visibility
document.getElementById("b1").style.visibility = "hidden";
//better idea: opacity
document.getElementById("b1").style.opacity = "0";2.Modify classname instead of DOM operations
var ele = document.getElementById("b1");//worse idea: DOM operations
ele.style.left = "10px";
ele.style.top = "20px";//better idea: change classname
ele.className += " className1";3.Use DocumentFragment when append new nodes to the DOM (also refer to 使用DocumentFragment來加快DOM操作速度)
//append nodes when the DOM was already completed
document.addEventListener('DOMContentLoaded', function() {
    var fragment = document.createDocumentFragment();
    for (var i = 0; i < 1000; i++) {
        var newNode = document.createElement("div");
        newNode.innerHTML = i;
        fragment.appendChild(newNode);
    }
    document.body.appendChild(fragment);
});
You can also refer to: - reflow和repaint引发的性能问题
Life cycle and document.readyState
1. loading: DOM is not yet
2. interactive: DOM is already completed but resources are not yet
- JavaScript:
[ document.body.onload]: just can bind one function
document.body.onload = function ()
{
    // DOM Ready!
}
[DOMContentLoaded]: can add more than one event
document.addEventListener("DOMContentLoaded", function(){
    // DOM Ready!
});- jQuery: $(document).ready (document == window.document)
$(document).ready(function() {
    // DOM Ready!
})
3.complete: all resource is already loaded
- JavaScript:
[ window.onload]: just can bind one function
window.onload = function ()
{
    // All resources finished loading!
}
[load event listener]: can add more than one event
window.addEventListener("load", function(event) {
    // All resources finished loading!
});- jQuery: $(window).load()
$(window).load()The better choice for DOM ready event
- $(document).ready will fallback to window.onload if the browser won’t support DOMContentLoaded event
if ( document.readyState !== "loading" ) {
    // Handle it asynchronously to allow scripts the opportunity to   delay ready
    window.setTimeout( jQuery.ready );
} else {
    // Use the handy event callback
    document.addEventListener( "DOMContentLoaded", completed );
    // A fallback to window.onload, that will always work
    window.addEventListener( "load", completed );
}
Other states
[unload]
- It will be trigger when the user leaves the page
[beforeunload]
- It will be trigger when the user refresh the page
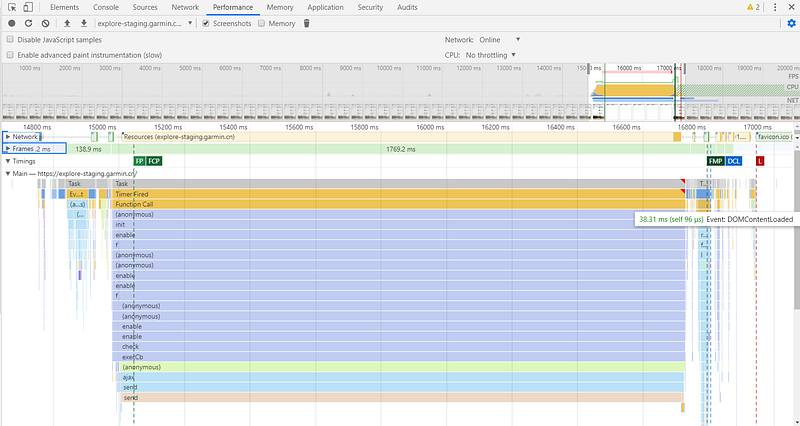
The information was recorded in the performance tab
You can also read: - 重新認識 JavaScript: Day 16 那些你知道與不知道的事件們 - 重新認識 JavaScript 番外篇 (6) — 網頁的生命週期 - 兼容所有浏览器的 DOM 载入事件 - 使用 jQuery(document).ready() 與 window.onload 注意事項
References
- JavaScript modules
- Eliminate content repaints with the new Layers panel in Chrome
- Inside look at modern web browser (part 3)
- Preload vs Prefetch
- Preload, Prefetch And Priorities in Chrome
- 在瀏覽器第一次渲染之前
- 03. [CSS] Reflow 及 Repaint 是什麼?
- reflow和repaint引发的性能问题
- [熱門面試題] 從輸入網址列到渲染畫面,過程經歷了什麼事?
- 使用DocumentFragment來加快DOM操作速度
- [Day 19] Performance — Web Vitals
Summary
Thanks for your patient. I am Sean. I work as a software engineer.
This article is my note. Please feel free to give me advice if any mistakes. I am looking forward to your feedback.
Please feel free to clap if this article can help you. Thank you.
You can also subscribe my page on Facebook.
Related topics
How to use the two-way binding in Knout.js and ReactJS?
Learn how to use SignalR to build a chatroom application
My reflection of
IT & Network:
Database:
Software testing:
Debugging:
DevOps:


