
Deploying AWS Lambda Container Images
Learn how to package AWS Lambda functions as container images with AWS CDK and Python.

AWS Lambda is one of the most commonly known services from AWS. As per the AWS website, it is a compute service that lets you run code without provisioning or managing servers. You will only run your code when needed and it scales automatically from few requests per day to thousands per second.
You can write your code for AWS Lambda using different runtimes. As of the time of writing the supported runtimes are: Node.js, Python, Java, C#, Ruby, Go, and PowerShell.
Recently, AWS announced support for container images and you can now package and deploy Lambda functions as container images. One of the advantages is that this allows developers to build and deploy larger workloads that rely on sizable dependencies.
Additionally, AWS is providing base images for the following supported Lambda runtimes (Python, Node.js, Java, .NET, Go, Ruby). AWS also states that will maintain and regularly update these images, in addition, to release an AWS base image when any new managed runtime becomes available.
In this post, we will explore how to package AWS Lambda functions using container images. We will use Python as the programming language for the AWS Lambda function and we will take advantage of the AWS CDK to deploy our AWS service.
If you find this article helpful, please do not forget to like or comment below.
Lambda Container Images
To package our code and dependencies as a container image, we can rely on the Docker command line interface (CLI) and the Amazon Elastic Container Registry (Amazon ECR).
When creating AWS Lambda container images you must create the Lambda function from the same account as the container registry in Amazon ECR.
You can use base images provided by AWS or you can bring alternative base images from other container registries. For the latter, AWS provides an open-source runtime client that you add to your alternative base image to make it compatible with the Lambda service.
Additionally, AWS provides a pretty useful tool as a runtime interface emulator for you to test your functions locally using Docker CLI.
Restrictions
As per AWS documentation, there are some restrictions to comply with before using container images with the AWS Lambda service:
Image Type: AWS Lambda supports any image that conforms to any of the following image manifest formats.
- Docker image manifest V2, schema 2 (Docker version 1.10 and newer)
- Open Container Initiative (OCI) Specifications (v1.0.0 and up)
Image Settings: AWS Lambda supports the following container image settings in the Dockerfile:
- ENTRYPOINT — Specifies the absolute path to the entry point of the application.
- CMD — Specifies parameters that you want to pass in with ENTRYPOINT.
- WORKDIR — Specifies the absolute path to the working directory.
- ENV — Specifies an environment variable for the Lambda function.
Lambda will ignore the values of any unsupported container image settings in the Dockerfile.
Container Image: The container image must implement the Lambda Runtime API. It must be able to run on a read-only file system. Your function code can access a writable /tmp directory with 512 MB of storage.
The default Lambda user must be able to read all the files required to run your function code and Lambda only supports Linux-based container images.
Now that we are aware of the requirements and restrictions, let’s create an AWS Lambda container image.
Setting up AWS CDK
As with any AWS implementation, there are several ways to create and deploy your resources to the cloud. In this case, we will be using AWS CDK.
AWS CDK is a software development framework to define your cloud application resources using familiar programming languages. It provides high-level components called constructs that preconfigure cloud resources with proven defaults, enabling the provision of resources in a safe, repeatable manner through AWS CloudFormation.
Prerequisites
To set up AWS CDK properly, we will need:
- An AWS account and credentials.
- Node.js.
- Python 3.6 or later.
- Python package installer, pip, and virtual environment manager, virtualenv.
Install the AWS CDK using the following Node Package Manager command.
npm install -g aws-cdkTo verify the correct installation and print the version number of the AWS CDK, run the following command:
cdk --versionInitialize AWS CDK
Let’s start using AWS CDK by creating the App.
mkdir aws-lambda-container-cdk
cd aws-lambda-container-cdkImportant: You need an empty directory in order to initialize cdk and make sure you have provided your AWS credentials via the AWS CLI.
We can initialize the app using the cdk init command, specifying the desired template (“app”) and programming language.
cdk init app --language pythonThe cdk init command generates a number of files and folders inside the aws-lambda-container-cdk directory to help you organize the source code for your AWS CDK app.
After initializing the project, activate the project’s virtual environment. This allows the project’s dependencies to be installed locally in the project folder, instead of globally.
source .venv/bin/activateThe next step is to install the app’s standard dependencies:
python -m pip install -r requirements.txtWe can proceed to install the AWS Construct Library module for AWS Lambda by executing:
python -m pip install aws-cdk.aws-lambdaWe have installed and prepared the fundamental building blocks for our CDK application. Now let’s create the container image.
Creating the Docker Container Image
To create our container image, we need a Dockerfile. Let’s create a directory that contains the Dockerfile and all container related files.
Create a new directory called assets under aws-lambda-container-cdk directory.
mkdir assets
In this example, we will be using a base image for Python provide by AWS. Create a Dockerfile under the newly created directory and provide the following content:
FROM public.ecr.aws/lambda/python:3.8

COPY app.py   ./

CMD ["app.handler"]
I have also created a python file called app.py under the assets directory with the following content:
import sys

def handler(event, context):
    return 'Hello from AWS Lambda using Python' + sys.version + '!'
Adding the Lambda resource
To create our AWS Lambda function using AWS CDK, we need to follow a few simple steps:
- Add the lambda resource to the CDK stack. Find the python file by the name aws_lambda_container_stack.py created under the directory aws_lambda_container. Change the file as below:
This code will create the AWS Lambda function and deploy all the code created in the assets folder to the AWS Lambda as a container image. For more information about AWS CDK, please one of my previous posts.
You can get the complete code from this public repository. Select the main branch.
Testing Lambda container images
We are now ready to test our container image locally. For testing purposes, AWS provides The AWS Lambda Runtime Interface Emulator (RIE). It is a proxy for the Lambda Runtime API that enables you to locally test your Lambda function packaged as a container image. You can get additional information about the AWS Lambda RIE here.
The RIE allows us to test whether our function code is compatible with the Lambda environment and to test that the Lambda function runs successfully.
Before testing, you will need to provide AWS security credentials. You can configure the credentials by setting up the AWS CLI with:
AWS_ACCESS_KEY_IDAWS_SECRET_ACCESS_KEYAWS_REGION
These credentials can also be provided during runtime but this approach is less secure.
To test your Lambda function with the emulator:
- Build your image locally using the
docker buildcommand.
docker build -t myfunctionname:latest .
- Run your container image locally using the
docker runcommand.
docker run -p 9000:8080 myfunctionname:latestThe command above runs the image as a container and starts up an endpoint locally at localhost:9000/2015-03-31/functions/function/invocations.
- From a new terminal window, post an event to the endpoint using a
curlcommand:
curl -XPOST "http://localhost:9000/2015-03-31/functions/function/invocations" -d "{}"This is the output from my terminal after the last command:

As you can see, the container is returning the correct output from the app.py script:
return 'Hello from AWS Lambda using Python' + sys.version + '!'Now we can proceed to deploy our resources using AWS CDK.
Deploy the AWS Lambda function
We are ready to deploy our Lambda resource. To deploy the stack using AWS CDK, go to the console and type cdk deploy from the main folder.
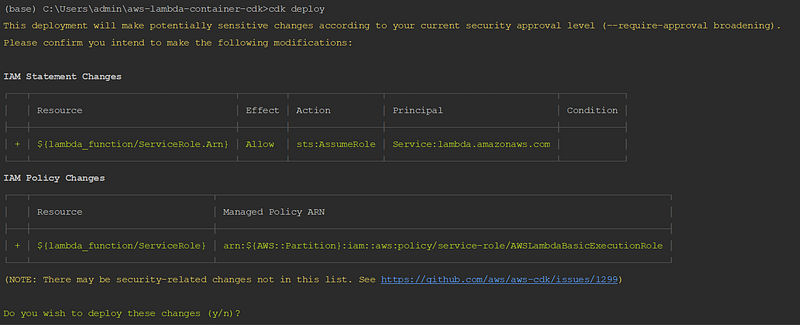
AWS CDK will provide an overview of the resources that will be deployed. In this case, you will see the roles and policies that will be added along with the Lambda resource to be created.
If you proceed with the changes provided, the lambda will be deployed and the IAM roles and policies will be created and added to the resource.
There will be several steps to deploy the resources:
- The container image will be built and push to AWS ECR.
- The IAM roles will be created to provide the right policies to the AWS Lambda.
- The AWS Lambda function will be deployed.
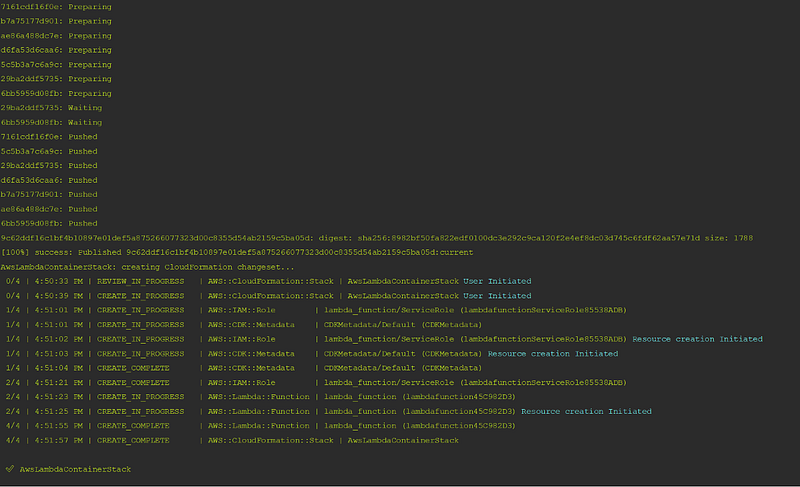
You can now go to the AWS console and test your newly created AWS Lambda container image.
As you have witnessed, this new feature of AWS Lambda provides great potential. Looking forward to hearing your ideas on how it was able to help you in tackle different challenges on your individual projects.
Happy coding! Do not forget to follow me or subscribe via email here. You can also support my writing by joining Medium using the following link.
For more AWS content
For a vibrant cloud community with more content, you can visit:


