
Building Serverless Services with AWS CDK
Create serverless services in a reliable and reproducible manner using AWS CDK and Python.
Serverless computing alleviates operational overhead for developers by allowing cloud providers to handle infrastructure management tasks such as capacity provisioning. Developers can focus on their requirements and business goals, while only paying for the compute resources they use.
AWS Lambda and AWS Fargate are prime examples of serverless services with features like automatic scaling, built-in high availability, and a pay-for-value billing model. These services increase agility, reduce cost, and time to market for the solutions we create.
An efficient way to build and deploy serverless services is through Infrastructure as Code (IaC). IaC can be defined as the process of provisioning and managing your cloud resources programmatically. AWS CloudFormation is a perfect example of tools that enable users to provision resources through IaC.
In this article, we are going to explore how to build and deploy serverless services on AWS using infrastructure as code. We will deploy services such as: AWS API Gateway, AWS Lambda, and AWS Fargate. To deliver infrastructure as code through CloudFormation, we will be using the AWS Cloud Development Kit (AWS CDK) as our framework.
AWS CDK
In simple terms, AWS CDK is a software development framework to define your cloud application resources using familiar programming languages. It provides high-level components called constructs that preconfigure cloud resources with proven defaults. Enabling the provision of resources in a safe, reproducible way through AWS CloudFormation.
A concept such as reproducibility is important. Reproducibility can be described as “the extent to which consistent results are obtained when an experiment is repeated”.
AWS CDK enables reproducibility of infrastructure and services, providing developers with the ability to easily encapsulate and share best practices in infrastructure definition along with their solutions.
AWS Services
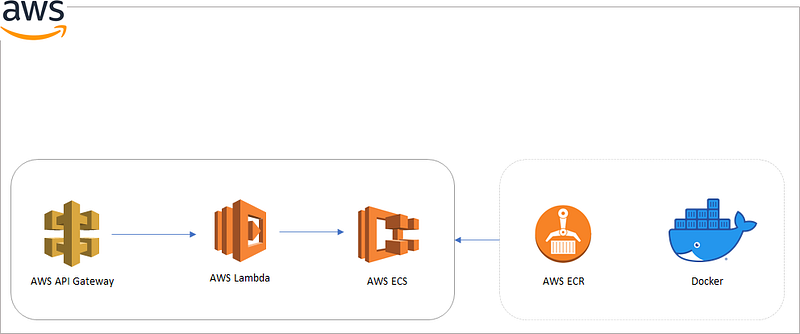
A description of each AWS cloud resource used during this article can be found below:
AWS API Gateway: a fully managed service that makes it easy for developers to create, publish, maintain, monitor, and secure APIs at any scale.
AWS Lambda: a serverless compute service that lets you run code without provisioning or managing servers, creating workload-aware cluster scaling logic, maintaining event integrations, or managing runtimes.
AWS Elastic Container Service (ECS): a fully managed container orchestration service.
AWS Elastic Container Registry (ECR): a fully managed container registry that makes it easy to store, manage, share, and deploy your container images and artifacts anywhere.
Amazon CloudWatch: a monitoring service that collects operational data in the form of logs, metrics, and events, providing you with a unified view of AWS resources.
Prerequisites
Important: This article will not go through the details of configuring AWS accounts or installing the necessary software applications to enable running AWS CDK. Please refer to AWS CDK Prerequisites for all necessary steps before using AWS CDK.
To work with the AWS CDK, you must have an AWS account and credentials. Additionally, you need to install Node.js and the AWS CDK Toolkit.
Python AWS CDK applications require Python 3.6 or later. If you don’t already have it installed, download a compatible version.
The Python package installer, pip, and virtual environment manager, virtualenv, are also required.
Constructs

A construct represents a “cloud component” and encapsulates everything AWS CloudFormation needs to create the component.
AWS CDK creates resources using Constructs. As stated on the AWS website, they are the basic building blocks of AWS CDK apps. A construct represents a “cloud component” and encapsulates everything AWS CloudFormation needs to create the component.
A construct can represent a single resource, such as AWS Lambda function, or it can represent a higher-level component consisting of multiple AWS resources.
Apps and Stacks
A CDK application is commonly called an app, which is represented by the AWS CDK class App. For our CDK application, we will use an example of a data product being delivered using AWS Services. Let’s start by creating our folder structure. Create a directory called “dataproduct”.
mkdir dataproduct
We will use this folder as our main directory:
cd dataproductImportant: Please keep in mind that you need an empty directory in order to initialize AWS CDK.
Now initialize the project using the “cdk init” command, specifying the desired template (“app”) and programming language.
cdk init app --language pythonThe previous command generates several files and folders inside the dataproduct directory to help you organize the source code for your AWS CDK application.
After initializing the project, activate the project’s virtual environment. This allows the project’s dependencies to be installed locally in the project folder, instead of globally.
source .venv/bin/activateInstall the app’s standard dependencies:
python -m pip install -r requirements.txtWe can verify there are no issues by listing the stacks in our app with the command below:
cdk lsYou should be able to see on the screen the current stack called dataproduct.
A stack defines a unit of deployment in AWS CDK. As you will see in this article, you can incorporate many resources within a stack and they will be provisioned as a single unit.
Manage AWS Construct Library modules
With CDK, we can use the Python package installer (pip) to install and update AWS Construct Library modules. AWS Construct Library modules are named aws-cdk.SERVICE-NAME.
We will be working with API gateway, Lambda, ECR, and ECS. Let’s proceed to install these libraries using pip:
python -m pip install aws-cdk.aws-lambda aws-cdk.aws-iam aws-cdk.aws-ecr aws-cdk.aws-ecs aws-cdk.aws-apigateway Exploring the App
Before creating our stack, we should take a look at some components currently present in our application, such as the App Construct.
The App Construct is used to define a stack within the scope of an application. It's the only construct that can be used as a root for the construct tree.
This construct has been initially created for us when we first executed cdk init and it can be found in the app.py file of the project.
from aws_cdk import core

from dataproduct.dataproduct_stack import DataproductStack


app = core.App()

DataproductStack(app, "dataproduct")

app.synth()
To successfully create some of the components needed in our stack, it is necessary to include an environment. As stated by AWS, an environment is the target AWS account and region into which the stack is intended to be deployed.
Each stack is explicitly or implicitly associated with an AWS account and region.
env = core.Environment(account="yourawsaccount", region="yourawsregion")Once created, the environment can be provided to the stack.
DataproductStack(app, "dataproduct", env=env)After the recent changes, the content of dataproduct/app.py file should like the code below:
Important: Provide your own AWS account and region.
from aws_cdk import core

from dataproduct.dataproduct_stack import DataproductStack


app = core.App()
env = core.Environment(account="yourawsaccount", region="yourawsregion")
DataproductStack(app, "dataproduct", env=env)
app.synth()Creating additional directories
We will need 2 additional directories to be created under the dataproduct folder: function and product.
· The function directory will contain the Lambda code.
· The product directory will contain our Dockerfile for the data product.
Let’s create both of them under the main dataproduct directory.
mkdir function productLambda Function Code
Create a python file dataproduct-lambda.py under the function directory and include the code below.
This code will enable the lambda function to run a task using the ECS Cluster and Task Definition provided.
Product
As for the product, create a Dockerfile under the product directory and include the line below:
FROM python:3.8-slim-busterThis will build a docker container based on python 3.8.
Creating the stack
We are now ready to add constructs to our stack using the default stack already created for us. It can be found under the main directory in the path:
dataproduct/dataproduct_stack.py
At the moment, it is an empty stack. For the stack to be useful, it will need constructs to be defined within it.
There are different levels of constructs: L1, L2 (low-level constructs, and high-level constructs respectively), and patterns. You can find additional information regarding constructs in https://docs.aws.amazon.com/cdk/latest/guide/constructs.html.
In this article, we will be using L1 and L2 constructs. The code below can be found in the git repo https://github.com/ramonmarrero/demo-dataproduct-cdk.
Important: Replace the vpc and subnet values for your own.
This might look overwhelming at first, specially if it is the first stack you are creating. To clarify the process, I will proceed to explain each resource in the stack in separate sections.
VPC
Let’s start with the first construct we can see in action, the VPC construct. In this case, it is used to retrieve an existing VPC:
ec2.Vpc.from_lookup(scope, id, vpc_id)ECS Cluster
The ECS Clusterconstruct is part of the ECS module, which contains constructs for working with Amazon Elastic Container Service (Amazon ECS). In this particular case, we are creating a cluster using the VPC previously selected:
ecs.Cluster(scope, id, vpc)Tags
In the next part, we create some tags for the cluster. Tags are informational key-value elements that you can add to constructs. The Tags.of is used to provide tag information for the resources created.
Tags.of(my_construct).add("key", "value")ECS Task Definition
The next step is to create an ECS task definition. A task definition is required to run containers in Amazon ECS. The task definition will need permissions to make AWS API calls such as pulling a container image from ECR and permission for the running task to interact with AWS services.
To enable this, 2 roles should be created: an IAM task execution role and a task role.
We create both IAM roles using the Role construct:
iam.Role(scope, id, assumed_by)Important: pay close attention to the service principal specified in the code.
As stated by AWS, “in IAM policies where the principal is a service, such as Amazon EC2, the service principal name can include the following formats, with “service” replaced by the name of the service”. For instance: service.amazonaws.com .
When creating roles, each service will have its own service principal. It is case sensitive and the format can vary across AWS services. To find the right service principal for your service, AWS recommends to refer to AWS services that work with IAM and look for the services that have Yes in the Service-linked role column.
Now, it is time to create the ECS task definition using the ECS task definition construct and provide both roles previously created.
ecs.TaskDefinition(scope, id, compatibility, cpu,
memory_mib, execution_role, task_role)
CloudWatch
In order to enable CloudWatch integration with our ECS service, we need to create Log Groups using the LogGroup construct.
logs.LogGroup(scope, id, log_group_name, removal_policy, retention)ECR
Important: At the time of writing this article, the Docker Image Assets module is experimental and under active development. It is subject to non-backward compatible changes or removal in any future version.
The next step consists of creating a container repository, building a docker image, and pushing the image to the repository. We can accomplish all these tasks using the Docker Image Assets construct:
assets.DockerImageAsset(scope, id, directory, build_args, file=None, repository_name)Link Services
Once the task definition, docker image, and logging details have been created, we can link them as below:
ecs.TaskDefinition.add_container(id, image, logging)Additionally, we can grant pull access for the ECS Task Definition:
DockerImageAsset.repository.grant_pull(grantee)Lambda Role
It is time to create our Lambda resource. Once again, first, we proceed to create the role and policies.
iam.Role(scope, id, assumed_by, managed_policies)This time, we can add managed policies to the role, such as: AWSLambdaVPCAccessExecutionRole and AWSLambdaBasicExecutionRole
And add policies to the Lambda Role to be able to access the ECS Execution and Task Role previously created.
iam.Role.add_to_policy(statement)Lambda Function
With the lambda role and policies created, we can now create the Lambda function.
lambda.Function(scope, id, runtime, function_name, role, handler, code, environment )API Gateway
We will define an API Gateway REST API with AWS Lambda proxy integration as our endpoint.
apigateway.LambdaRestApi(scope, id, handler)The handler reference the lambda function that handles all requests from this API.
And finally, we can add a lambda dependency to be created after ECS Cluster.
lambda.Function.node.add_dependency(cluster)With all the necessary resources already created, it is now time to include CloudFormation stack outputs for informational purposes.
# Lambda
core.CfnOutput(
    self, "LambdaResource",
    description="Data Product Lambda Function",
    value=lambda_fargate.function_name
)

# Repository
core.CfnOutput(
    self, "ECRResourceARN",
    description="Data Product Image URI",
    value=dataProductImage.image_uri
)
Synthesize your AWS CloudFormation template
The cdk synth command executes your app, which causes the resources defined in it to be translated to an AWS CloudFormation template.
With more than one stack in your app, you will need to specify which stack(s) to synthesize. In our case, there is only one, therefore the CDK can determine which stack to use.
Let’s synthesize the app by executing the command below:
cdk synthDeploy the stack
The cdk deploy command deploys the stack(s) to your AWS account.
cdk deployOnce executing the command, CDK will show on screen all resources present in the stack and about to be deployed.
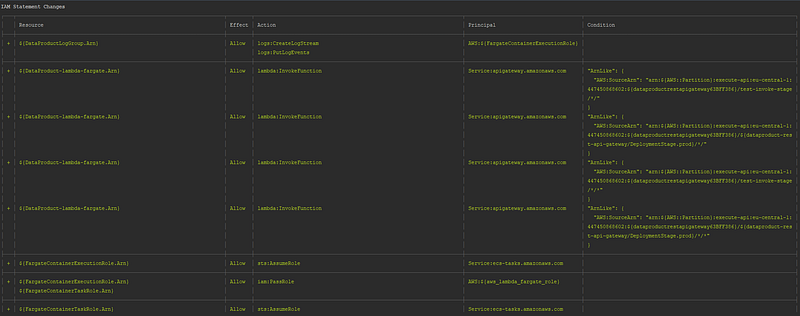
If we proceed to deploy the stack, cloudformation will build our product based on the Docker Image Asset specification. After this first step, all resources will be created, only considering dependencies if they have been specified.
By using the URL endpoint provided in the terminal output, we can trigger the process to access the Lambda function and therefore the ECS Fargate service.

Destroy the stack
The cdk destroy command destroy the stack that was previously deployed to your AWS account.
cdk destroy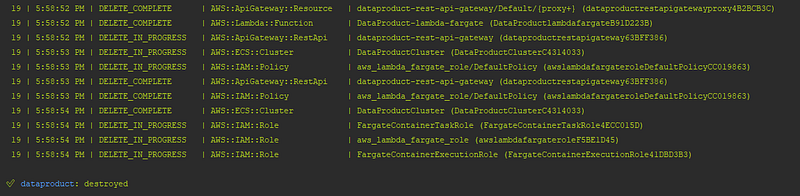
Conclusion
In this article, we have built and deployed serverless services on AWS using infrastructure as code. We have leverage AWS CDK, an open software development framework, to provide a reliable and reproducible way of creating and deploying our resources. AWS CDK is a powerful tool that enables us to deliver solutions that include both, infrastructure and product, via familiar programming languages such as python.
Happy coding! Do not forget to follow me or subscribe via email here. You can also support my writing by joining Medium using the following link. For more AWS content