
%22%3E)
Running Serverless Spark Applications with AWS Lambda.
Leverage Amazon SageMaker Processing to run serverless Spark applications from AWS Lambda.

A widely known big data processing framework such as Apache Spark needs no introduction. If you are reading this post, you most likely know what you are getting into, and just like me, you are curious to know if it is possible to run serverless Spark jobs from an AWS Lambda function.
That also means you are familiar with AWS and serverless services such as AWS Lambda.
That being said, we all know that a little bit of context “never hurt nobody”. So let’s start with Spark!
Spark as an analytics engine for large-scale data processing relies on infrastructure and other software dependencies. Lucky for us, we can use cloud services such as AWS to remove the heavy lifting of installing, upgrading, and maintaining Apache Spark and its dependencies. At the same time, avoiding configuring and maintaining underlying infrastructure or operating systems altogether by using managed services such as Amazon EMR and Amazon SageMaker.
The idea for what you are about to learn came while working with Amazon SageMaker Studio. During the development of a recent ML project, I noticed that the SageMaker Processing feature provided to run Spark applications, simply put, was a blessing.
Now I can easily run preprocessing and post-processing workloads using Spark right from SageMaker Notebooks, and without disrupting my ML workflow. Furthermore, everything was serverless, and as mentioned before, I don’t need to worry about configuring and maintaining underlying infrastructure or software either.
That last part made me even more curious, now with the SageMaker Processing feature available, can I start coupling this feature with other serverless AWS services? Let’s say AWS Step Functions or AWS Lambda.
After some research, I found out that AWS officially added support for SageMaker Processing using Step Functions already. But I was not able to find information regarding this feature and AWS Lambda, which makes sense based on AWS Lambda limitations.
But regardless of the AWS Lambda limitations, I am too curious to let that stop me, so I went for it and made it work.
In this post, I will present a way to run serverless Spark applications using AWS Lambda and SageMaker Processing.
Get ready to clone repos and look at some code!
SageMaker Processing
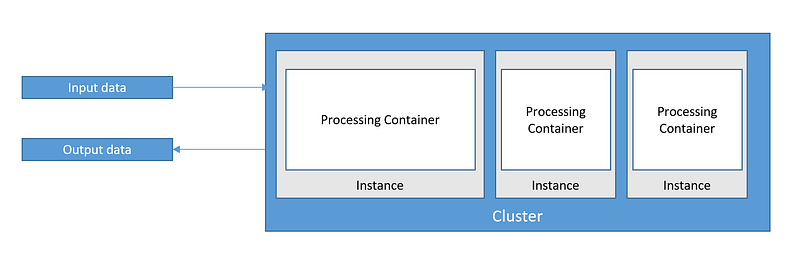
To understand how it is possible to run serverless Spark jobs from a Lambda function, we need to talk about SageMaker Processing and how it works.
SageMaker Processing allows engineers and data scientists to run processing jobs for data processing steps in your machine learning pipeline.
This feature relies on Amazon S3 for input and output of the data.
There are a some key parameters to consider while setting up SageMaker processing:
- Spark framework
- Instance type
- Amount of instances
- Python version
- Container version
Additional details on each of these parameters can be found here.
You can also provide a custom image as an additional parameter that will override your Spark framework, Python version, and container version.
Currently, there are two classes available to run Spark applications with SageMaker processing: sagemaker.spark.processing.PySparkProcessor and sagemaker.spark.processing.SparkJarProcessor .
We will focus on the PySparkProcessor. This example demonstrate how to use it:
from sagemaker.processing import PySparkProcessor

spark_processor = PySparkProcessor(
    base_job_name="my-sm-spark-job",
    framework_version="2.4",
    py_version="py37",
    container_version="1",
    role="[Your SageMaker-compatible IAM role]",
    instance_count=3,
    instance_type="ml.c5.xlarge",
    max_runtime_in_seconds=1200
)
After creating a Spark script mysparkscript.py, running the script in a processing job can be done as follows:
spark_processor.run(
    submit_app="mysparkscript.py",
    submit_py_files=["module.py"],
    submit_jars=["lib1.jar", "lib2.jar"],
    submit_files=["file1.txt", "file2.json"],
    arguments=["s3_input_bucket", bucket,
               "s3_input_key_prefix", input_prefix,
               "s3_output_bucket", bucket,
               "s3_output_key_prefix", input_preprocessed_prefix],
    spark_event_logs_s3_uri="s3://your-bucket/your-prefix/store-spark-events"
)
You can find more detailed information about these parameters here.
After executing your Spark processor, it will take a few minutes for the instances and additional dependencies to be properly configured. You can use AWS CloudWatch to monitor the job progress or any issues.
Once the setup is complete, it will run your script and deliver results to the output bucket specified.
SageMaker Processing acts as a transient cluster that will execute your script and delete all resources after the task is completed.
I hope this can provide you with an understanding of how SageMaker Processing works.
The SageMaker Processing feature will normally be use from a SageMaker Notebook or using a Step function. But, as we already know, we are not here for that.
I will now continue with the key part of this article; how to configure AWS Lambda to use SageMaker Processing.
AWS Lambda
This is where the fun begins! If you are familiar with AWS Lambda, you know that this serverless service has some limitations. Yes! I am talking about the function timeout.
As of today, you can run your Lambda functions for 900 seconds (15 minutes). This makes it unfeasible for large-scale data processing. But what if we could just trigger the process and not wait for the job completion? It is possible and this is exactly what I have done.
Let’s take a look at how to configure AWS Lambda to work with SageMaker Processing.
It is to be noted this is not part of an architectural best practice when using AWS Lambda.
For a hassle-free configuration, I have chosen Container images as the runtime for my Lambda function. AWS Lambda container images will provide me the ability to easily test my implementation locally, as we are about to see.
Additionally, I am using AWS CDK as the framework for deploying my AWS resources.
First, Let’s clone the GIT repository. Use the following command to clone the repo:
git clone https://github.com/ramonmarrero/aws-lambda-container-cdk.gitGo to the main directory aws-lambda-container-cdk:
cd aws-lambda-container-cdk
All files that are part of the lambda function can be found under the assets directory.
- abalone.csv: input file to be processed
- preprocess.py: Spark script for the Spark processor
- app.py: Lambda function code
- Dockerfile: contains all commands to assemble a Docker image.
- requirement.txt: holds the necessary libraries to be installed. The SageMaker library is key to be able to implement the SageMaker Processing feature from the Lambda function.
This is the content of the app.py :
In this example, I am setting up the PySparkProcessor with two instances and ml.m5.xlarge as instance type. These parameters are key characteristics of the Spark processor and they should be carefully selected depending of the data processing requirements.
To avoid timeout for the lambda function when running long data processing steps, I am using the multiprocessinglibrary that supports spawning processes. This way, the lambda function does not need to wait for the Spark processor to finish. When using multiprocessing, processes are spawned by creating a Process object and then calling its start() method.
Two other important pieces of this puzzle are the preprocess.py file and the bucketto be used for input and output of data processing steps.
Important: When using this code, remember to provide your bucket and appropriate role.
This is the content of the preprocess.pyfile. It is PySpark script:
For this example, our input file will be a csv file abalone.csv. It is part of the image and it will be uploaded to the bucket during runtime.
Now that we had a look at the code, we can easily test our Lambda function locally using the AWS Lambda Runtime Interface Emulator. For more details about deploying Lambda container images and testing locally, take a look at the following article.
Before testing, you will need to provide AWS security credentials when running the docker container.
AWS_ACCESS_KEY_IDAWS_SECRET_ACCESS_KEYAWS_REGION
Now, to test your Lambda function with the emulator, follow these simple steps:
- Go to the main folder
aws-lambda-container-cdk. - Build your image locally using the
docker buildcommand.
docker build -t myfunctionname:latest .
- Run your container image locally using the
docker runcommand.
docker run -p 9000:8080 -e AWS_ACCESS_KEY_ID=mykeyid -e AWS_SECRET_ACCESS_KEY=myaccesskey -e AWS_REGION=myregion myfunctionname:latestMake sure to replace the credentials with valid ones for your AWS account.
The command above runs the image as a container and starts up an endpoint locally at localhost:9000/2015-03-31/functions/function/invocations.
- From a new terminal window, post an event to the endpoint using a
curlcommand:
curl -XPOST "http://localhost:9000/2015-03-31/functions/function/invocations" -d "{}"In the first terminal (the one running the docker container), you will be able to see if the process was triggered. This terminal will also provide details if there are any issues during the execution.

If the process is successfully triggered, the best way to manage and monitor your serverless Spark job is using the AWS Console. Go to the SageMaker service and select Processing on the left side.

You will be able to see the running process and the current status. By selecting the Spark job, you can see additional details:
- App specification
- Processing inputs
- Monitoring details
Once your testing is done. To deploy the stack using AWS CDK, go to the console and type cdk deploy from the main folder aws-lambda-container-cdk.
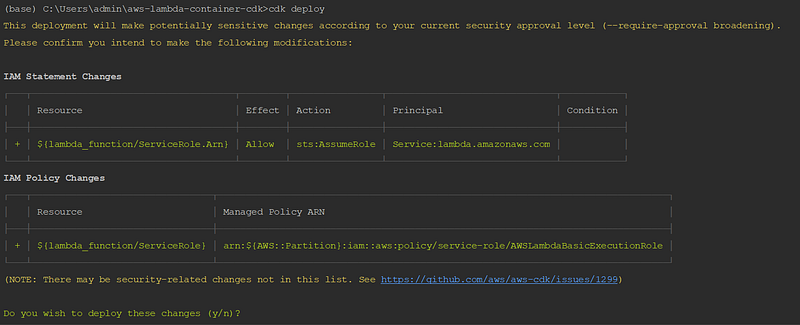
And there you have it! This is my way of running serverless Spark applications using AWS Lambda and SageMaker Processing.
I hope you enjoyed the ride as much as I did. Do not hesitate to reach out and let me know if you have any ideas on how to enhance the process further.
Happy coding! Do not forget to follow me or subscribe via email here. You can also support my writing by joining Medium using the following link.
For more AWS content
For a vibrant cloud community with more content, you can visit: