
Chapter 17 Coding our Microservice (Part 7)
Deploying using Docker
The following list is the previous chapters of this series:
- Chapter 1 — Introduction to Microservices
- Chapter 2 — Introduction to Microservices (Part 2)
- Chapter-3 Domain-driven design and microservices
- Chapter -4 Advantages of using Go for web development
- Chapter — 5 Understanding HTTP Protocols and REST APIs
- Chapter-6 HTTP Package in Golang
- Chapter 7 — Step-by-step guide on building a simple web service using Go
- Chapter 8 “ Documenting our APIs — Introduction to OpenAPI”
- Chapter 9 -Building a Microservice with Go (Defining the technologies )
- Chapter 10-Structuring our project
- Chapter 11- Coding our Microservice (Part 1)
- Chapter 12 — Coding our Microservice (Part 2)
- Chapter 13 — Coding our Microservice (Part 3)
- Chapter 14 — Coding our Microservice (Part 4)
- Chapter 15 — Coding our Microservices (Part 5)
- Chapter 16 — Coding our Microservices (Part 6)
Important note: The example here is just a implementation to run our code, in a real project the Database won’t depend on the dockerfiles and the docker-compose use to be replaced for another technology.
Deploying on Docker
Docker has become an indispensable tool in modern software development, allowing us to package our applications and their dependencies into portable containers.
In this step, we’ll explore the process of deploying our “Shopping Cart” microservice using Docker. By the end of this section, you’ll have a clear understanding of how to create Docker containers for your Go applications, making deployment more efficient and reliable.
Preparing the DataBase
Let’s start by preparing the database that our “Shopping Cart” microservice will use. For our test case, we need to define two tables: “shopping_cart” and “products.” We need to add a new folder in the root of the project named “DeployDB”, it is important to mention that that folder is not part of the microservice code, it is just to keep the database configuration for our use case.
Inside the new folder, we need to define the following files:
database.sql
USE shopping_cart;

CREATE TABLE shopping_cart (
    id CHAR(36) NOT NULL,
    user_id CHAR(36) NOT NULL,
    PRIMARY KEY (id)
);

CREATE TABLE product (
    id CHAR(36) NOT NULL,
    name VARCHAR(255) NOT NULL,
    quantity VARCHAR(50) NOT NULL,
    product_description VARCHAR(50) NOT NULL,
    shopping_cart_id CHAR(36) NOT NULL,
    PRIMARY KEY (id),
    FOREIGN KEY (shopping_cart_id) REFERENCES shopping_cart(id)
);
Explaining the code:
The SQL code is used to create two tables in a database called “shopping_cart”. It is explained in more detail below:
USE shopping_cart This line sets the current database on which the following operations will be performed. In this case, the database is called “shopping_cart”. This means that all subsequent SQL operations will be applied to this specific database.
CREATE TABLE shopping_cart (…) This code block creates a table called “shopping_cart” in the database “shopping_cart”. The “shopping_cart” table has the following columns:
- “id”: It is a column of type CHAR(36) that uses PRIMARY KEY and NOT NULL.
- “user_id”: It is a column of type CHAR(36) that stores a user identifier and NOT NULL.
CREATE TABLE product (…) This code block creates another table named “product” in the same “shopping_cart” database. The “product” table has the following columns:
- “id”: It is a column of type CHAR(36) that is used as PRIMARY KEY and NOT NULL.
- “name”: It is a column of type VARCHAR(255) that stores the name of the product and cannot be null.
- “quantity”: It is a column of type VARCHAR(50) that stores the quantity of the product and cannot be null.
- “product_description”: It is a column of type VARCHAR(50) that stores a description of the product and cannot be null.
- “hopping_cart_id”: It is a CHAR(36) type column that stores a shopping cart identifier and cannot be null.
Dockerfile
FROM mysql:latest

ENV MYSQL_ROOT_PASSWORD=root
ENV MYSQL_DATABASE=shopping_cart
ENV MYSQL_USER=user123
ENV MYSQL_PASSWORD=pass123

COPY database.sql /docker-entrypoint-initdb.d/database.sql
Explaining the code: The Dockerfile configuration code defined above will be used to create our database in a docker container. We have included a file for database initialization that automatically creates the necessary tables.
Shopping Cart Microservice Docker Configurations
After configuring the necessary Dockerfile for our database, it’s time to build the Dockerfile responsible for creating the “shopping cart” image. In this scenario, we must define the Dockerfile at the root of our source code and include the following instructions:
Dockerfile
FROM golang:latest
WORKDIR /app
COPY go.mod .
COPY go.sum .
RUN go mod download

COPY . .
RUN go build -o /cmd/main ./cmd
CMD ["/cmd/main"]
Explaining the code: This Dockerfile establishes an environment tailored for both building and running a Go application within a Docker container. It guarantees proper management of dependencies, orchestrates the application’s compilation, and automatically initiates its execution upon container startup. Let’s delve into each of these essential steps:
- FROM golang:latest This line indicates that we are basing our Docker image on the latest Golang (Go) image available on the Docker Hub.
- WORKDIR /app Sets the current working directory within the container to “/app”. This means that all subsequent commands and operations will be executed in the “/app” directory inside the container.
- COPY go.mod Copy the “go.mod” file.
- COPY go.sum Similar to the previous line, copy the “go.sum” file.
- RUN go mod download Run the “go mod download” command inside the container. This will download all project dependencies that are specified in the “go.mod” file and store them in the Go cache directory inside the container. This is necessary before building the application to ensure that all dependencies are available.
- COPY src dest Copies all the contents of the local directory to the working directory “/app” in the container.
- RUN go build -o /cmd/main ./cmd Run the “go build” command to build the Go application. The build output is saved to an executable file named “main” in the “/cmd” directory inside the container. This is done to make sure the app is ready to run.
- CMD[“/cmd/main”] Sets the default command to run when a container based on this image is started. In this case, it will run the “main” executable file found in the “/cmd” directory. This will start the Go application when the container starts.
Finally, to run our containers related to the “Shopping Cart” microservices we are going to use docker-compose, this will allow us to build the containers easily.
Before starting with the necessary configuration code, let’s see what “docker-compose” is. When incorporating ‘docker-compose’ into any project, it becomes imperative to craft a YAML file that serves as the blueprint for defining and configuring multiple Docker container services as a unified application. This approach streamlines the establishment of coherent and easily reproducible development environments, ultimately enhancing both the productivity and the quality of software development. These files are a fundamental part of the Docker Compose tool, which makes it easier to define and manage applications composed of multiple Docker containers.
Let’s see the configurations needed for our use case:
docker-compose.yml
version: '3.8'
services:
  mysql:
    image: mysql:latest
    restart: always
    environment:
      MYSQL_ROOT_PASSWORD: root
      MYSQL_DATABASE: shopping_cart
      MYSQL_USER: user123
      MYSQL_PASSWORD: pass123
    ports:
      - 3306:3306
    networks:
      - app-network
    healthcheck:
      test: ["CMD", "mysqladmin", "ping", "-h", "localhost"]
      timeout: 20s
      retries: 10
    volumes:
      - ./DeployDB/database.sql:/docker-entrypoint-initdb.d/database.sql
  app:
    build:
      context: .
      dockerfile: Dockerfile
    depends_on:
      - mysql
    ports:
      - 8080:8080
    networks:
      - app-network
    environment:
      - DB_HOST=mysql
      - DB_PORT=3306
      - DB_USER=user123
      - DB_PASSWORD=pass123
      - DB_DATABASE=shopping_cart
      - DB_TYPE=mysql
    command: ["sh", "-c", "sleep 20 && /cmd/main"]
networks:
  app-network:
Explaining the code: This “docker-compose” file defines two main services, “mysql” and “app”. Its key parts are explained below:
version: ‘3.8’. Indicates the version of the Docker Compose configuration format being used.
services. Define the container services that make up the application. Inside of that property are defined:
MySQL. Configures a MySQL database service. This service defines the following properties:
- “image: mysql:latest”: Uses the latest official MySQL image available on Docker Hub.
- “environment”: Set environment variables for MySQL, including root password, database user, and password.
- “ports”: Maps port 3306 of the MySQL container to port 3306 of the local host.
- “networks”: Connects the MySQL container to the network called “app-network”.
- “healthcheck”: Sets up a health check to make sure MySQL is working properly.
- “volumes”: Mounts a local SQL file in the MySQL container to initialize the database.
app: Configures a service for the main application. This defines the following properties:
- “build”: Specifies that the application container image should be built from a Dockerfile in the current directory.
- “depends_on”: Make sure the application service waits for the MySQL service to become available before starting.
- “ports”: Maps port 8080 of the application container to port 8080 of the local host.
- “networks”: Connects the application container to the same “app-network” network.
- “environment”: Set environment variables for the application, including connection information to the MySQL database.
- “command”: Execute a command to start the application, including an initial pause.
- “networks”: Define a network called “app-network” that connects both services, allowing them to communicate with each other.
To run the containers we can run the following command
docker-compose up
When the containers are up we can start interacting with our microservice up and running.
Consuming the REST APIs
In this step, we will demonstrate how to interact with the API using the OpenAPI documentation. As you may recall, OpenAPI allows us to configure it and utilize it for making requests and testing the different endpoints of the API.
The “Try it out” feature of OpenAPI provides an extremely useful capability to directly test API endpoints from within the API documentation. Here are some key advantages of using:
Real-time Interaction
It allows developers to send real HTTP requests to API endpoints and see real-time responses. This makes it easier to understand how the API functions and how to construct requests.
Tool-Free Testing
No additional tools or clients are required to test the API. Developers can experiment and debug easily without setting up third-party tools.
Learning and Documentation
It makes it easy for developers to learn about the API and how to use it directly from the documentation. This is especially valuable for new team members or those working with the API for the first time.
Debugging and Validation
Developers can test specific scenarios, debug issues, and verify that the API responds correctly to expected requests.
Living Documentation
This functionality keeps API documentation up to-date and dynamic, as any changes in the API are immediately reflected in the testing tool.
In summary, OpenAPI’s “Try it out” feature is an essential tool for enhancing understanding, development, and the quality of an API, while simplifying the testing and validation process.
Next will show some of our endpoints consumed from OpenAPI.
Manage “Shopping cart” endpoints
Create new shopping cart for user cURL request:
curl -X 'POST' \
  'http://localhost:8080/api/v1/shopping-cart' \
  -H 'accept: application/json' \
  -H 'Content-Type: application/json' \
  -d '{
  "user_id": "560a8451-a29c-41d4-a716-544676554499"
}'
The Figure 4.2 shows an example of the request to create a new shopping cart.
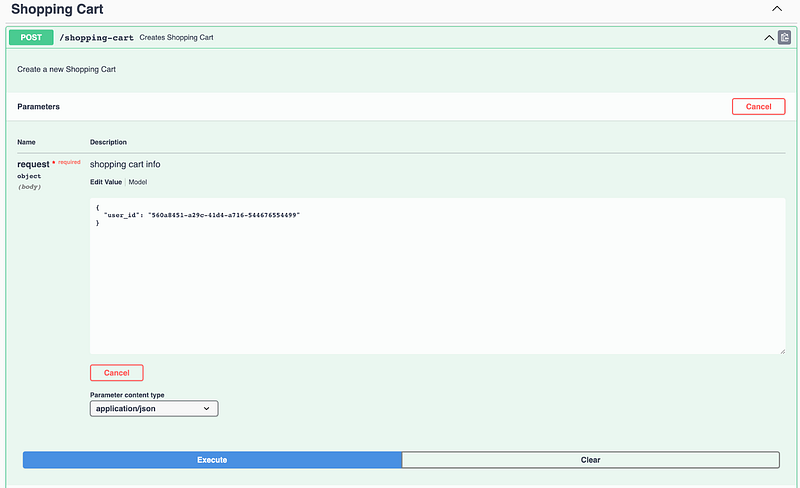
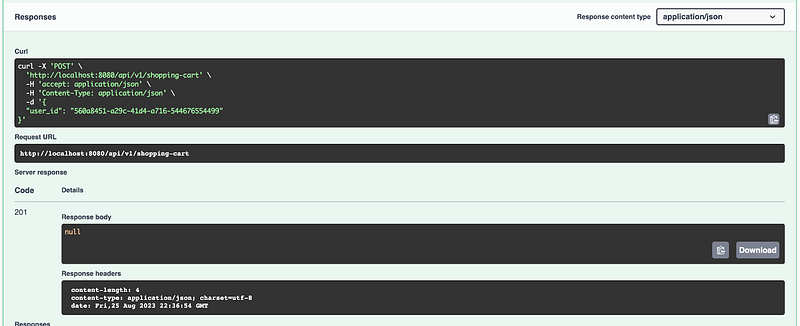
Figure 4.3 shows an example of the successful response of creating a shopping cart
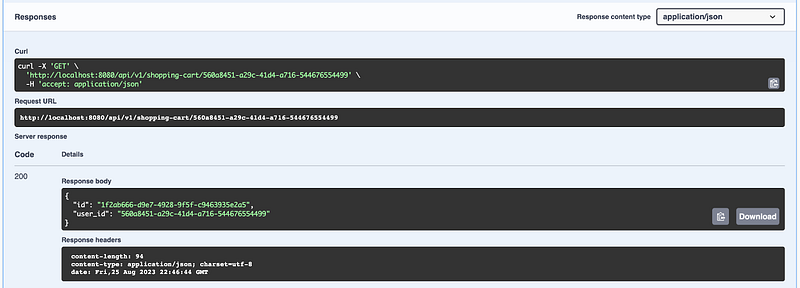
Get shopping cart for user cURL request:
curl -X 'GET' \
'http://localhost:8080/api/v1/shopping-cart/560a8451-a29c-41d4-a716-544676554499' \
-H 'accept: application/json'
Figure 4.4 shows an example of the request to get the user’s shopping cart.
Figure 4.4 shows an example of the request to get the user’s shopping cart.
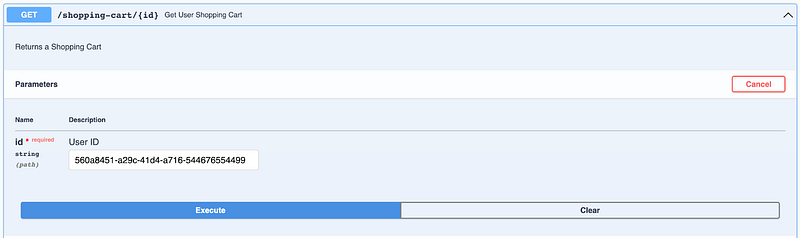
Figure 4.5 shows an example of the successful response of get shopping-cart.
Manage “Products” endpoints
Add products to shopping cart cURL request:
curl -X 'POST' \
  'http://localhost:8080/api/v1/product' \
  -H 'accept: application/json' \
  -H 'Content-Type: application/json' \
  -d '{
  "description": "smart tv full HD",
  "name": "TV",
  "quantity": 10,
  "shoppingCartId": "1f2ab666-d9e7-4928-9f5f-c9463935e2a5"
}'
Figure 4.6 shows an example of the request to add products in a user shopping cart.
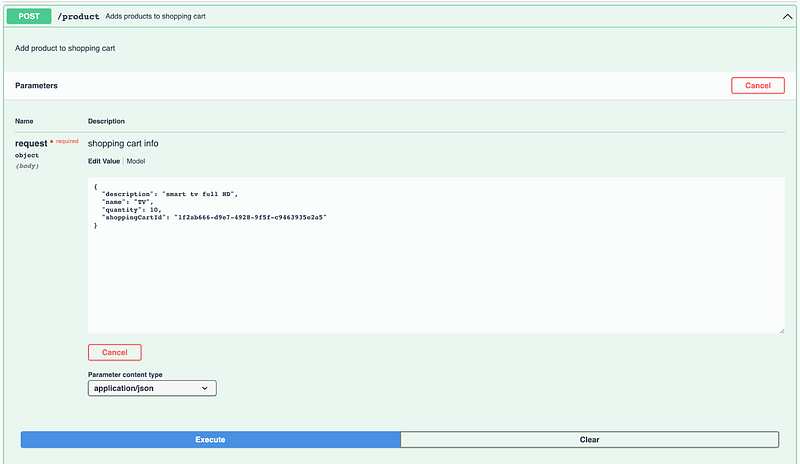
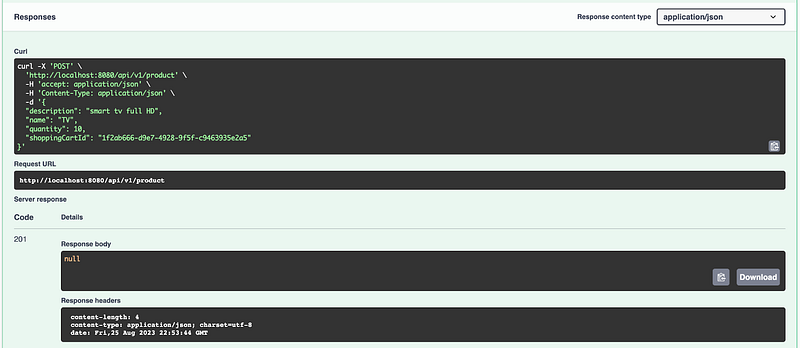
Figure 4.7 shows an example of the response to adding products to a user’s shopping cart.
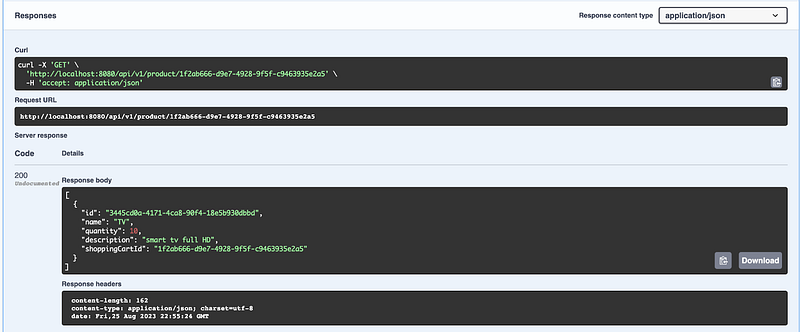
List shopping cart products cURL request:
curl -X 'GET' \
  'http://localhost:8080/api/v1/product/1f2ab666-d9e7-4928-9f5f-c9463935e2a5' \
  -H 'accept: application/json'
Figure 4.8 shows an example of the request to list the products in a user shopping cart.
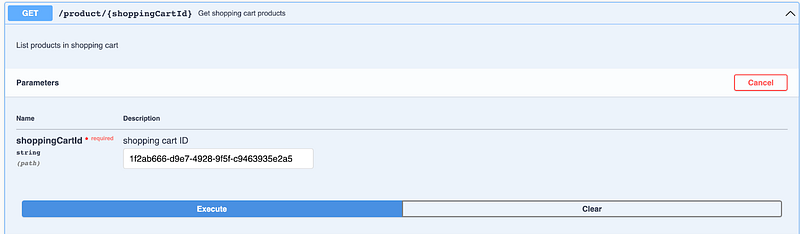
Figure 4.9 shows an example of the response to listing the products in a user’s shopping cart.
Conclusion
This chapter is entirely dedicated to the development of a microservice in Golang, using the ‘shopping cart’ domain from our e-commerce system as a practical example.
After carefully walking through the creation of this microservice, we now possess a comprehensive understanding that spans from defining our API, setting up routing, and performing unit testing, to adding a foundational architecture to our project. Armed with this knowledge, we are well-prepared to embark on building real-life microservices.
By delving into each of the topics discussed here, you’ve laid a solid foundation to venture further into the realm of microservices with Golang. As demonstrated, Domain-Driven Design (DDD) yields significant advantages in building microservices by offering well-defined contexts and responsibilities, fostering low coupling, and ensuring high cohesion.
We also explored specific frameworks that streamline the creation of microservices, simplifying the development of individual modules through their valuable contributions and standardized approaches.
In the upcoming chapter, we will delve deeper into microservices, specifically focusing on communication between each one. As part of the next chapter will be analyzed techniques like Asynchronous and Synchronous communication and communication protocols. To facilitate our exploration of communication techniques, we will introduce a second, smaller microservice. This addition will serve as a practical example to enhance our understanding of effective communication strategies and pave the way for more advanced topics in microservices.
Next readings …
Wait for Chapter 18 “Microservice Communication”.


