
7 macOS Terminal Commands That Feel Like Superpowers
Tiny commands that make a mighty difference

Pre-Note: To revert back any command with TRUE in it, use the command again by replacing TRUE with FALSE (Or vice-versa). Same goes for ON and OFF.#1. Enable Key Repeats
ZZZZZZZZZZ…..
Oh, I’m not dozing. I’m writing on my Windows PC, and my iPhone slipped from my hands and dropped on the “z” key with a thud 💥. Anyways,
<backspace. backspace. backspace…>
This wouldn’t have happened if I were on a Mac, right? As unlike Windows, macOS doesn’t allow key repetitions by holding down a key.
Instead, it lets you type variations of the letter you hold down: Like Ü for U.
But if that’s not something you’ll ever use, you may want to set the action for key repetition only :)
To do that, use defaults write NSGlobalDomain ApplePressAndHoldEnabled -boolean FALSE on Terminal. Now, restart any active applications to activate this setting for them.
Bonus features:
Go to Settings ⚙️ < Keyboard ⌨️, and you’ll see two sliders you may wanna tweak:
- Key repeat rate: Adjusts the rate at which characters repeat on hold.
- Delay until repeat: Adjusts the time of hold after which repeated characters start to appearrrrr.
#2. Quit Finder (Yeah, quit Finder)
Didn’t understand? Okay do this → open any app and press ⌘ + Q. (This will quit it).
Now try doing the same for a Finder window. <Boop sound> It doesn’t quit! Why?
macOS disallows you from doing that coz your desktop itself is a Finder window. So if it quits, your Desktop files disappear.
Okay, but this could be frustrating sometimes — as everytime you wanna quit a Finder window, you’ve got to reach for the red traffic light button using mouse/trackpad. Oh.
If you feel the same too, use defaults write com.apple.Finder QuitMenuItem -bool TRUE; killall Finder on Terminal. This will give you the superpower to quit Finder.
To try, open a Finder window and use ⌘ + Q. — Observe it quit just like any other app.
Exploit this trick:
If you quit Finder keeping other app(s) open, your Desktop items disappear.
So instead of paying $1.99 for HiddenMe app (#1 in this article) that does the same job (pretty much), you can use this nifty trick.
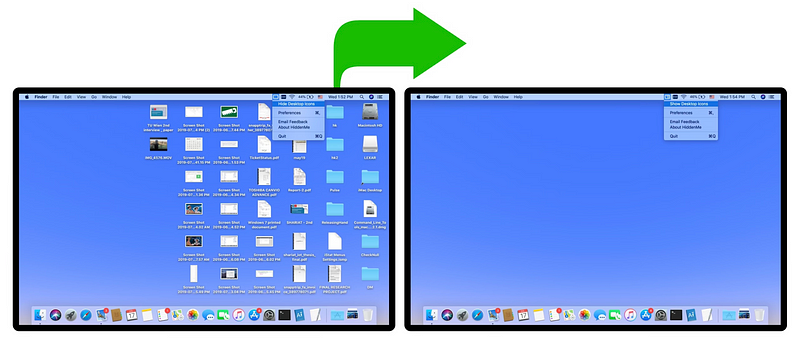
To have your items back, open Finder again on Dock.
(You’ve also understood how HiddenMe works, right?)
#3. Replace Sudo password with Touch ID
There exist some Sudo commands for Terminal — i.e., commands that need admin’s consent (their password) to be executed.
For example, the three commands in #6 of this article ⬇️ help you flush DNS cache.
7 macOS Terminal Commands That Kill Paid Apps
The most powerful ones you can use everyday
medium.com
One of it is Sudo: sudo killall -HUP mDNSResponder .
However, if you regularly use sudo commands on Terminal, it could be tiring to type your password everytime, especially if it’s long or complex.
How about authenticating via Touch ID? How easy’d it be?
To do that, follow this one-time process:
- Use
sudo nano /etc/pam.d/sudoon Terminal. - Type your password one last time.
- Sandwich this line between the first and second lines:
auth sufficient pam_tid.so.
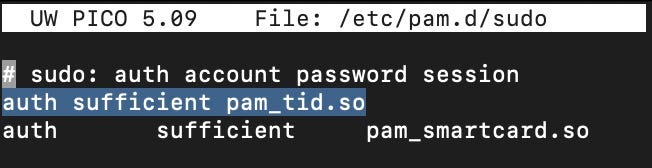
- Click ⌃ + X.
- Click Y, Enter, OK.
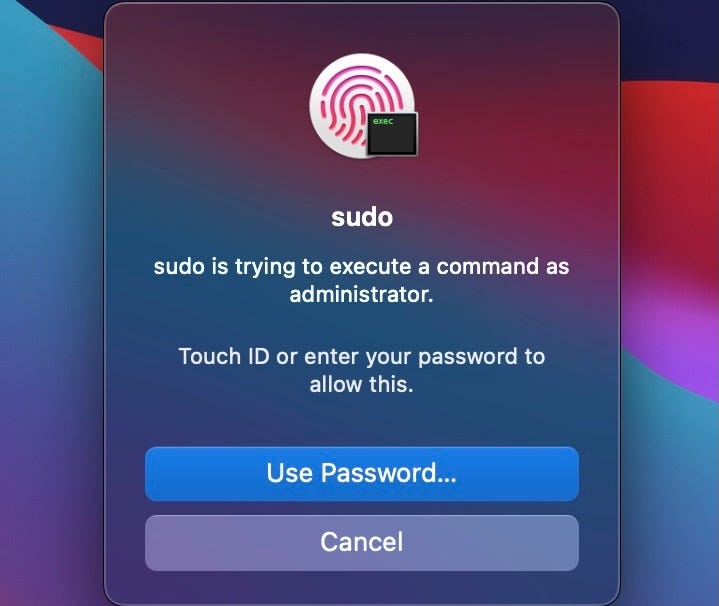
Now close Terminal and open a new session.
Use sudo killall -HUP mDNSResponder as an example to try your new trick.
Did it ask for your password? No. Touch ID!
#4. Tired of seeing App Crash Reports? 🥴
• Option 1: Make them appear as notifications
If you’re an app developer, or someone who frequently experiences app crashes, you might be tired of seeing Crash Reports that hinder your flow:
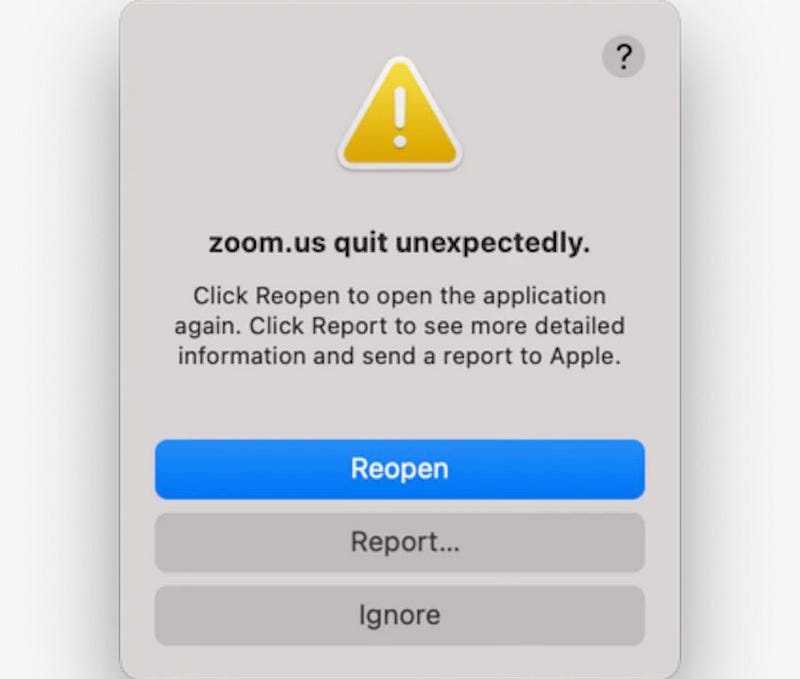
Worst part, they don’t go unless you do any action among the three, right?
It’s okay, I’ve got you covered :)
Let me tell you a trick to make Crash Reports show up as regular notifications: Simply use defaults write com.apple.CrashReporter UseUNC 1 on Terminal.
Aaaaannnnddddd…..
This is your new crash report →

Oof, such a sigh of relief!
• Option 2: Disable them completely
If you’re super-frustrated of Crash Reports, and wanna get their hell out of your life, use defaults write com.apple.CrashReporterDialogType none on Terminal.
They’re gone forever.
Changed your mind?
Use the command again by replacing none with crashreport .
#5. Rebuild Spotlight index 🔨
I use Spotlight on my Mac more often than I breathe.
It’s such a nifty tool that keeps all my files, browser history, notes, and apps real-time indexed — keeping everything just a ⌘ + space away!
However, I sometimes face issues like Spotlight not being quick, displaying incorrect results, or not showing files I knew existed.
It’s then it needs to be wiped up clean and reindexed back. To force reindex it, use sudo mdutil -i on / on Terminal.
You can verify its reindexing by typing something on Spotlight:

Note, Spotlight indexing is a resource-hogging task, so don’t perform it when you’re on something important or time-sensitive.
Bonus feature:
If your Mac’s always on its toes with heavy tasks (like 3D modelling, video-editing etc.), it’s suggested you TURN OFF Spotlight indexing, and re-index manually once a week.
This helps prevent overload, and allocates higher CPU to your own tasks:
- To turn off indexing:
sudo mdutil -a -i off - To turn on: Replace
offwithonand use the command again. - To reindex: Use the command as discussed before.
#6. Download files without a browser ⬇️
If your friend sends you the direct download link to a software, video, or a file, you don’t need to open it on Safari to download.
That’s a bit power-consuming and not CPU-friendly.
Instead, do this →
- Use
cd ~/Downloads/on Terminal to switch directory to Downloads. - Use
curl -O [PASTE LINK HERE]. (It’s the letter “O”, not zero)
This will download the file directly to your downloads folder.

You’ll also see a progress bar that shows useful metrics like:
- % of download completed,
- Avg. download speed,
- Est. total time, time spent, time left,
- (last one) Avg. download speed over the last 5 secs.
#7. Disable Power Chime 🔇
If you want to disable the sound on your Mac that plays when it’s just plugged in (whatever your reasons are),
Use defaults write com.apple.PowerChime ChimeOnNoHardware -bool TRUE; killall PowerChime on Terminal.
Note, this disables power chime only for when your Mac’s awake or in sleep. Coz you can anyways confirm it’s charging by seeing its battery icon.
But the chime will still play if you plug in your Mac when it’s shut-down and lid’s closed. However, ⬇️
And regarding charging your Mac, here’s something that’s got your back.
For more a‘macOS’zing terminal tricks, read these.
Join 285+ others to get notified whenever I publish a new story.