
Using Tags For a Simple Daily Focus in Obsidian
A platform agnostic tip for paperless productivity
I’ve been keeping track of my life with Apple’s Reminders, my digital calendar, and Obsidian on my Mac and iOS devices for some time now. It’s an impressive combination that puts the right job in front of me at the right time.
Still, even in the sweetness of my autonomously organised plain text world, I couldn’t help feeling something was missing.
My question: How can I turn my scattered task lists into one automated, curated, consolidated daily list? Reminders works well for subscriptions and repeating tasks, but I prefer to handle projects and random ideas in Obsidian. I didn’t want to copy or re-type tasks from one day to the next, and I needed a way to look ahead and view tasks scheduled for the next week and month, listed by project or area.
The answer: Use tags to classify tasks, and change them as the task’s status changes.
Plain text automation? Yes, please!
I’ve been using tags in Obsidian for almost 8 months, refining them as I go. I was interested to read Paco Cantero’s take on this a couple of weeks ago as he described his method of using tags to set his list of daily tasks. His story helped me crystallise the tagging method I’d been using into something even more useful and productivity-enhancing.
Every morning when I view my daily note in Obsidian (keyboard shortcut: Command + Option + period) I like to see—or have easy access to—two things: the tasks I’ve pre-scheduled for that day, and a curated list of tasks to choose from when those are done
The first way I attempted to do this was to create a list of things I knew needed to be done that week and month, which I inserted into every daily page via transclusion. Transclusion means the inclusion of one document within another, with a built-in link to the source. The reference document can literally be in more than one place at the same time.
Say, for example, I’m keeping a single file containing a running list of tasks I want to achieve this month. I can embed the contents of that file at any point in another file by typing the file name, surrounded by double brackets, preceded by an exclamation mark.
![[Monthly Task List]]In preview mode I can see the complete contents of that file. Nice!
However, there are some significant disadvantages to this method. Not only do I have to create a new task file each month, but when a task on the monthly list needs to move to a weekly or daily list, or to the next month, I have to manually copy it to the new list.
Transclusion is a useful tool, but it’s not flexible enough for the way I like to keep daily lists.
Sometimes the simplest ideas are the most powerful.
The second way to generate a daily to-do list is to use tags to bring the next tasks from whatever project I’m working on into the daily note. Tasks live wherever they were created, be that a project page or one of my daily notes. I don’t have to re-type the task, or place a link to each project in my to do list. This method is the same as dragging a task to the Today section in Things.
It’s not too good to be true: just add a tag, my friend! Sometimes the simplest ideas are the most powerful.
These are the task tags I’m using at the moment:
#today
#this-week
#this-month
#this-year
I place the tag directly after the checkbox of a task rather than at the end—even though the latter can feel more convenient—because I like them to appear aligned rather than scattered.
You don’t need to spend a great deal of time getting tag names just right. With the Tag Wrangler plugin you can make global changes to tag names as needed.
You may notice that pulling in tasks this way breaks the pretty checkbox in edit mode. I wish those neat little boxes were there purely for the aesthetics, but it’s not a deal-breaker.
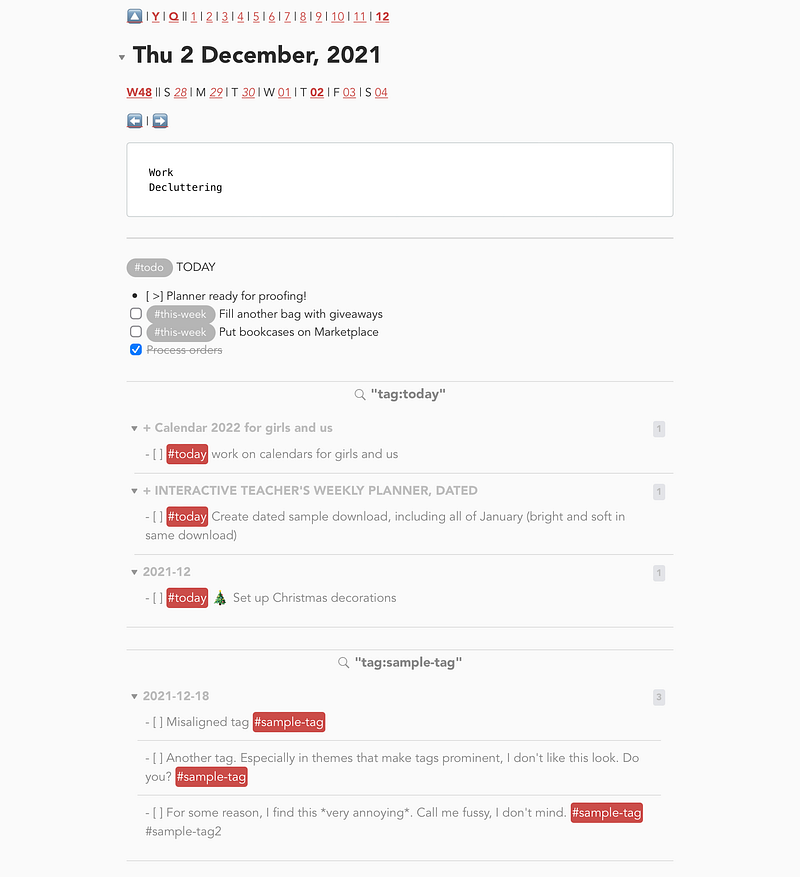
You can click on any tag to see a list of all instances of that tag in the sidebar, but the method I use most often is a simple query block. Type the following in edit mode — replacing “today” with the name of your tag:
```query
tag:#today
```
Your tasks tagged “today” will appear in Preview mode, listed beneath their project page title heading. Click on the tag or page heading to go directly to the page it appears on, and make any changes.
Real Life Examples
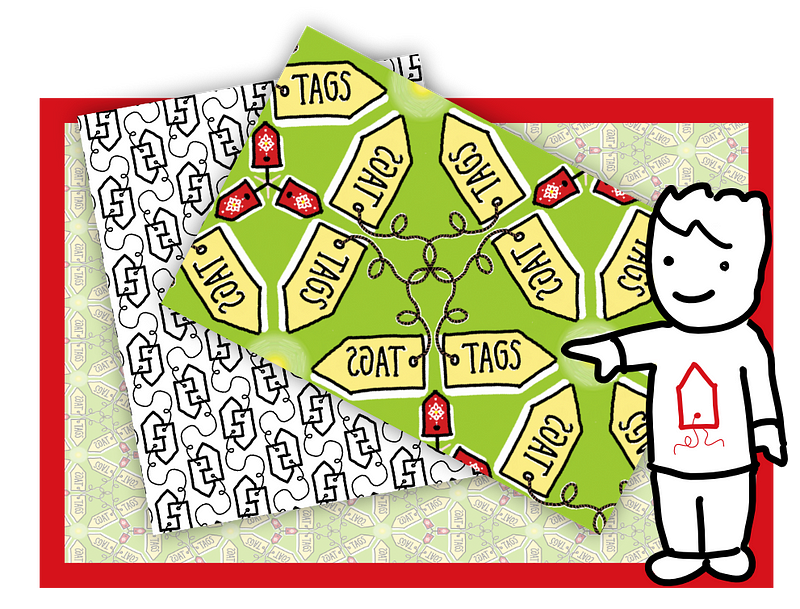
Last week I completed a massive project at work: a digital interactive planner for teachers. This thing has thousands of anchors and hyperlinks, and had to be done just right. I added tasks as they occurred to me on the planner project page, then each morning I marked those I wanted to get done that day with the today tag.
I’m super proud of that interactive planner and of the 3 tools that brought it to life on my Mac: Affinity Publisher for the 500+ page document, Numbers to track pages and dates, and Obsidian for task management. You can see the planner and download a sample, here.
Your task management needs may be more complex than mine as a solopreneur, so your application of this tagging system might look different to mine. Remember, you can use tags wherever you need a dynamic list that pulls in single lines of text from anywhere within your personal knowledge management and/or productivity system.
On my daily note page I have a Today section where I write up to three tasks (the minimum to feel I’ve had a successful day), followed by the list of #today tasks. The latter are part of my daily note template, so they appear without me lifting a finger.
When a task is done, I remove the today tag and add the completion date using a text expansion shortcut in Keyboard Maestro. The shortcut inserts @done followed by the current date in YYYY-MM-DD format (the only date format you should use, in my opinion). I find it a helpful way to track progress.
This is the string I have Keyboard Maestro insert whenever I type ;ddx —
@done%ICUDateTime%yyyy-MM-dd%The thing I love most about my bespoke productivity system (check it out here) is the flexibility to try out different things, and let it grow or contract naturally as the feedback of real life suggests the need for change.
Bonus tips
Never delete past tasks! Archive them instead. I completed the aforementioned interactive planner project after many months of grueling (but quite enjoyable) work. On the very day I was to make the final export and put the planner up for sale on my website, the whole dang thing crashed and corrupted! After I got over the initial feeling of devastation and got back to work, I had that list of tasks detailing granular corrections to go back to, and the order I’d done them in. Talk about time saved!
Archive text behind drop-down lists. Obsidian seems to do this automatically, though you can extend its features by activating the Outliner plugin. Perfect for keeping completed tasks on hand, but out of the way.
Obsidian primer: Share this handy, succinct tuturial with people who aren’t familiar with Obsidian, but want to be. Obsidian’s own help-files are also helpful, and have the advantage of being built-in to the app.
Further reading:
If you’ve enjoyed this story and would like unlimited access to others like it, consider joining Medium as a paying member. If you sign up using my referral link, I’ll earn a small commission.