
Angular 17 and NET Core 8: Deep Dive into Angular Client
Tutorial 4

Preface
This is another installment in our comprehensive series, Building a Talent Management SPA with Angular 17 and NET Core 8. For a broader view of the series and to access other parts, you can refer back to the series’ table of contents, where each segment is meticulously organized to guide you through every stage of building a robust Talent Management SPA.
Introduction
This blog post aims to serve as an insightful and detailed guide, specifically focusing on the Angular client of the Talent Management SPA. Whether you are a seasoned developer or just starting out with Angular, this exploration will enhance your understanding of building complex, real-world applications using this popular framework. Our goal is to dissect the application’s structure, elucidate its core functionalities, and provide a clear understanding of how the Angular client operates within the broader context of the application.
Prerequisites
Ensure you have the following installed before you start:
- Node.js (Latest Stable Version)
- Angular CLI (Version 17)
- A preferred code editor (e.g., Visual Studio Code)
Table of Contents
In this blog, we’ll delve into the intricacies of the Angular client, exploring how it is architected, its interaction with the .NET Web API, and the various features it offers. From the project setup to advanced functionalities, we’ll uncover the layers that make the Talent Management SPA a standout example of modern web application development. So, let’s embark on this enlightening journey to uncover the capabilities and design patterns that define the Angular client of the Talent Management SPA.
Part 1: Overview of Talent Management SPA
The Talent Management SPA represents a modern approach to managing employee data, positions, departments, and various HR-related functionalities. At its core, the application leverages the power of Angular, a platform known for its efficiency in building dynamic SPAs, and .NET Web API, a framework used for creating HTTP services. Angular’s role in this application is pivotal, offering a responsive and interactive user experience. It handles the client-side interactions, presenting a seamless interface for users to navigate through various features like viewing employee details, managing positions, and much more.
Meanwhile, the .NET Web API works behind the scenes as the server-side powerhouse, handling data processing, business logic, and database interactions. This combination of Angular for the frontend and .NET Web API for the backend encapsulates a full-stack development approach, ensuring a robust, scalable, and maintainable application architecture.
Part 2. Getting Started
Note: If you have followed the instructions in the Tutorial 1: Setting Up the Project and cloned the Angular Client source code from GitHub, you can skip Part 2.
GitHub Repository
The Angular client for the Talent Management SPA is readily available for download on GitHub. You can access the repository at TalentManagement-Client-Angular on GitHub. This repository contains all the necessary code and files you’ll need to get the Angular client up and running on your local machine.
Installation Guide
To get started with the Talent Management SPA’s Angular client, follow these steps:
Step 1: Clone the Repository
Open your terminal or command prompt. Navigate to the directory where you want to clone the repository. Run the following git command:
git clone https://github.com/workcontrolgit/TalentManagement-Client-Angular.gitStep 2: Navigate to the Project Directory
Once the cloning process is complete, navigate to the project directory:
cd TalentManagement-Client-AngularStep 3: Install Dependencies
The project relies on various npm packages. Install them by running:
npm install
This command reads the package.json file and installs all the necessary dependencies required for the project.
Step 4: Running the Application
With all dependencies installed, you can now run the application. Execute:
ng serve
This command will compile the application and start a development server.
Step 5: Accessing the Application
Once the server starts, you can access the application by opening a web browser and navigating to http://localhost:4200.
This will load the Talent Management SPA, where you can explore its features and functionalities.
Step 6: Exploring the Code
Open the project in your preferred code editor, like Visual Studio Code, to explore and modify the source code. Familiarize yourself with the project structure, components, services, and other aspects of the Angular application.
By following these steps, you should have the Talent Management SPA’s Angular client running on your local environment. This setup will allow you to experiment with the code, understand how the application functions, and make modifications as needed.
Part 3: Architecture Overview
Understanding the architecture is crucial for both navigating the existing codebase and contributing effectively to the project’s development. The Angular project for the Talent Management SPA is meticulously structured to facilitate ease of development and maintenance, ensuring a coherent and scalable application design.
3.1 Project Structure
The Talent Management SPA’s Angular project is structured to promote ease of development and maintenance. Understanding this structure is crucial for navigating and modifying the application effectively.
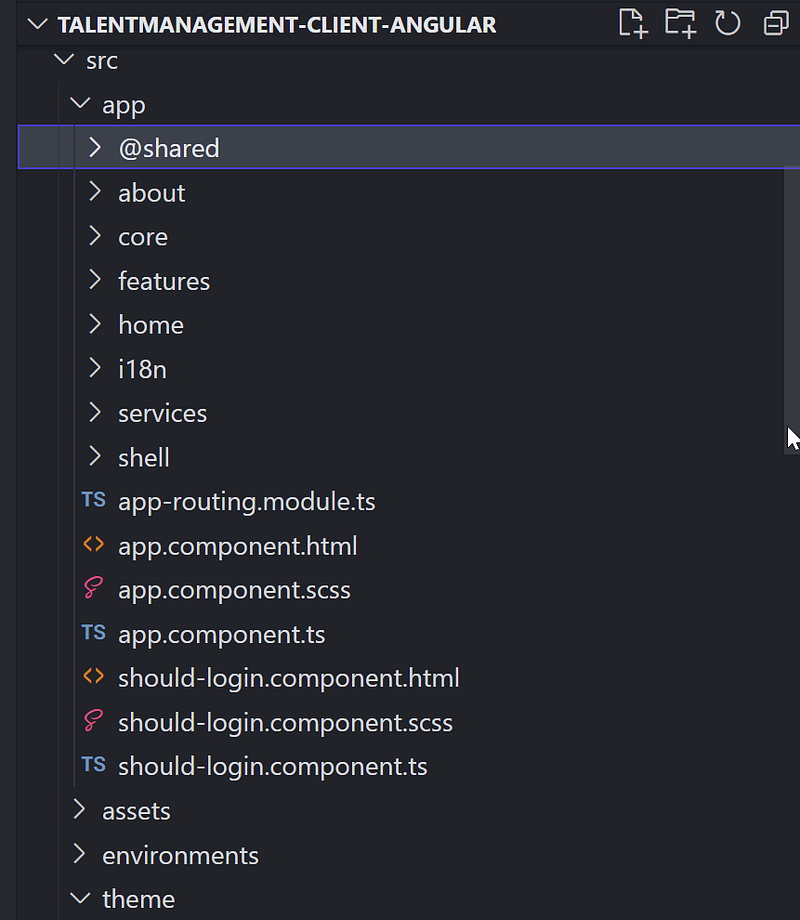
Here’s a breakdown of the key directories and files:
@shared: This directory contains shared modules, components, services, and other entities that can be reused throughout different parts of the application.about: This directory provides information about the application.core: This directory includes singleton services, application-wide components, and other features that are loaded once during the application’s lifetime.features: This directory contains feature modules, each encapsulating a specific set of related functionalities.home: This directory is the module for the home page of the application, containing components and services related to the home view.services: This directory contains injectable services that provide functionality to various components throughout the application, such as data retrieval and business logic.shell: This directory includes components and services that make up the shell of the application, such as the main layout, navigation, and other common UI elements./assets: Contains static files like images, fonts, and sometimes global CSS files./environments: Includes environment-specific configuration files, likeenvironment.tsfor development andenvironment.prod.tsfor production.package.json: Lists the project's dependencies and scripts. This is where you can see the versions of Angular and other npm packages used in the project.angular.json: Configuration file for Angular CLI. It includes settings for builds, testing, linting, and more./node_modules: Contains all the npm packages and dependencies installed for your project (generated after runningnpm install).
3.2 Key Features and Packages:
- Components and Data Binding: Angular’s powerful component-based architecture and data-binding capabilities are extensively used to create a responsive user interface that dynamically updates based on user interactions and data changes.
- Services and Dependency Injection: Angular’s dependency injection system is utilized for creating reusable services, such as for HTTP requests to interact with the .NET Web API backend.
- RxJS: Implements reactive programming patterns for handling asynchronous operations and events, often used in services for handling HTTP responses.
- Angular Bootstrap (ng-bootstrap): UI components are from ng-bootstrap, providing a consistent and modern look and feel.
- Routing: The Angular Router is used to enable navigation between different views and components, a key feature for SPAs.
Understanding this architecture and how Angular is utilized in the Talent Management SPA provides a solid foundation for both navigating the existing codebase and contributing to the project’s development.
Part 4: Key Components Explained
In Angular, a component is a fundamental building block of Angular applications. It controls a part of the screen (a view) through its associated template. The relationship between an Angular component and its HTML and CSS files can be understood as follows:
- Component Class: This is a TypeScript class where the logic of the component is defined. It’s annotated with
@Component, a decorator that provides metadata about the component, including its selector, template, and styles. - HTML Template: This is the view for the component. It’s a standard HTML file that defines what will be displayed on the browser. The HTML template interacts with the Angular component class through data binding. Data binding can be one-way (from the component to the template or vice versa) or two-way (bidirectional).
- CSS Styles: These are the stylesheets that define the look and feel of the component. CSS files in Angular can be scoped to the component, meaning that the styles defined in a component’s CSS file will only apply to that particular component, ensuring that styles do not clash across different parts of the application.
In any Angular application, components are the building blocks that control the view layer, handling everything from rendering data to taking user input. In the Talent Management SPA, we have a suite of components each tasked with a specific area of functionality. Below, we’ll break down some of these critical components, providing an overview of their role within the application, accompanied by illustrative code snippets.
4.1 Employee List Component
The Employee List component is responsible for displaying a list of employees. It typically retrieves data from a service, iterates over the data, and renders each employee’s information in a user-friendly format.
Code Snippet: Employee List Component
import { Component, OnInit } from '@angular/core';

import { Employee } from '@shared/interfaces/employee';
import { ApiHttpService } from '@app/services/api/api-http.service';
import { ApiEndpointsService } from '@app/services/api/api-endpoints.service';
import { DataTablesResponse } from '@shared/interfaces/data-tables-response';
import { ModalService } from '@app/services/modal/modal.service';

import { Logger } from '@app/core';

import { DataTablesModule } from 'angular-datatables';

const log = new Logger('Employee');

@Component({
  selector: 'app-employee-list',
  templateUrl: './employee-list.component.html',
  styleUrls: ['./employee-list.component.scss'],
  standalone: true,
  imports: [DataTablesModule],
})
export class EmployeeListComponent implements OnInit {
  dtOptions: DataTables.Settings = {};
  employees: Employee[] = [];
  message = '';

  constructor(
    private apiHttpService: ApiHttpService,
    private apiEndpointsService: ApiEndpointsService,
    private modalService: ModalService
  ) {}

  wholeRowClick(employee: Employee): void {
    let modalTitle = 'Employee Detail';

    this.openModal(modalTitle, employee);

    log.debug('Whole row clicked.', employee);
  }

  ngOnInit() {
    this.dtOptions = {
      pagingType: 'full_numbers',
      pageLength: 10,
      serverSide: true,
      processing: true,
      ajax: (dataTablesParameters: any, callback) => {
        // Call WebAPI to get employees
        this.apiHttpService
          .post(this.apiEndpointsService.postEmployeesPagedEndpoint(), dataTablesParameters)
          .subscribe((resp: DataTablesResponse) => {
            this.employees = resp.data;
            callback({
              recordsTotal: resp.recordsTotal,
              recordsFiltered: resp.recordsFiltered,
              data: [],
            });
          });
      },
      // Set column title and data field
      columns: [
        {
          title: 'Last Name',
          data: '',
        },
        {
          title: 'First Name',
          data: '',
        },
        {
          title: 'Email',
          data: '',
        },
        {
          title: 'Employee Number',
          data: '',
        },
        {
          title: 'Position Title',
          data: '',
        },
      ],
    };
  }

  openModal(title: string, employee: Employee) {
    this.modalService.OpenEmployeeDetailDialog(title, employee);
  }
}
Code Snippet: Employee List HTML Template
<div class="container-fluid mt-3">
  <div class="card">
    <div class="card-header">
      <div class="float-start">
        <h3 class="text-secondary">Employees</h3>
      </div>
    </div>
    <div class="card-body">
      <div class="row">
        <table datatable [dtOptions]="dtOptions" class="table table-hover">
          @if (employees.length !== 0) {
          <tbody>
            @for (employee of employees; track employee) {
            <tr (click)="wholeRowClick(employee)">
              <td>{{ employee.lastName }}</td>
              <td>{{ employee.firstName }}</td>
              <td>{{ employee.email }}</td>
              <td>{{ employee.employeeNumber }}</td>
              <td>{{ employee.position.positionTitle }}</td>
            </tr>
            }
          </tbody>
          } @else {
          <tbody>
            <tr>
              <td colspan="4" class="no-data-available">No data!</td>
            </tr>
          </tbody>
          }
        </table>
      </div>
    </div>
    <div class="card-footer">Hint: All columns are searchable and sortable.</div>
  </div>
</div>
Code Snippet: Employee List CSS Styles
::ng-deep table.dataTable td.dataTables_empty {
  display: none;
}
4.2 Authentication Component
The should-login.component plays a role in the authentication process, guiding users to log in to access certain parts of the application.
Code Snippet: Authentication Component
import { Component } from '@angular/core';
import { OAuthService } from 'angular-oauth2-oidc';
import { AuthService } from '@app/core/auth/auth.service';
import { environment } from '@env/environment';
import { TranslateModule } from '@ngx-translate/core';

@Component({
  selector: 'app-should-login',
  templateUrl: './should-login.component.html',
  styleUrls: ['./should-login.component.scss'],
  standalone: true,
  imports: [TranslateModule],
})
export class ShouldLoginComponent {
  version: string | null = environment.version;
  constructor(private authService: AuthService, private oAuthService: OAuthService) {}

  public login($event: any) {
    $event.preventDefault();
    this.oAuthService.initLoginFlow();
  }
}
4.3 Shared Components and Services
The @shared , services, and shell folders contain components and services that are used across multiple features of the application, such as utility functions, shared pipes, and directives.
Code Snippet: Modal Service
import { Injectable, Injector, Type } from '@angular/core';
import { NgbModal } from '@ng-bootstrap/ng-bootstrap';

import { ErrorDialogComponent } from '@shared/errors/error-dialog.component';
import { ConfirmationDialogComponent } from '@shared/confirmation-dialog/confirmation-dialog.component';
import { EmployeeDetailComponent } from '@app/features/employee/detail/employee-detail/employee-detail.component';
import { Employee } from '@shared/interfaces/employee';

@Injectable({
  providedIn: 'root',
})
export class ModalService {
  modalService = this.injector.get(NgbModal);

  constructor(private injector: Injector) {}

  OpenEmployeeDetailDialog(title: string, employee: Employee): void {
    //var modalService = this.injector.get(NgbModal);
    const modalRef = this.modalService.open(EmployeeDetailComponent);
    modalRef.componentInstance.title = title;
    modalRef.componentInstance.employee = employee;
  }

  OpenErrorDialog(title: string, message: string, status?: string): void {
    //var modalService = this.injector.get(NgbModal);
    const modalRef = this.modalService.open(ErrorDialogComponent);
    modalRef.componentInstance.title = title;
    modalRef.componentInstance.message = message;
    modalRef.componentInstance.status = status;
  }

  OpenConfirmDialog(
    title: string,
    message: string,
    btnOkText: string = 'OK',
    btnCancelText: string = 'Cancel',
    dialogSize: 'sm' | 'lg' = 'sm'
  ): Promise<boolean> {
    const modalRef = this.modalService.open(ConfirmationDialogComponent, { size: dialogSize });
    modalRef.componentInstance.title = title;
    modalRef.componentInstance.message = message;
    modalRef.componentInstance.btnOkText = btnOkText;
    modalRef.componentInstance.btnCancelText = btnCancelText;
    return modalRef.result;
  }
}
These components and snippets provide a glimpse into the functionality of the Talent Management SPA. Each component is designed to fulfill a specific role, working together to create a cohesive user experience. As you delve deeper into the codebase, you’ll discover how these components interact with services and models to perform CRUD operations, manage state, and navigate between different views.
Part 5: Data Handling and Services
In Part 5 of our comprehensive guide, we delve into the crucial aspects of Data Handling and Services within the context of an Angular application interacting with a .NET Web API. This section is essential for understanding how to manage data effectively, integrate with external APIs, and structure business logic in an Angular application. We’ll explore the intricacies of API integration, emphasizing the interaction between the Angular client and the .NET Web API. Additionally, we will dissect the roles and implementations of services and models, which are pivotal in managing data and encapsulating the business logic of our application.
5.1 API Integration
In the Talent Management SPA, the Angular client interacts with the .NET Web API through HTTP protocols facilitated by Angular’s HttpClient module. This integration is key to performing CRUD (Create, Read, Update, Delete) operations against the backend services which manage the talent data.
- GET: Retrieves data from the API. This could be a list of employees, a specific employee’s details, or other resources.
- POST: Sends new data to the API, typically used when creating new records like adding a new employee.
- PUT: Updates existing data on the API, such as modifying an employee’s details.
- DELETE: Removes data from the API, for instance, when deleting an employee record.
The use of RxJS Observable ensures that these HTTP requests are handled asynchronously, allowing the UI to remain responsive while waiting for the data to be loaded or updated.
5.2 Services and Models
Services in the Talent Management SPA act as intermediaries between the Angular components and the .NET Web API. They use models to type-check the data being sent and received, providing a structured and predictable data management system.
Models represent the shape of data entities. An Employee model, for example, would define properties such as id, name, position, and any other relevant details.
// employee.model.ts
import { Position } from './position';

export interface Employee {
  id: string;
  firstName: string;
  middleName: string;
  lastName: string;
  birthday: Date;
  email: string;
  gender: number;
  employeeNumber: string;
  prefix: string;
  phone: string;
  position: Position;
  salary: number;
}
Services leverage these models and encapsulate the logic for making API calls. They ensure that components don’t directly manipulate data, adhering to Angular’s best practices for separation of concerns. Services also handle other aspects of business logic, such as data transformation and error handling.
5.3 Code Walk Through
Let’s review the code in the ApiHttpService in api-http.service.ts
// Angular Modules
import { Injectable } from '@angular/core';
import { HttpClient } from '@angular/common/http';
// RxJs
import { Observable } from 'rxjs';

@Injectable({
  providedIn: 'root',
})
export class ApiHttpService {
  constructor(
    // Angular Modules
    private http: HttpClient
  ) {}

  public get = (url: string, options?: any): Observable<any> => this.http.get(url, options);

  public post = (url: string, data: any, options?: any): Observable<any> => this.http.post(url, data, options);

  public put = (url: string, data: any, options?: any): Observable<any> => this.http.put(url, data, options);

  public delete = (url: string, options?: any): Observable<any> => this.http.delete(url, options);
}
The code snippet you provided defines an Angular service named ApiHttpService, which encapsulates HTTP request methods for interacting with a web API. This service is a crucial part of an Angular application that needs to communicate with a backend server. Let's break down its key components and functionalities:
1. Angular and RxJS Modules:
@Injectable({ providedIn: 'root' }): This decorator marks the class as a service that can be injected. TheprovidedIn: 'root'metadata means that this service is available application-wide (singleton) and Angular will create a single, shared instance ofApiHttpService.HttpClient: This is an Angular service provided by the@angular/common/httpmodule, used for making HTTP requests.Observable: Imported fromrxjs, this is a key part of the Reactive programming paradigm used in Angular. It represents a lazy collection of future values or events.
2. Service Class:
- The
ApiHttpServiceclass is decorated with@Injectable, making it injectable into other components or services. - It has a constructor that injects the
HttpClientservice, which is Angular's mechanism to make HTTP requests and handle responses.
3. HTTP Methods:
.get(url: string, options?: any): This method wraps theHttpClient'sgetmethod, used to make HTTP GET requests. It retrieves data from the specified URL and returns an Observable that emits the requested data..post(url: string, data: any, options?: any): This wraps theHttpClient'spostmethod, used for making HTTP POST requests. It submits data (data) to the specified URL, useful for creating new resources on the server..put(url: string, data: any, options?: any): This wraps theHttpClient'sputmethod, used for making HTTP PUT requests. It updates a resource with the specifieddataat the given URL..delete(url: string, options?: any): This method wraps theHttpClient'sdeletemethod, used for making HTTP DELETE requests to remove a resource at the specified URL.
4. Observables and Reactive Programming:
- Each method returns an
Observable, allowing the calling components to subscribe to these methods and react to the data returned from the server asynchronously. - This approach is part of the reactive programming paradigm, which makes handling asynchronous tasks and events more efficient and effective in Angular applications.
Overall Functionality: The ApiHttpService acts as an abstraction layer over Angular's HttpClient, simplifying HTTP operations throughout the application. By centralizing HTTP requests in this service, the code in components that consume this service becomes cleaner and more maintainable. This service also handles any additional configurations (passed in options) required for the HTTP requests, such as headers or query parameters.
By abstracting the HTTP communications into ApiHttpService, the application maintains a clean separation of concerns where the EmployeeService and other similar services act as a facade for components to interact with backend data. This modular approach greatly simplifies unit testing and maintenance.
The Angular client’s services and models form the backbone of the SPA’s data management. They provide a clean, maintainable way to handle business logic and interactions with the .NET Web API, ensuring that the application functions smoothly and efficiently.
6. User Interface and User Experience
In Part 6 of our series, we turn our focus to the pivotal aspects of User Interface (UI) and User Experience (UX) in web application development. This section is dedicated to understanding the principles of designing intuitive and engaging interfaces, a critical factor in the success of any application. We will explore the use of Bootstrap components and their customization to craft aesthetically pleasing and functional UIs. Additionally, we’ll delve into responsive design strategies, ensuring that our application provides a seamless and user-friendly experience across various devices and screen sizes.
6.1 UI Components Bootstrap and Customization
Bootstrap, a popular front-end framework, is renowned for its versatile and ready-to-use components that significantly ease the process of UI development. Bootstrap, known for its flexibility and ease of use, has been instrumental in designing a cohesive look and feel for our application.
- Layout and Grid System: We utilized Bootstrap’s responsive grid system to structure our web pages, ensuring that all elements align perfectly and adapt to different screen sizes. This grid system is a cornerstone of creating a responsive design.
- Navigation Bars and Dropdowns: For efficient navigation, we incorporated Bootstrap’s navigation bars and dropdown menus. These components have been customized to match our application’s theme, providing a smooth navigation experience.
- Forms and Input Groups: The application’s forms and input groups are designed using Bootstrap’s form controls. They have been styled for clarity and ease of use, ensuring that form inputs are accessible and user-friendly.
- Buttons and Alerts: We used Bootstrap’s buttons and alert components to handle user interactions and feedback. The styles of these components have been modified to align with the overall design language of the application.
- Modals and Tooltips: For interactive elements like dialog boxes and information pop-ups, Bootstrap’s modals and tooltips were customized to provide information without overwhelming the user.
In customizing these components, we ensured that the UI remains consistent and intuitive across the entire application, enhancing the overall user experience.
6.2 Responsive Design
Our approach to responsive design in this SPA (Single Page Application) focuses on ensuring that the application is accessible and user-friendly across a wide range of devices, from desktops to smartphones.
- Mobile-First Approach: We adopted a mobile-first design philosophy, starting with an interface optimized for smaller screens and then scaling up to larger ones. This approach ensures that our application delivers a robust user experience on mobile devices.
- Media Queries: Utilizing CSS media queries, our design dynamically adapts to different screen sizes. This responsiveness ensures that layouts, font sizes, and navigation elements adjust appropriately to provide an optimal viewing experience.
- Testing and Optimization: Rigorous testing has been conducted to ensure the responsiveness of the application. This includes testing on various devices and browsers to identify and fix any issues related to layout, performance, or accessibility.
Through the strategic use of Bootstrap and a focus on responsive design principles, we have created an SPA that is not only functional but also delivers a superior user experience, regardless of the device used to access it.
6.3 Code Walk Thru
Let’s take a look at an example of UI and Responsive Design in HeaderComponent
Code snippet in header.component.ts
import { Component, OnInit } from '@angular/core';
import { Router, RouterLink, RouterLinkActive } from '@angular/router';

import { Observable } from 'rxjs';
import { AuthService } from '@app/core/auth/auth.service';
import { AsyncPipe } from '@angular/common';
import { LanguageSelectorComponent } from '../../i18n/language-selector.component';
import { TranslateModule } from '@ngx-translate/core';
import { NgbCollapse, NgbDropdown, NgbDropdownToggle, NgbDropdownMenu } from '@ng-bootstrap/ng-bootstrap';
@Component({
  selector: 'app-header',
  templateUrl: './header.component.html',
  styleUrls: ['./header.component.scss'],
  standalone: true,
  imports: [
    TranslateModule,
    NgbCollapse,
    RouterLink,
    RouterLinkActive,
    LanguageSelectorComponent,
    NgbDropdown,
    NgbDropdownToggle,
    NgbDropdownMenu,
    AsyncPipe,
  ],
})
export class HeaderComponent implements OnInit {
  menuHidden = true;
  isAuthenticated: Observable<boolean>;

  constructor(private authService: AuthService, private router: Router) {
    this.isAuthenticated = authService.isAuthenticated$;
  }

  ngOnInit() {}

  toggleMenu() {
    this.menuHidden = !this.menuHidden;
  }

  login() {
    this.authService.login();
  }

  logout() {
    this.authService.logout();
  }

  get username(): string | null {
    return this.authService.identityClaims ? (this.authService.identityClaims as any)['name'] : null;
  }
}
Code snippet in the header.component.html
<header>
  <nav class="navbar navbar-expand-lg navbar-dark bg-dark mb-0">
    <div class="container-fluid">
      <a class="navbar-brand" href="/" translate>APP_NAME</a>
      <button
        class="navbar-toggler"
        type="button"
        aria-controls="navbar-menu"
        aria-label="Toggle navigation"
        (click)="toggleMenu()"
        [attr.aria-expanded]="!menuHidden"
      >
        <span class="navbar-toggler-icon"></span>
      </button>
      <div id="navbar-menu" class="collapse navbar-collapse float-xs-none" [ngbCollapse]="menuHidden">
        <div class="navbar-nav me-auto mb-2 mb-lg-0">
          <a class="nav-item nav-link" routerLink="/home" routerLinkActive="active">
            <i class="fas fa-home"></i>
            <span translate>Home</span>
          </a>
          <a class="nav-item nav-link" routerLink="/employee" routerLinkActive="active">
            <i class="fa-solid fa-people-group"></i>
            <span translate>Employee</span>
          </a>
          <a class="nav-item nav-link" routerLink="/position" routerLinkActive="active">
            <i class="fas fa-sitemap"></i>
            <span translate>Position</span>
          </a>
          <a class="nav-item nav-link" routerLink="/about" routerLinkActive="active">
            <i class="fas fa-question-circle"></i>
            <span translate>About</span>
          </a>
        </div>
        <div class="navbar-nav ml-auto">
          <app-language-selector [inNavbar]="true"></app-language-selector>
          <div class="nav-item" ngbDropdown display="dynamic">
            <a id="user-dropdown" class="nav-link" ngbDropdownToggle>
              <i class="fas fa-user-circle"></i>
            </a>
            <div ngbDropdownMenu aria-labelledby="user-dropdown">
              @if((isAuthenticated | async) === true) {
              <h6 class="dropdown-header">
                <span translate>Logged in as</span> <b>{{ username }}</b>
              </h6>
              <div class="dropdown-divider"></div>
              <button class="dropdown-item" (click)="logout()" translate>Logout</button>
              } @else {
              <button class="dropdown-item" (click)="login()">Login</button>
              }
            </div>
          </div>
        </div>
      </div>
    </div>
  </nav>
</header>
The provided code snippet showcases an Angular component, HeaderComponent, which is designed to serve as a responsive navigation header in an application. Let's discuss its various aspects, focusing on the UI components and responsive design:
1. Component Structure and Responsiveness
- The header uses Bootstrap’s responsive navigation bar (
navbar) classes, ensuring it adjusts layout based on screen size. Thenavbar-expand-lgclass indicates the navigation items will be collapsed into a hamburger menu on smaller screens (less than large). - A
navbar-togglerbutton is included for smaller screens, toggling the visibility of the navigation links. - The
[ngbCollapse]="menuHidden"directive is used for the collapsible menu, controlled by themenuHiddenproperty toggled by thetoggleMenu()method.
2. Integration with Angular and Bootstrap
- The component imports several Angular and ng-bootstrap modules like
RouterLink,RouterLinkActive,NgbCollapse,NgbDropdown, and others, ensuring comprehensive functionality and styling. NgbDropdownand related directives provide interactive dropdown features, particularly for user authentication controls.
3. Internationalization and Localization
- The
TranslateModuleand theLanguageSelectorComponentare used for language selection and translation features, demonstrating the application's support for multiple languages. - Text content within the template uses the
translatedirective, enabling dynamic translation based on the selected language.
4. Authentication and User Interface
- The
isAuthenticatedObservable fromAuthServicetracks the user's authentication status. This is used in the template to conditionally display login or logout options. - The user’s name (
username) is dynamically retrieved and displayed if the user is authenticated, enhancing the personalized user experience.
5. Styling and Icons
- The component’s styling is defined in
header.component.scss, allowing for custom styles on top of Bootstrap's default styles. - Font Awesome icons (
fas fa-home,fa-solid fa-people-group, etc.) are used within the navigation links for visual enhancement.
6. Reactive Programming
- The use of the
AsyncPipe(isAuthenticated | async) in the template for handling the Observable showcases a reactive programming approach, making the component more efficient and responsive to state changes.
7. Template and Navigation Links
- Navigation links (
routerLink) are defined for different application routes (/home,/employee,/position,/about), withrouterLinkActiveto visually indicate the currently active route. - The use of
@if...elsesyntax in the template suggests a server-side template rendering approach (possibly Angular Universal or a similar technology), which is less common in typical client-side Angular applications.
This HeaderComponent is a well-structured Angular component, demonstrating responsive design principles, internationalization, and integration of various Angular and ng-bootstrap features. It effectively combines functionality and aesthetics to provide a user-friendly navigation experience, adaptable to different screen sizes and locales.
Part 7. Advanced Features
In advanced web application development, particularly for SPA, three critical aspects come to the forefront — Routing and Navigation, Server-Side Operations like Paging, Sorting, and Typeahead Search, and the implementation of Reactive Forms. Each of these components plays a pivotal role in enhancing user experience, optimizing performance, and ensuring robust data management.
7.1 Routing and Navigation
In our Talent Management Single Page Application (SPA), the management of routing and navigation plays a crucial role in providing a seamless user experience. We utilize Angular’s Router module to manage navigation between different views and states of the application.
- Router Configuration: Our SPA’s routes are defined in a dedicated module file (
app-routing.module.ts). Here, we map various paths to the corresponding components, enabling URL-driven navigation. - Lazy Loading: To optimize performance, we implement lazy loading of feature modules. This means that Angular only loads modules as they are needed, rather than at the initial load of the SPA, significantly reducing the initial load time.
- Route Guards: For security and user experience purposes, we use route guards to control access to certain routes based on specific conditions like user authentication or role-based permissions.
- Navigational Directives: In the UI, we use directives like
routerLinkandrouterLinkActiveto manage navigational interactions, offering a smooth transition between different sections of the application.
Example routing snippet code from app-routing.module.ts
import { NgModule } from '@angular/core';
import { Routes, RouterModule, PreloadAllModules } from '@angular/router';
import { Shell } from '@app/shell/shell.service';
import { AuthGuard } from '@app/core/auth/auth-guard.service';
import { AuthGuardWithForcedLogin } from '@app/core/auth/auth-guard-with-forced-login.service';
import { ShouldLoginComponent } from './should-login.component';

const routes: Routes = [
  Shell.childRoutes([
    {
      path: 'about',
      loadChildren: () => import('./about/about.module').then((m) => m.AboutModule),
    },
  ]),
  Shell.childRoutes([
    {
      path: 'employee',
      // canActivate:[AuthGuardWithForcedLogin],
      loadChildren: () => import('./features/employee/employee.module').then((m) => m.EmployeeModule),
    },
    {
      path: 'position',
      loadChildren: () => import('./features/position/position.module').then((m) => m.PositionModule),
    },
    {
      path: 'profile',
      loadChildren: () => import('./features/profile/profile.module').then((m) => m.ProfileModule),
    },
  ]),
  { path: 'should-login', component: ShouldLoginComponent },

  // Fallback when no prior route is matched
  { path: '**', redirectTo: '', pathMatch: 'full' },
];

@NgModule({
  imports: [RouterModule.forRoot(routes, { preloadingStrategy: PreloadAllModules })],
  exports: [RouterModule],
  providers: [],
})
export class AppRoutingModule {}
The provided code snippet is an example of how Routing and Navigation is implemented in an Angular application, specifically using the RouterModule. Let's break down the key aspects:
1. Route Configuration
- The routes are defined in an array of
Routes, which maps URL paths to components or modules. - The
loadChildrensyntax is used for lazy loading of modules. This means modules likeAboutModule,EmployeeModule,PositionModule, andProfileModuleare not loaded until the user navigates to their respective routes. This improves the initial load time of the application.
2. Lazy Loading
- The use of
import('./path/to/module').then((m) => m.ModuleName)is a standard way to implement lazy loading in Angular. It helps in splitting the code at the module level and loading it only when required.
3. Shell Service
- The
Shell.childRoutes([])method suggests the use of a shell service. This is typically used to apply a common layout or set of guards to a group of routes. In this context, it's likely used for adding a common header, footer, or navigation bar, and potentially some authentication guards to the routes.
4. Authentication Guards
- The commented line
// canActivate:[AuthGuardWithForcedLogin]indicates the intention to protect theemployeeroute with an authentication guard. This guard would check if a user is logged in and potentially redirect them to a login page if not authenticated.
5. Specific Components and Fallback Route
- The route
{ path: 'should-login', component: ShouldLoginComponent }directly links a path to a component without lazy loading. This is likely a straightforward route used for specific purposes like a login reminder. - The fallback route
{ path: '**', redirectTo: '', pathMatch: 'full' }is a wildcard route. It redirects users to the root of the application if they enter a URL path that doesn't match any of the defined routes.
6. Preloading Strategy
- The
RouterModule.forRoot(routes, { preloadingStrategy: PreloadAllModules })configuration indicates that the application uses a preloading strategy.PreloadAllModulesmeans that after the application has loaded, Angular will preload any lazy-loaded modules in the background.
7. Modular Structure
- This routing configuration demonstrates a modular approach, segregating different functionalities (like
about,employee,position, andprofile) into separate modules. This enhances maintainability and scalability.
The AppRoutingModule in this snippet shows a well-organized routing structure that leverages lazy loading for performance optimization, potential route protection via guards, and a modular design for scalable application architecture. The use of a shell service indicates a design pattern that encapsulates common elements across different routes, promoting code reuse and consistency in the user interface.
7.2 Paging and Sorting
Efficient data handling is essential in our application, especially when dealing with large datasets. To address this, we have incorporated paging and sorting features.
- Server-Side Paging: To handle large sets of data, we use server-side paging. This approach ensures that only a subset of data is fetched and displayed at a time, reducing the load on the server and improving the application’s responsiveness.
- Sorting Functionality: We provide a sorting feature on data tables, allowing users to sort data based on various fields. This is integrated both in the UI and at the server level, ensuring consistent and efficient data sorting.
7.3 Typeahead Search
To enhance the user experience, particularly in data retrieval, we implement a typeahead search feature.
- Real-Time Search: As users type in the search field, suggestions and results are dynamically displayed, offering real-time feedback based on the input.
- Integration with Backend: The typeahead search is integrated with our backend services, allowing for quick and efficient fetching of search results from the server.
- Debouncing Requests: To optimize performance and reduce the load on the server, we use debouncing techniques. This means the application waits for a certain period of inactivity before sending the search query to the server, reducing the number of requests made.
7.4 Angular Reactive Forms
Reactive Forms in Angular provide a model-driven approach to handling form inputs whose values change over time. This approach is particularly suited for complex scenarios where dynamic validation, conditional fields, or complex data structures are involved.
- Form Control and Form Group: Reactive forms are based on the concept of
FormControlandFormGroup. AFormControlis linked to a specific form element in the view, managing its value and validation status. AFormGroup, on the other hand, groups multiple form controls into a single form entity, enabling us to manage a form with multiple fields as a whole. - Dynamic Form Building: One of the strengths of Reactive Forms is the ease of dynamically creating form fields based on data. For instance, fields can be added or removed programmatically based on user actions or data received from backend services.
- Data Model Binding: Reactive Forms offer a seamless way to bind form fields directly to data models. This binding ensures that changes in the form fields are immediately reflected in the associated data model and vice versa.
- Validation and Custom Validators: Reactive Forms come with built-in validators for common requirements like required fields, pattern matching, and range checks. Additionally, Angular allows the creation of custom validators, giving the flexibility to implement complex validation logic tailored to specific business needs.
- Reactive Transformations: Using RxJS observables, Reactive Forms can react to changes in real-time. This feature is particularly useful for features like field visibility toggling, dynamic error message display, and enabling/disabling form controls based on certain conditions.
- Integration with Other Features: The integration of Reactive Forms with other advanced features like server-side pagination, sorting, and typeahead search enhances the overall functionality and user experience of our Talent Management SPA.
Example code: PositionDetailComponent in position-detail.component.ts
import { Component, OnInit } from '@angular/core';
import { ActivatedRoute, RouterLink } from '@angular/router';
import { FormGroup, FormBuilder, Validators, ReactiveFormsModule } from '@angular/forms';
import { Logger } from '@app/core';
import { TranslateModule } from '@ngx-translate/core';
import { CommonModule } from '@angular/common';

// api services
import { ApiHttpService } from '@app/services/api/api-http.service';
import { ApiEndpointsService } from '@app/services/api/api-endpoints.service';
// interface class mapping to web api DTO (data transfer object)
import { DataResponsePosition } from '@shared/interfaces/data-response-position';

// validation
import { RxReactiveFormsModule } from '@rxweb/reactive-form-validators';

// ui service modal and toaster
import { ModalService } from '@app/services/modal/modal.service';
import { ToastService } from '@app/services/toast/toast.service';


// interface classes
import { Position } from '@shared/interfaces/position';
import { Department } from '@app/@shared/interfaces/department';
import { SalaryRange } from '@app/@shared/interfaces/salaryrange';

// dropdownbox library ng-select https://github.com/ng-select/ng-select
import { NgSelectModule } from '@ng-select/ng-select';

// boostrap tooltip https://ng-bootstrap.github.io/#/components/tooltip/examples
import { NgbTooltipModule } from '@ng-bootstrap/ng-bootstrap';

// logger
const log = new Logger('Detail');

@Component({
  selector: 'app-detail',
  templateUrl: './position-detail.component.html',
  styleUrls: ['./position-detail.component.scss'],
  standalone: true,
  imports: [ReactiveFormsModule, RxReactiveFormsModule, CommonModule, RouterLink, TranslateModule, NgSelectModule, NgbTooltipModule],
})
export class PositionDetailComponent implements OnInit {
  formMode = 'New';
  sub: any;
  id: any;
  entryForm!: FormGroup;
  error: string | undefined;
  position!: Position;
  isAddNew: boolean = false;
  submitted = false;

  departments!: Department[];
  salaryRanges!: SalaryRange[];

  constructor(
    private toastService: ToastService,
    private route: ActivatedRoute,
    private formBuilder: FormBuilder,
    private apiHttpService: ApiHttpService,
    private apiEndpointsService: ApiEndpointsService,
    private modalService: ModalService
  ) {
    this.createForm();
    this.readDepartments();
    this.readSalaryRanges();
  }

  ngOnInit() {
    this.sub = this.route.params.subscribe((params) => {
      this.id = params['id'];
      if (this.id !== undefined) {
        this.read(this.route.snapshot.paramMap.get('id'));
        this.formMode = 'Edit';
      } else {
        this.isAddNew = true;
        this.formMode = 'New';
      }
    });
    log.debug('ngOnInit:', this.id);
  }

  // Handle Create button click
  onCreate() {
    this.create(this.entryForm.value);
    log.debug('OnInsert: ', this.entryForm.value);
    log.debug('OnInsert: ', this.entryForm.get('positionNumber')!.value);
  }

  // Handle Update button click
  onUpdate() {
    this.put(this.entryForm.get('id')!.value, this.entryForm.value);
    this.showToaster('Great job!', 'Data is updated');
  }

  // Handle Delete button click
  onDelete() {
    this.modalService
      .OpenConfirmDialog('Position deletion', 'Are you sure you want to delete?')
      .then((Yes) => {
        if (Yes) {
          this.delete(this.entryForm.get('id')!.value);
          log.debug('onDelete: ', this.entryForm.value);
        }
      })
      .catch(() => {
        log.debug('onDelete: ', 'Cancel');
      });
  }
  // CRUD > Read, map to REST/HTTP GET
  read(id: any): void {
    this.apiHttpService.get(this.apiEndpointsService.getPositionByIdEndpoint(id), id).subscribe({
      //Assign resp to class-level model object.
      next: (resp: DataResponsePosition) => {
        //Assign data to class-level model object.
        this.position = resp.data;
        //Populate reactive form controls with model object properties.
        this.entryForm.setValue({
          id: this.position.id,
          positionNumber: this.position.positionNumber,
          positionTitle: this.position.positionTitle,
          positionDescription: this.position.positionDescription,
          departmentId: this.position.departmentId,
          salaryRangeId: this.position.salaryRangeId,
          department: this.position.departmentId,
          salaryRange: this.position.salaryRangeId,
        });
      },
      error: (error) => {
        log.debug(error);
      },
    });
  }

  delete(id: any): void {
    this.apiHttpService.delete(this.apiEndpointsService.deletePositionByIdEndpoint(id), id).subscribe({
      next: (resp: any) => {
        log.debug(resp);
        this.showToaster('Great job!', 'Data is deleted');
        this.entryForm.reset();
        this.isAddNew = true;
      },
      error: (error) => {
        log.debug(error);
      },
    });
  }

  // CRUD > Create, map to REST/HTTP POST
  create(data: any): void {
    this.apiHttpService.post(this.apiEndpointsService.postPositionsEndpoint(), data).subscribe({
      next: (resp: any) => {
        this.id = resp.data; //guid return in data
        this.showToaster('Great job!', 'Data is inserted');
        this.entryForm.reset();
      },
      error: (error) => {
        log.debug(error);
      },
    });
  }

  // CRUD > Update, map to REST/HTTP PUT
  put(id: string, data: any): void {
    this.apiHttpService.put(this.apiEndpointsService.putPositionsPagedEndpoint(id), data).subscribe({
      next: (resp: any) => {
        this.id = resp.data; //guid return in data
      },
      error: (error) => {
        log.debug(error);
      },
    });
  }

  readDepartments(): void {
    this.apiHttpService.get(this.apiEndpointsService.getDepartmentsEndpoint()).subscribe({
      //Assign resp to class-level model object.
      next: (resp: Department[]) => {
        //Assign data to class-level model object.
        this.departments = resp;
        log.debug('Departments ', this.departments);
      },
      error: (error) => {
        log.debug(error);
      },
    });
  }

  readSalaryRanges(): void {
    this.apiHttpService.get(this.apiEndpointsService.getSalaryRangesEndpoint()).subscribe({
      //Assign resp to class-level model object.
      next: (resp: SalaryRange[]) => {
        //Assign data to class-level model object.
        this.salaryRanges = resp;
        log.debug('SalaryRanges ', this.salaryRanges);
      },
      error: (error) => {
        log.debug(error);
      },
    });
  }

  // reactive form
  private createForm() {
    this.entryForm = this.formBuilder.group({
      id: [''],
      positionNumber: ['', Validators.required],
      positionTitle: ['', Validators.required],
      positionDescription: ['', Validators.required],
      departmentId: ['', Validators.required],
      salaryRangeId: ['', Validators.required],
    });
  }

  // call modal service
  showToaster(title: string, message: string) {
    this.toastService.show(title, message, {
      classname: 'bg-success text-light',
      delay: 2000,
      autohide: true,
    });
  }

  // convenience getter for easy access to form fields
  get f() {
    return this.entryForm.controls;
  }
}
Example code: Reactive Form HTML Mark up in position-detail.component.html
<div class="container-fluid">
  <!-- HTML form mark up -->
  <form [formGroup]="entryForm" novalidate>
    <div class="card">
      <div class="card-header">
        <div class="float-start">
          <h3 class="text-secondary">Position</h3>
        </div>
        <div class="float-end">
          <!-- HTML markup for form mode New or Edit -->
          <a class="btn text-dark" ngbTooltip="Click to Return to Previous Page" [routerLink]="['/position']"><i class="fa fa-arrow-left"></i> Back</a>
        </div>
      </div>
      <div class="card-body">
        <div class="alert alert-danger" [hidden]="!error" translate>
          Position Number, Title, Description or Salary incorrect.
        </div>
        <div class="form-group">
          <label for="id" class="fw-bold">Id</label>
          <label class="d-block mb-3">
            <input
              type="text"
              class="form-control"
              formControlName="id"
              [ngClass]="{ 'is-invalid': f.id.errors }"
              autocomplete="id"
              [placeholder]="'Auto Assigned Id' | translate"
              readonly
            />
            <span hidden translate>Id</span>
            <small [hidden]="f.id.valid || f.id.untouched" class="text-danger" translate> Id is required </small>
          </label>

          <label for="positionNumber" class="fw-bold">Position Number</label>
          <label class="d-block mb-3">
            <input
              type="text"
              class="form-control"
              formControlName="positionNumber"
              [ngClass]="{ 'is-invalid': f.positionNumber.errors }"
              autocomplete="positionNumber"
              [placeholder]="'Enter position number here' | translate"
              required
            />
            <span hidden translate>PositionNumber</span>
            <small [hidden]="f.positionNumber.valid || f.positionNumber.untouched" class="text-danger" translate>
              Please enter a position number. This information is required.
            </small>
          </label>

          <label for="positionTitle" class="fw-bold">Position Title</label>

          <label class="d-block mb-3">
            <input
              type="text"
              class="form-control"
              formControlName="positionTitle"
              [ngClass]="{ 'is-invalid': f.positionTitle.errors }"
              autocomplete="current-positionTitle"
              [placeholder]="'Enter Position Title Here' | translate"
              required
            />
            <span hidden translate>Position Title</span>
            <small [hidden]="f.positionTitle.valid || f.positionTitle.untouched" class="text-danger" translate>
              Please provide the title of the position. This field is required.
            </small>
          </label>
          <label for="positionDescription" class="fw-bold">Position Description</label>

          <label class="d-block mb-3">
            <textarea
              type="text"
              rows="5"
              class="form-control"
              formControlName="positionDescription"
              [ngClass]="{ 'is-invalid': f.positionDescription.errors }"
              autocomplete="current-positionDescription"
              [placeholder]="'Describe the key responsibilities and qualifications...' | translate"
              required
            >
            </textarea>
            <span hidden translate>PositionDescription</span>
            <small
              [hidden]="f.positionDescription.valid || f.positionDescription.untouched"
              class="text-danger"
              translate
            >
              Don't forget to add a description! It helps employees to understand the role.
            </small>
          </label>

          <!--departments -->
          <label for="department" class="fw-bold">Department</label>
          <label class="d-block mb-3">
            <ng-select
              [items]="departments"
              bindLabel="name"
              formControlName="departmentId"
              bindValue="id"
              placeholder="Select Department"
            >
            </ng-select>
            <span hidden translate>Department</span>
            <small [hidden]="f.departmentId.valid || f.departmentId.untouched" class="text-danger" translate>
              Please select the department for this position. It's necessary for org chart.
            </small>
          </label>

          <label for="salaryRange" class="fw-bold">Salary Group/Range</label>

          <label class="d-block mb-3">
            <ng-select
              [items]="salaryRanges"
              bindLabel="name"
              formControlName="salaryRangeId"
              bindValue="id"
              placeholder="Select Salary Range"
            >
              <ng-template ng-label-tmp let-item="item">
                <span>{{ item.name }} ({{ item.minSalary }} - {{ item.maxSalary }})</span>
              </ng-template>
              <ng-template ng-option-tmp let-item="item" let-index="index" let-search="searchTerm">
                <span>{{ item.name }} ({{ item.minSalary }} - {{ item.maxSalary }})</span>
              </ng-template>
            </ng-select>
            <span hidden translate>Salary Range</span>
            <small [hidden]="f.salaryRangeId.valid || f.salaryRangeId.untouched" class="text-danger" translate>
              Please choose a salary range. This information is vital for budgeting and candidate expectations.
            </small>
          </label>
        </div>
      </div>
      <div class="card-footer">
        <div class="float-left">
          <!-- HTML markup for Create button -->
          @if (this.isAddNew) {
          <button
            (click)="onCreate()"
            class="btn btn-primary w-20"
            type="submit"
            [disabled]="entryForm.invalid || !isAddNew" ngbTooltip="Click to Add New Record"
          >
            <span translate><i class="fas fa-plus"></i> Save</span>
          </button>
          } @else {
          <!-- HTML markup for Update button -->
          <button
            (click)="onUpdate()"
            class="btn btn-primary w-20"
            type="submit"
            [disabled]="entryForm.invalid || isAddNew" ngbTooltip="Click to Save Changes"
          >
            <span translate><i class="fas fa-edit"></i> Update</span>
          </button>
          <!-- HTML markup for Delete button -->
          <button
            (click)="onDelete()"
            class="btn btn-danger w-20"
            type="submit"
            [disabled]="entryForm.invalid || isAddNew" ngbTooltip="Click to Remove Record"
          >
            <span translate><i class="fas fa-trash-alt"></i> Delete</span>
          </button>
          }
        </div>
      </div>
    </div>
  </form>
</div>
The provided code snippets position-detail.component.ts and position-detail.component.html demonstrate an implementation of an Angular Reactive Form in a complex application scenario, specifically for a position detail component in a Talent Management System. Let’s discuss the key aspects of this Reactive Form implementation:
1. Form Initialization and Configuration
createForm()method initializes the form withformBuilder.group(). This method defines the structure of the form, associating form controls with corresponding form fields.- Validators are applied to ensure required fields are filled (
Validators.required). This ensures data integrity when the form is submitted.
2. Form Model and Data Binding
- The form is mapped to the
Positionmodel, ensuring data consistency between the form and the backend data structures. - CRUD operations (
create,read,update,delete) are defined to handle data interactions with the backend via theApiHttpService.
3. Dynamic Data Loading
- Departments and salary ranges are loaded dynamically and bound to dropdown selections using
ng-select. This provides a user-friendly way to select from a list of options.
4. Reactive Form Controls
- Each form control is bound to a template-driven form field. For example,
formControlName="positionNumber"binds the input field to thepositionNumbercontrol in the form group. - Conditional rendering and validation messages are implemented. For instance, the
[hidden]attribute hides error messages until they are relevant (e.g., when a field is invalid and touched).
5. Event Handling and Form Submission
- Event handlers like
onCreate(),onUpdate(), andonDelete()are tied to corresponding button clicks, handling the form's submit actions. - Form submission is conditional, based on whether the form is in ‘New’ or ‘Edit’ mode, determined by the
formModeandisAddNewflags.
6. Advanced Features
- Integration with
NgbTooltipModulefor tooltips andTranslateModulefor localization, enhancing user experience and accessibility. - The
Loggerservice (log) is used for debugging and logging purposes, which is crucial for maintenance and troubleshooting.
7. Reactive Form Validation and Access
- The
get f()method provides convenient access to form controls, simplifying syntax in the template. - Real-time validation feedback is provided to the user as they interact with the form.
8. UI and Styling
- The form’s UI is structured using Bootstrap classes, ensuring a responsive and visually appealing layout.
- Conditional styling (
[ngClass]) is used to reflect the state of form controls (e.g., invalid fields highlighted).
Adding Reactive Forms to your SPA enhances form handling capabilities, especially in dynamic and data-intensive applications. It complements the existing advanced features by providing robust, scalable, and maintainable solutions for complex forms management.
Part 8: Application Security — JWT and OIDC
In the contemporary landscape of web application development, ensuring robust security is paramount, especially for applications like a Talent Management SPA. This section focuses on the implementation of application security using JSON Web Tokens (JWT) and OpenID Connect (OIDC), two widely adopted standards in the realm of secure identity management.
8.1 Understanding JWT and OIDC:
- JSON Web Tokens (JWT): JWTs are an open standard (RFC 7519) used for securely transmitting information between parties as a JSON object. In the context of web applications, JWTs are commonly used for authentication and authorization. A JWT token is compact, self-contained, and can include information like user identity, roles, and token expiration time. JWTs are typically returned by an identity provider after a user successfully authenticates and are subsequently used in HTTP requests to access protected resources.
- OpenID Connect (OIDC): OIDC is an authentication layer built on top of OAuth 2.0, an authorization framework. It allows clients to verify the identity of the user and obtain basic profile information in an interoperable and REST-like manner. OIDC adds an identity layer to OAuth 2.0, enabling clients to receive information about authenticated sessions and end-users.
8.2 Integrating JWT and OIDC in SPA:
- Authentication Flow: In our Talent Management SPA, authentication begins with the user logging in through an OIDC-compliant identity provider (IdP). Upon successful authentication, the IdP returns an ID token (which is a JWT), often alongside an access token and a refresh token.
- Using JWT for API Security: The JWT obtained from the IdP is then sent with HTTP requests to access protected resources on the server. Our backend (.NET Web API) validates this JWT to ensure it’s authentic and checks the permissions (claims) within the token to authorize access to resources.
- Handling Token Expiry and Renewal: The SPA handles token expiration scenarios gracefully, often using the refresh token to obtain a new JWT without requiring the user to re-authenticate.
8.3 Security Considerations:
- Token Storage: Proper handling and storage of JWTs in the SPA are crucial. Storing tokens in web storage (like localStorage) can make them susceptible to XSS attacks. A common strategy is to store the JWT in memory and use HttpOnly cookies for refresh tokens.
- Cross-Origin Resource Sharing (CORS): In an SPA, CORS needs to be correctly configured to prevent unauthorized domains from accessing resources.
- Token Validation: The backend must rigorously validate JWTs, checking their integrity, expiration, and the issuer’s trustworthiness.
- Redirection and Callbacks: Handling redirections after authentication and callbacks securely is essential to prevent Open Redirection vulnerabilities.
8.4 Leveraging Libraries and Frameworks:
- Many Angular applications leverage libraries like
angular-oauth2-oidcto integrate OIDC and OAuth 2.0 flows. - Backend frameworks (.NET Core) offer built-in or third-party middleware to handle JWT validation and processing.
Incorporating JWT and OIDC into the Talent Management SPA enhances the application’s security posture. It ensures that only authenticated and authorized users can access sensitive functionalities while maintaining a seamless user experience. By adhering to these standards, the SPA aligns with modern security practices, offering robust protection mechanisms in the increasingly complex domain of web application security.
Let’s do a code walk-through for setting angular-oauth2-oidc
Example code: authAppInitializerFactory from auth-app-initializer.factory.ts
import { AuthService } from './auth.service';

export function (authService: AuthService): () => Promise<void> {
  return () => authService.runInitialLoginSequence();
}
Example code: CoreModule in core.module.ts
import { APP_INITIALIZER, ModuleWithProviders, NgModule, Optional, SkipSelf } from '@angular/core';
import { CommonModule } from '@angular/common';
import { HttpClientModule } from '@angular/common/http';
import { RouteReuseStrategy, RouterModule } from '@angular/router';
import { TranslateModule } from '@ngx-translate/core';

import { RouteReusableStrategy } from './route-reusable-strategy';

// OIDC Integration
import { AuthConfig, OAuthModule, OAuthModuleConfig, OAuthStorage } from 'angular-oauth2-oidc';
import { authAppInitializerFactory } from './auth/auth-app-initializer.factory';
import { authConfig } from './auth/auth-config';
import { AuthGuardWithForcedLogin } from './auth/auth-guard-with-forced-login.service';
import { AuthGuard } from './auth/auth-guard.service';
import { authModuleConfig } from './auth/auth-module-config';
import { AuthService } from './auth/auth.service';
import { RoleGuard } from './auth/role-guard.service';

// We need a factory since localStorage is not available at AOT build time
export function storageFactory(): OAuthStorage {
  return localStorage;
}

@NgModule({
  imports: [CommonModule, HttpClientModule, OAuthModule.forRoot(), TranslateModule, RouterModule],
  providers: [
    AuthService,
    AuthGuard,
    RoleGuard,
    AuthGuardWithForcedLogin,
    {
      provide: RouteReuseStrategy,
      useClass: RouteReusableStrategy,
    },
  ],
})
export class CoreModule {
  static forRoot(): ModuleWithProviders<CoreModule> {
    return {
      ngModule: CoreModule,
      providers: [
        { provide: APP_INITIALIZER, useFactory: authAppInitializerFactory, deps: [AuthService], multi: true },
        { provide: AuthConfig, useValue: authConfig },
        { provide: OAuthModuleConfig, useValue: authModuleConfig },
        { provide: OAuthStorage, useFactory: storageFactory },
      ],
    };
  }
  constructor(@Optional() @SkipSelf() parentModule: CoreModule) {
    // Import guard
    if (parentModule) {
      throw new Error(`${parentModule} has already been loaded. Import Core module in the AppModule only.`);
    }
  }
}
The provided code snippet demonstrates how to set up and integrate the angular-oauth2-oidc library in an Angular application for handling OpenID Connect (OIDC) and OAuth 2.0 flows. Let's break down the key parts of this setup:
1. Initial Login Sequence:
- The function
authAppInitializerFactoryis defined to initialize the authentication process. It takes anAuthServiceinstance as a parameter and returns a function that executesrunInitialLoginSequence(). runInitialLoginSequence()inAuthServiceis likely responsible for initiating the authentication flow, such as checking if the user is already logged in or needs to be redirected to a login page.
2. Angular Module Setup:
- The
CoreModuleclass is an NgModule that imports necessary Angular modules likeCommonModule,HttpClientModule,OAuthModule,TranslateModule, andRouterModule. OAuthModule.forRoot()initializes the OAuth module with global configuration.
3. Providers Configuration:
- Various services are provided in the
CoreModule, includingAuthService,AuthGuard,RoleGuard, andAuthGuardWithForcedLogin. - The
APP_INITIALIZERtoken is used to run code during the application initialization phase. It's configured to execute theauthAppInitializerFactory. This ensures that the authentication process starts as soon as the app loads. AuthConfig,OAuthModuleConfig, andOAuthStorageare configured with the respective objects (authConfig,authModuleConfig, and a factory function forOAuthStorage). This configuration sets up the OIDC client with specifics like client ID, issuer URL, redirect URIs, etc.
4. OAuthStorage Factory:
- The
storageFactoryfunction is a factory provider forOAuthStorage. It returnslocalStorage, indicating that the OAuth tokens and related data will be stored in the browser's localStorage.
Overall, the code snippets for authAppInitializerFactory and CoreModule set up OIDC and OAuth 2.0 authentication in an Angular application using the angular-oauth2-oidc library. It configures necessary services, authentication flows, and storage mechanisms, and ensures that the authentication process is initialized as the application starts. This setup is critical for securing the application and managing user authentication and authorization effectively.
Live Demo
Dive into the dynamic world of Talent Management with our Angular Client and Web API. Experience hands-on management with our Angular 17 and Bootstrap 5-powered Angular Client at https://workcontrolgit.github.io/TalentManagement-Client-Angular, offering a user-friendly and interactive platform.
For backend insights, explore our comprehensive Web API at https://talentmanagementwebapi.azurewebsites.net/swagger/index.html. Hosted on Azure with detailed Swagger documentation, it simplifies the understanding of server-side operations. These integrated tools provide a complete view of the Talent Management system, showcasing the seamless synergy between front-end and back-end technologies.
Summary

This blog post serves as a comprehensive guide for both seasoned and novice developers, offering insights into the application’s structure and core functionalities. The blog begins with essential prerequisites like Node.js and Angular CLI, followed by a detailed walkthrough of setting up the Angular client, including cloning from GitHub and installing dependencies.
The architecture of the Talent Management SPA is meticulously broken down, highlighting the project’s structure, key directories, and files. This is followed by an exploration of the Angular client’s interaction with the .NET Web API, detailing the handling of HTTP requests and responses, and the usage of services and models for data management.
Key components like the Employee List and Position Management are explained with code snippets, showcasing the application’s functionality in managing employee data and positions. The blog emphasizes the use of Angular Reactive Forms for handling form inputs, validations, and changes, a model-driven approach suitable for dynamic and complex scenarios.
Additionally, the blog covers advanced features such as Routing and Navigation, using Angular’s Router module for seamless user experience, and server-side operations like paging, sorting, and typeahead search for performance optimization. Finally, it touches upon UI components and responsive design, utilizing Bootstrap for a user-friendly interface, and the mobile-first approach to ensure the application’s accessibility across various devices.
Overall, this blog provides a deep dive into building a robust Talent Management SPA, offering valuable insights and practical examples for developing modern web applications using Angular and .NET technologies.
Additional Resources
- Upgrade Angular 16 to 17 and Try Out New Control Flow Language
- Angular Advanced UI: Combo Box with Ng-Select Typeahead Search and Rating Component in Reactive Form
- Angular 16 Reactive Form and Validation
- Implement Toast with Bootstrap 5 in Angular 15 or 16
- Angular 15 & Net 7: Auth Guard and Role-Based Access Control with JSON Web Token
- Angular Guard for Role-Based Access Control (RBAC) Driven by JWT
Thank you for reading! I hope you found this useful. For more great content, follow me and consider becoming a Medium member. Your support helps me create more awesome articles. Have a fantastic day! — Fuji Nguyen


