
Angular 16 Reactive Form and Validation | Tutorial

Introduction
Angular Reactive Forms is a powerful feature of the Angular framework that allows you to create and manage forms in a reactive and declarative manner. Reactive forms provide a way to build complex, dynamic forms with ease.
Angular form validation is a feature provided by the Angular framework that allows you to validate user input in HTML forms. It enables you to define rules and conditions for input fields and provides feedback to users when their input is invalid.
How to Implement Reactive Form
To implement a reactive form in Angular, you’ll need to follow these steps:
Step 1: Import the required Angular modules
In your component’s module file (e.g., app.module.ts), import the ReactiveFormsModule from @angular/forms. This module provides the necessary classes and directives for reactive forms.
Step 2: Create the form controls and form group
In your component file (e.g., position.component.ts), import the necessary classes from @angular/forms, such as FormBuilder, FormGroup, and Validators. Use the FormBuilder to create the form controls and group them together in a form group.
Step 3: Bind the form controls in the template
In your component’s template (e.g., position.component.html), use the formGroup directive to bind the form group to the HTML form element. For each form control, use the formControlName directive to bind it to the corresponding control in the form group.
Step 4: Handle form submission and validation
In your component’s class, you can handle the form submission by implementing a method (e.g., submitForm()). In this method, you can check the validity of the form using the valid property of the form group. You can also access the form values using the value property.
Use Case
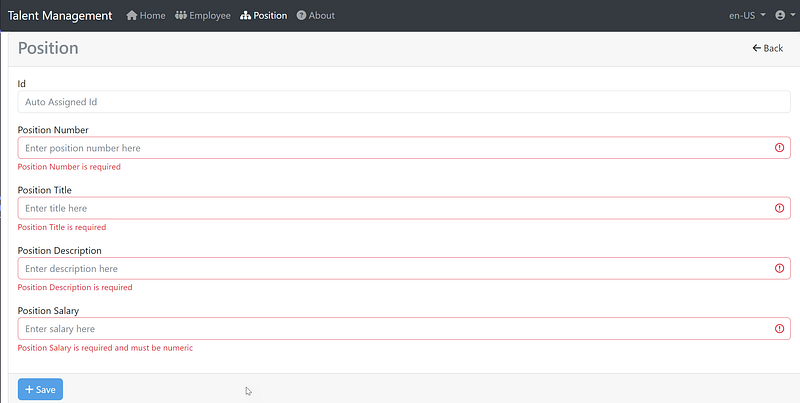
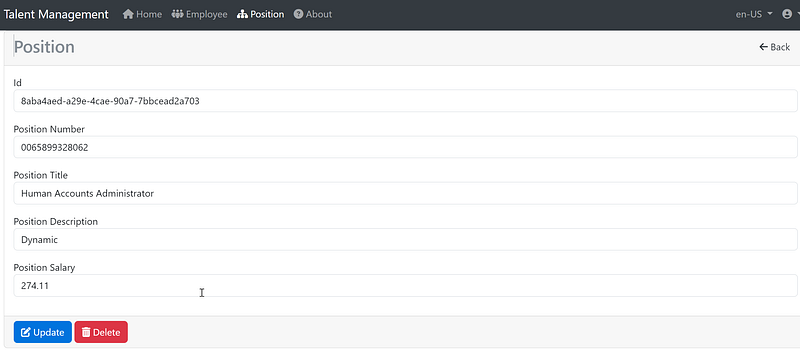
You are tasked with developing a data entry form to add/update the position table. The form is used to support adding or editing records. The validation includes the required data field and data type validation. Please refer to the figure below for an example screenshot of the form.
Source Code Discussed in This Blog Post
The source code discussed in this blog post is from the demo Talent Management project, which consists of three distinct but interrelated repositories. These repositories include
1. Angular 16 Client
The Angular 16 repository serves as the front-end interface for the project, providing users with a user-friendly and intuitive interface for managing and accessing talent data. The source code in this repository was first generated using the template ngX-Rocket before adding custom code.
2. Net 7 Api Resources
The NET7 API resource repository acts as the back-end of the system, providing access to talent data and implementing all necessary business logic. The source code of the API resource project was generated using the clean architecture Template OnionAPI which is available for download from Visual Studio Marketplace.
3. Duende IdentityServer for Token Service
The Dudende token service repository is responsible for managing authentication and authorization, ensuring that only authorized users can access the system’s sensitive talent data. The source code for this repository was generated using the template skoruba Admin UI.
You have the option to download the complete full-stack source code and run it on your localhost environment. When prompt for account to login, use (admin, Pa$$word123). For more information about this sample project, please visit Fullstack Angular 15, Bootstrap 5 & .NET 7 API: Project Demo and Tutorial.
Part 1: Reactive Form Typescript Walkthrough
Below is the Typescript code to bind HTML markup (see Part 2 later for HTML code) to a component class and implement the necessary methods for handling form submission and other logic taken from the source code file position.component.ts
import { Component, OnInit } from '@angular/core';
import { ActivatedRoute, RouterLink } from '@angular/router';
import { FormGroup, FormBuilder, Validators, ReactiveFormsModule } from '@angular/forms';
import { Logger } from '@app/core';
import { ApiHttpService } from '@app/services/api/api-http.service';
import { ApiEndpointsService } from '@app/services/api/api-endpoints.service';
import { Position } from '@shared/interfaces/position';
import { DataResponsePosition } from '@shared/interfaces/data-response-position';
import { ModalService } from '@app/services/modal/modal.service';

import { RxwebValidators, RxReactiveFormsModule } from '@rxweb/reactive-form-validators';
import { ToastService } from '@app/services/toast/toast.service';
import { NgIf } from '@angular/common';
import { TranslateModule } from '@ngx-translate/core';
import { CommonModule } from '@angular/common';

const log = new Logger('Detail');

@Component({
  selector: 'app-detail',
  templateUrl: './position-detail.component.html',
  styleUrls: ['./position-detail.component.scss'],
  standalone: true,
  imports: [ReactiveFormsModule, RxReactiveFormsModule, CommonModule, RouterLink, TranslateModule, NgIf],
})
export class PositionDetailComponent implements OnInit {
  formMode = 'New';
  sub: any;
  id: any;
  entryForm!: FormGroup;
  error: string | undefined;
  position!: Position;
  isAddNew: boolean = false;
  submitted = false;

  constructor(
    private toastService: ToastService,
    private route: ActivatedRoute,
    private formBuilder: FormBuilder,
    private apiHttpService: ApiHttpService,
    private apiEndpointsService: ApiEndpointsService,
    private modalService: ModalService
  ) {
    this.createForm();
  }

  ngOnInit() {
    this.sub = this.route.params.subscribe((params) => {
      this.id = params['id'];
      if (this.id !== undefined) {
        this.read(this.route.snapshot.paramMap.get('id'));
        this.formMode = 'Edit';
      } else {
        this.isAddNew = true;
        this.formMode = 'New';
      }
    });
    log.debug('ngOnInit:', this.id);
  }

  // Handle Create button click
  onCreate() {
    this.create(this.entryForm.value);
    log.debug('OnInsert: ', this.entryForm.value);
    log.debug('OnInsert: ', this.entryForm.get('positionNumber')!.value);
  }

  // Handle Update button click
  onUpdate() {
    this.put(this.entryForm.get('id')!.value, this.entryForm.value);
    this.showToaster('Great job!', 'Data is updated');
  }

  // Handle Delete button click
  onDelete() {
    this.modalService
      .OpenConfirmDialog('Position deletion', 'Are you sure you want to delete?')
      .then((Yes) => {
        if (Yes) {
          this.delete(this.entryForm.get('id')!.value);
          log.debug('onDelete: ', this.entryForm.value);
        }
      })
      .catch(() => {
        log.debug('onDelete: ', 'Cancel');
      });
  }
  // CRUD > Read, map to REST/HTTP GET
  read(id: any): void {
    this.apiHttpService.get(this.apiEndpointsService.getPositionByIdEndpoint(id), id).subscribe(
      //Assign resp to class-level model object.
      (resp: DataResponsePosition) => {
        //Assign data to class-level model object.
        this.position = resp.data;
        //Populate reactive form controls with model object properties.
        this.entryForm.setValue({
          id: this.position.id,
          positionNumber: this.position.positionNumber,
          positionTitle: this.position.positionTitle,
          positionDescription: this.position.positionDescription,
          positionSalary: this.position.positionSalary,
        });
      },
      (error) => {
        log.debug(error);
      }
    );
  }
  // CRUD > Delete, map to REST/HTTP DELETE
  delete(id: any): void {
    this.apiHttpService.delete(this.apiEndpointsService.deletePositionByIdEndpoint(id), id).subscribe(
      (resp: any) => {
        log.debug(resp);
        this.showToaster('Great job!', 'Data is deleted');
        this.entryForm.reset();
        this.isAddNew = true;
      },
      (error) => {
        log.debug(error);
      }
    );
  }

  // CRUD > Create, map to REST/HTTP POST
  create(data: any): void {
    this.apiHttpService.post(this.apiEndpointsService.postPositionsEndpoint(), data).subscribe((resp: any) => {
      this.id = resp.data; //guid return in data
      this.showToaster('Great job!', 'Data is inserted');
      this.entryForm.reset();
    });
  }

  // CRUD > Update, map to REST/HTTP PUT
  put(id: string, data: any): void {
    this.apiHttpService.put(this.apiEndpointsService.putPositionsPagedEndpoint(id), data).subscribe((resp: any) => {
      this.id = resp.data; //guid return in data
    });
  }

  // reactive form
  private createForm() {
    this.entryForm = this.formBuilder.group({
      id: [''],
      positionNumber: ['', Validators.required],
      positionTitle: ['', Validators.required],
      positionDescription: ['', Validators.required],
      positionSalary: ['', RxwebValidators.numeric({ allowDecimal: true, isFormat: false })],
    });
  }

  // call modal service
  showToaster(title: string, message: string) {
    this.toastService.show(title, message, {
      classname: 'bg-success text-light',
      delay: 2000,
      autohide: true,
    });
  }

    // convenience getter for easy access to form fields
    get f() { return this.entryForm.controls; }
}
The above code is an Angular component called PositionDetailComponent. It represents the TypeScript implementation of the component and includes various imports and class properties and methods. Let's go through the code section by section:
- The imports at the top of the code include necessary dependencies from Angular and external libraries. These imports are used for various functionalities such as routing, form handling, validation, services, and more.
- The component decorator is used to specify the component’s selector, template URL, and style URLs. It also includes the
standalone: trueproperty, which indicates that this component can be used independently without any parent component. - Inside the component class definition, there are various class properties declared. Some notable properties include
formModefor tracking the form mode (New or Edit),subfor storing the subscription to route params,idfor storing the ID of the position,entryFormfor the reactive form group,errorfor storing error messages,positionfor storing position data,isAddNewfor determining if it's a new position, andsubmittedfor tracking form submission. - The constructor initializes the form by calling the
createForm()method and injects the required services likeToastService,ActivatedRoute,FormBuilder,ApiHttpService,ApiEndpointsService, andModalService. - The
ngOnInit()method is called when the component is initialized. It subscribes to the route params and retrieves theidparameter. Based on the existence of theid, it sets the form mode and calls theread()method to fetch the position data if in edit mode. - The component includes methods for handling button clicks and CRUD operations.
onCreate()handles the create button click and calls thecreate()method to submit the form data.onUpdate()handles the update button click and calls theput()method to update the position data.onDelete()handles the delete button click and prompts the user for confirmation using theModalService. If confirmed, it calls thedelete()method to delete the position data. - The
read(),delete(),create(), andput()methods make HTTP requests using theApiHttpServiceto perform CRUD operations on the position data. They handle the response and error accordingly. - The
createForm()method is used to create the reactive form using theformBuilder. It defines form controls with initial values and validators. - The
showToaster()method is used to display a toast message using theToastService. It shows a success message with a specific title and message. - The
get f()method is a getter property that provides easy access to the form fields in the template usingentryForm.controls.
Overall, this component manages the creation, reading, updating, and deleting (CRUD) operations for a position entity using a reactive form. It communicates with an API through the ApiHttpService and displays toast messages for success or failure using the ToastService.
If you are new to the Reactive Form, pay special attention to the block of code below
private createForm() {
    this.entryForm = this.formBuilder.group({
      id: [''],
      positionNumber: ['', Validators.required],
      positionTitle: ['', Validators.required],
      positionDescription: ['', Validators.required],
      positionSalary: ['', RxwebValidators.numeric({ allowDecimal: true, isFormat: false })],
    });
  }
The method createForm() creates a form using the formBuilder service from Angular's Reactive Forms module. Let's break down the code step by step:
- The method is declared as
private, which means it can only be accessed within the same class. - Inside the method, a form is created using
this.formBuilder.group(). TheformBuilderis an instance ofFormBuilderclass provided by Angular's Reactive Forms module. - The form group is initialized with an object literal that defines the form controls. Each form control is represented by a key-value pair, where the key is the name of the control and the value is an array with two elements.
- The first element of each control’s array is the initial value of the control. In this case, the
idcontrol is initialized with an empty string''. - The second element of each control’s array is an array of validators to apply to the control. Validators are functions used to validate user input. In this code, the
Validators.requiredvalidator is used to make thepositionNumber,positionTitle, andpositionDescriptioncontrols required. - The
positionSalarycontrol is configured with a custom validator calledRxwebValidators.numeric(). This validator is from theRxwebValidatorslibrary, which is used to validate numeric inputs. It allows decimal numbers (allowDecimal: true) and does not enforce a specific format (isFormat: false). - After creating the form group, it is assigned to the
entryFormproperty of the class. This property is assumed to be declared somewhere in the class.
Overall, this method sets up a form with five controls: id, positionNumber, positionTitle, positionDescription, and positionSalary, with appropriate validators applied to some of the controls. The form can be used for data entry and validation in an Angular application.
Part 2: Reactive Form HTML Markup Walkthrough
Below is an example of an Angular reactive form that includes multiple form controls with validation taken from source code file position.component.html
<div class="container-fluid">
  <!-- HTML form mark up -->
  <form [formGroup]="entryForm" novalidate>
    <div class="card">
      <div class="card-header">
        <div class="float-start"><h3 class="text-secondary">Position</h3></div>
        <div class="float-end">
          <!-- HTML markup for form mode New or Edit -->
          <a class="btn text-dark" [routerLink]="['/position']"><i class="fa fa-arrow-left"></i> Back</a>
        </div>
      </div>
      <div class="card-body">
        <div class="alert alert-danger" [hidden]="!error" translate>
          Position Number, Title, Description or Salary incorrect.
        </div>
        <div class="form-group">
          <label for="id">Id</label>
          <label class="d-block mb-3">
            <input
              type="text"
              class="form-control"
              formControlName="id"
              [ngClass]="{ 'is-invalid': f.id.errors }"
              autocomplete="id"
              [placeholder]="'Auto Assigned Id' | translate"
              readonly
            />
            <span hidden translate>Id</span>
            <small
              [hidden]="f.id.valid || f.id.untouched"
              class="text-danger"
              translate
            >
              Id is required
            </small>
          </label>
          <label for="positionNumber">Position Number</label>
          <label class="d-block mb-3">
            <input
              type="text"
              class="form-control"
              formControlName="positionNumber"
              [ngClass]="{ 'is-invalid': f.positionNumber.errors }"
              autocomplete="positionNumber"
              [placeholder]="'Enter position number here' | translate"
              required
            />
            <span hidden translate>PositionNumber</span>
            <small
              [hidden]="f.positionNumber.valid || f.positionNumber.untouched"
              class="text-danger"
              translate
            >
              Position Number is required
            </small>
          </label>
          <label for="positionTitle">Position Title</label>          <label class="d-block mb-3">
            <input
              type="text"
              class="form-control"
              formControlName="positionTitle"
              [ngClass]="{ 'is-invalid': f.positionTitle.errors }"
              autocomplete="current-positionTitle"
              [placeholder]="'Enter title here' | translate"
              required
            />
            <span hidden translate>PositionTitle</span>
            <small
              [hidden]="f.positionTitle.valid || f.positionTitle.untouched"
              class="text-danger"
              translate
            >
              Position Title is required
            </small>
          </label>
          <label for="positionDescription">Position Description</label>          <label class="d-block mb-3">
            <input
              type="text"
              class="form-control"
              formControlName="positionDescription"
              [ngClass]="{ 'is-invalid': f.positionDescription.errors }"
              autocomplete="current-positionDescription"
              [placeholder]="'Enter description here' | translate"
              required
            />
            <span hidden translate>PositionDescription</span>
            <small
              [hidden]="
                f.positionDescription.valid || f.positionDescription.untouched
              "
              class="text-danger"
              translate
            >
              Position Description is required
            </small>
          </label>
          <label for="positionSalary">Position Salary</label>
          <label class="d-block mb-3">
            <input
              type="text"
              class="form-control"
              formControlName="positionSalary"
              [ngClass]="{ 'is-invalid': f.positionSalary.errors }"
              autocomplete="current-positionSalary"
              [placeholder]="'Enter salary here' | translate"
              required
            />
            <span hidden translate>PositionSalary</span>
            <small
              [hidden]="f.positionSalary.valid || f.positionSalary.untouched"
              class="text-danger"
              translate
            >
              Position Salary is required and must be numeric
            </small>
          </label>
        </div>
      </div>
      <div class="card-footer">
        <div class="float-left">
          <!-- HTML markup for Create button -->
          <button
            (click)="onCreate()"
            class="btn btn-primary w-20"
            type="submit"
            [disabled]="entryForm.invalid || !isAddNew"
            *ngIf="this.isAddNew"
          >
            <span translate><i class="fas fa-plus"></i> Save</span>
          </button>
          <!-- HTML markup for Update button -->
          <button
            (click)="onUpdate()"
            class="btn btn-primary w-20"
            type="submit"
            [disabled]="entryForm.invalid || isAddNew"
            *ngIf="!this.isAddNew"
          >
            <span translate><i class="fas fa-edit"></i> Update</span>
          </button>
          <!-- HTML markup for Delete button -->
          <button
            (click)="onDelete()"
            class="btn btn-danger w-20"
            type="submit"
            [disabled]="entryForm.invalid || isAddNew"
            *ngIf="!this.isAddNew"
          >
            <span translate><i class="fas fa-trash-alt"></i> Delete</span>
          </button>
        </div>
      </div>
    </div>
  </form>
</div>
The above code represents an HTML form markup with a reactive form implementation in Angular. Let’s walk through the code section by section:
- The outermost container
<div class="container-fluid">sets the layout to occupy the full width of its parent container. - Inside the container, there is a
<form>element with[formGroup]="entryForm"binding the form group to theentryFormproperty of the component. - Within the form, there is a
<div class="card">element representing a card-like container for the form content. - The
<div class="card-header">section contains the header of the card. It includes a heading<h3 class="text-secondary">Position</h3>and a<div>element with a link for navigation. - The
<div class="card-body">section contains the main content of the form. It starts with an<div class="alert alert-danger">element that is conditionally hidden based on theerrorproperty. Inside the alert, there is a message indicating incorrect position details. - Inside the
<div class="form-group">, there are several form controls defined using<label>and<input>elements. Each input element has attributes likeformControlNamebinding it to a specific form control in theentryFormFormGroup. - Each input element also has additional attributes like
[ngClass]for dynamic styling based on the form control's validity,autocompletefor specifying the type of autocomplete,[placeholder]for placeholder text, andrequiredfor making the field mandatory. - Below each input, there is a
<small>element that displays a validation error message when the form control is invalid or untouched. The[hidden]attribute is used to show or hide the error message based on the form control's state. - The
<div class="card-footer">section contains the footer of the card. It includes a<div class="float-left">element with buttons for creating, updating, and deleting entries. The buttons have click event bindings to corresponding methods in the component and are conditionally shown or hidden based on theisAddNewproperty.
This code provides a basic implementation of an Angular reactive form with form controls and validation.
Frequently Asked Questions
Question 1: How to validate money in Angular?
Answer: Define the money input field in your form using the FormControl class. You can specify validators to enforce specific rules. For example, you can use the Validators.pattern validator with a regular expression /^\d+(\.\d{1,2})?$/ to validate the money format. See below for an example code
  ngOnInit() {
    this.moneyForm = new FormGroup({
      money: new FormControl('', [
        Validators.required,
        Validators.pattern(/^\d+(\.\d{1,2})?$/)
      ])
    });
  }
Question 2: How to interact with native HTML form validation
Answer: By default, Angular disables native HTML form validation by adding the novalidate attribute on the enclosing <form> element and uses directives to match these attributes with validator functions in the framework. This means that Angular handles the validation logic internally. However, if you want to use native validation in combination with Angular-based validation, you can add the ngNativeValidate attribute to the <form> element:
<form ngNativeValidate>
  ...
</form>
Recommended Contents
- What are Template and Reactive forms in Angular?⛅
- Upgrading Angular 15 to 16: A Full-stack Web Development Project using Angular and .NetCore WebAPI ♥
- Load Angular Component into Bootstrap Modal | Tutorial ⛽
- Implement Toast with Bootstrap 5 in Angular 15 or 16 | Tutorial ☕
- Fullstack Angular 15, Bootstrap 5 & NET 7 API: Project Demo and Tutorial ♥
- Seven Object-Oriented Programming Jokes ☺
Summary

Angular Reactive Forms is a powerful feature provided by the Angular framework for handling form-based data entry and validation in a reactive and declarative manner. It offers a flexible and robust approach to building forms that can be used for tasks such as data input, editing, and validation.
Thanks for reading! Hope you found it useful. Want more? Please follow me and become a member on medium for more articles. With your support, I’ll keep creating awesome content for you. Have a great day ahead! — Fuji Nguyen