
Node.js app in the real world : deployment, decorators, going further
This is Part 5 of a 5-part series.
Part 0 was the introduction, Part 1 was about structuring your application and coding style, Part 2 was about persisting our domain, setting up the HTTP interface. Part 3 was about authentication, access control and error handling. Part 4 was about CLI commands, commenting, documenting and testing our REST API written in JavaScript under Node.js with a Koa server, a Mongodb database and the Mongoose ODM. This final part will be about deploying and some “advanced” tips and tricks.

How to deploy in production ?
Configuration files
Before deploying in production, you have to differentiate your dev, test and prod environnements. One way to do it is to have the following structure :
config/
  environments/
    dev.js
    prod.js
    test.js
  app.js
  db.js
  cache.js
  index.js
In your database configuration file, you’ll have something like this :
config/db.js
const dbConfig = {
  dev: {
    host: ‘localhost’,
    port: ‘27017’,
    database: ‘myApp_dev’,
    auth: false
  },
  test: {
    host: ‘localhost’,
    port: ‘27017’,
    database: ‘myApp_test’,
    auth: false
  },
  prod: process.env.DATABASE_URL
}
Your cache configuration file will be similarly structured.
By the way, I won’t go into details on here to set up a cache, but if you are in production, please use one. It can be Redis for instance. If so, just create in your infrastructure layer a RedisCache service (get inspiration from our ManageDB service seen in Part 2 — this would be a good training) :
- Implementing get() and close() methods,
- Connecting to the cache database at instanciation,
- Failing silently if no cache database is running,
- Closing gracefully if there is a connection error.
Then add a simple middleware like this in your presentation layer :
src/interfaces/http/cache/httpCache.js
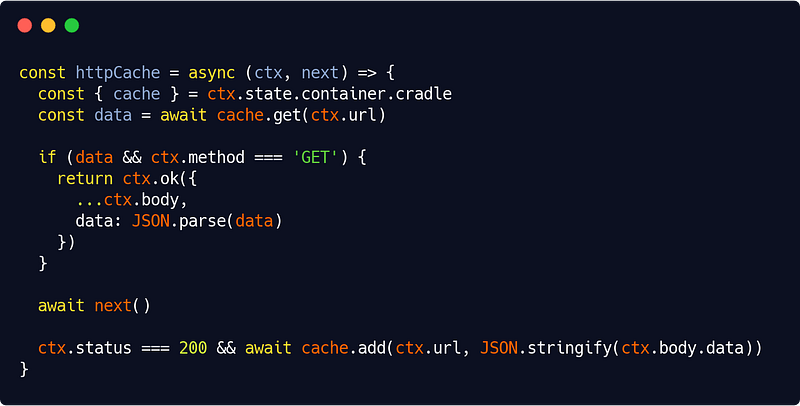
The key here is :
await next()not being the last line : all code before will be processed before using our API services (so if we have a cache entry, we use it), all code after will be processed once we have the data in ctx.body.data (if everything went right, we add a cache entry for the route). That’s really the beauty of Koa.
So let’s go back to our configuration files. Our environments/ files will each contain (unsuprisingly) environnement-specific variables other than database or cache-related ones. They can be for instance the HTTP port, secrets, SMTP configuration, or externals API keys.
But for production, I recommend using an .env file and use dotenv. So in your prod.js file you will have for example :
config/environments/prod.js
const prodConfig = {
  server: { port: process.env.PORT || 3000 },
  secret: process.env.SECRET,
  mail: {
    host: process.env.MAIL_HOST,
    port: process.env.MAIL_PORT,
    user: {
      id: process.env.MAIL_ID,
      password: process.env.MAIL_PASSWORD
    }
  }
}
and your actual environments variables will be in your .env file.
Lastly, our app.js file will contain environment-independant variables for your application, such as the access control list configuration rules for example (see Part 3).
Now we have to load all those configuration files at startup, so we’ll do :
config/index.js

And we have our full config object for our service container (see Part 1). And you can safely know that the right values will be used if you set NODE_ENV to either dev, prod or test.
Building
Before building with :
babel src -d dist- Make sure all your tests pass (of course),
- Use a linter :
eslint src config test
Then you’re set and ready to go !
You can easily automate building and deploying at each Git commit (ensure your commits due digilence then !) using the right tools or services (like Heroku for instance).
You can (and probably should) also consider using pm2 for running your app in production.
How to implement useful decorators ?
Now that we have our app ready, let’s go a bit further.
Basically, the goal here is to write code like this :
src/app/game/player/create.js
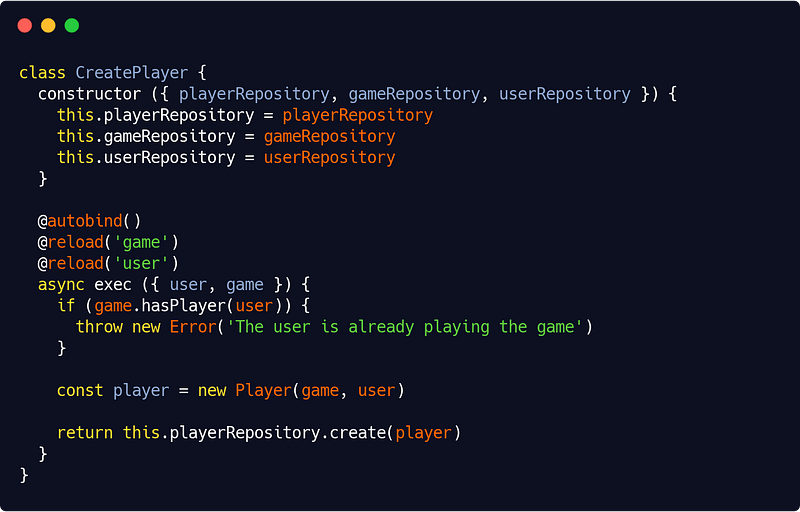
Notice the @autobind and @reload decorators.
Before I explain, be aware that decorators are only a Stage 2 TC39 proposal, meaning they are not part of JavaScript yet, and may well never be.
Yet I am very much a fan of a such syntax : it’s clear and elegant, it minimizes code duplication, it’s great for testing. It has many advantages and I’ve no doubt that decorators will eventually be added to the JavaScript . It just most likely won’t be as I’ll present them here.
So, at we reach the end of this series, let’s dive into some experimental terroritory ! But if you’re still uncomfortable using them, no worries, they are essentially sugar that you can implement differently (although far more tediously) in plain JavaScript.
As of now (meaning : the current state of implementation by Babel, which is not in line with the current state of the TC39 proposal, so caution must be exerted here — told you it was the experimental part), you will wrote your @autobind decorator like this :
src/app/utils/decorators.js
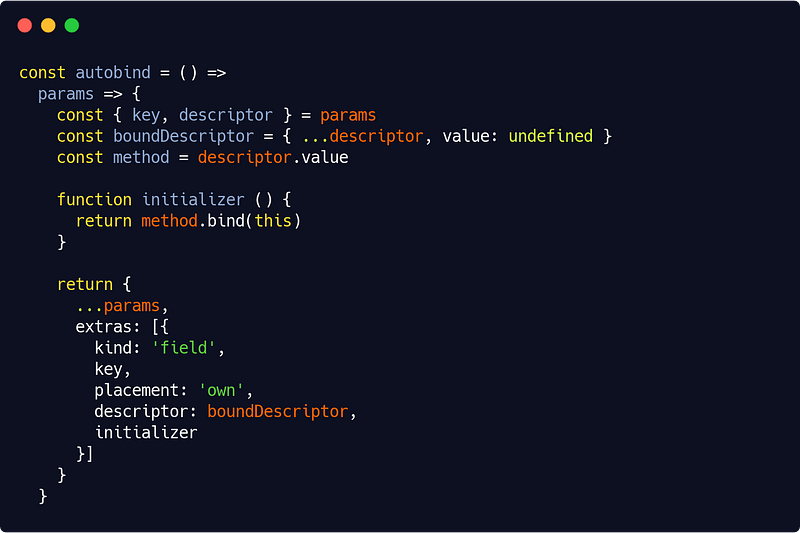
Now this requires some explanations : autobind is a function which returns another function (the actual decorator). That returned function takes a params object which can be destructured like this :
{ key, descriptor } = params(there are others properties, but no need to talk about them here — in all the method decorators we’ll be writing, we’ll only need key and descriptor).
descriptor is our method descriptor, key is its name.
Again, this will likely change in the future, so if you implement such a method, keep an eye both on the TC39 proposal and on the current Babel implementation. Until then just trust the semantics above and below.
Broadly (I won’t go into further details than the following for all the reasons stated earlier), our decorator function will itself return an object which the same properties as the params object, along with an optional extras array.
All you have to know at that point is that, for our autobind magic to occur, you need to build one object as a member of that extras array. That object if of kind “field”, has the same name (key) as our method, and contains a copy (boundDescriptor) of our method, a copy which is itself bound to its class instance through a provided initializer function.
Yeah, don’t worry, this one was the most difficult.
Let’s see our @reload decorator now :
src/app/utils/decorators.js
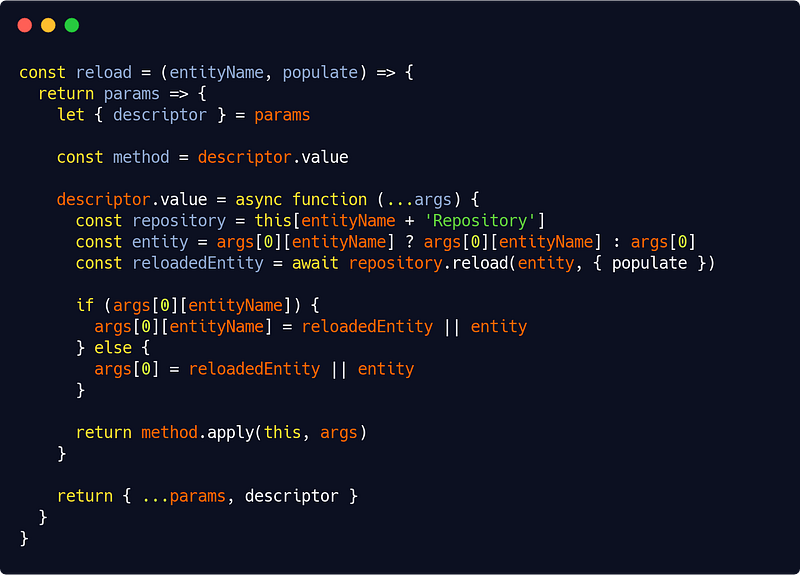
Here we only need the descriptor property of the params object. We will change its value so that if an entity is passed as argument to the method, it will be automatically reloaded from database.
Now as JavaScript is not strongly typed, the only way to know if a given entity type has been passed as parameter is to have a property named entityName in the method arguments object. To account for other cases though, we have added another possibility : that the entity is the first argument of the method. But you’ll no doubt deduce that if we are in the latter case, there can be only one @reload decorator on the method.
As we did in Part 3 when we handled access control, we assume that the repository for a given entity called entityName is itself called entityNameRepository. Again, this is rather good practice to have that discipline anyway. We’ll also need, rather logically, the repositories for our @reload decorators to be members of the instance.
That’s why, earlier, you saw that code in our proposed service class :
class CreatePlayer {
  constructor ({ playerRepository, gameRepository, userRepository })  {
    this.playerRepository = playerRepository
    this.gameRepository = gameRepository
    this.userRepository = userRepository
  }

  @reload(‘game’)
  @reload(‘user’)
  async exec ({ user, game }) { ... }
}
Here we are both reloading a game and user entity, needing both repositories as extra dependencies, in addition to the “natural” playerRepository.
This @reload decorator greatly simplify the code. Every time you’re not sure that your entity is a plain JavaScript entity, a corresponding model in your ODM semantics, or even a simple identifier — see how we smartly implemented our base repository reload() method ;) in Part 2—, then you’ll use the @reload decorator and be happy !
Of course if we used a strongly typed language, we could have used type hinting to trigger the reload and be even less verbose. And indeed this is often what’s done in other language’s frameworks.
Now you can imagine many more ideas for decorators, and even class decorators (for instance to check a repository against an interface), but I won’t explain this here, partly because, and I cannot stress this enough, decorators are still experimental in JavaScript, partly because I’m sure it would be an interesting challenge for you to do it yourself ;)
Yet I want to add something more general here : as you may have guessed already, decorators are a way to elegantly compensate (some) JavaScript limitations. Yet there is another, likely more robust way to do that : TypeScript. So yes, you may consider diving into this JavaScript superset. I choose not to in this series because (and for the same reason that I choose Node.js in the first place) I wanted the ideas outlined here to apply in the broader range of cases possible.
Now how to go beyond infinity ?
There are a bunch of things we didn’t tackle in this series. Event sourcing, concurrency and retrying strategies too. Among others.
Also we may have wrote a highly decoupled API but we didn’t really focus on performance.
These are directions for further investigation from your part once you’ve mastered everything else.
And of course we didn’t talk about the front-end ;)
So I’ll conclude by pointing to some extra (good) ressources here on medium for further reading :
And for even further reading :
We’re almost at the end of our journey now. Based on the principles that I’ve outlined in the series, I have written a full API boilerplate which is ready to use and has, to get back to our premises as well as summing up this whole series, the following features :
- A user model with zero dependencies (to other librairies as well as to Node.js modules)
- A thin app layer for managing users, with zero hard dependencies (except of course on the user model) and dependencies injection (DI) mechanism,
- An infrastructure layer containing all the implementation-specific code, notably data access (Mongodb + Mongoose, Redis…),
- A presentation layer with an HTTP interface for the API and a command line interface (CLI) app for managing users,
- Full and flexible authentication and access control systems,
- Overall Separation of Concerns (SoC), Single Responsibilty Principle (SRP) as much as possible and clean, Dont Repeat Yourself (DRY), Keep It Simple, Stupid (KISS) code as much as possible, aiming at open/closed principle for classes…
- 100% unit test coverage (175+ unit tests) and 20+ integration tests…
This boilerplate was a huge body of work and it’s available for sale. Please contact me for terms if you’re interested.
You may also use this maybe less thorough but nonetheless really excellent starting boilerplate (from which I myself drew inspiration) :
In any case, feel free to comment, review, criticize, pinpoint typos or mistakes, or just praise this article as well as other articles from this series.
I hope you enjoyed the ride, folks. Happy coding !