
Node.js app in the real world : repository pattern, HTTP server, controllers, routing
This is Part 2 of a 5-part series.
Part 0 was the introduction, Part 1 was about structuring your application and coding style, now let’s talk about implementing in detail the repository pattern, separating domain classes from database models, adding some automated logic to an ODM (Object-Document Mapping), setting up the HTTP server, and managing controllers as well as composing proper routes for our REST API written in JavaScript under Node.js with a Koa server, a Mongodb database and the Mongoose ODM.

How to implement the repository pattern and persist our domain efficiently ?
As we hinted in Part 0, we are handling persistence through entity repositories. This allows us to completely abstract how persistence is done (which models and which database).
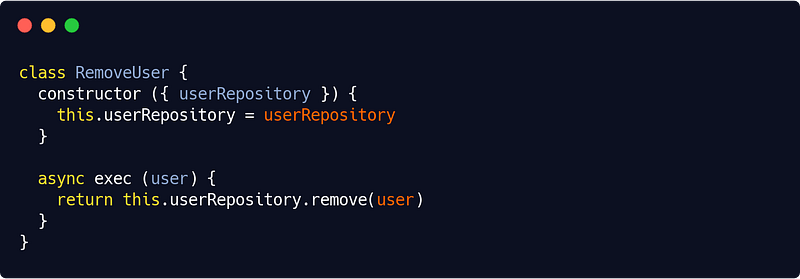
The repository class
We decided to use Mongoose. So part of our repository would look like this :
src/infra/database/repositories/mongooseRepository.js
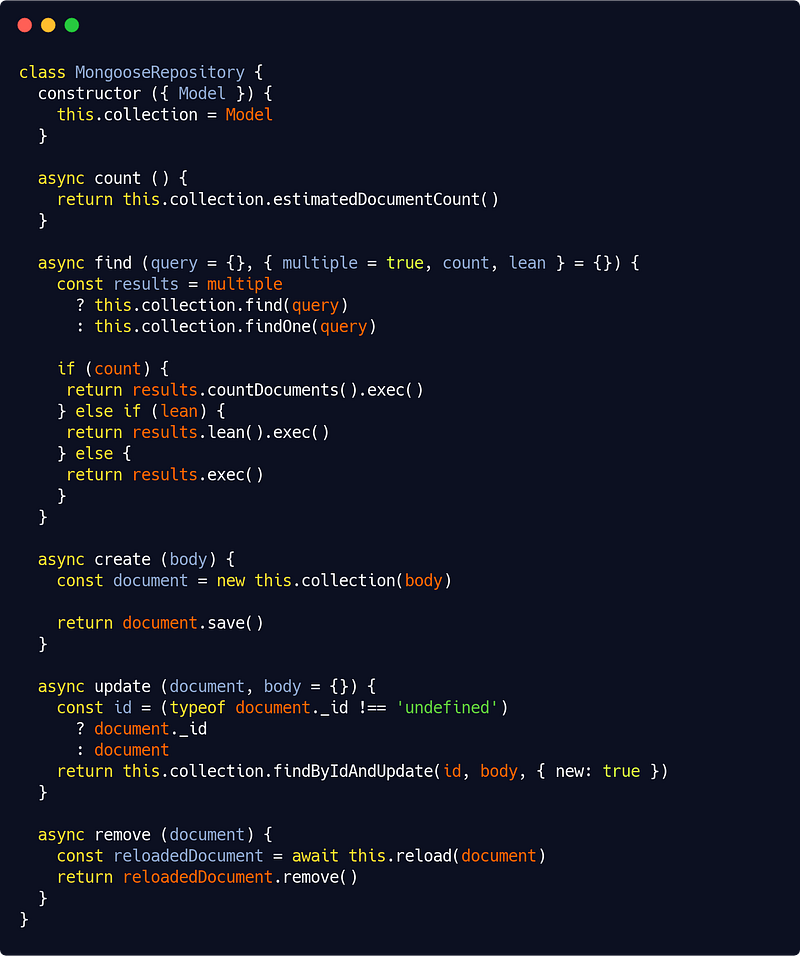
Of course this is a minimal version. Our repository would likely implement a better find() method, capable for instance to limit, skip, sort results, as well as to select and populate — in Mongodb terms, fetching joined entities — fields. It would also likely implement helper methods like findAll(), findById() and findOne(). All of this is easy to write yourself looking at the above code and the Mongoose docs.
Let’s add another useful method to our repository, though. We’ll call it reload() :
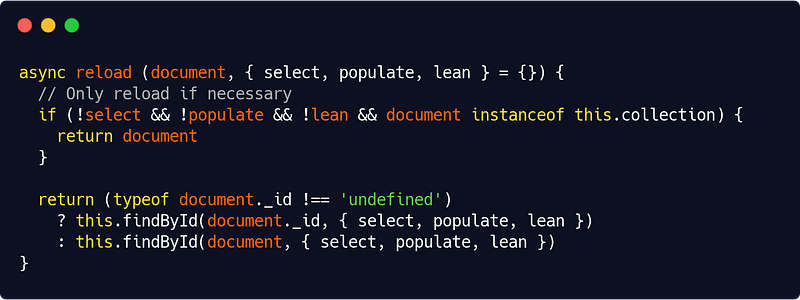
This reload() method will allow us to convert identifiers to Mongoose documents, plain entities to Mongoose documents, or simply reload a Mongoose documents with different query parameters (selected fields, populated ones, or a lean version).
The domain entities
Now we need to write both our entities and our models, and link them. If we are to follow strict DDD principles for perfect decoupling, we must indeed separate the two even if it means more work. As a good practice, we would also need a mechanism to abstract identifiers in our app services.
So let’s write first a base Entity class as follows :
src/domain/entity.js

All other domain entities will inherit from this base class. In our app code we will then write things like to check if userOne has the same id as userTwo :
userOne.referenceEquals(userTwo.toString())We’ve abstracted away the id parameter in all our app code, provided that our ODM/ORM has a toString() method that returns a model id (and of course Mongoose has this) — if not we should write it in the infrastructure layer.
Our User entity could now look like this :
src/domain/user.js
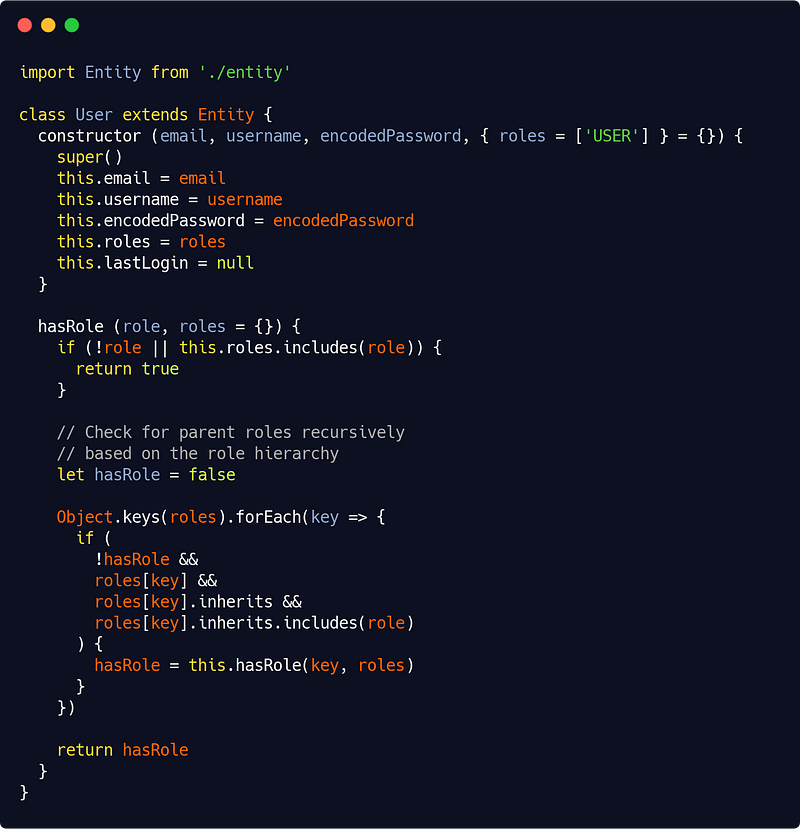
You’ll notice we have included an hasRole() method which works with a role hierarchy. In Part 3 you’ll undestand why. Consider it a teasing ;p
The models
Now we have to write our User model :
src/infra/database/models/mongoose/user.js
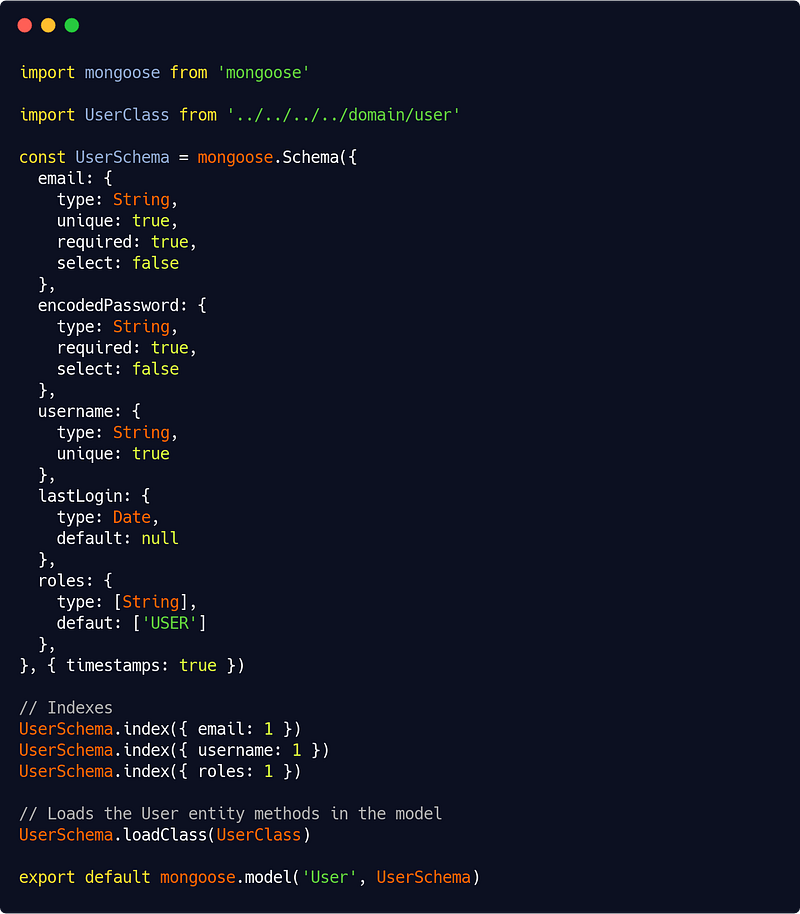
We need to map all of our User entity properties into User model properties. This may looks tedious but such a mapping has to occur somehow.
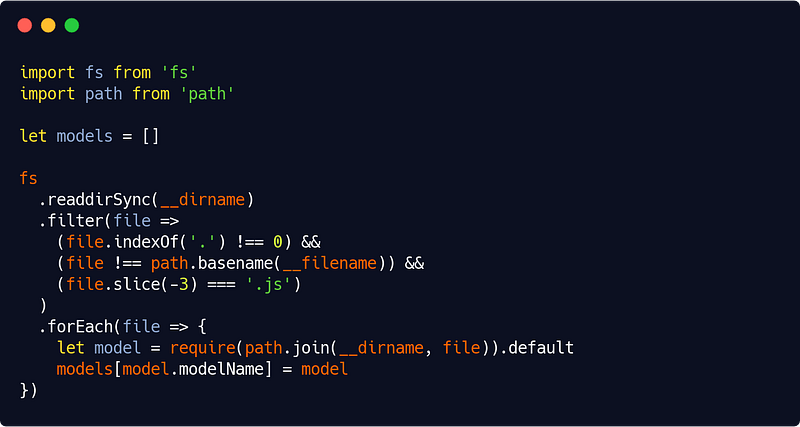
Please refer to Mongoose documentation for writing your models Schema objects and applying indexes. You’ll also find it handy to have an index file to load all your models into one models object :
src/infra/database/models/mongoose/index.js
Now the real “magic” comes from this line in our User model :
UserSchema.loadClass(UserClass)which is a Mongoose feature allowing us to copy our domain methods into our model. That way, when we do things like :
const user = await this.userRepository.create(userEntity)The user object we get has all the properties and methods of a User entity. The app doesn’t have to know about our model definitions, our ODM or our database. It just needs a User entity, so we’re good !
If we decide to use another persistence tool and even another database, let’s say for instance Sequelize and Postgres, we would write our models the Sequelize way, implement a loadClass() method (not too difficult, I’ll leave it up to you) and a repository with the same “interface” as our Mongoose one (more on this in Part 5).
Connecting to the database
We will define a ManageDB service as such :
src/infra/database/index.js
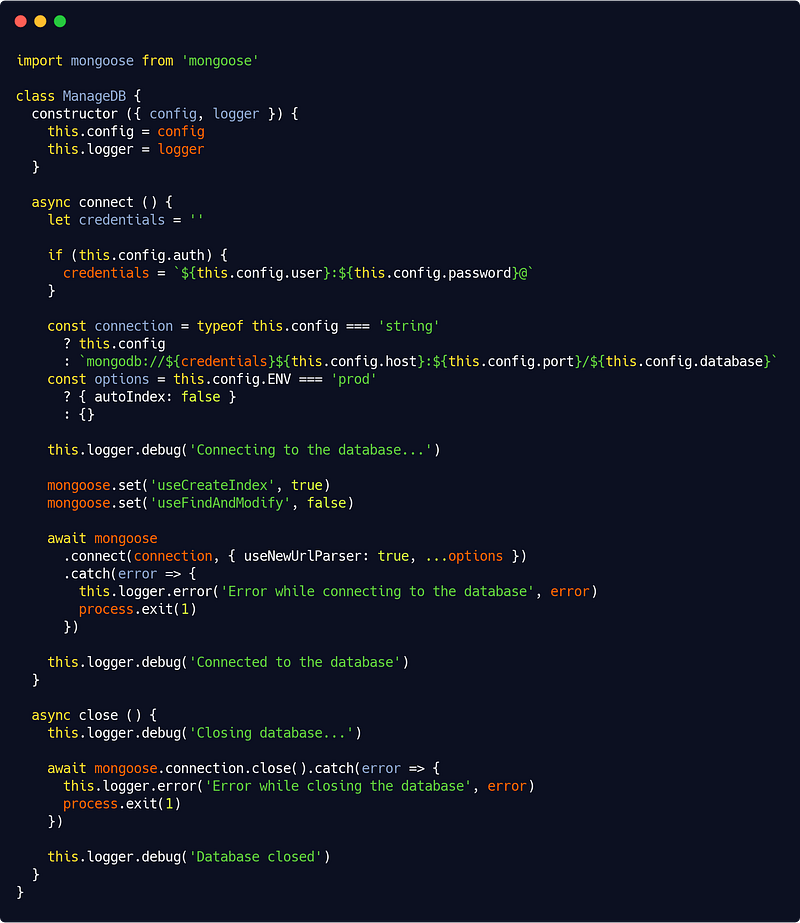
If we have a database URL to connect, we use it, if we have a configuration file like this :
{
    host: ‘localhost’,
    port: ‘27017’,
    database: ‘myApp_dev’,
    auth: false
  }
we use it instead.
For more information on Mongoose options used in the above file, such as autoIndex, useCreateIndex, useFindAndModify or useNewUrlParser, please refers to the documentation as it exceeds the scope of this series.
Going further
Let’s say we have a Game entity (and model), a Player entity (and model), and of course our User entity (and model). A Player is a given User participating in a given Game. So in that way of modelizing our domain, when we remove a Game (delete the record), we must remove its Players (but of course not the corresponding Users).
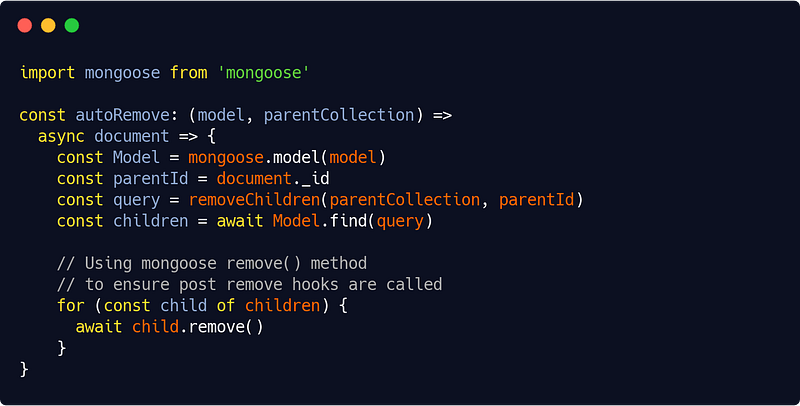
We could do this at app level by emitting an event, creating an event listener and so on (see Part 1). But we could also, and it will be much simpler, create a generic Mongoose (here) middleware to automate these things :
src/infra/database/mongooseMiddleware.js
And in our Game model we would simply include the middleware :
src/infra/database/models/mongoose/game.js
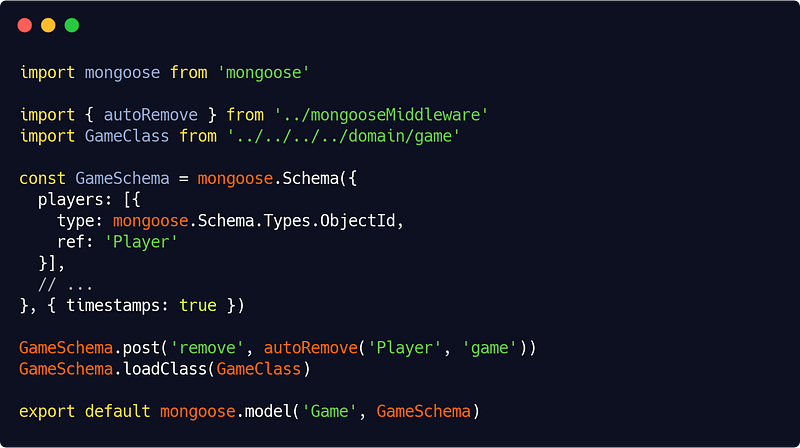
This is a neat way I feel. Of course it creates some “magic”, but it’s quite clean. You can think of many use cases for similar middlewares (like an autoPopulate() one), and effectively turn your Mongoose ODM into a tailored ORM. This means less code at app level but of course, if you drop Mongoose, you’ll have to port your middlewares according to the new tool you’ve chosen.
How to set up your HTTP server ?
There a zillion tutorials about setting up an HTTP server under Node.js, but I still have a few things to say about this here. Bear with me.
We’ll be using a few Koa middlewares : of course one to enable Cors (@koa/cors) and a body parser (koa-bodyparser) but also the very useful awilix-koa package that plays well with our dependency injection library from the same author, Awilix. We’ve also added, still from that same author, the highly optional but nice and small koa-respond library which allows to use methods like ctx.ok(…) or ctx.forbidden(…) instead of ctx.send(200, …) or ctx.send(403, …).
All other middlewares (for authentication, access control, logging, caching and error handling) will be our own. We’ll get back to them later.
So here’s our (almost) full server.js code :
src/interfaces/http/server.js
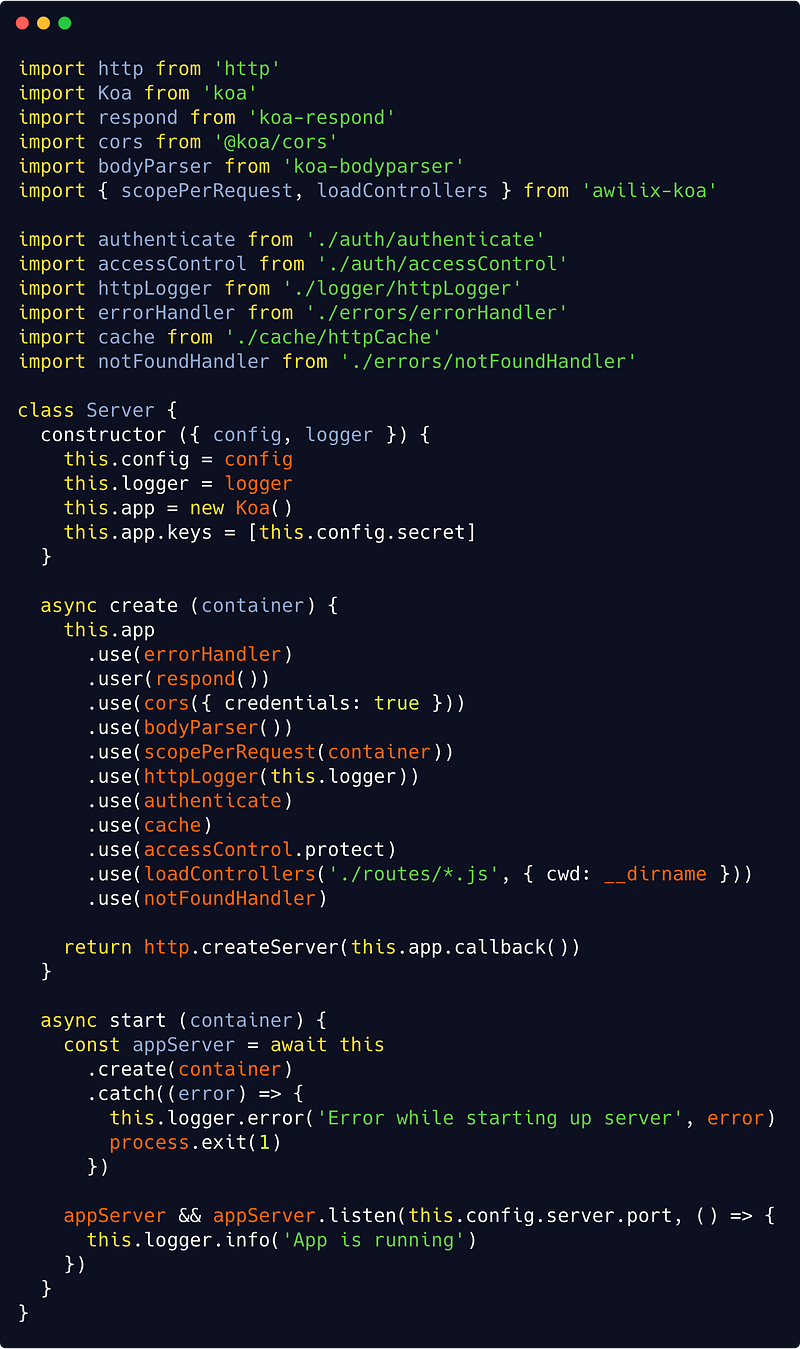
The create() method does not start the server but set it up with all relevant middlewares and event listeners tuned in.
Our first middleware in the list is the error handler (see Part 3). We then enable Cors, parse the Request body and scope our container to the Request (so non-singleton services will be instantiated each time there’s a new Request) with axilix-koa’s scopePerRequest() method. This will attach our container to the Koa context, hence services could be requested through :
ctx.state.container.cradle[serviceName]Now it’s time to log what we do (using a custom logger), authenticate the user (see below), cache the Response if needed, and protect the resource with access control rules (again, see below).
We then load our controllers with axilix-koa’s loadControllers() method and if, after all these middlewares have been processed, there’s still no Response, we are dealing with 404 errors.
The rest of the code is even more straightforward. We could refine this of course by displaying some information, or making sure that we clean up the database and cache connections on server close.
How to manage controllers and write proper routes for our API ?
Let’s recap, we have our domain, our persistence layer, our app services and our server in place. Now let’s define routes and link them to our services with controllers.
Extra thin controllers
Well, in fact, we’ll basically need just one extra thin base controller :
src/interfaces/http/api/mainController.js
So thin that you can even be fancy (not recommended at all, here it’s just for fun) and write the same code in a one-liner :
const api = (instance, method, params = []) => async ctx => ctx[ctx.method === 'POST' ? 'created' : 'ok']({ ...ctx.body, data: await instance[method](...processArgs(ctx, params)) }Here a few explanations are needed though.
The api() method takes a service instance and method and an optional array of (route) parameters. The appropriate instance and method will be specified in another file whose responsibility is to match routes and services :
src/interfaces/http/api/manageUser.js
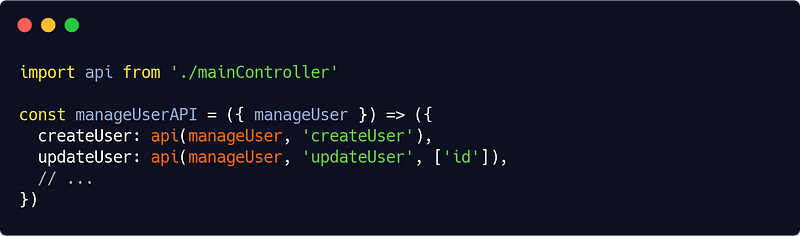
(Remember our tie-all ManageUser class from Part 1.)
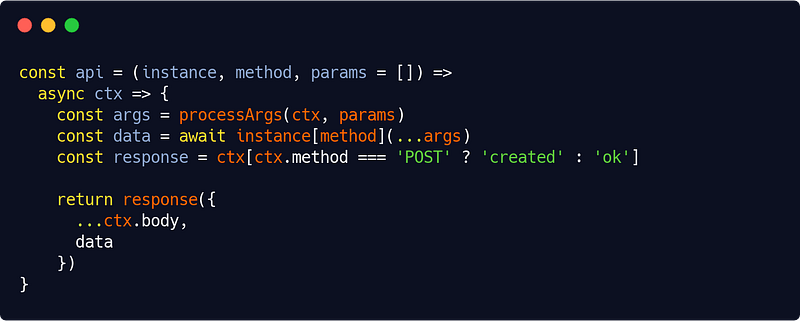
Then in our api() controller we would process the array parameters as such :
src/interfaces/http/api/mainController.js
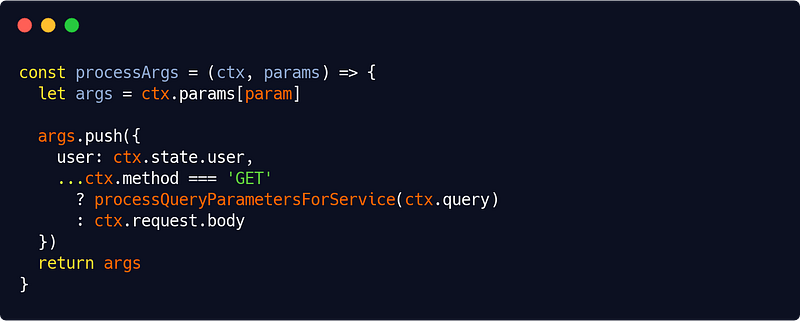
The processArgs() adds the route parameters an object containing the user and either query parameters or POST body properties.
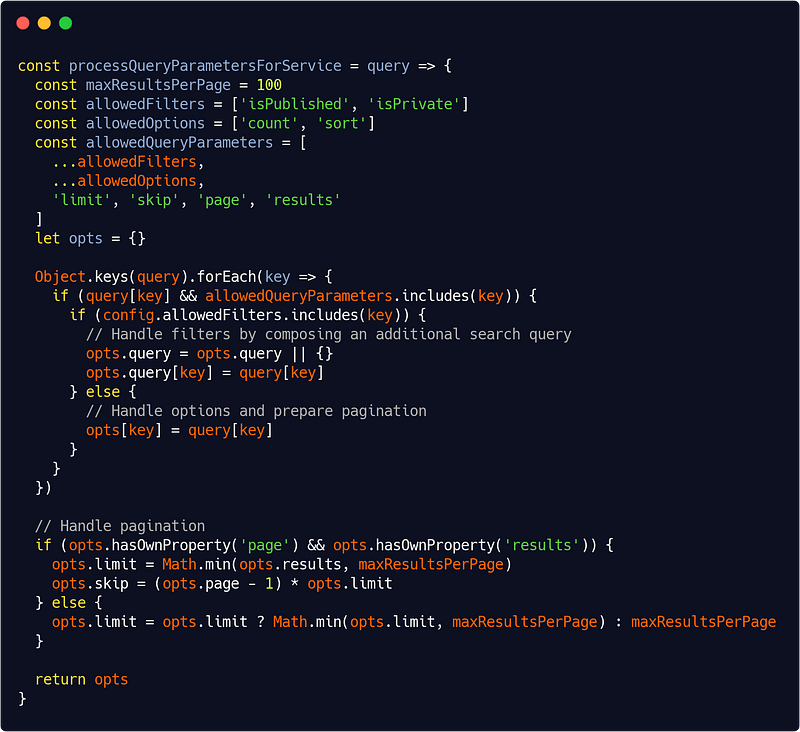
The processQuery parametersForService() function is the place to add some parameter filtering or to handle pagination, for instance :
We also rely in our extra thin controller on the previously mentioned koa-respond with its ctx.ok() (code 200) and ctx.created() (code 201) methods.
Route definitions
We now have to set up our routes and point them to our controllers. With the also previously mentioned awilix-koa, it’s a breeze :
src/interfaces/http/routes/manageUser.js
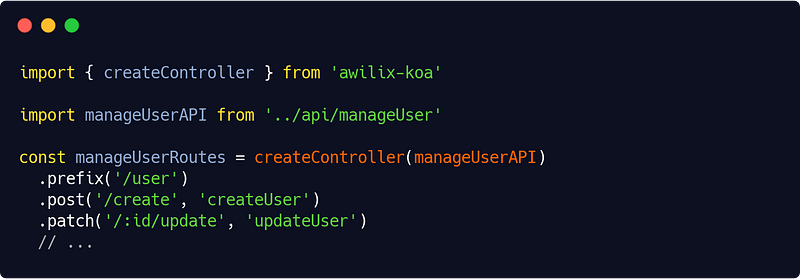
And so on.
As for writing routes, here’s my prefered pattern :
/[resource]/[id]/[operation]/[parameter]/[parameter]...
I use the singular (user and not users) for specifying the resource. Lots of APIs use the plural but I always felt it to be a bit off. It’s really a matter of personal preference though, the important thing as always is consistency. The id is optional (there won’t be one for a create operation) as well as the parameters.
I use create, update, remove… for operations, but really as long as it makes sense for most people, anything will be fine.
As for the response, I recommend setting up meta-informations like this (you can do that in an extra Koa middleware, just remember to use it in your Server class before loading your controllers) :
ctx.body = {
  self: ctx.originalUrl,
  meta: {
    name: 'Your API Name',
    version: 'x.x.x',
    copyright: '(c) XXXX Your Company Name <your@company.email>'
  }
}
That’s why I always use koa-respond methods like this :
return response({
  ...ctx.body,
  data
})
which is to add the response data (in a data field) to the previously set ctx.body. As you have noticed, we distinguish code 200 response from code 201 (new resource created). We will also distinguish code 40X responses in the next part.
Speaking of Part 3, it will be time for us then to handle authentication, access control, and handling errors properly. Let’s meet at the next stop !


