
Node.js app in the real world : authentication, access control, error handling
This is Part 3 of a 5-part series.
Part 0 was the introduction, Part 1 was about structuring your application and coding style, Part 2 was about persisting our domain, setting up the HTTP interface, notably a server, managing routes and controllers. This third part will tackle authentication, access control, and handling errors properly for our REST API written in JavaScript under Node.js with a Koa server, a Mongodb database and the Mongoose ODM.

How to handle authentication ?
Here is the code from our authentication (Koa)middleware :
src/interfaces/http/auth/authenticate.js
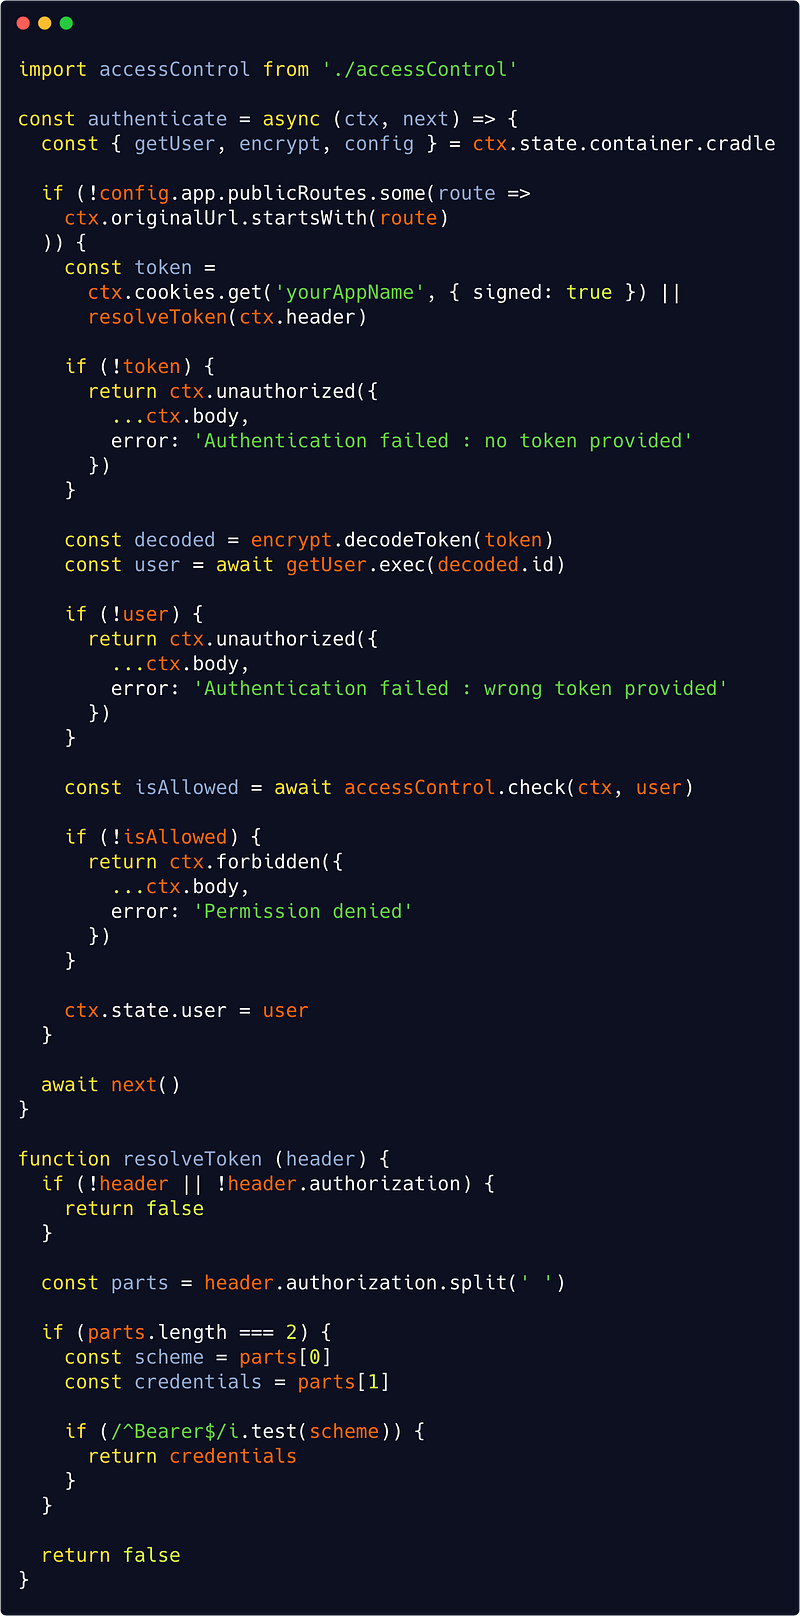
A lot is actually going on there, but each step is pretty simple :
- First we are looking at some configuration parameter to see if the requested route is public, in which case we move on without authentication ;
- Second we are getting back a token either from a secure (httpOnly) cookie sent with the Request or from a Authorization Bearer header : if none is found then we send a 401 error ;
- Third we decode the token (with some service of your choice implementing a decode() method — incidentally, it will be same service that we’ll use to encode password when creating a new user : remember we skipped this in Part 1, but of course we must do that), get the corresponding user (or send a 401 error if a wrong token has been provided),
- And finally check if that user has the right permissions for the given route (see below), sending a 403 error if not.
Authentication can of course be managed with a full blown library like Passport.js, but it’s perfectly fine to write your own middleware, don’t forget a few things like (obviously) hashing passwords correctly, a password resetting process, a lot of tests, possibly fake user authentication and so on. This really extends the scope of this series but you’ll find lots of resources on the Web about all this.
Now the most complex part really is the access control, and that part is actually twofold : we need a middleware to check access to a resource, and another to protect a resource.
How to handle access control ?
But we first we need to decide what type of access control we want. I recommand reading this excellent resource to better understand access control. Here I’ve chosen to go for a hierarchy ressource-based one (or HRBAC model). Meaning the configuration file looks like this :
config/app.js
publicRoutes: [
  '/user/create',
  '/user/token/create',
  '/user/exist/email',
  '/user/exist/username',
  '/user/password/reset',
  '/user/logout'
],
aclRules: {
  roles: {
    USER: {
      can: {
        read: [{ resource: 'user' }],
        update: [{ resource: 'user', when: { isOwner: true } }],
        remove: [{ resource: 'user', when: { isOwner: true } }]
      }
    },
    ADMIN: {
      inherits: ['USER'],
      can: { update: [{ resource: 'user' }] }
    },
    SUPER_ADMIN: {
      inherits: ['ADMIN'],
      can: { remove: [{ resource: 'user' }] }
    }
  }
}
There are basically 4 types of operations described above :
- Creating a user which is public,
- Getting user information (reading) which requires the role USER,
- Updating a user which requires the role ADMIN unless we’re updating our own record,
- Deleting (removing) a user which requires the role SUPER_ADMIN unless we’re updating our own record
Each role inherits the permissions of the role “beneath” it, which greatly simplify the configuration file.
The above code only cares about our user module, but we can extend the configuration file to other resources and add extra conditions (such as, for instance : is the resource published or not ? is it private or public ?). It all amounts to defining such conditions and add them as when parameters.
Here’s an example of how the configuration file would like when doing so :
defaultParams: {
  isPublished: true,
  isPrivate: false
},
roles: {
  USER: {
    can: {
      read: [{ resource: ‘place’, when: {
        isPublished: true,
        isPrivate: false
      }, except: { isOwner: true } }]
      // ...
    }
  }
  // ...
}
Now what if some resource depends on whether the user has access or not to a linked resource ? For exemple let’s say we have a player resource and a game resource. Then we’ll simply add this in our aclRules configuration :
defaultParams: { ... },
roles: { ... },
dependencies: {player: { on: ‘game’ } }
That’s all (provided you only want one-level dependencies, but I can hardly think of use cases where you’d want more to be honest) !
So the goal is to rely entirely on such a descriptive configuration file for our whole access control system. How can we do this ?
My approach was to create a domain level entity called AccessControlList which models everything we need. It could go like this :
src/domain/accessControlList.js
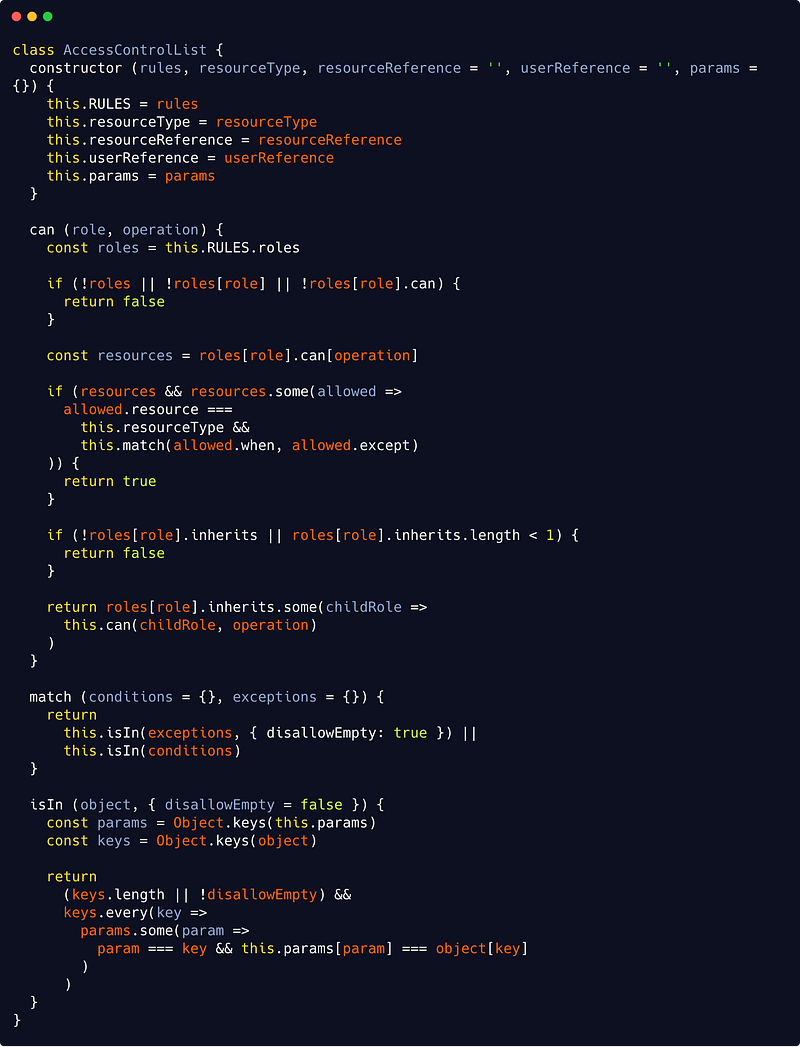
While not trivial, the code is again pretty straightforward when you think about it.
In our can() method, We are denying access if a role/capability combination does not exist, but we are allowing access if the resource asked match all when conditions (if present) or, based on our entity params property, if any matching exception is found. The whole (very simple) matching algorithm is found is the isIn() method.
Finally if there’s no match, we try inherited roles (through recursion), if there’s any inheritance.
Protecting a resource
So everytime a resource is created, updated or deleted, we will create and persists a new AccessControlList instance. This will occur in our protect() middleware :
src/interfaces/http/auth/accessControl.js
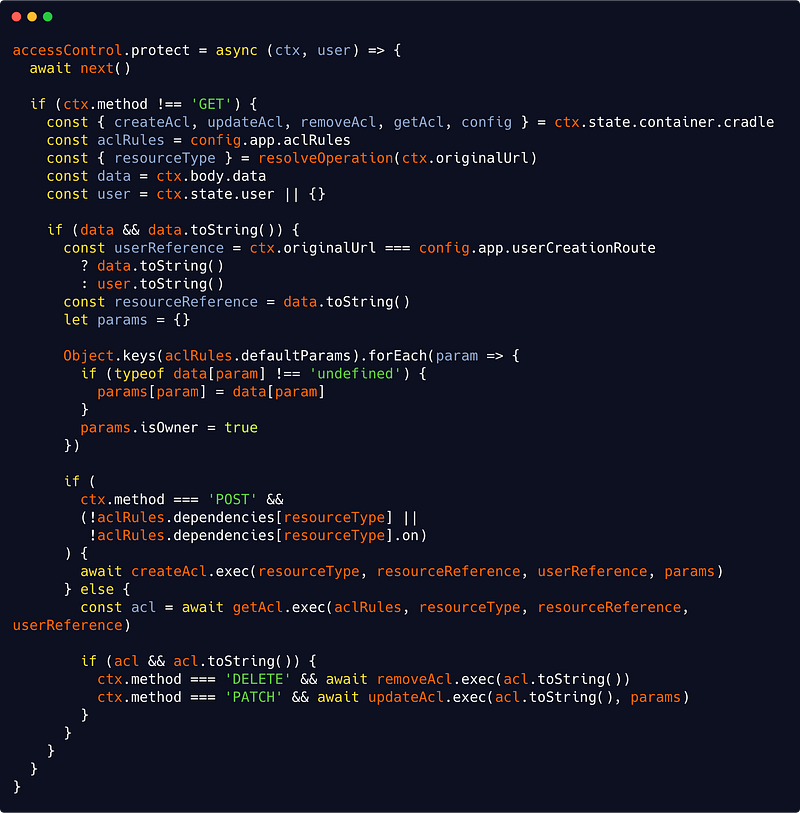
We will protect a resource when dealing with a POST request. The resource posted would then be in the data field of our ctx.body object. We will then get our resourceReference from data.toString() as our resource is a domain entity with such a method (see Part 2).
Now remember that in Part 2 also, we fetched our current user and placed it in ctx.state.user. This is from where we will get our userReference. We are being careful though to distinguish user creation route (injected as a configuration parameter here), where we have no ctx.state.user as this is a public route.
We are also checking if some parameters allowed by our AccessControlList rules are actually present in the data object, and we skip protection for a dependant resource (as we need only to protect the parent).
Of course you could break down the above middleware into smaller functions because, I admit, as such it violates the single responsibility principle. But again I didn’t wanted things to be overly complicated.
Notice we are using a helper functions here : resolveOperation(), as well as 4 container services : createAcl, getAcl, removeAcl and updateAcl. It’s of course your responsibility to implement such services following the directions provided in Part 1.
Let’s see our resolveOperation() code :
src/interfaces/http/auth/accessControl.js
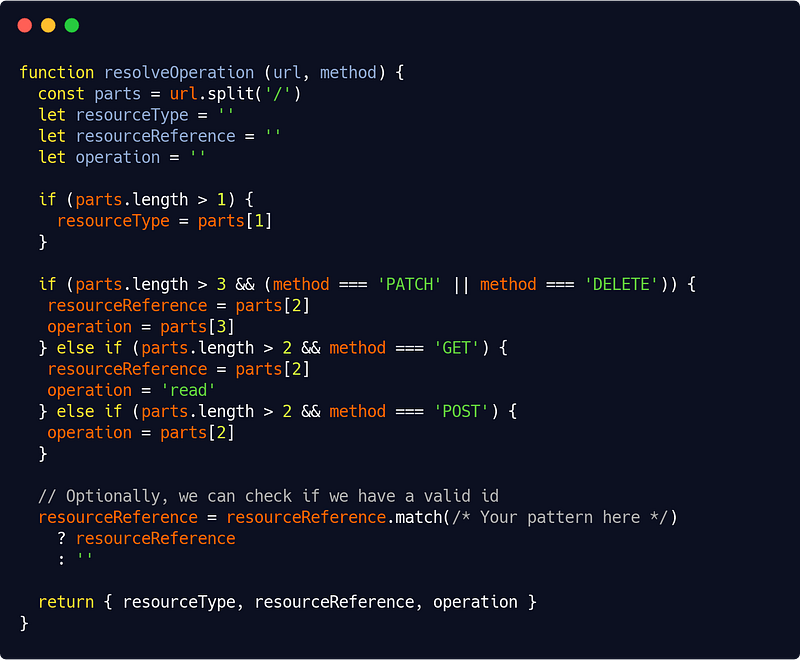
The code is pretty easy to understand with some examples. The following routes will thus give :
PATCH /user/001/update : place as resource type, 001 as resource reference, update as operation
POST /place/create : place as resource type, create as operation
GET or DELETE /place/001 : place as resource type, 001 as resource reference, read as operation
This requires some discipline when creating routes (see Part 2 for tips) but you’ll need that anyway to have a robust API.
Checking access control
When on the other hand the resource is queried, the interface is then responsible to check the appropriate AccessControlList instance (if it exists) as well as for its potential dependencies’s own AccessControlList instances. And if no such instance exists, the interface will allow access based on the generic rules, given an operation and a resource type. This will occurs in our accessControl.check middleware :
src/interfaces/http/auth/accessControl.js
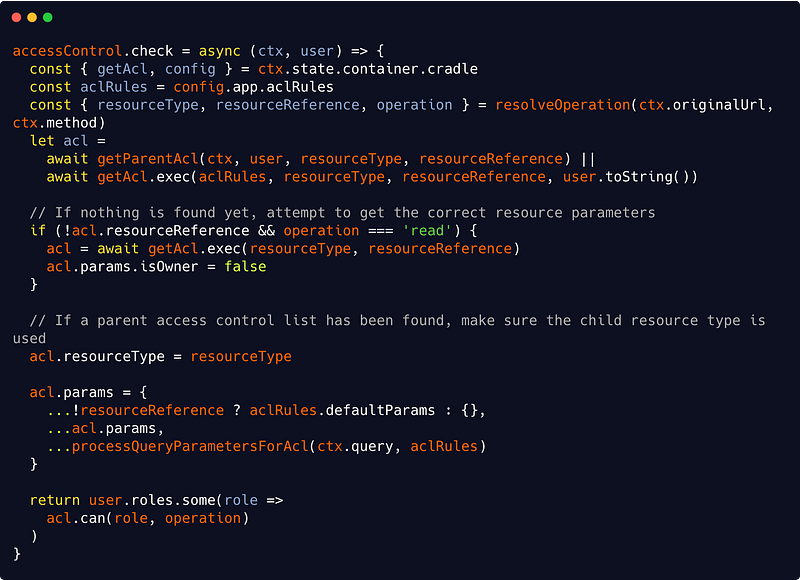
We are using two new helper functions here : getParentAcl() and processQueryParametersForAcl(). Let’s start with the second :
src/interfaces/http/auth/accessControl.js

(Our isOwner parameter is hard-coded here — being so universal — but you can choose to make it configurable of course.)
Now our getParentAcl() method is responsible for checking if a resource is dependant of another :
src/interfaces/http/auth/accessControl.js

The code should be self-explanatory (again, I highly encourage you to write readable code with meaningful variables and function names — and I hope you’ll be convinced it pays off when reading the above code — and using comments only when needed but wisely).
However, notice that the above code expects (otherwise it would break) your repository services to be name with the following pattern :
[resource]Repository(userRepository for instance.)
You can imagine a more flexible system if you want, but such conventions are good practices anyway so it may not be worth it.
Also notice that we’re making use here of our base repository reload() method (see Part 2), silently failing if there’s an error at this level (it will just deny permission at the end) — we’ll see below how to handle errors that need to be handled.
This makes another expectation : that either one of the POST body parameters is the (properly named) parent resource (again, this seems natural and good practice, so I suggest you adhere with this kind of simple, efficient and coherent formalism) or that we are able to get the parent resource from a (properly named) corresponding property — this also seems very logical but requires some discipline : this is the (small) price to pay for a very easy configurable access control system.
So we’re at where we wanted to be : we now have a full blown access control mechanism. And if additional control is needed based on more complex logic, it will typically occur at application level.
How to handle errors properly ?
You should catch any error occurring in your code and log most of them. But you only have to present certain errors to the user :
- Errors in your own code should crash your application,
- Errors due to a bad request should inform the user that his request was… bad (and for what reasons),
- Errors due to other services (database connection, cache connection, external APIs) are likely to be hidden as such to the user (but logged precisely), yet they must trigger some error in your application and you should present that error to the user.
Basically, that’s the gist of it.
For a detailed (and great) explanation on error handling in Node.js, here’s a mandatory read.
Now how to do that in our different layers ? And when exactly do we throw, catch, return and log ? Answers below.
In our domain layer, we won’t throw or catch or return any error. We certainly could, but it’s not necessary.
In our application layer, we will throw custom errors everytime they’re needed. Here’s a very basic example :
src/app/game/player/create.js
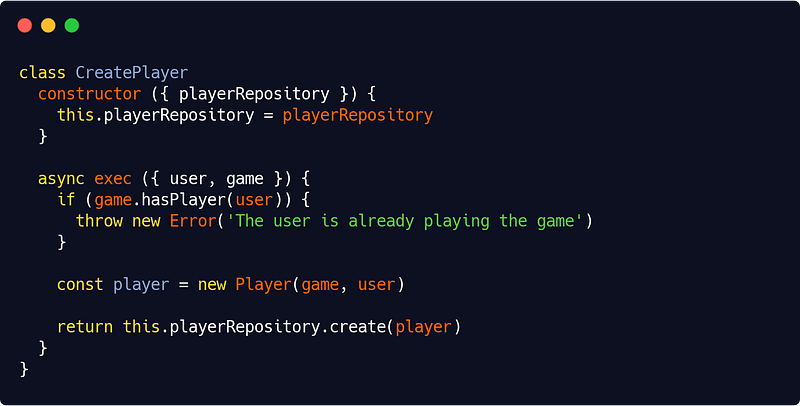
Here we are creating a player as defined in Part 2 (from a given user and a given game). In our domain Game entity, we’ll have implemented a hasPlayer() method which checks is a user is already a player. We are using it in our app level code to throw a custom error if that’s the case.
In our infrastructure layer, we will catch and log then re-throw some errors. For instance in our MongooseRepository we could do :
src/infra/database/repositories/mongooseRepository.js
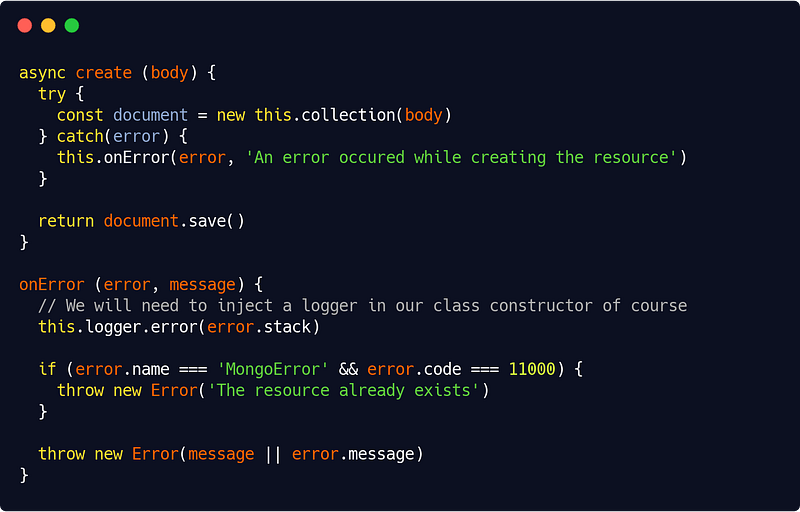
Just beware or try/catch hell when you do that ! You could use a decorator (as the ones we’ll see in Part 5) as a solution though.
Finally, in the presentation layer, we’ll catch errors in a centralized way and present them to the user. In the HTTP interface, This will be the responsibility of our (very simple) errorHandler Koa middleware :
src/interfaces/http/errors/errorHandler.js
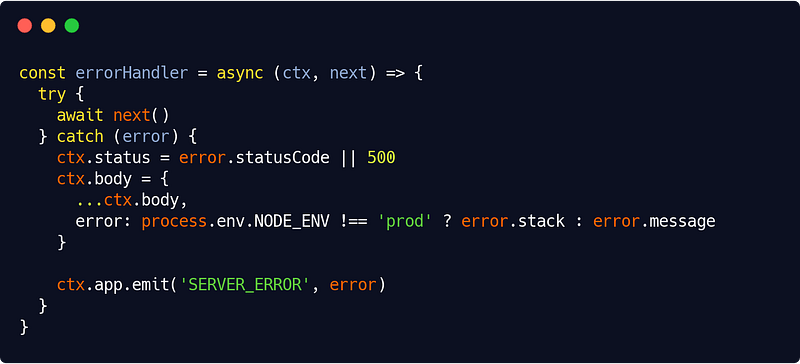
We have a nice all-encompassing try/catch block at the top level. This feels satisfying, right ?
In production, we display the error message, in test and development mode, we display the error stack trace.
The SERVER_ERROR event allow us to log the error in our server.js code like this :
src/interfaces/http/server.js

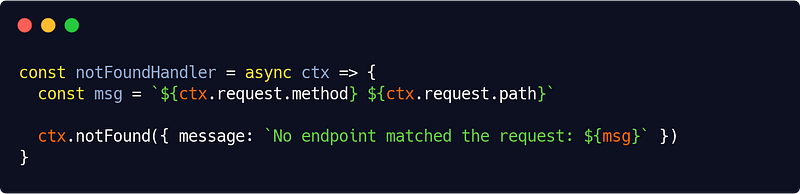
In our HTTP interface, to be thorough, we’ll also need a notFoundHandler middleware which is, given all what we have set up so far, even more simple :
src/interfaces/http/errors/notFoundHandler.js
And now we have our error handling system complete. Such, we can enhance it various ways (a custom Error object, domain errors, etc.). It’s up to you now.
In Part 4, we’ll handle documentation issues, testing and how to interface our app services with CLI commands. See you later guys !