
Web Development
How to Create an Angular Library with NodeJS
Export an Angular Material Table with npm publish

You can check my video course on Udemy: How to Identify, Diagnose, and Fix Memory Leaks in Web Apps.
In a previous article, I’ve created an Angular Material Table with an inline edit functionality like Excel. In this post, I’m going to publish it with NodeJS as an angular library, so it could be reused by installing it like any other npm package in other angular applications. This is really helpful to avoid duplicating code and maintain it n times. A typical use case is the implementation of the authentication layer. Instead of copy/paste the same source code in your different angular apps, you can just export the auth-component and the auth-service as an Angular library and re-use it the same way you are using other npm packages.
Getting started
Let’s create a new Angular project:
ng new multi-edit-table-app
cd multi-edit-table-app
and use the Angular CLI to generate a new library skeleton with the following command:
ng generate library multi-edit-table
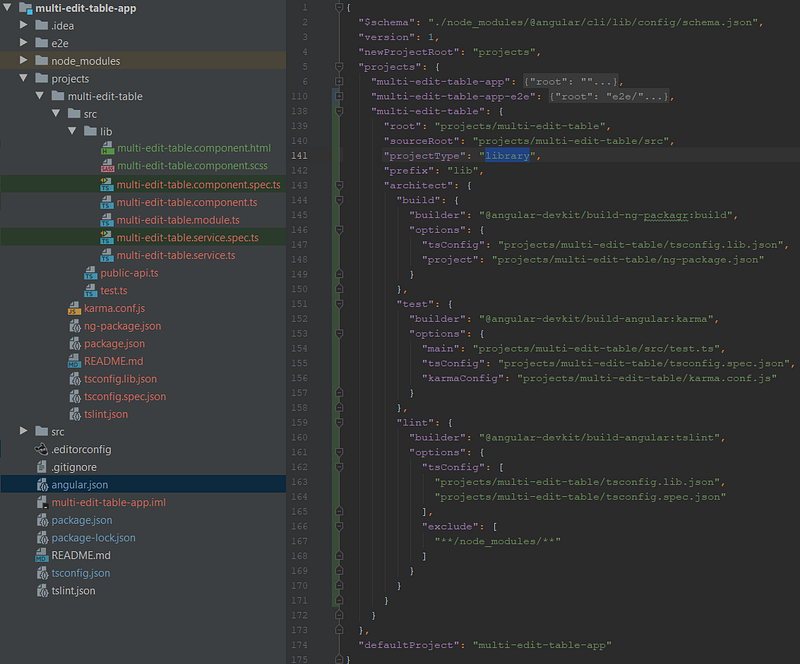
This creates the projects/multi-edit-table folder in our workspace, which contains a component and a service inside an NgModule. The workspace configuration file angular.json will be updated with a project of type 'library'. The source code under the/src folder is playing the role of the hosting angular app which is using our library.
Generating a library component
When generating a component for our library we use the --project flag to tell Angular CLI that we want it to generate the component in our library project:
ng generate component multi-edit-table --project=multi-edit-tableThe filesmulti-edit-table.comoponent.html, multi-edit-table.comoponent.scss, multi-edit-table.comoponent.ts,... will be added to the projects/multi-edit-table/src/lib/multi-edit-tablefolder, but I moved those file to the parent folder projects/multi-edit-table/src/libsince it’s the only component in this library.
We have to replace the content of those files (*.html, *.scss and *.ts) with the content of app.comoponent.html, app.comoponent.scss andapp.comoponent.tsfrom the last post (Github).
Accessibility in Angular–Good Practices and Pitfalls
5 case studies on keyboard listeners
medium.com
Adding the component to the entry file
As you noted our library project has an entry file that defines its public API:
projects\multi-edit-table\src\public_api.ts
We need to add the following lines to the entry file to tell ng-packagr that this component class should be exposed to the users of our library (ng-packagr is a solution for packaging Angular libraries, it’s part of Angular CLI):
export * from './lib/multi-edit-table.service';
export * from './lib/multi-edit-table.component';
export * from './lib/multi-edit-table.module';
Then install the following dependencies:
npm install @angular/material
npm install @angular/cdk
npm install hammerjsand update peerDependencies in projects/multi-edit-table/package.json:
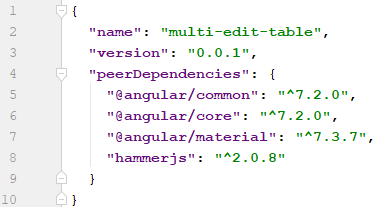
projects/multi-edit-table/package.jsonWhen we create an Angular library there are at least 3 package.json files in our workspace:
- Workspace Root package.json: the main
package.jsonfile in the root of our workspace. - Library Project package.json: the
projects/multi-edit-tabledirectory and tellsng-packagrwhat information goes into the distributionpackage.jsonthat will be shipped with our library. - Library Distribution package.json: generated by ng-packagr in the
dist/multi-edit-tabledirectory when we build our library. It is thepackage.jsonthat gets published with our library.
We have to import the angular theme now, by adding the following line to projects/multi-edit-table/src/lib/multi-edit-table.component.scss:
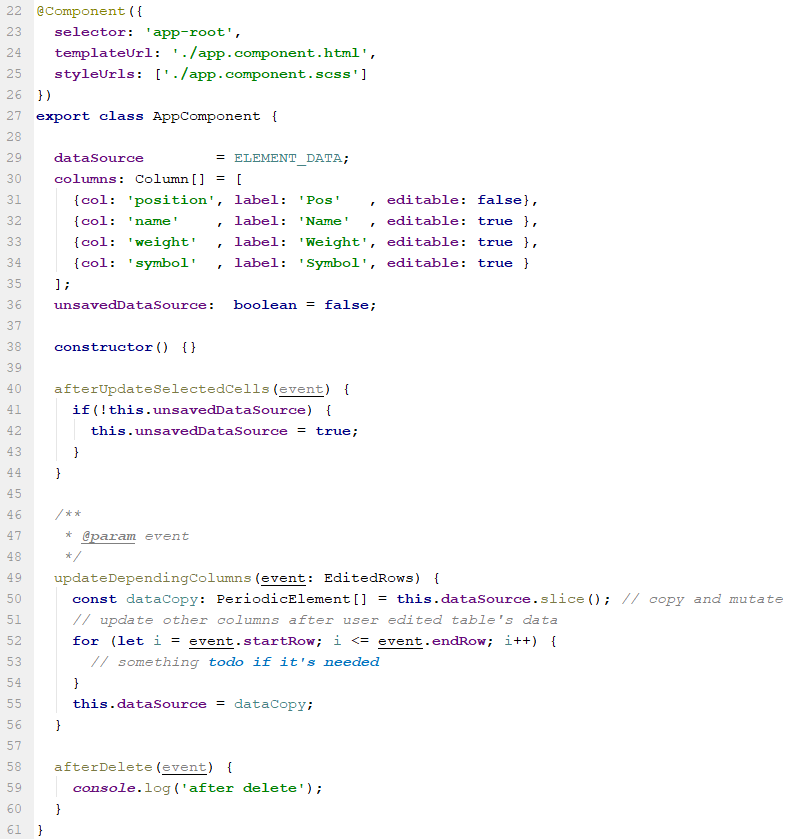
@import “~@angular/material/prebuilt-themes/indigo-pink.css”;Since the MultiEditTableComponent will be changed from a component (in our last Angular app) to be part of a library, we need to add the Column interface and we have to change some attributes and methods by using@Inputand @outputto improve its reusability:
export interface Column {
  col:       string;
  label:     string;
  editable?: boolean;
}
export interface EditedRows {
  startRow: number;
  endRow:   number;
}
export interface EditedCell {
  rowId:     number;
  colId:     number;
  cellsType: string;
  newValue:  string;
}
@Component({
selector: 'lib-multi-edit-table',
templateUrl: './multi-edit-table.component.html',
styleUrls: ['./multi-edit-table.component.scss']
})
export class MultiEditTableComponent implements OnChanges {
@Input() dataSource;
@Input() columns: Column[];
@Output() updateDependingColumns = new EventEmitter<EditedRows>();
@Output() updateCell = new EventEmitter<EditedCell>();
@Output() afterDelete = new EventEmitter<void>();
displayedColumns: string[]; ngOnChanges(changes: SimpleChanges): void {
if(changes.columns) {
this.displayedColumns = this.columns.map((column: Column) => column.col );
this.LAST_EDITABLE_COL = this.displayedColumns.length - 1;
}
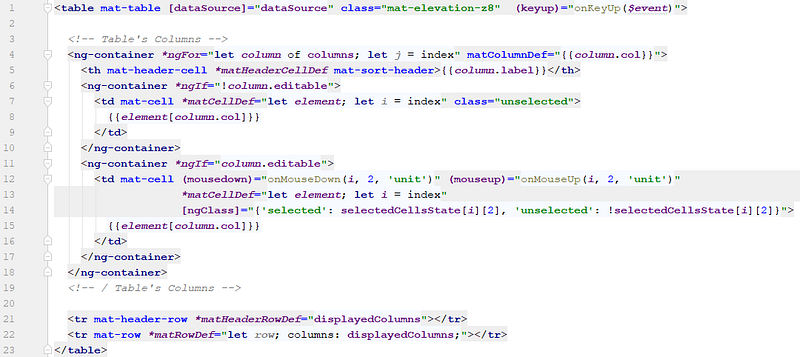
}Update multi-edit-table.component.html:
and app.component.html like the following:

and here how the inputs and outputs — required by the library — and declared in app.component.ts are looking like:
Now we can build, test, and lint the project with Angular CLI commands:
ng build multi-edit-table
ng test multi-edit-table
ng lint multi-edit-table
After building the library, the distribution package.json looks like this:

Publishing our Angular Library on npm
I’m not going to dive in this too deep, but Todd Palmer does an awesome job explaining more details about publishing an angular library on npm in this nice article.
To be able to publish a package, we need to sign up for an npm account. If you have already an npm Enterprise profile, you can create a second profile for a different registry, such as the public npm registry. To set the public registry for an open-source profile, you need to run the following command:
npm config set registry https://registry.npmjs.comthen you can log in to npm:
npm loginThis will prompt us for our npm credentials and email. Finally, we are ready to publish our library (packaged in the .tgz file) by running the package and publish tasks:
npm run package
npm publish ./dist/multi-edit-table/multi-edit-table-1.0.0.tgz
The package npm task is a custom task that we need to add to our main package.json file in the root of our workspace:
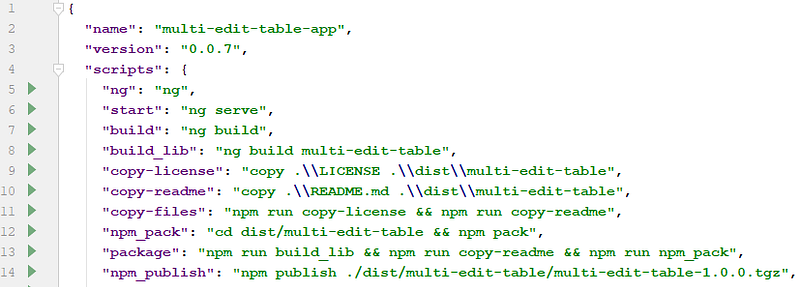
Npm allows us to publish a specific name and version combination once. Hence, we need to change the version each time we want to publish updates to our library on npm. The published package is available on npm at this URL: https://www.npmjs.com/package/multi-edit-table
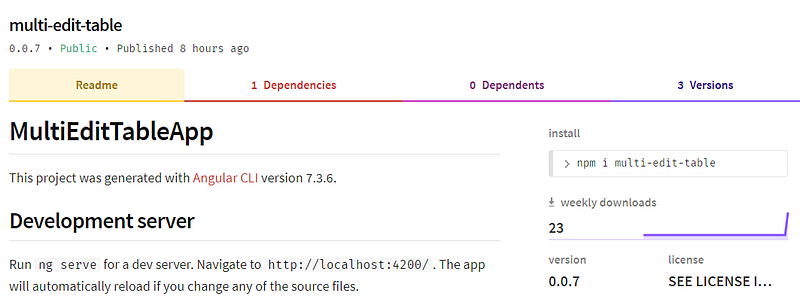
If you want to use it in your project, you just have to run:
npm install multi-edit-table🧠💡 I write about engineering, technology, and leadership for a community of smart, curious people. Join my free email newsletter for exclusive access or sign up for Medium here.
You can check my video course on Udemy: How to Identify, Diagnose, and Fix Memory Leaks in Web Apps.