avatarRakia Ben Sassi

Free AI web copilot to create summaries, insights and extended knowledge, download it at here

4359

Abstract

l @angular/material <span class="hljs-built_in">npm</span> install @angular/cdk <span class="hljs-built_in">npm</span> install @angular/flex-layout</pre></div><ul><li>Import Angular theme by adding this line to <code>src/style.scss</code>:</li></ul><div id="fbc4"><pre>@import <span class="hljs-string">"~@angular/material/prebuilt-themes/indigo-pink.css"</span>;</pre></div><ul><li>Generate <code>BaseModule</code>:</li></ul><div id="01d7"><pre>ng <span class="hljs-keyword">generate</span> <span class="hljs-keyword">module</span> shared/base-<span class="hljs-keyword">module</span></pre></div><ul><li>Generate a new component in it, <code>dynamic-layout</code>:</li></ul><div id="8c70"><pre>ng <span class="hljs-keyword">generate</span> component shared/base-<span class="hljs-keyword">module</span>/dynamic-layout --<span class="hljs-keyword">export</span></pre></div><ul><li>Generate <code>ContactsModule</code>:</li></ul><div id="9975"><pre>ng <span class="hljs-keyword">generate</span> <span class="hljs-keyword">module</span> modules/contacts</pre></div><ul><li>Generate the following components in it:</li></ul><div id="c50b"><pre>ng <span class="hljs-keyword">generate</span> <span class="hljs-keyword">module</span> modules/contacts/containers/contact-container</pre></div><div id="9d1c"><pre>ng <span class="hljs-keyword">generate</span> <span class="hljs-keyword">module</span> modules/contacts/presenters/contact</pre></div><div id="a55a"><pre>ng <span class="hljs-keyword">generate</span> <span class="hljs-keyword">module</span> modules/contacts/presenters/contact-list</pre></div><div id="ba69"><pre>ng <span class="hljs-keyword">generate</span> <span class="hljs-keyword">module</span> modules/contacts/presenters/contact-update/contact-form</pre></div><div id="2e6a"><pre>ng <span class="hljs-keyword">generate</span> <span class="hljs-keyword">module</span> modules/contacts/presenters/contact-update/contact-update-dialog --<span class="hljs-keyword">type</span>=dialog</pre></div><ul><li>Update routing in <code>app-routing.module.ts</code>:</li></ul><div id="5d8f"><pre>const routes: Routes = [ { path: <span class="hljs-string">''</span>, redirectTo: <span class="hljs-string">'contacts'</span>, pathMatch: <span class="hljs-string">'full'</span> }, { path: <span class="hljs-string">'contacts'</span>, component: ContactContainerComponent } ];</pre></div><h1 id="92da">Dive Into Details</h1><p id="dcc3">All right, time to dive into the good stuff now. Our main presenter in <code>ContactsModule</code> is <code>ContactComponent</code>, which is the place to specify the values for two dynamic templates — “<code>list</code>” and “<code>update</code>” — using multi-slot content projection.</p><p id="a32c">The <code>dynamic-layout</code> tag wraps the content in the component, and depending on the value of <code>layoutStyle</code>, the <code>DynamicLayoutComponent</code> will manage how and where to render the update template:</p> <figure id="a9c5"> <div> <div>

            <iframe class="gist-iframe" src="/gist/rakia/980e9b80bf2a08c8ce1ffa3a06fbec98.js" allowfullscreen="" frameborder="0" height="undefined" width="undefined">
          </div>
        </div>
    </figure></iframe></div></div></figure><p id="abc4">The TypeScript part, <code>contact.component.ts</code>:</p>
    <figure id="c5c6">
        <div>
          <div>
            
            <iframe class="gist-iframe" src="/gist/rakia/52cb477784777d9d59d627bdb3510268.js" allowfullscreen="" frameborder="0" height="undefined" width="undefined">
          </div>
        </div>
    </figure></iframe></div></div></figure><p id="9f04">As you may have noticed, <code>ContactComponent</code> is extending <code>BasePresenter</code>, a parent component that takes care of handling create/open/remove for the appropriate update view and redirects the user to the list or update pages:</p>
    <figure id="accd">
        <div>
          <div>
            
            <iframe class="gist-iframe" src="/gist/rakia/c5baf8c42eca90811b524588f92e2f06.js" allowfullscreen="" frameborder="0" height="undefined" width="undefined">
          </div>
        </div>
    </figure></iframe></div></div></figure><p id="a7d4">Similar to <code>BasePres

Options

enter</code>, I have used <code>BaseContainer</code> and <code>BaseList</code> parent components and delegated the common functionalities to them, which is helpful to avoid duplicating code:</p> <figure id="a634"> <div> <div>

            <iframe class="gist-iframe" src="/gist/rakia/8ae561aa01f8eb040d98b6f81e5ba444.js" allowfullscreen="" frameborder="0" height="undefined" width="undefined">
          </div>
        </div>
    </figure></iframe></div></div></figure>
    <figure id="f689">
        <div>
          <div>
            
            <iframe class="gist-iframe" src="/gist/rakia/81429cf7a772bc655830e04f8dec4012.js" allowfullscreen="" frameborder="0" height="undefined" width="undefined">
          </div>
        </div>
    </figure></iframe></div></div></figure><p id="dbe3">Now it’s time to reveal how I’ve designed <code>DynamicLayoutComponent</code>. The TypeScript part does not have any logic except some input fields and event emitters to communicate with the hosting component:</p>
    <figure id="06b5">
        <div>
          <div>
            
            <iframe class="gist-iframe" src="/gist/rakia/3fc9034d5d9c78cb0b35d17649cce7bd.js" allowfullscreen="" frameborder="0" height="undefined" width="undefined">
          </div>
        </div>
    </figure></iframe></div></div></figure><p id="ccf0"><code>dynamic-layout.component.html</code> is our main game territory. It’s the place where I’ve added the logic to attach the right content to the right template via <code>ng-content select="[list]"</code> and <code>ng-content select="[update]"</code>. I’ve specified also the placeholders to render each template with <code>ng-container *ngTemplateOutlet="update"</code> and <code>ng-container *ngTemplateOutlet="list"</code>:</p>
    <figure id="13c6">
        <div>
          <div>
            
            <iframe class="gist-iframe" src="/gist/rakia/be963376ac85e14de213dd505f25abe9.js" allowfullscreen="" frameborder="0" height="undefined" width="undefined">
          </div>
        </div>
    </figure></iframe></div></div></figure><p id="afe3">Last but not least is to show you how the parent <code>StoreService</code> looks. It’s a <code>BehaviorSubject</code>-based service that’s playing the role of a store at the same time. It’s the class that all modules’ store services are inheriting from as well:</p>
    <figure id="6229">
        <div>
          <div>
            
            <iframe class="gist-iframe" src="/gist/rakia/cfc8d309ea7063467e59fe522163c155.js" allowfullscreen="" frameborder="0" height="undefined" width="undefined">
          </div>
        </div>
    </figure></iframe></div></div></figure><p id="a75b">The whole application is available in <a href="https://github.com/rakia/angular-dynamic-layout">Github here</a>. Check the app yourself and click around.</p><h1 id="4292">Final Thoughts</h1><p id="214b">Angular content projection and dynamic template are very useful features to build reusable components and achieve a clean architecture. We have seen how <code>ng-content</code> and <code>ng-template</code> directives work, and how they can improve the UX design and solve problems that we face the most with enterprise applications.</p><p id="8131">Moving many functions to a central place by benefiting from Typescript/Angular inheritance allowed me to get rid of a lot of boilerplate code and facilitate maintenance in the future. The solution that I have presented is not the only one to build the end application. Feel free to give feedback about it or share how you have resolved a similar challenge.</p><p id="c6e2">Thanks for reading.</p><p id="30fc">🧠💡 I write about engineering, technology, and leadership for a community of smart, curious people. <a href="https://rakiabensassi.substack.com/"><b>Join my free email newsletter for exclusive access</b></a><b> </b>or sign up for Medium <a href="https://rakiabensassi.medium.com/membership">here</a>.</p><p id="eee3"><i>You can check my <b>video course</b> on Udemy: <a href="https://www.udemy.com/course/identify-and-fix-javascript-memory-leaks/">How to Identify, Diagnose, and Fix Memory Leaks in Web Apps</a>.</i></p></article></body>

Software Engineering

Angular Dynamic Templates: How to Build an App With 3 Layout Styles

An advanced use case of Angular ngTemplateLayout

Photo by Halacious on Unsplash

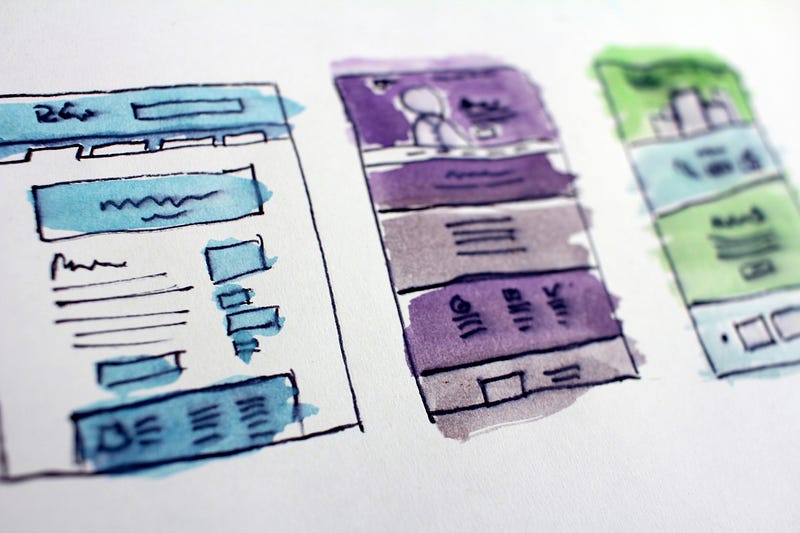
Angular offers very powerful features that support a wide variety of advanced use cases. Today we are going to learn how to design and implement an Angular app that supports three layout styles:

  • Open update view in a dialog
  • Open update view in a new page with
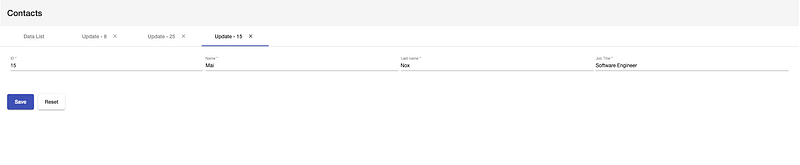
 arrowBack to go back to the previous page where all items are listed
  • Open multiple update views in multiple tabs

To switch between the three layouts, all we need to do is to change the value of a variable layoutStyle. It’s as simple as that. The default value is 'dialog'.

layoutStyle = 'dialog' | 'tabs' | 'newPage'
Layout style 1: Contact update in a dialog
Layout style 2: Contact update in a new tab
Layout style 3: Contact update in a new page with go-back button

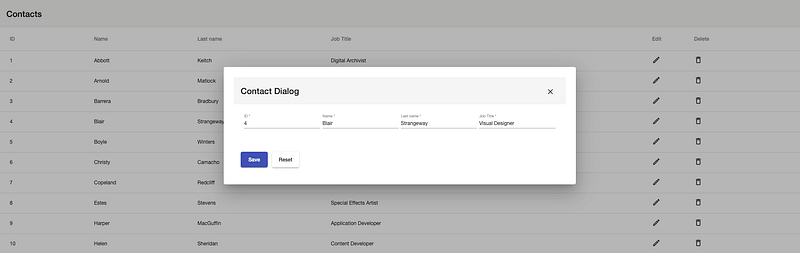
We will use the container-presenter design pattern and benefit from components inheritance, content projection, and some of the cool features of Angular Core and Angular template system (ng-template, ng-container, ngTemplateOutlet) to achieve our goal. Let’s start by introducing the ng-template directive that allows a flexible layout system.

ng-template Directive

Angular is already using ng-template under the hood in many of the structural directives like ngIf, ngFor, and ngSwitch. The content of this tag contains part of a template that can be composed together with other templates in order to form the final component template. Here is a simple use case:

The else clause is pointing to a template that has the name progress-bar. The name was assigned to it via a template reference, using the #progress-bar syntax.

Project Setup

If you don’t have Angular CLI already on your machine, then let’s start installing it by following these instructions. The next step is to create the project with this command:

ng new ng-dynamic-layout
cd ng-dynamic-layout

The ng new command prompts you for information about features to include in the initial app. Press y for “Would you like to add Angular routing?” and choose SCSS as stylesheet format, then press Enter.

npm install @angular/material
npm install @angular/cdk
npm install @angular/flex-layout
  • Import Angular theme by adding this line to src/style.scss:
@import "~@angular/material/prebuilt-themes/indigo-pink.css";
  • Generate BaseModule:
ng generate module shared/base-module
  • Generate a new component in it, dynamic-layout:
ng generate component shared/base-module/dynamic-layout --export
  • Generate ContactsModule:
ng generate module modules/contacts
  • Generate the following components in it:
ng generate module modules/contacts/containers/contact-container
ng generate module modules/contacts/presenters/contact
ng generate module modules/contacts/presenters/contact-list
ng generate module modules/contacts/presenters/contact-update/contact-form
ng generate module modules/contacts/presenters/contact-update/contact-update-dialog --type=dialog
  • Update routing in app-routing.module.ts:
const routes: Routes = [
  { path: '', redirectTo: 'contacts', pathMatch: 'full' },
  { path: 'contacts', component: ContactContainerComponent }
];

Dive Into Details

All right, time to dive into the good stuff now. Our main presenter in ContactsModule is ContactComponent, which is the place to specify the values for two dynamic templates — “list” and “update” — using multi-slot content projection.

The dynamic-layout tag wraps the content in the component, and depending on the value of layoutStyle, the DynamicLayoutComponent will manage how and where to render the update template:

The TypeScript part, contact.component.ts:

As you may have noticed, ContactComponent is extending BasePresenter, a parent component that takes care of handling create/open/remove for the appropriate update view and redirects the user to the list or update pages:

Similar to BasePresenter, I have used BaseContainer and BaseList parent components and delegated the common functionalities to them, which is helpful to avoid duplicating code:

Now it’s time to reveal how I’ve designed DynamicLayoutComponent. The TypeScript part does not have any logic except some input fields and event emitters to communicate with the hosting component:

dynamic-layout.component.html is our main game territory. It’s the place where I’ve added the logic to attach the right content to the right template via ng-content select="[list]" and ng-content select="[update]". I’ve specified also the placeholders to render each template with ng-container *ngTemplateOutlet="update" and ng-container *ngTemplateOutlet="list":

Last but not least is to show you how the parent StoreService looks. It’s a BehaviorSubject-based service that’s playing the role of a store at the same time. It’s the class that all modules’ store services are inheriting from as well:

The whole application is available in Github here. Check the app yourself and click around.

Final Thoughts

Angular content projection and dynamic template are very useful features to build reusable components and achieve a clean architecture. We have seen how ng-content and ng-template directives work, and how they can improve the UX design and solve problems that we face the most with enterprise applications.

Moving many functions to a central place by benefiting from Typescript/Angular inheritance allowed me to get rid of a lot of boilerplate code and facilitate maintenance in the future. The solution that I have presented is not the only one to build the end application. Feel free to give feedback about it or share how you have resolved a similar challenge.

Thanks for reading.

🧠💡 I write about engineering, technology, and leadership for a community of smart, curious people. Join my free email newsletter for exclusive access or sign up for Medium here.

You can check my video course on Udemy: How to Identify, Diagnose, and Fix Memory Leaks in Web Apps.

JavaScript
Programming
Software Development
Web Development
UX
Recommended from ReadMedium