
Introduction to Bitnami Sealed Secrets in Kubernetes
How to store your secrets in GitHub using Sealed Secrets and Kubeseal
Nowadays in the Kubernetes era, all of our manifests are stored in an SCM tool like GitHub, Gitlab, BitBucket, etc. But where are your Kubernetes secrets stored? Do you store them in any SCM tool? If yes, then you may probably want to delete them from SCM right away. Because Kubernetes secrets are base64 encoded. Anyone knowing this command base64 -d can easily decode your secrets. So where do you want to store your secrets now? May be store all the manifests in GitHub and store the secrets elsewhere? And then write a wrapper for that and pull the files from multiple places? Or maybe manually create all the secrets? What if you forgot a value for one of the secrets? What if you lost your machine and all the secrets are exposed? To avoid all this here comes the life savior SealedSecrets. The kubeseal is a utility that would basically convert the secrets to SealedSecrets which means that the secret sealed by the kubeseal utility can only be decrypted by the controller in the Kubernetes cluster from which the SealedSecret resource has been created. Sounds Interesting? Let us explore more about Kubeseal and SealedSecrets in this article.
What is the entire story all about? (TLDR)
- Install kubeseal and sealed secrets in our Kubernetes Cluster.
- Create a docker registry secret.
- Seal the Docker Registry secret using Kubeseal ( With our own certificates ) and create a SealedSecret out of it.
- Finally storing the secrets in GitHub
Prerequisites
- A Kubernetes cluster ( Can be either On-Prem, AKS, EKS, GKE, Kind ).
- GitHub Account ( Optional ).
Installing kubeseal and sealed secrets
I have written a Makefile for the purpose of easier installation. This makefile contains targets for installing helm, kubeseal, and SealedSecrets helm chart.
Let us now download this Makefile to install all the components in our Kubernetes cluster.
curl -s https://gist.githubusercontent.com/pavan-kumar-99/e1a2a88c467fd470d9c98a43341c0b9a/raw/ceadb9fe21c53d605be895df24585696f587858f/Makefilemake install_kubesealThis would now install the kubeseal utility in your machine. Before installing sealed secrets let us understand how the sealed secrets controller and kubeseal works. kubeseal uses asymmetric crypto to encrypt secrets that only the controller can decrypt. The controller generates its own certificates when is deployed for the first time, it also manages the renewal for you. kubeseal then uses the default certificate to seal your secrets. However, you can also use your own certificates and encrypt the secrets using those certificates. Alright !! Enough of the theory, let us now get into action.
Before we install the sealed secrets controller let us first create our certificates for the controller to seal our secrets.
export PRIVATEKEY="seal.key"
export PUBLICKEY="seal.crt"
export NAMESPACE="kube-system"
export SECRETNAME="seal-cert"
openssl req -x509 -nodes -newkey rsa:4096 -keyout "$PRIVATEKEY" -out "$PUBLICKEY" -subj "/CN=sealed-secret/O=sealed-secret"
kubectl -n "$NAMESPACE" create secret tls "$SECRETNAME" --cert="$PUBLICKEY" --key="$PRIVATEKEY"kubectl -n "$NAMESPACE" label secret "$SECRETNAME" sealedsecrets.bitnami.com/sealed-secrets-key=activeLet us now deploy the sealed secret controller helm chart to our cluster using the same Makefile. This would now create all the components needed for sealed secrets to be functional.
make install_sealed_secrets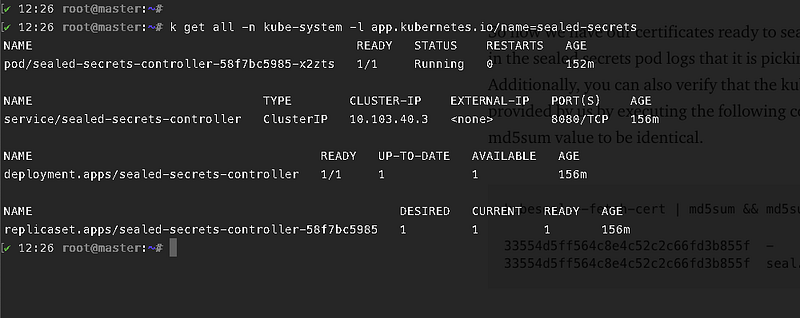

So now we have our certificates ready to seal/unseal our secrets. You can see in the sealed secrets pod logs that it is picking the secret created by us. Additionally, you can also verify that the kubeseal utility is using the same key provided by us by executing the following command. You should find the md5sum value to be identical.
kubeseal --fetch-cert | md5sum && md5sum seal.crt33554d5ff564c8e4c52c2c66fd3b855f -
33554d5ff564c8e4c52c2c66fd3b855f seal.crtCreate a docker registry secret and Seal it with Kubeseal
Let us now create a secret and then seal it using kubeseal.
kubectl create secret docker-registry pavan-docker-creds --docker-username=pavan --docker-password=mypassword123 --docker-email[email protected] --dry-run=client -o yaml | kubeseal -o yaml ###kubeseal -o yaml = Output the SealedSecrets in YAML format.
You can now push the secret into any of the SCM. Only the sealed secrets controller have the access to unseal the secret. So now whenever the sealed secret resource is applied it automatically creates the secret resource for you. This means that whenever the SealedSecrert resource is applied the controller automatically decrypts the sealed secret and convert that to a Kubernetes-based secret ( base 64 ).
kubectl create secret docker-registry pavan-docker-creds --docker-username=pavan --docker-password=mypassword123 --docker-email[email protected] --dry-run=client -o yaml | kubeseal -o yaml | kubectl apply -f - 
Now if you clearly observe the ownerReferences of this secret it points to the SealedSecret created by us earlier.

And now you can safely push your secrets to SCM. I have already pushed my secrets to GitHub using kubeseal and SealedSecrets. Are you doing the same?
Conclusion
Thanks for reading my article. Hope you have liked it. Here are some of my other articles that may interest you.
Recommended
Reference

👋 Join FAUN today and receive similar stories each week in your inbox! ️ Get your weekly dose of the must-read tech stories, news, and tutorials.
Follow us on Twitter 🐦 and Facebook 👥 and Instagram 📷 and join our Facebook and Linkedin Groups 💬


