
I Can’t Explain How Useful These 9 Mac HomeBrew Tools Are
Tiny UI-less tools for your rescue

Contents
1 — Mailsy (Creates temp emails) 2 — ata (ChatGPT client) 3 — qrencode (Creates QR codes) 4 — Bartib (Time-tracker tool) 5 — Calcurse (Time organiser) 6 — thefuck (Corrects typoes) 7 — tty-clock (Shows time) 8 — xtitle (Identifies Terminals) 9 — tmate (Telecasts Terminal activity)
#1. Mailsy (Instantly generates disposable emails)
Mailsy is the quickest disposable email generator (DEG) I’ve ever used.
In fact, I’ve also used apps like Tempbox before as DEGs (#1 of this article → ),
but that felt a bit heavy coz it’s got a UI.
On flip-side, Mailsy’s a UI-less Homebrew tool so it’s quicker and lightweight-er.
How to use
- To generate a new email:
mailsy g
foo@bar:~$ mailsy g
Account created: 7o8ptb@internetkeno.com- To fetch received messages:
mailsy m
foo@bar:~$ mailsy m
? Select an email (Use arrow keys)
❯ 1. Hello, World! - from nikhilvemu@gmail.com
  2. Mailsy - from nikhilvemu@gmail.com
Hit return on a message, and its body will be displayed in your default browser.
- To delete an account:
mailsy d
foo@bar:~$ mailsy d
Account deleted- To view details of the account:
mailsy me
foo@bar:~$ mailsy me

 Email: 7[email protected]
createdAt: 6/5/2023, 9:09:05 AMHow cool! But there are some
Drawbacks
Unlike Apple’s Hide My Email,
- You can only receive messages to the email. You can’t send.
- Incoming messages can’t be chosen to be forwarded to your own email.
- You can’t own multiple disposable emails at once. You’ve got to delete one before you’d generate another.
Install mailsy: brew install mailsy
#2. ata (ask the terminal anything)
I’ve already written about a Homebrew ChatGPT client — aichat:
ata is yet another ChatGPT client for Homebrew.
As you first run it, it asks you to fill its config file with your API key, GPT model, max tokens, and temperature. Next,
To run it, use ata and it’s ready to hear your prompt.
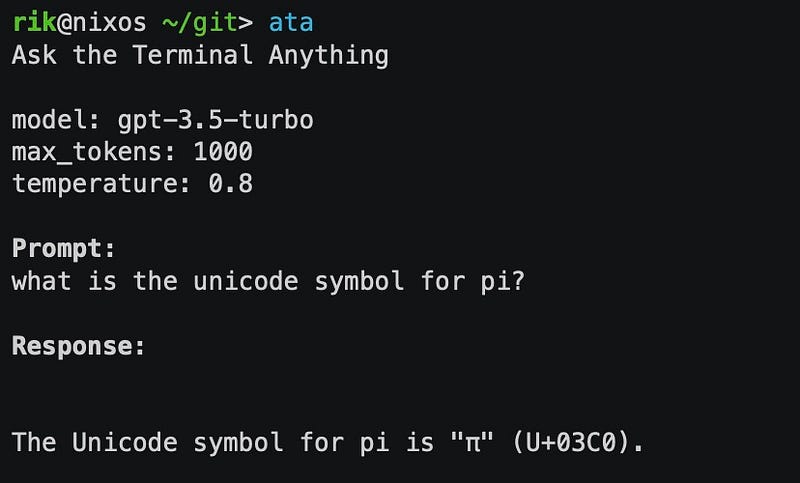
To abort a response midway, use ⌃ + C. To quit ata, use it again.
ata’s way handier than web ChatGPT for simple one-off prompts. If you prefer conversations with ChatGPT and not one-off prompts, ata isn’t for you. Use aichat.
Install ata: brew install ata
#3. qrencode (Create QR codes instantly)
I wish QR Code generator were a native macOS app.
(“Who would use it?” “Do you use Colour Picker?”)
Coz finding web tools and creating QR codes online is a tedious job. There aren’t any popular offline tools for it too.
But that’s until now. We’ve got qrencode!
After you install it, to create a QR code that encodes the text “Hello World”, use qrencode -t ansiutf8 "Hello World"

See? You’ve got the QR code directly on Terminal! How impressive!
How to save them as images?
Don’t take screenshots. Do this.
If you want a QR code (code.png) that encodes “Hello World”, use qrencode -o code.png "Hello World" — and the file will be created in the directory.
To generate a QR code for contents of a text file, use qrencode -o output_file.png -r input_file.txt .
Bonus: Create Wi-Fi QR Code
If you have a long Wi-Fi password and are sick of repeating it to everyone who visits your house, try this.
Create a QR Code in the format: WIFI:T:<auth_type>;S:<SSID>;P:<password>;; , where:
<auth_type>: WPA, WPA2, WEP, or nopass<SSID>: Your Wi-Fi name<password>: Your Wi-Fi password
Example: WIFI:T:WPA2;S:MyNetwork;P:MyPassword123;;

If you own a coffee shop, stick this on a wall. Anyone who scans this code will instantly connect to your network :)
Install qrencode: brew install qrencode
#4. Bartib (Your personal time-tracker)
Bartib’s your new time-tracking assistant that helps log your activities throughout the day, and generate timesheet reports.
Demo (as if you’re already using Bartib)
Let’s say you’re starting a task X from an ‘Important Project’. So you use this command on Terminal:
bartib start -d "Task X" -p "Important Project"And Bartib acknowledges: Started activity: "Task X" (Important Project) at 2023-01-08 09:41 .
After few minutes, you wanna go have some coffee. So you stop the task to resume it later:
bartib stopYou’re back to work:
bartib continueAfter few minutes, you realise there’s a more urgent task from another project. So you start it:
bartib start -d "Urgent Task Y" -p "Another Project"(Note, Bartib automatically stops the current activity as you start another one)
You’ve finished ‘Urgent Task Y’ and it’s lunch time. And you wanna check all the tasks you’ve worked on since morning:
foo@bar: ~ $ bartib list --today

Started Stopped Description        Project                Duration
08:00   08:34   Task X             Important Project         34m
08:49   10:01   Task X             Important Project      1h 12m
10:15   10:35   Urgent Task Y      Another Project           20m
10:35   10:53   Urgent Task X      Important Project         18m
10:55   11:25   Simple Task Z      Less Important Project    30m
11:35   12:34   Boring Task XY     Internal Project          59m
After lunch, you plan to continue working on ‘Urgent Task Y’. Instead of typing task’s name and description again, you do this:
foo@bar: ~ $ bartib last

 #  Description        Project
[3] Urgent Task Y      Just Another Project B
[2] Urgent Task X      Important Project
[1] Simple Task Z      Less Important Project
[0] Boring Task XY     Internal Project C
Now, you use bartib continue 3 to resume with ‘Urgent Task Y’.
It’s been evening, so you stop the current task to leave to home. Here’s the report of your today’s work:
alice@work: ~ $ bartib report --today

Important Project.................................  2h 43m
    Another Task xyz..............................     15m
    Important Call with the Client................     35m
    Urgent Task X.................................  1h 53m

Internal Project C................................  4h 30m
    Another Meeting...............................     45m
    Boring Task XY................................  1h 15m
    Long Meeting with Everyone from the Department  2h 30m

Just Another Project B............................     45m
    More Urgent Task Y............................     45m

Less Important Project............................  2h 27m
    Simple Task No. 5.............................  1h 35m
    Simple Task Z.................................     52m

Total............................................. 10h 25m
AMAZING, right? They’re so neatly organised. Isn’t it such a nifty time tracking tool?
More useful commands:
- To start or stop an activity at a preset time, use -t HH:MM in the start or stop command.
- To list the last 25 activities, use
bartib last -n 25. Without-n 25, it only lists last 10 activities. - To cancel the current activity and delete its entry completely, use
bartib cancel.
I’ve just scraped the surface. There’s a lot more you can do with Bartib. Check out its official page to know!
Install bartib: brew install bartib
#5. Calcurse (Your personal time organiser)
Calcurse is the most lightweight Calendar and To-Do app I’ve ever used.
Simply type calcurse and your calendar pops up over the screen — displaying all your appointments and todo items.
Gif:
It lets you
- Add calendar events like you normally do — with date, time, description, duration, and repetition.
- Edit, move, or delete your existing appointments — so it’s fully customisable.
- Add todo items with specific priorities and check them off when they’re done.
Best part, Calcurse colour-codes calendar dates with appointments, making it easy to find the ones you have every month.
All you need to do is to remember (or see and use) the hotkeys required to operate Calcurse.
Once you get familiar with them, Calcurse can potentially be your only personal organiser.
Install calcurse: brew install calcurse
#6. thefuck (Quickly correct mistyped commands)
Oh, lemme type a commit message and come back. 1 min.
gti commit -m "Fixed a bug"
zsh: command not found: gti
Oh, f*ck! I typed gti for git.
Do things like these often happen to you? Then instead of shouting “F*CK” (like me), type fuck on Terminal.
Then you’ll be prompted with a set of correct console commands you might’ve intended to type.
Use ↑/↓ to scroll through the probably correct commands and hit Enter to use it.

(Ignore the error. I didn’t configure Git, so this occurred.)
If thefuck weren’t there,
- I’d had to hit ↑ to get the typo-ed command back,
- Navigate to ‘gti’ by repeatedly hitting ←,
- Change ‘gti’ to ‘git’ and then hit Enter 😩
There are about 170 rules preset by thefuck devs. And if you wanna set up your own rules for your most attempted typos, you can do that too.
Better demo
Instal thefuck: brew install thefuck
#7. tty-clock (Shows time to let you know it exists)

As you type tty-clock, it displays the current time in a green bold font. That’s almost what tty-clock could do.
But why do I say this is so useful?
Non-programmers don’t understand this. But I, as a savvy coder, spend a fair share of my day on macOS Terminal. It’s so addictive I often lose track of my time while exploring new console commands and HB tools.
I lately got my eureka moment.
I’m now using tmux to separate my Terminal into panes and am using tty-clock in the cornermost pane to keep track of time. Like this →
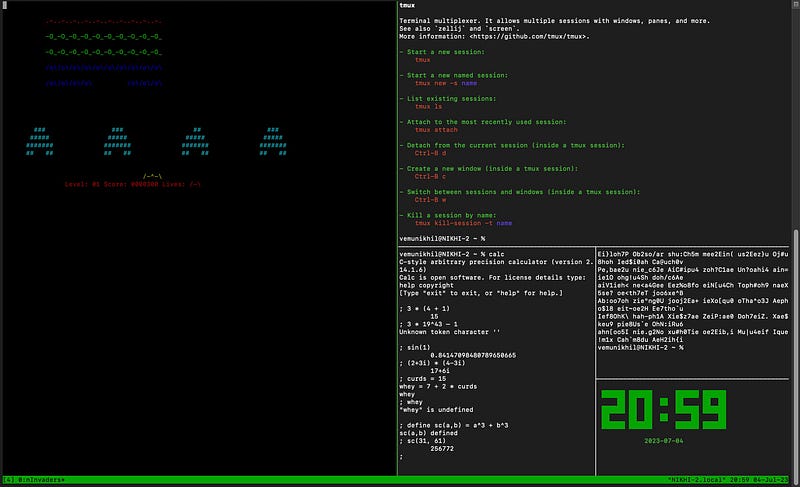
(Find tmux in #2 of this article →
Productivity++ Time consciousness++
Also, you could
- Enable seconds:
-s - Enable 12h format:
-t - Use UTC time:
-u - Set date format:
-f format - Hide date:
-D - Enable blinking colon:
-B
Install tty-clock: brew install tty-clock
#8. xtitle (Distinguishes various Terminal windows)
I know. I know. Not everybody likes tmux.
Some people prefer using different standalone Terminal windows for separate activities.
Like
- one for gaming,
- one for programming,
- one for personal
etc.
If you’re one of such people, you’ll appreciate this little Homebrew tool — xtitle.
Why?
It lets you distinguish between different Terminal windows and makes it quicker to get to your preferred window on Mission Control.
For example, here’s how my Terminals appear
without xtitle distinguish-ment:

(All the windows have the same title, making it difficult to identify each one unless there’s any visual difference based on their content.)
with xtitle distinguish-ment:

See, I’ve changed their titles to Personal, Programming, and Gaming respectively.
If you wanna make sub-sections for the windows, you can change their icons. (Not literally their icon. It’s still text)
Demo
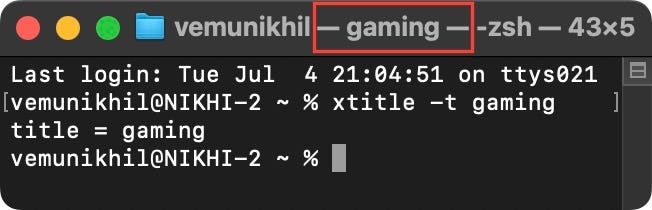
Let’s say you’re playing Pac-Man on Terminal. To dedicate that window to gaming, you use xtitle -t gaming .
Now the window’s title changes to:
Now you’re sick of Pac-Man and wanna play Space Invaders on another gaming window for a while. But then, how’d you distinguish between them two?
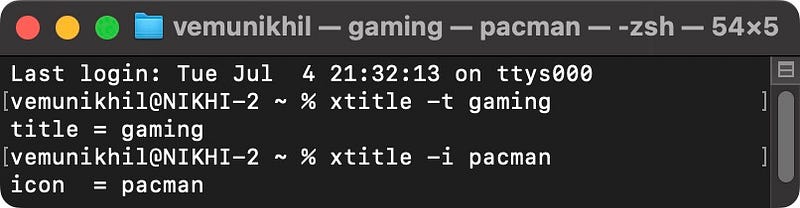
Simple! Change their icons.
Change the first window’s icon to pacman using xtitle -i pacman :
Create another window for spaceinvaders and type xtitle -t gaming; xtitle -i spaceinvaders :
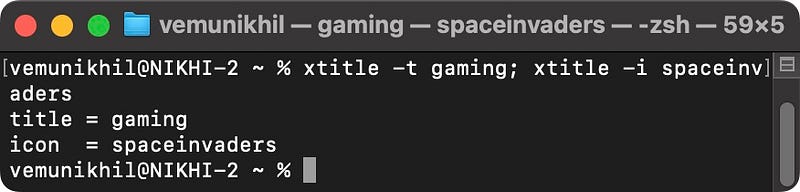
Now both their titles are the same. And it’s the game that distinguishes them both.
Happy gaming!
Install xtitle: brew install xtitle
#9. tmate (Live-telecast your Terminal activity)
Let’s confess. You’re already loving the above 8 Homebrew tools, right?
If so, you might wanna show your remote friends how they work. But how?
tmate! It lets you share your Terminal activity live over the internet via a shareable link.
Simply type tmate , and you’ll see these links to share your Terminal activity via web or ssh and give read-only or write-access:
Connecting to ssh.tmate.io...
Note: clear your terminal before sharing readonly access
web session read only: https://tmate.io/t/xx-XXxXXxXxxXxXXxXXXx0xxxXxX
ssh session read only: ssh [email protected].io
web session: https://tmate.io/t/0xxXxXxXxXXXX0Xxx00Xxxx0x
ssh session: ssh 0[email protected].io- If it’s read-only, your friend can only see what you’re doing on your Terminal.
- If it’s write-access, your friend can even control it — i.e., you can both collaborate on one Terminal!
After sharing the link, hit Q to start your Terminal activity. (Note, the links are unique for every new session)
This (tmate) way is better than screen-sharing or Remote Desktop coz it uses very less internet bandwidth.
Install tmate: brew install tmate
For more a’macOS’zing Terminal commands, read these
For only Homebrew tools, read these.
Join 390+ others to get notified whenever I publish a new story.


