
How to Write a Multiple-Timeline Story in 4 Steps
Boost the emotional power of your stories

Get a free copy of the happy-sad ending builder to help you create story endings that are both happy and sad.
I fucking love it when a story starts with two separate timelines that eventually come together in the end. When done right, this heightens the emotional impact of the story experience beyond what a single-timeline story can do.
For this reason, figuring out how to write a multiple-timeline story was a big deal to me. I learned while using the trick in three different stories. In one instance, I was able to make people cry by the time the two timelines collided in the third act.
Multiple (or dual/parallel) timeline stories are great because, by introducing two different timelines from the get-go, you spur the viewers’ curiosity. They start wondering how the two stories are connected and when they will eventually connect. It’s such an effective trick for building a high level of interest in the story early on.
Many writers try to harness the power of multiple timelines but fail woefully because of different reasons. Sometimes, the balance between the two timelines isn’t right, such that one is significantly weaker than the other in terms of emotional intensity or story coherence. Other times, it’s because the connection between both timelines isn’t strong enough to warrant the split.
My goal is to help you avoid such rookie mistakes. In this article, I share what I know about how to create a multiple-timeline story. By the end, you will be able to create your own multiple-timeline story. Without further delay, let’s begin.
How to write a multiple-timeline story in 4 steps
Step 1–select a primary timeline
Every multiple-timeline story is composed of more than one timeline. For this article, we shall consider just two timelines. We will call them primary (1) and secondary (2).
The primary timeline is the one that gets the most screentime. It has our main protagonist and antagonist. The secondary timeline mostly offers context to the events in the primary timeline.
Once you determine your primary timeline, you will avoid the problem of imbalance between the timelines. If it’s 50/50, there’s an imbalance because you’ll be forcing the audience to follow two separate groups of characters for the price of one. This isn’t ideal. Recall that stories can’t be told with more than one protagonist unless they all have the same goal.
A good ratio between both timelines is 70/30 or 80/20 in favor of the primary. But seeing as storytelling is a subjective art form, you are free to go against this recommendation. So long as it works for your story, that’s all that matters.
Step 2–create the story for the different timelines
It’s important for you to know the story that unfolds in both timelines because then you will have all the information you need for the most important part of the process — selecting transition points.
You don’t need to know all the details, just enough to know the story’s beginning, middle, and end. By fleshing out both stories before trying to tie them together, you give each timeline the best story treatment possible.
When you know both stories, you can then figure out the most ideal transition points and how best to break the stories up.
One important thing to note:
Make both timelines equally interesting. Don’t give the audience the opportunity to prefer one to the other. If this happens, your story is screwed. Every time the story transitions to the lesser-liked timeline, grumbles will follow, and in extreme cases, readers and viewers will ignore your story to spend time on social media or one of a billion other things they could do.
Step 3–break the story into sequences
Usually, this step will be carried out simultaneously with step four. I only separated it so that it’s easier to explain both.
Once you know the story (from beginning to end) for both timelines, you break the story (for each timeline) into blocks. The idea is to be able to move blocks (sequences of scenes) around in a way that makes it easy to plot (arrange scenes) for maximum emotional impact.
Think of it as dividing a novel into chapters. Except, in this case, the chapters are just arbitrary sections of the story that could change later (you always want to be open to new arrangements while plotting).
Step 4–select your transition points
If you adhered to the advice in step one, then finding transition points won’t be difficult because you won’t need as many. My structural approach to this process has been the same across both of my multiple timeline stories. Interstellar and Arrival also use this method to different extents.
The secret is to use the major beats (big character or story moments) in the primary story as transition points. Again, this depends on what constitutes maximum impact for your story.
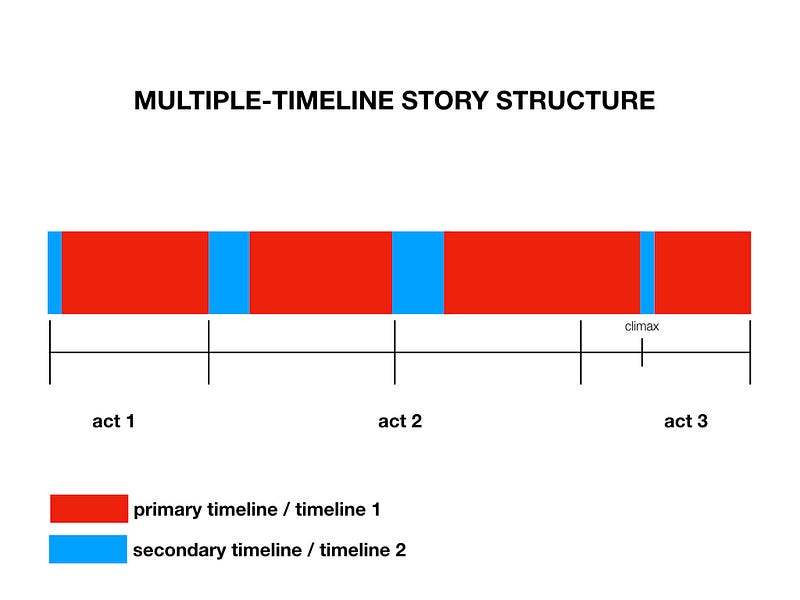
In execution, this is what it looks like:
- Timeline 2 begins the story. Think of this as a prologue.
- If a film, this would be a great place for the title credits.
- Then we drop into timeline 1 (primary timeline). We stay here until something major happens. Usually, this is the inciting incident (an event that changes the status quo in the character's life) or the big event (the event that forces the character to enter act 2).
- We switch back to timeline 2 for another short amount of time, picking up where we left off in the prologue.
- Back to timeline 1 and we stay there until another major event. Usually, this is the midpoint.
- Then we flip to timeline 2 for another short amount of time. This time, the connections with the first story should start to really show even though the way it connects doesn’t come together yet. It’s a delicate balancing act, but it’s very possible and it reaps a bountiful emotional reward.
- Back to timeline 1 and this time we stay until the climax, the story’s most emotionally intense moment.
- And then to timeline 2 for that last time for its own climax. This is the point where the connection of both stories is made explicit. How this section is handled determines just how good the story will be. If you nail it, you’ve got a winner.
- And finally back to timeline 1 where we stay until the story finishes.
The main purpose of this design is maximum emotional impact.
Arrival, although not very emotional, uses the logic behind this structure to great effect. The primary timeline is the one where the Aliens arrive on earth and the US government needs the help of Louise Banks. The secondary timeline is the rest of her life which she sees from the vantage point of her present. The connection to the two timelines is made explicit in the climax of the third act when Louise, played by the terrific Amy Adams, intentionally travels to her future to get information from the Chinese Prime Minister to stop the superpowers from starting World War III.
Interstellar achieves a similar kind of ending. The connection between the present, past, and future is made explicit in the third act when we enter the black hole with Cooper.
Another reason why this arrangement works is that it gives the transitions a sense of rhythm. The audience is able to appreciate one story (since it’s given more attention) while waiting for the second one to make total sense in the context of the first one.
Please note that this isn’t supposed to be a rule. Your story doesn’t have to adhere to specific transition points. The idea is for you to use this as a starting point. You can choose to add or remove transition points depending on what your story demands.
But how do you know that you’re making the right decisions and not just acting out of ignorance for story structure?
The key is knowledge of plotting
The key to creating effective multiple-timeline stories is a solid knowledge of how to plot. You can’t escape it. If you do not plot events properly, especially the transition points, you may lose out on a great achievement.
I recommend reading this ultimate guide on plotting. If you don’t have time to read the whole thing, focus on the principles of plotting. They will help you make the best decisions when plotting your multiple-timeline story.
Conclusion
Creating a multiple-timeline story is terrific fun even though it requires more work than single-timeline stories, especially in relation to plotting. When executed properly, the benefits to the story are unquantifiable.
Never forget, the only thing better than a great story is a great story that unfolds in multiple timelines.
Get a free copy of the happy-sad ending builder to help you create story endings that are both happy and sad.